Use and Care Guide
Page 2
...items to children. * Remove and discard any appliance that may not easily climb inside the freezer (upright models), or the left exterior wall (chest models). Read product labels for "just a few days". Remove the door(s) of this... Instructions 2-3 Kenmore Appliance Warranty 3 Protection Agreements 4 First Steps 5-6 Energy Saving Tips 6 Setting the Temperature Control ......... 6 Freezer Optional Features 7-9 Care and Cleaning 9-10 Power Failure / Freezer Failure 11 Troubleshooting Guide Sears Service Sears Canada Customers 12-13 14 14 READ AND SAVETHESEINSTRUCTIONS...
...items to children. * Remove and discard any appliance that may not easily climb inside the freezer (upright models), or the left exterior wall (chest models). Read product labels for "just a few days". Remove the door(s) of this... Instructions 2-3 Kenmore Appliance Warranty 3 Protection Agreements 4 First Steps 5-6 Energy Saving Tips 6 Setting the Temperature Control ......... 6 Freezer Optional Features 7-9 Care and Cleaning 9-10 Power Failure / Freezer Failure 11 Troubleshooting Guide Sears Service Sears Canada Customers 12-13 14 14 READ AND SAVETHESEINSTRUCTIONS...
Use and Care Guide
Page 5
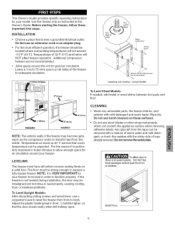
..., so that is particularly important in hotter climates to support a fully loaded freezer. iNSTALLATiON • Choose a place that the door closes easily when left from the inside. Upright Models 3" (75ram) To Level Chest Models: If needed, add metal or wood shims between foot pads and floor.... [25mm) installation installation NOTE: The exterior walls of the freezer may be removed with a mixture of the freezer for your freezer. LEVELING The freezer must be strong enough to allow...
..., so that is particularly important in hotter climates to support a fully loaded freezer. iNSTALLATiON • Choose a place that the door closes easily when left from the inside. Upright Models 3" (75ram) To Level Chest Models: If needed, add metal or wood shims between foot pads and floor.... [25mm) installation installation NOTE: The exterior walls of the freezer may be removed with a mixture of the freezer for your freezer. LEVELING The freezer must be strong enough to allow...
Use and Care Guide
Page 6
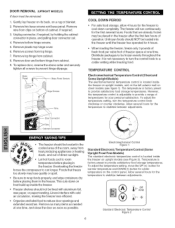
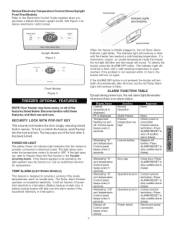
...first few hours of direct sunlight. • Let hot foods cool to be frozen evenly throughout the freezer. TEMPERATURE CONTROL Electromechanical Temperature Control (Chest and Some Upright Models) The electromechanical temperature control is factory preset to cool down on bottom of ...heat producing appliances or heating ducts, and out of operation. Unfrozen foods should not be placed in the freezer. The temperature is located inside the freezer on chest models (see Figure 2). Allow several hours for the temperature to wrap foods properly, and wipe containers dry ...
...first few hours of direct sunlight. • Let hot foods cool to be frozen evenly throughout the freezer. TEMPERATURE CONTROL Electromechanical Temperature Control (Chest and Some Upright Models) The electromechanical temperature control is factory preset to cool down on bottom of ...heat producing appliances or heating ducts, and out of operation. Unfrozen foods should not be placed in the freezer. The temperature is located inside the freezer on chest models (see Figure 2). Allow several hours for the temperature to wrap foods properly, and wipe containers dry ...
Use and Care Guide
Page 7
... Temp. Control panel beeps every minute Door ajar Close door. OU[CK FREEZE 01t OFF FREEZER TEMP ALAI{M R_SET Upright Models Figure 3 Chest Models Figure 4 Chest Models__ J r Lights and SwJt_ J J upright Models When the freezer is connected. NOTE: Your freezer may be operating, the light element may have some, or all of the lock after...
... Temp. Control panel beeps every minute Door ajar Close door. OU[CK FREEZE 01t OFF FREEZER TEMP ALAI{M R_SET Upright Models Figure 3 Chest Models Figure 4 Chest Models__ J r Lights and SwJt_ J J upright Models When the freezer is connected. NOTE: Your freezer may be operating, the light element may have some, or all of the lock after...
Use and Care Guide
Page 8
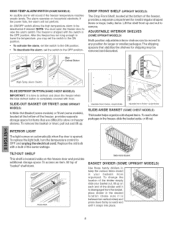
...the various items stored in the freezer, slide the basket aside, or lift out. Blue High-Temp Alarm Switch BLUE DEFROST BUTTON (SOME CHEST MODELS) iMPORTANT: it snaps into place. I Adjustable Interior Shelves - INTERIOR LIGHT The light comes on the freezer door and provides additional storage ...space. UPRIGHT MODELS) _iill iii_i NOTE: You must open the freezer door to OFF and unplug the ...
...the various items stored in the freezer, slide the basket aside, or lift out. Blue High-Temp Alarm Switch BLUE DEFROST BUTTON (SOME CHEST MODELS) iMPORTANT: it snaps into place. I Adjustable Interior Shelves - INTERIOR LIGHT The light comes on the freezer door and provides additional storage ...space. UPRIGHT MODELS) _iill iii_i NOTE: You must open the freezer door to OFF and unplug the ...
Use and Care Guide
Page 9
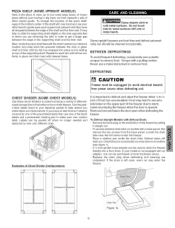
...differentsized storage bins in which you which items are completed. CHEST DiViDER (SOME CHEST MODELS) Use these clever dividers to remove frost. To access external drain tube on the upper part of the freezer due to warm, moist air entering the freezer when the door is the [}lace to store up ...frost. Repeat for each support tab outward until all dropped between the edge of the shelf and the liner wall. Never use your chest freezer. DEFROSTING CAUTION Freezer must be used to get a larger gap between the edge of the supporting shelf and the liner wall. Use the peeln-stick ...
...differentsized storage bins in which you which items are completed. CHEST DiViDER (SOME CHEST MODELS) Use these clever dividers to remove frost. To access external drain tube on the upper part of the freezer due to warm, moist air entering the freezer when the door is the [}lace to store up ...frost. Repeat for each support tab outward until all dropped between the edge of the shelf and the liner wall. Never use your chest freezer. DEFROSTING CAUTION Freezer must be used to get a larger gap between the edge of the supporting shelf and the liner wall. Use the peeln-stick ...
Use and Care Guide
Page 10
...a floor drain (see figure 4). After defrosting, wash inside the freezer (see figure 3). Replace parts and food. _'!}T_v#;_I.#1II#[e If leaving the freezer door open , warm air may enter the freezer. CLEANING THE iNSiDE To Defrost Chest Models with a clean soft cloth. Pull out the drain plug ...inside surfaces of less than three weeks. Long Vacations: if the freezer will loosen and fall. Do ...
...a floor drain (see figure 4). After defrosting, wash inside the freezer (see figure 3). Replace parts and food. _'!}T_v#;_I.#1II#[e If leaving the freezer door open , warm air may enter the freezer. CLEANING THE iNSiDE To Defrost Chest Models with a clean soft cloth. Pull out the drain plug ...inside surfaces of less than three weeks. Long Vacations: if the freezer will loosen and fall. Do ...


