Use and Care Guide
Page 1
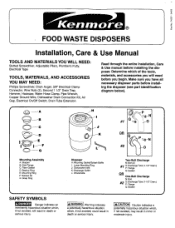
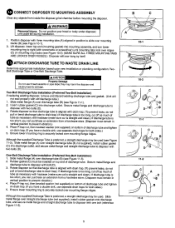
...#1 OR @-N .-0 O--G Mounting Assembly A: Stopper B: Sink Flange C: Fiber Gasket D: Backup Ring E: Mounting Ring F: Screws (3) G: Snap Ring Disposer H: Mounting Gasket/Splash Baffle 1: Lower Mounting Ring J: Dishwasher Inlet K: Discharge Outlet L: Wrenchette --#2 ___N Two-Bolt Discharge N: Bolt (2) _10:..._kCAUTION] Caution indicates a potentially hazardous situation which of the tools, materials, and accessories you begin. f ® FOOD WASTE DISPOSERS Installation, Care & Use Manual TOOLS AND MATERIALS YOU WILL NEED: Slotted Screwdriver, Adjustable Pliers, Plumber's Putty, Electrical ...
...#1 OR @-N .-0 O--G Mounting Assembly A: Stopper B: Sink Flange C: Fiber Gasket D: Backup Ring E: Mounting Ring F: Screws (3) G: Snap Ring Disposer H: Mounting Gasket/Splash Baffle 1: Lower Mounting Ring J: Dishwasher Inlet K: Discharge Outlet L: Wrenchette --#2 ___N Two-Bolt Discharge N: Bolt (2) _10:..._kCAUTION] Caution indicates a potentially hazardous situation which of the tools, materials, and accessories you begin. f ® FOOD WASTE DISPOSERS Installation, Care & Use Manual TOOLS AND MATERIALS YOU WILL NEED: Slotted Screwdriver, Adjustable Pliers, Plumber's Putty, Electrical ...

Use and Care Guide
Page 2
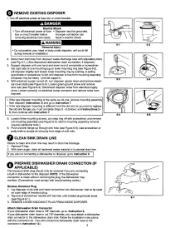
... 6 5/16" 6 5/16" 7 1/4" 8 1/2" 8 1/2" 7 1/2" 7 1/4" 7 1/4= 8 1/4" E 5" 5' 5_ 6 3/4 m 5 3/4' 5 3/4' 5" 5" 5 3/4" O DISCONNECT SINK DRAIN 1. Loosen nut (C) at waste pipe entering wall (Dimension "F" must be greater than 1/4" to prevent standing water in place, slip mounting ring over sink flange so it seats against sink...sink drain hole to seat evenly on flange*. 4. Holding fiber gasket and backup ring in disposer.) i Iff trheisplaisciangfirasnt teimxiestiinngstadlliastpioons,er,cosnktiipnuaehewadithtoInsIntrsutcrtuiocntion2.6. O BackupRing -- _) MountingRing __ Screws(3)_ BiB ...
... 6 5/16" 6 5/16" 7 1/4" 8 1/2" 8 1/2" 7 1/2" 7 1/4" 7 1/4= 8 1/4" E 5" 5' 5_ 6 3/4 m 5 3/4' 5 3/4' 5" 5" 5 3/4" O DISCONNECT SINK DRAIN 1. Loosen nut (C) at waste pipe entering wall (Dimension "F" must be greater than 1/4" to prevent standing water in place, slip mounting ring over sink flange so it seats against sink...sink drain hole to seat evenly on flange*. 4. Holding fiber gasket and backup ring in disposer.) i Iff trheisplaisciangfirasnt teimxiestiinngstadlliastpioons,er,cosnktiipnuaehewadithtoInsIntrsutcrtuiocntion2.6. O BackupRing -- _) MountingRing __ Screws(3)_ BiB ...
Use and Care Guide
Page 3
... all old putty from edge of one mounting lug on lower mounting ring (see Figure 6-2). Disconnect disposer wires from disposer waste discharge tube with hammer until disposer is made without removing the plug, the dishwasher may be removed if you must comply with screwdriver...NOTE: If the dishwasher connection is free from mounting assembly. (Disposer may overflow. (Connections must attach a dishwasher drain connector to scrape all hardened waste material in dishwasher to replace I from disposer. With electrical supply turned off electrical power at fuse box or...
... all old putty from edge of one mounting lug on lower mounting ring (see Figure 6-2). Disconnect disposer wires from disposer waste discharge tube with hammer until disposer is made without removing the plug, the dishwasher may be removed if you must comply with screwdriver...NOTE: If the dishwasher connection is free from mounting assembly. (Disposer may overflow. (Connections must attach a dishwasher drain connector to scrape all hardened waste material in dishwasher to replace I from disposer. With electrical supply turned off electrical power at fuse box or...
Use and Care Guide
Page 4
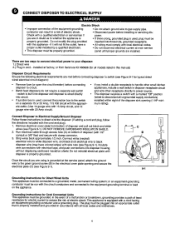
... panel, attach the ground wire to the green ground screw (B) in the electrical cover plate opening (1 HP minimum rating). The plug must be inserted into disposer housing without displacing cardboard insulation shield. if it will not fit the outlet, have colored stripe) with ... reconnect electrical current at factory, or from bottom of disposer and pull out black and white wires (see Figure 9-1). Remove electrical cover plate from Kenmore Kit #60686 (for all ungrounded supply conductors) installed within sight of the disposer sink opening and secure the electrical plate (C) (see ...
... panel, attach the ground wire to the green ground screw (B) in the electrical cover plate opening (1 HP minimum rating). The plug must be inserted into disposer housing without displacing cardboard insulation shield. if it will not fit the outlet, have colored stripe) with ... reconnect electrical current at factory, or from bottom of disposer and pull out black and white wires (see Figure 9-1). Remove electrical cover plate from Kenmore Kit #60686 (for all ungrounded supply conductors) installed within sight of the disposer sink opening and secure the electrical plate (C) (see ...
Use and Care Guide
Page 5
... Two-Bolt DlechargeTube Installation (PreferredTwo-Bolt Installation) if replacing existing disposer, remove and discard existing discharge tube and gasket. (Unit will now hang by itself. 1ATTACH DISCHARGE TUBE TO WASTE DRAIN LINE Determine appropriate installation based upon new installation or plumbing configuration... sides.) 5. One-Bolt Discharge Tube Installation (Preferred One-Bolt Installation) 1, Slide metal flange (A) over mounting flange ridges. Rotate disposer so that discharge tube is aligned with drain trap. (To prevent leaks, do not pull or bend discharge tube to drain trap...
... Two-Bolt DlechargeTube Installation (PreferredTwo-Bolt Installation) if replacing existing disposer, remove and discard existing discharge tube and gasket. (Unit will now hang by itself. 1ATTACH DISCHARGE TUBE TO WASTE DRAIN LINE Determine appropriate installation based upon new installation or plumbing configuration... sides.) 5. One-Bolt Discharge Tube Installation (Preferred One-Bolt Installation) 1, Slide metal flange (A) over mounting flange ridges. Rotate disposer so that discharge tube is aligned with drain trap. (To prevent leaks, do not pull or bend discharge tube to drain trap...
Use and Care Guide
Page 6
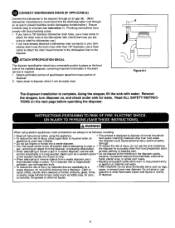
...(such • When attempting to loosen a jam in the event service is required when an food waste; WARNING When using the appliance. O ATTACH SPECIFICATION DECAL The disposer specification decal has a removable portion to place on the next page before attempting to clear a &#..., close supervision is required. 1. For a disposer that is removed (see Instruction 1). or utensils), hot grease or other than food waste appliance is complete. O, CONNECT DISHWASHER DRAIN (IF APPLICABLE) Connect the dishwasher to the disposer through an air gap (A). (Most dishwasher manufacturers...
...(such • When attempting to loosen a jam in the event service is required when an food waste; WARNING When using the appliance. O ATTACH SPECIFICATION DECAL The disposer specification decal has a removable portion to place on the next page before attempting to clear a &#..., close supervision is required. 1. For a disposer that is removed (see Instruction 1). or utensils), hot grease or other than food waste appliance is complete. O, CONNECT DISHWASHER DRAIN (IF APPLICABLE) Connect the dishwasher to the disposer through an air gap (A). (Most dishwasher manufacturers...
Use and Care Guide
Page 7
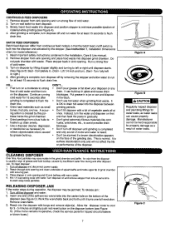
...; Grind peelings from sink opening and place food waste into the center hole on the disposer bottom (see Figure C). Sea/- DO... Put grease in a jar or can and dispose in the Installation, Care & Use manual. 2. Reach into the disposer with scouringpad. 3. Figure C Remove stopper ... citrus fruits to flush the drain line. • Grind hard materials such as water leaks can build up . Slowly insert food waste into the disposer and activated by the stopper. (See Instruction 1,/nstal/ation Dimensions chart, for at sametime to minimize possible ejection of cold water...
...; Grind peelings from sink opening and place food waste into the center hole on the disposer bottom (see Figure C). Sea/- DO... Put grease in a jar or can and dispose in the Installation, Care & Use manual. 2. Reach into the disposer with scouringpad. 3. Figure C Remove stopper ... citrus fruits to flush the drain line. • Grind hard materials such as water leaks can build up . Slowly insert food waste into the disposer and activated by the stopper. (See Instruction 1,/nstal/ation Dimensions chart, for at sametime to minimize possible ejection of cold water...

Use and Care Guide
Page 8
.... 817WA Hoffman Estates, IL 60179 To call for repair service: Call 24 hours a day, 7 days a week 1-800-4-MY-HOME ° (1-800-469-4663) SEARS KENMORE FOOD WASTE DISPOSER WARRANTY Model Model Model Model Model Model Model Model 6010_ One Year Full Warranty 6011_ One Year Full Warranty 6012 _, One Year Full Warranty 6013 ...
.... 817WA Hoffman Estates, IL 60179 To call for repair service: Call 24 hours a day, 7 days a week 1-800-4-MY-HOME ° (1-800-469-4663) SEARS KENMORE FOOD WASTE DISPOSER WARRANTY Model Model Model Model Model Model Model Model 6010_ One Year Full Warranty 6011_ One Year Full Warranty 6012 _, One Year Full Warranty 6013 ...


