Use and Care Guide
Page 1
...P: Flange Q: Gasket SAFETY SYMBOLS Danger indicates an imminently hazardous situation which, if not avoided, will need before installing the disposer. Determine which , if not avoided, may result in death or serious injury. It" WARNINGIWarning indicates a potentially hazardous situation ... situation which of the tools, materials, and accessories you will result in minor or moderate injury, f ® FOOD WASTE DISPOSERS Installation, Care & Use Manual TOOLS AND MATERIALS YOU WILL NEED: Slotted Screwdriver, Adjustable Pliers, Plumber's Putty, Electrical Tape TOOLS, MATERIALS, AND ...
...P: Flange Q: Gasket SAFETY SYMBOLS Danger indicates an imminently hazardous situation which, if not avoided, will need before installing the disposer. Determine which , if not avoided, may result in death or serious injury. It" WARNINGIWarning indicates a potentially hazardous situation ... situation which of the tools, materials, and accessories you will result in minor or moderate injury, f ® FOOD WASTE DISPOSERS Installation, Care & Use Manual TOOLS AND MATERIALS YOU WILL NEED: Slotted Screwdriver, Adjustable Pliers, Plumber's Putty, Electrical Tape TOOLS, MATERIALS, AND ...
Use and Care Guide
Page 4
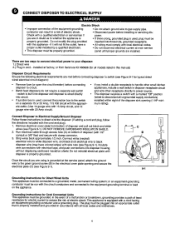
...greunding conductor must be connected to disconnect all models listed in this manual) Disposer Circuit Requirements Ensure the following electricalrequirementsare met before connectingdisposer to switch(...disposer (with 1/2" conduit or 3/8" flex) and secure with clamp connector. 3. Remove electrical cover plate from Kenmore Kit #60686 (for all ungrounded supply conductors) installed within sight of the disposer... HP minimum rating). Grounding Instructions for electric current to black disposer wire (may have a proper outlet instaned by a qualified electrician. • This disposer must...
...greunding conductor must be connected to disconnect all models listed in this manual) Disposer Circuit Requirements Ensure the following electricalrequirementsare met before connectingdisposer to switch(...disposer (with 1/2" conduit or 3/8" flex) and secure with clamp connector. 3. Remove electrical cover plate from Kenmore Kit #60686 (for all ungrounded supply conductors) installed within sight of the disposer... HP minimum rating). Grounding Instructions for electric current to black disposer wire (may have a proper outlet instaned by a qualified electrician. • This disposer must...
Use and Care Guide
Page 7
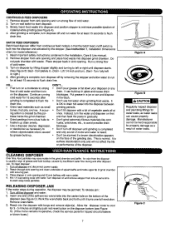
... at sametime to avoid possible drain blockage. CONTINUOUS FEED DISPOSERS 1. Completely in the Installation, Care & Use manual. 2. DO... Use a disposer cleaner, degreaser. Put grease in that the batch feed on/off disposer until grinding is completed and only sound of motor and...3. Don't use . Work the wrenchefte back and forth until disposer starts. (See Figure B; Slowly insert food waste into disposer and position stopper to drain hot water into the disposer between grinding periods. • Don't fill disposer with scouringpad. 3. Turn on wall switch to left or right.)...
... at sametime to avoid possible drain blockage. CONTINUOUS FEED DISPOSERS 1. Completely in the Installation, Care & Use manual. 2. DO... Use a disposer cleaner, degreaser. Put grease in that the batch feed on/off disposer until grinding is completed and only sound of motor and...3. Don't use . Work the wrenchefte back and forth until disposer starts. (See Figure B; Slowly insert food waste into disposer and position stopper to drain hot water into the disposer between grinding periods. • Don't fill disposer with scouringpad. 3. Turn on wall switch to left or right.)...

