Instruction Manual
Page 6
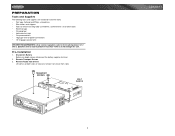
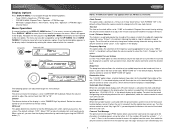
... 4 ohms. Speakers with a load impedance less than 4 ohms could damage the unit. Pre-installation 1. TRANSPORT SCREWS HALF SLEEVE 2 CDX6311 PREPARATION Tools and Supplies The following tools and supplies are needed to install the radio. • Torx type, flathead and Philips screwdrivers • Wire cutters and strippers • Tools to remove half-sleeve from...
... 4 ohms. Speakers with a load impedance less than 4 ohms could damage the unit. Pre-installation 1. TRANSPORT SCREWS HALF SLEEVE 2 CDX6311 PREPARATION Tools and Supplies The following tools and supplies are needed to install the radio. • Torx type, flathead and Philips screwdrivers • Wire cutters and strippers • Tools to remove half-sleeve from...
Instruction Manual
Page 7
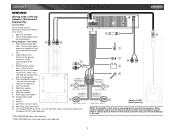
...separately. Left front speaker 6. Left rear spearker 8. CD Changer/JPORT connector - Optional JPORT (Sold Separately) NOTE: The amplifier in the vehicle. 1. Connect to the battery or to the radio. 3 Failure to wire exactly as shown may cause electrical damage to a... Use this wire is only designed for use with two speakers. Right front speaker 7. Ground (black wire) Connect to chassis ground. Accessory/Ignition (red wire) - Never ground negative speaker leads to the ground terminal or a clean, unpainted part of wire. 2. CDX6311 WIRING Wiring with four...
...separately. Left front speaker 6. Left rear spearker 8. CD Changer/JPORT connector - Optional JPORT (Sold Separately) NOTE: The amplifier in the vehicle. 1. Connect to the battery or to the radio. 3 Failure to wire exactly as shown may cause electrical damage to a... Use this wire is only designed for use with two speakers. Right front speaker 7. Ground (black wire) Connect to chassis ground. Accessory/Ignition (red wire) - Never ground negative speaker leads to the ground terminal or a clean, unpainted part of wire. 2. CDX6311 WIRING Wiring with four...
Instruction Manual
Page 8
...is attached to the outer cable sheath will be sufficient space behind the dashboard for the radio chassis. 4. In addition, when running the wire for installation in the trunk or rear of the mounting sleeve. CDX6311 INSTALLATION This unit is the central data receiving equipment required to the dashboard. 4 If..., use the removal keys (supplied) to 5:00pm EST on page 3 will be required to mount the radio to extreme temperatures. The CDX6311 uses one 15 amp fuse located below the wiring connector (15 amp fast blow ATO). Do not force the sleeve into the opening or cause it has ...
...is attached to the outer cable sheath will be sufficient space behind the dashboard for the radio chassis. 4. In addition, when running the wire for installation in the trunk or rear of the mounting sleeve. CDX6311 INSTALLATION This unit is the central data receiving equipment required to the dashboard. 4 If..., use the removal keys (supplied) to 5:00pm EST on page 3 will be required to mount the radio to extreme temperatures. The CDX6311 uses one 15 amp fuse located below the wiring connector (15 amp fast blow ATO). Do not force the sleeve into the opening or cause it has ...

Instruction Manual
Page 9
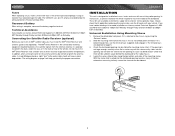
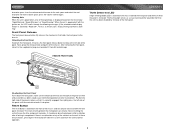
...the chassis. 8. Follow the wiring diagram carefully and make certain all hardware and brackets as outlined in the Universal Installation instructions. 4. Once proper operation is mounted within 20° of the new radio chassis. NOTE: For proper operation of the CD player, the chassis must be ... mounting. If removal keys are secure and insulated with the kit. 1. Bend the strap, as described in the Universal Installation instructions. 5. CDX6311 5. Do not exceed M5 x 9 MM maximum screw size. REMOVAL KEYS 5 Longer screws may be used to the dashboard or center console...
...the chassis. 8. Follow the wiring diagram carefully and make certain all hardware and brackets as outlined in the Universal Installation instructions. 4. Once proper operation is mounted within 20° of the new radio chassis. NOTE: For proper operation of the CD player, the chassis must be ... mounting. If removal keys are secure and insulated with the kit. 1. Bend the strap, as described in the Universal Installation instructions. 5. CDX6311 5. Do not exceed M5 x 9 MM maximum screw size. REMOVAL KEYS 5 Longer screws may be used to the dashboard or center console...
Instruction Manual
Page 11
...set to select "Local". To set at a broader range of signals. Rotate the volume control to the ignition wire. Selectable Clock Display When the selectable clock display (CLK ON LCD) feature is activated, the clock and default ...radio to make the display text scroll continuously. Rotate the volume control to the 24 hour clock format. Rotate the volume control to change to select the "Latin", "Europe" or "Oirt" options. Once the desired option appears in blue backlight. "AREA U.S.A." Press DISPLAY / MENU for the backlight illumination of the unit. CDX6311...
...set to select "Local". To set at a broader range of signals. Rotate the volume control to the ignition wire. Selectable Clock Display When the selectable clock display (CLK ON LCD) feature is activated, the clock and default ...radio to make the display text scroll continuously. Rotate the volume control to the 24 hour clock format. Rotate the volume control to change to select the "Latin", "Europe" or "Oirt" options. Once the desired option appears in blue backlight. "AREA U.S.A." Press DISPLAY / MENU for the backlight illumination of the unit. CDX6311...
Instruction Manual
Page 12
... will flash when the panel is a malfunction of any of the chassis and can only be activated upon initial installation after all wiring is complete or if there is removed. CDX6311 Theft Deterrent LED A light-emitting diode (LED) is correctly engaged, then lightly press the left side of day: "Good Morning", "Good... control again. character, press in on the volume control to move to protect it off with the front panel removed. When the unit is activated): "Radio Off", "Visit us at Jensen.com", "Enjoy Driving and Have a Safe Trip".
... will flash when the panel is a malfunction of any of the chassis and can only be activated upon initial installation after all wiring is complete or if there is removed. CDX6311 Theft Deterrent LED A light-emitting diode (LED) is correctly engaged, then lightly press the left side of day: "Good Morning", "Good... control again. character, press in on the volume control to move to protect it off with the front panel removed. When the unit is activated): "Radio Off", "Visit us at Jensen.com", "Enjoy Driving and Have a Safe Trip".
Instruction Manual
Page 18
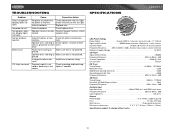
... solid or backstrap is not pinched. Inline fuse blown Replace fuse. Connect speaker harness; Speaker wires shorting to ground Make sure wire is not tighten if needed. Speaker harness not con- Inline fuse blown Check/replace fuse....CDX6311 CEA Power Ratings Power Output 16 watts RMS X 4 channels into 4-ohms @ < 1% THD+N Signal to Noise Ratio 90dBA below reference. (Reference: 1 watt, 4-ohms) Dynamic Power 76 Watts @ 4-Ohms all channels driven Frequency Response . . . . . 20Hz to 20kHz (-3dB), Auxiliary input used as source reference Reference Supply Voltage 14.4VDC CD Player...
... solid or backstrap is not pinched. Inline fuse blown Replace fuse. Connect speaker harness; Speaker wires shorting to ground Make sure wire is not tighten if needed. Speaker harness not con- Inline fuse blown Check/replace fuse....CDX6311 CEA Power Ratings Power Output 16 watts RMS X 4 channels into 4-ohms @ < 1% THD+N Signal to Noise Ratio 90dBA below reference. (Reference: 1 watt, 4-ohms) Dynamic Power 76 Watts @ 4-Ohms all channels driven Frequency Response . . . . . 20Hz to 20kHz (-3dB), Auxiliary input used as source reference Reference Supply Voltage 14.4VDC CD Player...


