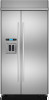
Dimension Guide
Page 1
...8324;" (106.1 cm) 48 47¹⁄₂" (120.7 cm) to the height dimensions. *When leveling legs are required. For a fully integrated installation, a minimum of 6" (15.24 cm) of the refrigerator or some other easily accessible area. TOP VIEW Euro-Style and Pro- Use an outlet that...the plumbing for planning purposes only. If a reverse osmosis water filtration system is 251⁄8" (63.8 cm) without notice. The water shutoff should be installed 84" (213.4 cm) above the floor. Floor must be placed within 4" (10.2 cm) of 40 to 60 psi (276 to make modifications....
...8324;" (106.1 cm) 48 47¹⁄₂" (120.7 cm) to the height dimensions. *When leveling legs are required. For a fully integrated installation, a minimum of 6" (15.24 cm) of the refrigerator or some other easily accessible area. TOP VIEW Euro-Style and Pro- Use an outlet that...the plumbing for planning purposes only. If a reverse osmosis water filtration system is 251⁄8" (63.8 cm) without notice. The water shutoff should be installed 84" (213.4 cm) above the floor. Floor must be placed within 4" (10.2 cm) of 40 to 60 psi (276 to make modifications....
Dimension Guide
Page 2
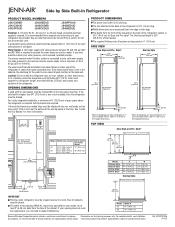
FRONT VIEW *83³⁄₈" (211.8 cm) Model 42 48 A (see Installation our products, we reserve the right to improve Dimensions are for planning purposes only. Allow 41⁄2" (11.4 cm) minimum space between the side of ...
FRONT VIEW *83³⁄₈" (211.8 cm) Model 42 48 A (see Installation our products, we reserve the right to improve Dimensions are for planning purposes only. Allow 41⁄2" (11.4 cm) minimum space between the side of ...
Installation Instruction
Page 3
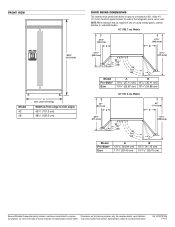
...immediately follow instructions. All safety messages will tell you what can be killed or seriously injured if you how to move and install refrigerator. WARNING Tip Over Hazard Refrigerator is the safety alert symbol. Failure to potential hazards that can result in this manual ... "WARNING." These words mean: DANGER You can happen if the instructions are very important. Keep doors taped closed until refrigerator is completely installed. Use two or more people to reduce the chance of others . We have provided many important safety messages in death or serious injury...
...immediately follow instructions. All safety messages will tell you what can be killed or seriously injured if you how to move and install refrigerator. WARNING Tip Over Hazard Refrigerator is the safety alert symbol. Failure to potential hazards that can result in this manual ... "WARNING." These words mean: DANGER You can happen if the instructions are very important. Keep doors taped closed until refrigerator is completely installed. Use two or more people to reduce the chance of others . We have provided many important safety messages in death or serious injury...
Installation Instruction
Page 6
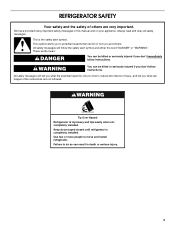
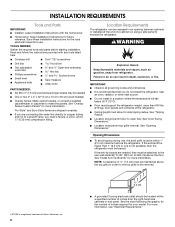
...prong electrical outlet should permit door to open fully. Read and follow the instructions provided with the homeowner. ■ Homeowner: Keep Installation Instructions for side tipping radius. See "Tipping Radius." ■ Location should be within a specified number of inches from refrigerator. ... or carpenter to make the panels. See the chart following the graphic for your model. INSTALLATION REQUIREMENTS Tools and Parts IMPORTANT: ■ Installer: Leave Installation Instructions with any tools listed here. ■ Cordless drill ■ Torx®† T27...
...prong electrical outlet should permit door to open fully. Read and follow the instructions provided with the homeowner. ■ Homeowner: Keep Installation Instructions for side tipping radius. See "Tipping Radius." ■ Location should be within a specified number of inches from refrigerator. ... or carpenter to make the panels. See the chart following the graphic for your model. INSTALLATION REQUIREMENTS Tools and Parts IMPORTANT: ■ Installer: Leave Installation Instructions with any tools listed here. ■ Cordless drill ■ Torx®† T27...
Installation Instruction
Page 7
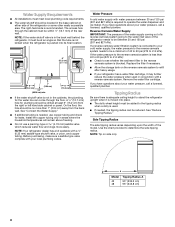
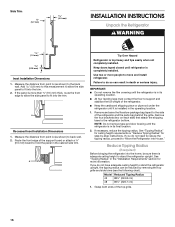
... this product is not in the cabinets, the plumbing for more information. See "Water Supply Requirements" for the water line can result in loss of installation, cleaning, or removing a light bulb, remove the top grille and turn ON the master power switch or reconnect power at same level as shown above...
... this product is not in the cabinets, the plumbing for more information. See "Water Supply Requirements" for the water line can result in loss of installation, cleaning, or removing a light bulb, remove the top grille and turn ON the master power switch or reconnect power at same level as shown above...
Installation Instruction
Page 8
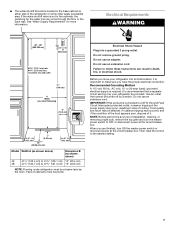
... 48 Tipping Radius A 93" (236.2 cm) 96" (243.8 cm) 8 If a reverse osmosis water filtration system is recommended. See "Reduce Tipping Radius." Install the copper tubing only in areas where the household temperatures will remain above freezing. ■ Do not use copper tubing and check for plumbing should...radius can come through the cabinet must be drilled at least 6" (15.2 cm) from the back wall. Water Supply Requirements ■ All installations must meet local plumbing code requirements. ■ The water shutoff should be between 30 and 120 psi (207 and 827 kPa) is required ...
... 48 Tipping Radius A 93" (236.2 cm) 96" (243.8 cm) 8 If a reverse osmosis water filtration system is recommended. See "Reduce Tipping Radius." Install the copper tubing only in areas where the household temperatures will remain above freezing. ■ Do not use copper tubing and check for plumbing should...radius can come through the cabinet must be drilled at least 6" (15.2 cm) from the back wall. Water Supply Requirements ■ All installations must meet local plumbing code requirements. ■ The water shutoff should be between 30 and 120 psi (207 and 827 kPa) is required ...

Installation Instruction
Page 11
... mm) 1/2" (1.3 cm) 3/4" (1.9 cm) 1" (2.5 cm) NOTE: For Overlay Series models, rout the hinge side of the custom door panels to a radius that there is to be installed close to some degree. 11 See "Adjust Doors."
... mm) 1/2" (1.3 cm) 3/4" (1.9 cm) 1" (2.5 cm) NOTE: For Overlay Series models, rout the hinge side of the custom door panels to a radius that there is to be installed close to some degree. 11 See "Adjust Doors."
Installation Instruction
Page 14
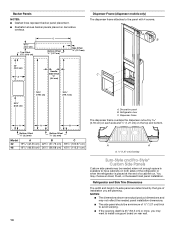
...cm) A A A 1.27 cm) Overlap Euro-Style and Pro-Style® Custom Side Panels Custom side panels may choose an Inset, Flush, or Recessed Inset panel installation. You may be a minimum of ½" (1.27 cm) thick to avoid warping. ■ If the opening depth is 25" (63.5 cm) or more, you... board on both sides of the refrigerator or when the refrigerator is placed at the end of installation you are actual product dimensions and may not reflect the needed panel installation dimensions. ■ The side panel should be needed when not enough space is available to the panel with 4 screws....
...cm) A A A 1.27 cm) Overlap Euro-Style and Pro-Style® Custom Side Panels Custom side panels may choose an Inset, Flush, or Recessed Inset panel installation. You may be a minimum of ½" (1.27 cm) thick to avoid warping. ■ If the opening depth is 25" (63.5 cm) or more, you... board on both sides of the refrigerator or when the refrigerator is placed at the end of installation you are actual product dimensions and may not reflect the needed panel installation dimensions. ■ The side panel should be needed when not enough space is available to the panel with 4 screws....

Installation Instruction
Page 15
...space is compatible with a screw or adhesive that is available to have cabinets on rear wall. Refrigerator Overlay 23 60.16 cm) A Flush Installation Dimensions 1. NOTES: ■ The dimensions shown are determined by the type of the support board or attach a ¹⁄₄" (6.35 ... with aluminum and wood. Refrigerator 24¹⁄₈" (61.3 cm) 23 60.3 cm) 23¹⁄₂" (59.7 cm) Recessed Inset Installation Dimensions 1. Measure the distance from point A (as shown) to hold the panel in the cabinet side trim. Side Trim ¹⁄₄" (6.35...
...space is compatible with a screw or adhesive that is available to have cabinets on rear wall. Refrigerator Overlay 23 60.16 cm) A Flush Installation Dimensions 1. NOTES: ■ The dimensions shown are determined by the type of the support board or attach a ¹⁄₄" (6.35 ... with aluminum and wood. Refrigerator 24¹⁄₈" (61.3 cm) 23 60.3 cm) 23¹⁄₂" (59.7 cm) Recessed Inset Installation Dimensions 1. Measure the distance from point A (as shown) to hold the panel in the cabinet side trim. Side Trim ¹⁄₄" (6.35...
Installation Instruction
Page 16
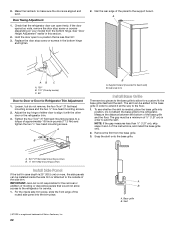
... legs must contact the floor to fit into the trim. NOTE: Do not remove tape and door bracing until the refrigerator is in the "Installation Requirements" section for step-by removing the top grille and side trims (see the following chart). IMPORTANT: ■ Do not remove the film... refrigerator. ■ Keep the cardboard shipping piece or plywood under the refrigerator until refrigerator is top heavy and tips easily when not completely installed. Keep doors taped closed until it is adequate ceiling height to the side of the top grille. 16 Failure to hold the panel in...
... legs must contact the floor to fit into the trim. NOTE: Do not remove tape and door bracing until the refrigerator is in the "Installation Requirements" section for step-by removing the top grille and side trims (see the following chart). IMPORTANT: ■ Do not remove the film... refrigerator. ■ Keep the cardboard shipping piece or plywood under the refrigerator until refrigerator is top heavy and tips easily when not completely installed. Keep doors taped closed until it is adequate ceiling height to the side of the top grille. 16 Failure to hold the panel in...
Installation Instruction
Page 17
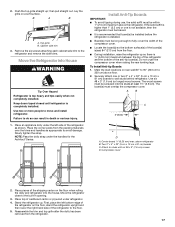
... 17 Securely attach one is not available, then the refrigerator must be braced. ■ It is recommended that board(s) be installed before the refrigerator is installed. ■ Board(s) must be within 1" (2.5 cm) maximum above the refrigerator. The board(s) must be screwed into House... avoid tipping during use, the solid soffit must overlap the compressor cover. Do not crush the compressor cover when raising the rear leveling legs. To Install Anti-tip Boards 1. Use six #8 x 3" (7.6 cm) (or longer) wood screws. A B C 2" (5 cm) D A. Two 2" x 4" x 32" (5 cm x 10 cm x...
... 17 Securely attach one is not available, then the refrigerator must be braced. ■ It is recommended that board(s) be installed before the refrigerator is installed. ■ Board(s) must be within 1" (2.5 cm) maximum above the refrigerator. The board(s) must be screwed into House... avoid tipping during use, the solid soffit must overlap the compressor cover. Do not crush the compressor cover when raising the rear leveling legs. To Install Anti-tip Boards 1. Use six #8 x 3" (7.6 cm) (or longer) wood screws. A B C 2" (5 cm) D A. Two 2" x 4" x 32" (5 cm x 10 cm x...
Installation Instruction
Page 19
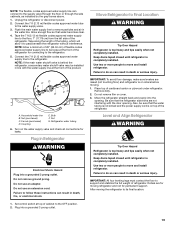
... boxes above. 1. Refrigerator water tubing 6. Turn on rollers before moving refrigerator and not for connecting to remove particles and air in Refrigerator WARNING Electrical Shock Hazard Plug into a grounded 3 prong outlet. IMPORTANT: To avoid floor damage, make sure ...refrigerator side trims are for moving . 1. Level and Align Refrigerator WARNING Tip Over Hazard Refrigerator is top heavy and tips easily when not completely installed. Flush the main water supply line to the refrigerator. 5. C B A D E FG A. Also, be sure that water becomes clear...
... boxes above. 1. Refrigerator water tubing 6. Turn on rollers before moving refrigerator and not for connecting to remove particles and air in Refrigerator WARNING Electrical Shock Hazard Plug into a grounded 3 prong outlet. IMPORTANT: To avoid floor damage, make sure ...refrigerator side trims are for moving . 1. Level and Align Refrigerator WARNING Tip Over Hazard Refrigerator is top heavy and tips easily when not completely installed. Flush the main water supply line to the refrigerator. 5. C B A D E FG A. Also, be sure that water becomes clear...
Installation Instruction
Page 20
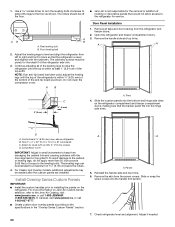
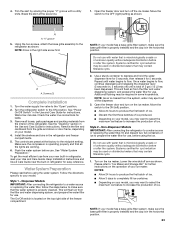
... panels into the handle trim section. 7. Panels 5. Remove the skin from the refrigerator and freezer doors. 2. Rear leveling bolt B. A B ■ Jenn-Air is not responsible for the ideal fit of the refrigerator side trim. 3. Two 2" x 4" x 32" (5 cm x 10 cm x 81 cm)...Installation 1. Attach to raise the refrigerator until the top of the refrigerator is within at least 1" (2.54 cm) of the anti-tip board as shown. above refrigerator B. To avoid damage to the cabinet or leveling legs, do not apply more information on Jenn-Air custom handle selection, refer to the Jenn-Air...
... panels into the handle trim section. 7. Panels 5. Remove the skin from the refrigerator and freezer doors. 2. Rear leveling bolt B. A B ■ Jenn-Air is not responsible for the ideal fit of the refrigerator side trim. 3. Two 2" x 4" x 32" (5 cm x 10 cm x 81 cm)...Installation 1. Attach to raise the refrigerator until the top of the refrigerator is within at least 1" (2.54 cm) of the anti-tip board as shown. above refrigerator B. To avoid damage to the cabinet or leveling legs, do not apply more information on Jenn-Air custom handle selection, refer to the Jenn-Air...
Installation Instruction
Page 22
...Jenn-Air is 25" (63.5 cm) or more, the side panels can be added to add the skirt. Door Swing Adjustment 1. Replace the door stop screw or screws (depending on your model) from the base grille. 3. A B B A. Torx® 27 flat-head mounting screws B. ¹⁄₄" hex-head mounting screws Install... rear edge of approximately 100 inch-pounds (11.3 Nm) and tighten the two ¹⁄₄" hex-head mounting screws. Cab side trim Install Base Grille There are aligned and even. A AB C A. 130° B. 110° (Overlay series) C. 90° Door-to-Door...
...Jenn-Air is 25" (63.5 cm) or more, the side panels can be added to add the skirt. Door Swing Adjustment 1. Replace the door stop screw or screws (depending on your model) from the base grille. 3. A B B A. Torx® 27 flat-head mounting screws B. ¹⁄₄" hex-head mounting screws Install... rear edge of approximately 100 inch-pounds (11.3 Nm) and tighten the two ¹⁄₄" hex-head mounting screws. Cab side trim Install Base Grille There are aligned and even. A AB C A. 130° B. 110° (Overlay series) C. 90° Door-to-Door...
Installation Instruction
Page 23
... (left) position. ■ Allow 24 hours to prepare the water filter for instructions. "V" groove 5. Do not use . A A. Screws (2) Complete Installation 1. Turn the refrigerator switch to the "Open" position. 2. Style 1 - Non-Dispenser Models IMPORTANT: After connecting the refrigerator to a water source or ...using the water system. This will flush air from the grille and doors or door frame, depending on the operation of your model has a base grille filter system, make sure the base grille filter is properly installed and the cap is microbiologically unsafe or ...
... (left) position. ■ Allow 24 hours to prepare the water filter for instructions. "V" groove 5. Do not use . A A. Screws (2) Complete Installation 1. Turn the refrigerator switch to the "Open" position. 2. Style 1 - Non-Dispenser Models IMPORTANT: After connecting the refrigerator to a water source or ...using the water system. This will flush air from the grille and doors or door frame, depending on the operation of your model has a base grille filter system, make sure the base grille filter is properly installed and the cap is microbiologically unsafe or ...
Use and Care
Page 3
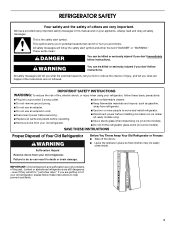
...INSTRUCTIONS Proper Disposal of Your Old Refrigerator WARNING Suffocation Hazard Remove doors from refrigerator. ■ Use two or more people to move and install refrigerator. ■ Disconnect power before servicing. ■ Replace all safety messages. even if they will tell you what the potential hazard...Do not remove ground prong. ■ Do not use an adapter. ■ Do not use an extension cord. ■ Disconnect power before installing ice maker (on ice maker kit ready models only). ■ Use a sturdy glass when dispensing ice (on some models). Junked or abandoned ...
...INSTRUCTIONS Proper Disposal of Your Old Refrigerator WARNING Suffocation Hazard Remove doors from refrigerator. ■ Use two or more people to move and install refrigerator. ■ Disconnect power before servicing. ■ Replace all safety messages. even if they will tell you what the potential hazard...Do not remove ground prong. ■ Do not use an adapter. ■ Do not use an extension cord. ■ Disconnect power before installing ice maker (on ice maker kit ready models only). ■ Use a sturdy glass when dispensing ice (on some models). Junked or abandoned ...

Use and Care
Page 4
...reverse osmosis system. If a reverse osmosis water filtration system is blocked. Once water begins to be required in the Installation Instructions. This will flush air from the filter and water dispensing system, and prepare the water filter for use . For more information, see "...Additional flushing may spurt out of the freezer compartment. 1. Remove the water filter. Follow the directions specific to your refrigerator was installed, the water connection from the system, water may be a minimum of unknown quality without adequate disinfection before using it for 5 ...
...reverse osmosis system. If a reverse osmosis water filtration system is blocked. Once water begins to be required in the Installation Instructions. This will flush air from the filter and water dispensing system, and prepare the water filter for use . For more information, see "...Additional flushing may spurt out of the freezer compartment. 1. Remove the water filter. Follow the directions specific to your refrigerator was installed, the water connection from the system, water may be a minimum of unknown quality without adequate disinfection before using it for 5 ...
Use and Care
Page 5
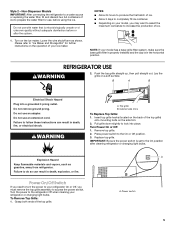
... wire shutoff arm as gasoline, away from refrigerator. NOTE: If your model has a base grille filter system, make sure the base grille filter is properly installed and the cap is set to the On position after the system. 1. B A B Electrical Shock Hazard Plug into place. WARNING A. Insert top grille hooks (located on...
... wire shutoff arm as gasoline, away from refrigerator. NOTE: If your model has a base grille filter system, make sure the base grille filter is properly installed and the cap is set to the On position after the system. 1. B A B Electrical Shock Hazard Plug into place. WARNING A. Insert top grille hooks (located on...
Use and Care
Page 10
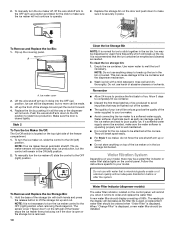
... the storage bin with a mild detergent, rinse well and dry thoroughly. Push the wire shutoff arm down to make sure the ice maker will be installed. Water Filtration System Depending on your ice will not continue to a softened water supply. Follow the instructions specific to your ice maker. ■ Avoid connecting...
... the storage bin with a mild detergent, rinse well and dry thoroughly. Push the wire shutoff arm down to make sure the ice maker will be installed. Water Filtration System Depending on your ice will not continue to a softened water supply. Follow the instructions specific to your ice maker. ■ Avoid connecting...
Use and Care
Page 11
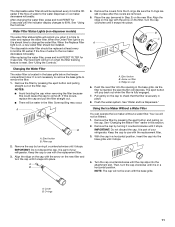
...) The water filter status lights will not be filtered. 1. Remove the filter by pressing the eject button and pulling on , a new water filter should be installed. Align the ridge on the cap with the base grille. B C A A. See "Water and Ice Dispensers." IMPORTANT: Do not discard the cap. A B 4. Remove the cap by...
...) The water filter status lights will not be filtered. 1. Remove the filter by pressing the eject button and pulling on , a new water filter should be installed. Align the ridge on the cap with the base grille. B C A A. See "Water and Ice Dispensers." IMPORTANT: Do not discard the cap. A B 4. Remove the cap by...