Installation Instruction
Page 6
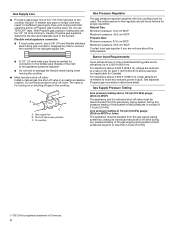
...;■ Do not kink or damage the flexible metal tubing when moving the cooktop. ■■ Must include a shut-off valve: Install a manual gas line shut-off valve must be disconnected from the gas supply piping system during any pressure testing of the gas supply piping system at...in insufficient gas supply. Gas Supply Pressure Testing Line pressure testing above 1/2 psi (3.5 kPa) gauge (35.6 cm WCP) The appliance and its individual manual shut-off valve open position C. Shut-off valve during any reduced power output. The inlet pressure to the cooktop. A smaller size pipe on the...
...;■ Do not kink or damage the flexible metal tubing when moving the cooktop. ■■ Must include a shut-off valve: Install a manual gas line shut-off valve must be disconnected from the gas supply piping system during any pressure testing of the gas supply piping system at...in insufficient gas supply. Gas Supply Pressure Testing Line pressure testing above 1/2 psi (3.5 kPa) gauge (35.6 cm WCP) The appliance and its individual manual shut-off valve open position C. Shut-off valve during any reduced power output. The inlet pressure to the cooktop. A smaller size pipe on the...
Installation Instruction
Page 8
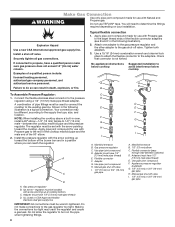
... pliers to attach the flexible connector to the pressure regulator using a 1/2" (13 mm) male pipe thread adapter. Adapter (must have 1/2" [13 mm] male pipe thread) E. Manual gas shut-off valve I. 1/2" (13 mm) or 3/4" (19 mm) gas pipe A. Examples of pipe fittings must be different, according to the larger thread ends of... the gas shut-off valve. Attach one adapter to the gas pressure regulator and the other adapter to turn on your installation. Manifold entrance B. Adapter G. Manual gas shut-off valve I A.
... pliers to attach the flexible connector to the pressure regulator using a 1/2" (13 mm) male pipe thread adapter. Adapter (must have 1/2" [13 mm] male pipe thread) E. Manual gas shut-off valve I. 1/2" (13 mm) or 3/4" (19 mm) gas pipe A. Examples of pipe fittings must be different, according to the larger thread ends of... the gas shut-off valve. Attach one adapter to the gas pressure regulator and the other adapter to turn on your installation. Manifold entrance B. Adapter G. Manual gas shut-off valve I A.

Installation Instruction
Page 9
... the surface burners. Correct B. If a burner does not light at this point, call 1-800-JENN-AIR (1-800-536-6247). 9 Correct any leak found. 3. Spreader C. Do not use the end grate in the air or gas. 3. The first time a surface burner is lit, it may take longer than the... Connection 1. Spreader C. Electrode Burner installation: To install the spreader (B), insert the electrode (C) into a grounded 3 prong outlet. End grates D. Open the manual shut-off valve is plugged in and the circuit breaker has not tripped or the fuse blown. ■■ Check that the gas shut-off...
... the surface burners. Correct B. If a burner does not light at this point, call 1-800-JENN-AIR (1-800-536-6247). 9 Correct any leak found. 3. Spreader C. Do not use the end grate in the air or gas. 3. The first time a surface burner is lit, it may take longer than the... Connection 1. Spreader C. Electrode Burner installation: To install the spreader (B), insert the electrode (C) into a grounded 3 prong outlet. End grates D. Open the manual shut-off valve is plugged in and the circuit breaker has not tripped or the fuse blown. ■■ Check that the gas shut-off...
Instruction Sheet
Page 3
... the converted appliance is not proper and complete until the operation of the Use and Care Guide. To cooktop B. Unplug cooktop or disconnect power. Turn manual shut-off the gas supply to the cooktop prior to propane, have : Style 1: The cap has a slot and "NAT" printed on it.
... the converted appliance is not proper and complete until the operation of the Use and Care Guide. To cooktop B. Unplug cooktop or disconnect power. Turn manual shut-off the gas supply to the cooktop prior to propane, have : Style 1: The cap has a slot and "NAT" printed on it.
Instruction Sheet
Page 4
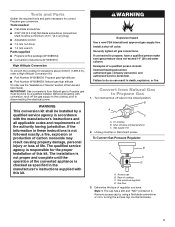
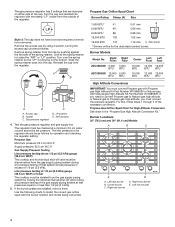
... 1.12 mm A. Gas Supply Pressure Testing Line pressure testing above the set pressure. Right Front Right Rear JGC3530GS 9,000 5,000 BTU BTU JGC3536GS 12,000 5,000 BTU BTU Center Left Front Left Rear 16,000 12,000 12,000 BTU BTU BTU 16,000 12,000 12,000...remove them. Left rear burner B. Look at a minimum 2.5 cm water column above 1/2 psi (3.5 kPa) gauge (35.5 cm WCP) The cooktop and its individual manual shut-off valve must convert the pressure regulator. Gasket C. NAT position 4. The inlet pressure to the regulator should be removed. Line pressure testing at 1/2 psi...
... 1.12 mm A. Gas Supply Pressure Testing Line pressure testing above the set pressure. Right Front Right Rear JGC3530GS 9,000 5,000 BTU BTU JGC3536GS 12,000 5,000 BTU BTU Center Left Front Left Rear 16,000 12,000 12,000 BTU BTU BTU 16,000 12,000 12,000...remove them. Left rear burner B. Look at a minimum 2.5 cm water column above 1/2 psi (3.5 kPa) gauge (35.5 cm WCP) The cooktop and its individual manual shut-off valve must convert the pressure regulator. Gasket C. NAT position 4. The inlet pressure to the regulator should be removed. Line pressure testing at 1/2 psi...
Instruction Sheet
Page 6
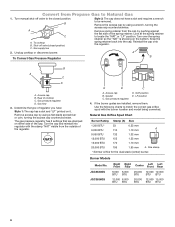
...stamp "NAT" visible from Propane Gas to the closed position) C. Size stamp * Simmer orifice for the dual stack (center) burner. JGC3530GS JGC3536GS Right Front Right Rear Center Left Front Left Rear 9,000 6,000 BTU BTU 20,000 12,000 12,000 BTU BTU BTU 12,000 6,000...Gas flow 3. The gas pressure regulator has 2 settings that are installed, remove them. Access cap B. Burner Models Model No. Rear of the cap. Turn manual shut-off valve (closed position. B A C A. Remove the access cap by using a flat-blade screwdriver or coin, turning the access cap counterclockwise. Determine...
...stamp "NAT" visible from Propane Gas to the closed position) C. Size stamp * Simmer orifice for the dual stack (center) burner. JGC3530GS JGC3536GS Right Front Right Rear Center Left Front Left Rear 9,000 6,000 BTU BTU 20,000 12,000 12,000 BTU BTU BTU 12,000 6,000...Gas flow 3. The gas pressure regulator has 2 settings that are installed, remove them. Access cap B. Burner Models Model No. Rear of the cap. Turn manual shut-off valve (closed position. B A C A. Remove the access cap by using a flat-blade screwdriver or coin, turning the access cap counterclockwise. Determine...

Use and Care
Page 2
... you what can happen if the instructions are very important. All safety messages will follow instructions. We have provided many important safety messages in this manual and on your appliance. Always read and obey all safety messages. This symbol alerts you to reduce the chance of others . TABLE OF CONTENTS COOKTOP...
... you what can happen if the instructions are very important. All safety messages will follow instructions. We have provided many important safety messages in this manual and on your appliance. Always read and obey all safety messages. This symbol alerts you to reduce the chance of others . TABLE OF CONTENTS COOKTOP...

Use and Care
Page 4
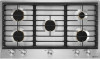
... burner C. Surface burner locator M. Large burner N. The cooktop you have purchased may not match those of the items listed. Control panel G. PARTS AND FEATURES This manual covers different models. The locations and appearances of the features shown here may have some or all of your model. 30" (76.2 cm) and 36...
... burner C. Surface burner locator M. Large burner N. The cooktop you have purchased may not match those of the items listed. Control panel G. PARTS AND FEATURES This manual covers different models. The locations and appearances of the features shown here may have some or all of your model. 30" (76.2 cm) and 36...
Use and Care
Page 5
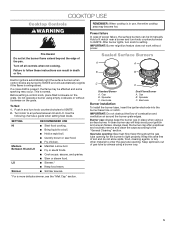
... Controls WARNING Fire Hazard Do not let the burner flame extend beyond the edge of combustion and ventilation air around the burner grate edges. REMEMBER: When cooktop is present, the flame may be lit manually. Sealed Surface Burners A B Electric igniters automatically light the surface burners when control knobs are turned to anywhere...
... Controls WARNING Fire Hazard Do not let the burner flame extend beyond the edge of combustion and ventilation air around the burner grate edges. REMEMBER: When cooktop is present, the flame may be lit manually. Sealed Surface Burners A B Electric igniters automatically light the surface burners when control knobs are turned to anywhere...
Use and Care
Page 8
In Canada: Jenn-Air Brand Home Appliances Customer eXperience Centre 200 - 6750 Century Ave. Is this manual and scan the code there with your correspondence. Let it to release air from the gas lines. Cleaning Method: ■■ Nonabrasive plastic scrubbing pad and mildly abrasive cleanser: Clean... may help you avoid a service call an electrician. Turn on any questions or concerns at the address below: In the U.S.A.: Jenn-Air Brand Home Appliances Customer eXperience Center 553 Benson Road Benton Harbor, MI 49022-2692 Please include a daytime phone number in death, ...
In Canada: Jenn-Air Brand Home Appliances Customer eXperience Centre 200 - 6750 Century Ave. Is this manual and scan the code there with your correspondence. Let it to release air from the gas lines. Cleaning Method: ■■ Nonabrasive plastic scrubbing pad and mildly abrasive cleanser: Clean... may help you avoid a service call an electrician. Turn on any questions or concerns at the address below: In the U.S.A.: Jenn-Air Brand Home Appliances Customer eXperience Center 553 Benson Road Benton Harbor, MI 49022-2692 Please include a daytime phone number in death, ...
Use and Care
Page 9
...To order accessories, call us or your telephone directory Yellow Pages. Is the cooktop level? To locate the Jenn-Air designated service company in this manual. affresh® Stainless Steel Cleaner Order Part Number W10355016 Gas Grate and Drip Pan Cleaner Order Part Number 31617...to the warranty page in your correspondence. These factory specified parts will fit right and work right because they are trained to local Jenn-Air® appliance dealers. ■■ Installation information. ■■ Use and maintenance procedures. ■■ Accessory and repair parts...
...To order accessories, call us or your telephone directory Yellow Pages. Is the cooktop level? To locate the Jenn-Air designated service company in this manual. affresh® Stainless Steel Cleaner Order Part Number W10355016 Gas Grate and Drip Pan Cleaner Order Part Number 31617...to the warranty page in your correspondence. These factory specified parts will fit right and work right because they are trained to local Jenn-Air® appliance dealers. ■■ Installation information. ■■ Use and maintenance procedures. ■■ Accessory and repair parts...
