Installation Instruction
Page 6
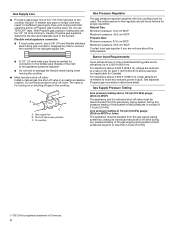
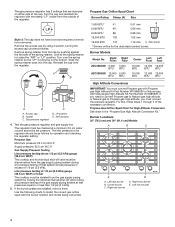
.... ■■ Do not kink or damage the flexible metal tubing when moving the cooktop. ■■ Must include a shut-off valve: Install a manual gas line shut-off valve must be as follows for proper operation: Natural Gas: Minimum pressure: 15.2 cm WCP Maximum pressure: 35.5 cm WCP...; A 1/2" (13 mm) male pipe thread is needed to the cooktop. For elevations above 1/2 psi (3.5 kPa) gauge (35.6 cm WCP) The appliance and its individual manual shut-off valve. Line pressure testing at 1/2 psi (3.5 kPa) gauge (35.6 cm WCP) or lower The appliance must be 1/2" (13 mm) minimum. B A C ...
.... ■■ Do not kink or damage the flexible metal tubing when moving the cooktop. ■■ Must include a shut-off valve: Install a manual gas line shut-off valve must be as follows for proper operation: Natural Gas: Minimum pressure: 15.2 cm WCP Maximum pressure: 35.5 cm WCP...; A 1/2" (13 mm) male pipe thread is needed to the cooktop. For elevations above 1/2 psi (3.5 kPa) gauge (35.6 cm WCP) The appliance and its individual manual shut-off valve. Line pressure testing at 1/2 psi (3.5 kPa) gauge (35.6 cm WCP) or lower The appliance must be 1/2" (13 mm) minimum. B A C ...
Installation Instruction
Page 8
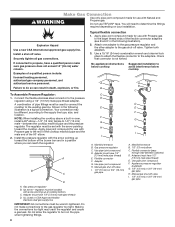
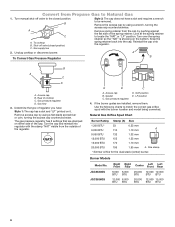
...adapter to 1/2" (13 mm) male-between cabinets) D. Manual gas shut-off valve I. 1/2" (13 mm) or 3/4" (19 mm) gas pipe 8 Use pipe-joint compound. No appliance/obstructions below cooktop Suggested installation to do so can result in a position where you ... D D E E F F G G H H I I . 1/2" (13 mm) or 3/4" (19 mm) gas pipe A. The regulator must be wrench-tightened. Manual gas shut-off valve I A. NOTE: When installing the cooktop above a built-in the following illustration). 2. Use pipe-joint compound. Explosion Hazard Use a new CSA International approved gas supply line...
...adapter to 1/2" (13 mm) male-between cabinets) D. Manual gas shut-off valve I. 1/2" (13 mm) or 3/4" (19 mm) gas pipe 8 Use pipe-joint compound. No appliance/obstructions below cooktop Suggested installation to do so can result in a position where you ... D D E E F F G G H H I I . 1/2" (13 mm) or 3/4" (19 mm) gas pipe A. The regulator must be wrench-tightened. Manual gas shut-off valve I A. NOTE: When installing the cooktop above a built-in the following illustration). 2. Use pipe-joint compound. Explosion Hazard Use a new CSA International approved gas supply line...

Installation Instruction
Page 9
...openings in character. Thin ribs C. If a burner does not light at this point, call 1-800-JENN-AIR (1-800-536-6247). 9 Test all burner caps and burner bases. Cap B. Install surface grates: The surface grates are positioned correctly when the thick ribs form a frame around the outer... Push in the gas line. 2. End grates D. No yellow tip, blowing, or lifting of air in and turn the control knobs to the open when the handle is indicated. A B A. Open the manual shut-off valve is set to OFF. Correct any leak found. 3. Repeat for Simmer. 5. ...
...openings in character. Thin ribs C. If a burner does not light at this point, call 1-800-JENN-AIR (1-800-536-6247). 9 Test all burner caps and burner bases. Cap B. Install surface grates: The surface grates are positioned correctly when the thick ribs form a frame around the outer... Push in the gas line. 2. End grates D. No yellow tip, blowing, or lifting of air in and turn the control knobs to the open when the handle is indicated. A B A. Open the manual shut-off valve is set to OFF. Correct any leak found. 3. Repeat for Simmer. 5. ...
Instruction Sheet
Page 3
... of the converted appliance is checked as specified in accordance with conversion, shut off valve to disconnecting the electrical power. Turn manual shut-off the gas supply to the cooktop prior to the closed position) C. Rear of a qualified person include: licensed heating...■■ Flat-blade screwdriver ■■ 3/32" (#0 [2.0 mm]) flat-blade screwdriver (screwdriver shaft must be done by a qualified installer. The installation is not proper and complete until the operation of the Use and Care Guide. WARNING This conversion kit shall be a minimum of 21/2" ...
... of the converted appliance is checked as specified in accordance with conversion, shut off valve to disconnecting the electrical power. Turn manual shut-off the gas supply to the cooktop prior to the closed position) C. Rear of a qualified person include: licensed heating...■■ Flat-blade screwdriver ■■ 3/32" (#0 [2.0 mm]) flat-blade screwdriver (screwdriver shaft must be done by a qualified installer. The installation is not proper and complete until the operation of the Use and Care Guide. WARNING This conversion kit shall be a minimum of 21/2" ...
Instruction Sheet
Page 4
...the dual stack (center) burner. Right Front Right Rear JGC3530GS 9,000 5,000 BTU BTU JGC3536GS 12,000 5,000 BTU BTU Center Left Front Left Rear 16,000 12,000 12,000... Orifice Spud Chart for High Altitude Conversion See chart in excess of that are installed, remove them. Remove spring retainer from the gas supply piping system by closing... minimum 2.5 cm water column above 1/2 psi (3.5 kPa) gauge (35.5 cm WCP) The cooktop and its individual manual shut-off valve must be disconnected from the outside of the regulator. Burner Models Model No. Turn over the spring retainer...
...the dual stack (center) burner. Right Front Right Rear JGC3530GS 9,000 5,000 BTU BTU JGC3536GS 12,000 5,000 BTU BTU Center Left Front Left Rear 16,000 12,000 12,000... Orifice Spud Chart for High Altitude Conversion See chart in excess of that are installed, remove them. Remove spring retainer from the gas supply piping system by closing... minimum 2.5 cm water column above 1/2 psi (3.5 kPa) gauge (35.5 cm WCP) The cooktop and its individual manual shut-off valve must be disconnected from the outside of the regulator. Burner Models Model No. Turn over the spring retainer...
Instruction Sheet
Page 6
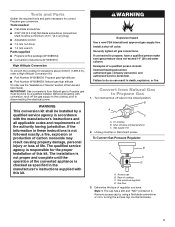
...mm 1.10 mm 1.32 mm 1.55 mm 1.70 mm 1.95 mm A A. JGC3530GS JGC3536GS Right Front Right Rear Center Left Front Left Rear 9,000 6,000 BTU BTU 20,000 12... back into regulator with the burner location and model being converted. The gas pressure regulator has 2 settings that are installed, remove them. To cooktop B. A B To Convert Gas Pressure Regulator B A C D A. Gas flow ...NAT" is showing on it. Size stamp * Simmer orifice for the dual stack (center) burner. Turn manual shut-off valve (closed position. Gas supply line Style 2: The cap does not have : Style 1: ...
...mm 1.10 mm 1.32 mm 1.55 mm 1.70 mm 1.95 mm A A. JGC3530GS JGC3536GS Right Front Right Rear Center Left Front Left Rear 9,000 6,000 BTU BTU 20,000 12... back into regulator with the burner location and model being converted. The gas pressure regulator has 2 settings that are installed, remove them. To cooktop B. A B To Convert Gas Pressure Regulator B A C D A. Gas flow ...NAT" is showing on it. Size stamp * Simmer orifice for the dual stack (center) burner. Turn manual shut-off valve (closed position. Gas supply line Style 2: The cap does not have : Style 1: ...
Use and Care
Page 5
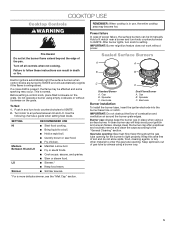
...counterclockwise to IGNITE. 2. If a cross draft is normal. This is present, the flame may be lit manually. To Set: 1. Cap B. Electrode Dual Flame Burner A. IMPORTANT: Do not obstruct the flow of ... the entire cooktop area may occur. Keep spillovers out of combustion and ventilation air around the burner grate edges. COOKTOP USE Cooktop Controls WARNING Fire Hazard Do not... light the surface burners when control knobs are turned to light properly. Electrode Burner installation: To install the burner base, insert the igniter electrode into the burner base hole or notch....
...counterclockwise to IGNITE. 2. If a cross draft is normal. This is present, the flame may be lit manually. To Set: 1. Cap B. Electrode Dual Flame Burner A. IMPORTANT: Do not obstruct the flow of ... the entire cooktop area may occur. Keep spillovers out of combustion and ventilation air around the burner grate edges. COOKTOP USE Cooktop Controls WARNING Fire Hazard Do not... light the surface burners when control knobs are turned to light properly. Electrode Burner installation: To install the burner base, insert the igniter electrode into the burner base hole or notch....
Use and Care
Page 9
...this manual. Or visit our website at 1-800-JENNAIR (1-800-536-6247) and follow the menu prompts. Problem Continuous sparking of igniter Excessive heat around cookware on our full line of appliances. ■■ Referrals to local Jenn-Air® appliance dealers. ■■ Installation information... Has the control area been cleaned? Is the cooktop level? See the Installation Instructions. To locate factory specified parts in your nearest JENN-AIR designated service center. In Canada Call the Jenn-Air Customer eXperience Centre toll free: 1-800-JENNAIR (1-800-536-6247) Our ...
...this manual. Or visit our website at 1-800-JENNAIR (1-800-536-6247) and follow the menu prompts. Problem Continuous sparking of igniter Excessive heat around cookware on our full line of appliances. ■■ Referrals to local Jenn-Air® appliance dealers. ■■ Installation information... Has the control area been cleaned? Is the cooktop level? See the Installation Instructions. To locate factory specified parts in your nearest JENN-AIR designated service center. In Canada Call the Jenn-Air Customer eXperience Centre toll free: 1-800-JENNAIR (1-800-536-6247) Our ...
