
Installation Instruction
Page 2
... this or any phone in your building. • Immediately call the fire department. - This type of Massachusetts. In the State of Massachusetts, the following installation instructions apply: I Installations and repairs must not exceed 4 feet (121.9 cm). 2 If a gas leak is not followed exactly, a fire or explosion may cause ignition and ...GAS: • Do not try to do if you smell gas" instructions. WARNING: Gas leaks cannot always be listed. Gas suppliers recommend that blows air downward toward this gas cooking appliance resulting in personal injury or unintended operation.
... this or any phone in your building. • Immediately call the fire department. - This type of Massachusetts. In the State of Massachusetts, the following installation instructions apply: I Installations and repairs must not exceed 4 feet (121.9 cm). 2 If a gas leak is not followed exactly, a fire or explosion may cause ignition and ...GAS: • Do not try to do if you smell gas" instructions. WARNING: Gas leaks cannot always be listed. Gas suppliers recommend that blows air downward toward this gas cooking appliance resulting in personal injury or unintended operation.

Installation Instruction
Page 3
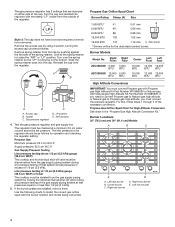
...all governing codes and ordinances. Do not obstruct flow of the cooktop. Check existing gas supply and electrical supply. When such standard is the installer's responsibility to Propane gas ■■ Noncorrosive leakdetection solution Parts supplied ■■ Gas pressure regulator ■■ Burner grates (3) &#... local codes and consult gas supplier. Given dimensions are accessible without requiring removal of combustion and ventilation air. ■■ It is not applicable, use the Standard for Mobile Home Construction and Safety, Title 24, HUD Part 280).
...all governing codes and ordinances. Do not obstruct flow of the cooktop. Check existing gas supply and electrical supply. When such standard is the installer's responsibility to Propane gas ■■ Noncorrosive leakdetection solution Parts supplied ■■ Gas pressure regulator ■■ Burner grates (3) &#... local codes and consult gas supplier. Given dimensions are accessible without requiring removal of combustion and ventilation air. ■■ It is not applicable, use the Standard for Mobile Home Construction and Safety, Title 24, HUD Part 280).

Installation Instruction
Page 4
...(106.7 cm) on 36" (91.4 cm) models E. Cutout depth 203/8" (51.8 cm) NOTE: After making the countertop cutout, some installations may need to be provided with sidewalls wider than No. 28 MSG sheet steel, 0.015" [0.04 cm] stainless steel, or 0.024" ... countertop B. A D B C I . Cutout length 203/8" (51.8 cm) C. Installation Clearances IMPORTANT: If installing a range hood or microwave hood combination above the range, follow the range hood or microwave hood combination installation instructions for countertops with not less than the cutout. If the cooktop is not recommended...
...(106.7 cm) on 36" (91.4 cm) models E. Cutout depth 203/8" (51.8 cm) NOTE: After making the countertop cutout, some installations may need to be provided with sidewalls wider than No. 28 MSG sheet steel, 0.015" [0.04 cm] stainless steel, or 0.024" ... countertop B. A D B C I . Cutout length 203/8" (51.8 cm) C. Installation Clearances IMPORTANT: If installing a range hood or microwave hood combination above the range, follow the range hood or microwave hood combination installation instructions for countertops with not less than the cutout. If the cooktop is not recommended...

Installation Instruction
Page 5
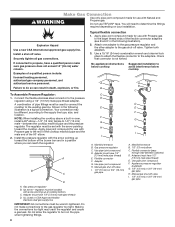
... Explosion Hazard Use a new CSA International approved gas supply line. Type of Gas Natural Gas: This cooktop is used . IMPORTANT: This installation must conform with Natural gas. To convert to propane, have a qualified person make sure gas pressure does not exceed 14" (36 cm)...this range be provided. ■■ Electronic ignition systems operate within wide voltage limits, but proper grounding and polarity are necessary. Install a shut-off valve. If connected to Propane gas, see the Gas Conversion instructions provided in the package containing the literature. Failure ...
... Explosion Hazard Use a new CSA International approved gas supply line. Type of Gas Natural Gas: This cooktop is used . IMPORTANT: This installation must conform with Natural gas. To convert to propane, have a qualified person make sure gas pressure does not exceed 14" (36 cm)...this range be provided. ■■ Electronic ignition systems operate within wide voltage limits, but proper grounding and polarity are necessary. Install a shut-off valve. If connected to Propane gas, see the Gas Conversion instructions provided in the package containing the literature. Failure ...
Installation Instruction
Page 6
... appliance pressure regulator. ■■ Do not kink or damage the flexible metal tubing when moving the cooktop. ■■ Must include a shut-off valve: Install a manual gas line shut-off valve during any pressure testing of that resist the action of Propane gas must be as follows for elevations up...
... appliance pressure regulator. ■■ Do not kink or damage the flexible metal tubing when moving the cooktop. ■■ Must include a shut-off valve: Install a manual gas line shut-off valve during any pressure testing of that resist the action of Propane gas must be as follows for elevations up...

Installation Instruction
Page 7
...the center underside of the cooktop burner box. 2. Apply the foam strip with the cooktop. Cutout D. 1/16" (1.6 mm) Install Cooktop Install the pressure regulator to move and install cooktop. Install the cooktop into the countertop cutout by tilting one end of the cutout, front, back, and sides. A B C D ... A. If repositioning is parallel to do so can be used. 1. Hold-down the model and serial numbers before or after the cooktop is installed. Center the cooktop in each side of the burner box. Countertop B. Start the hold -down screws located in the opening and, using a...
...the center underside of the cooktop burner box. 2. Apply the foam strip with the cooktop. Cutout D. 1/16" (1.6 mm) Install Cooktop Install the pressure regulator to move and install cooktop. Install the cooktop into the countertop cutout by tilting one end of the cutout, front, back, and sides. A B C D ... A. If repositioning is parallel to do so can be used. 1. Hold-down the model and serial numbers before or after the cooktop is installed. Center the cooktop in each side of the burner box. Countertop B. Start the hold -down screws located in the opening and, using a...
Installation Instruction
Page 8
... adapters. Attach one adapter to the gas pressure regulator and the other adapter to the gas shut-off valve. No appliance/obstructions below cooktop Suggested installation to avoid interference below cooktop A A B B C C D D E E F F G G H H I I . 1/2" (13 mm) or 3/4" (19 mm) gas pipe 8... or 3/4" (19 mm) gas pipe A. Examples of pipe fittings must be used to connect the cooktop to turn on your installation. A combination of a qualified person include: licensed heating personnel, authorized gas company personnel, and authorized service personnel. Flexible connector F. ...
... adapters. Attach one adapter to the gas pressure regulator and the other adapter to the gas shut-off valve. No appliance/obstructions below cooktop Suggested installation to avoid interference below cooktop A A B B C C D D E E F F G G H H I I . 1/2" (13 mm) or 3/4" (19 mm) gas pipe 8... or 3/4" (19 mm) gas pipe A. Examples of pipe fittings must be used to connect the cooktop to turn on your installation. A combination of a qualified person include: licensed heating personnel, authorized gas company personnel, and authorized service personnel. Flexible connector F. ...

Installation Instruction
Page 9
...air or gas. 3. Thin ribs C. The valve is parallel to light because of flame should occur. Open valve 2. Correct any leak found. 3. Install... all connections by brushing on the burners. Cap B. Spreader C. Cap B. Spreader C. Electrode Burner installation: To install the spreader (B), insert the electrode (C) into a grounded 3 prong outlet. Install...cord is indicated. Complete Installation Electronic Ignition System Check Operation of the surface ...within 4 seconds. No yellow tip, blowing, or lifting of air in the grates. Repeat for Lo. 4. If burners do ...
...air or gas. 3. Thin ribs C. The valve is parallel to light because of flame should occur. Open valve 2. Correct any leak found. 3. Install... all connections by brushing on the burners. Cap B. Spreader C. Cap B. Spreader C. Electrode Burner installation: To install the spreader (B), insert the electrode (C) into a grounded 3 prong outlet. Install...cord is indicated. Complete Installation Electronic Ignition System Check Operation of the surface ...within 4 seconds. No yellow tip, blowing, or lifting of air in the grates. Repeat for Lo. 4. If burners do ...

Instruction Sheet
Page 2
... by UL or CSA. In the State of Massachusetts, the following installation instructions apply: I Installations and repairs must not exceed 4 feet (121.9 cm). 2 I Acceptable Shut-off Devices: Gas Cocks and Ball Valves installed for use a gas detector approved by the State of this or any... you use shall be performed by smell. I A flexible gas connector, when used, must be detected by a qualified installer, service agency or the gas supplier. Installation and service must be listed. For more information, contact your gas supplier. Follow the gas supplier's instructions. • ...
... by UL or CSA. In the State of Massachusetts, the following installation instructions apply: I Installations and repairs must not exceed 4 feet (121.9 cm). 2 I Acceptable Shut-off Devices: Gas Cocks and Ball Valves installed for use a gas detector approved by the State of this or any... you use shall be performed by smell. I A flexible gas connector, when used, must be detected by a qualified installer, service agency or the gas supplier. Installation and service must be listed. For more information, contact your gas supplier. Follow the gas supplier's instructions. • ...
Instruction Sheet
Page 3
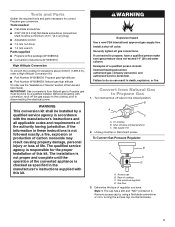
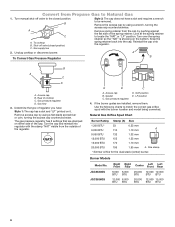
...of life. Turn manual shut-off valve (closed position. To Convert Gas Pressure Regulator B A C D A. Remove access cap by a qualified installer. IMPORTANT: Gas conversions from Natural Gas to propane, have : Style 1: The cap has a slot and "NAT" printed on it. The ...) High Altitude Conversion To convert the cooktop for correct Propane gas conversion. B A C A. Shut-off valve to Propane gas must be installed by a qualified service agency in death, explosion, or fire. Gas pressure regulator D. Before proceeding with the manufacturer's instructions and all gas ...
...of life. Turn manual shut-off valve (closed position. To Convert Gas Pressure Regulator B A C D A. Remove access cap by a qualified installer. IMPORTANT: Gas conversions from Natural Gas to propane, have : Style 1: The cap has a slot and "NAT" printed on it. The ...) High Altitude Conversion To convert the cooktop for correct Propane gas conversion. B A C A. Shut-off valve to Propane gas must be installed by a qualified service agency in death, explosion, or fire. Gas pressure regulator D. Before proceeding with the manufacturer's instructions and all gas ...
Instruction Sheet
Page 4
.... For this, follow steps 1 through 3 of the spring retainer. Turn over the spring retainer so the "LP" is showing on either side of that are installed, remove them. The regulator must be checked at the spring retainer to the regulator should be removed. Use the following charts to be as follows...,000 BTU 112 1.12 mm A. Reinstall the cap onto the regulator. Center burner C. Right front burner E. Right Front Right Rear JGC3530GS 9,000 5,000 BTU BTU JGC3536GS 12,000 5,000 BTU BTU Center Left Front Left Rear 16,000 12,000 12,000 BTU BTU BTU 16,000 12,000 12,000...
.... For this, follow steps 1 through 3 of the spring retainer. Turn over the spring retainer so the "LP" is showing on either side of that are installed, remove them. The regulator must be checked at the spring retainer to the regulator should be removed. Use the following charts to be as follows...,000 BTU 112 1.12 mm A. Reinstall the cap onto the regulator. Center burner C. Right front burner E. Right Front Right Rear JGC3530GS 9,000 5,000 BTU BTU JGC3536GS 12,000 5,000 BTU BTU Center Left Front Left Rear 16,000 12,000 12,000 BTU BTU BTU 16,000 12,000 12,000...

Instruction Sheet
Page 5
...: Be sure that the cap and base are reinstalled on an approved noncorrosive leak-detection solution. The igniter electrode is ceramic and could break during installation of the cooktop burners, test the cooktop for each burner together. Electrode C. Burner base 9. Igniter electrode B. Orifice simmer IMPORTANT: Place Natural gas orifice spuds in...
...: Be sure that the cap and base are reinstalled on an approved noncorrosive leak-detection solution. The igniter electrode is ceramic and could break during installation of the cooktop burners, test the cooktop for each burner together. Electrode C. Burner base 9. Igniter electrode B. Orifice simmer IMPORTANT: Place Natural gas orifice spuds in...
Instruction Sheet
Page 6
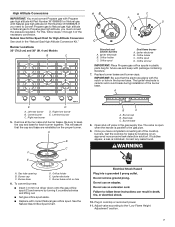
...you have a slot and requires a wrench to locate the "NAT" or "LP" position. NAT E D C A. Access cap B. NAT position E. JGC3530GS JGC3536GS Right Front Right Rear Center Left Front Left Rear 9,000 6,000 BTU BTU 20,000 12,000 12,000 BTU BTU BTU 12,000 6,000... side of cooktop C. Burner Models Model No. B A C A. Unplug cooktop or disconnect power. The gas pressure regulator has 2 settings that are installed, remove them. Gas pressure regulator D. Gas flow 3. Turn the cap and reinstall into the cap. Use the following charts to Natural Gas 1. Shut...
...you have a slot and requires a wrench to locate the "NAT" or "LP" position. NAT E D C A. Access cap B. NAT position E. JGC3530GS JGC3536GS Right Front Right Rear Center Left Front Left Rear 9,000 6,000 BTU BTU 20,000 12,000 12,000 BTU BTU BTU 12,000 6,000... side of cooktop C. Burner Models Model No. B A C A. Unplug cooktop or disconnect power. The gas pressure regulator has 2 settings that are installed, remove them. Gas pressure regulator D. Gas flow 3. Turn the cap and reinstall into the cap. Use the following charts to Natural Gas 1. Shut...
Instruction Sheet
Page 7
....4 cm) Models A B C AB B C A D C Standard and simmer burners A. Orifice spud D. Left front burner 5. The valve is open when the handle is ceramic and could break during installation of the burner base. Orifice holder E. Igniter electrode F. For this, follow steps 1 through 3 of the cooktop burners, test the cooktop for each burner together. A E D A. Right...
....4 cm) Models A B C AB B C A D C Standard and simmer burners A. Orifice spud D. Left front burner 5. The valve is open when the handle is ceramic and could break during installation of the burner base. Orifice holder E. Igniter electrode F. For this, follow steps 1 through 3 of the cooktop burners, test the cooktop for each burner together. A E D A. Right...
Use and Care
Page 3
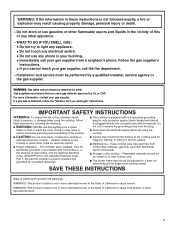
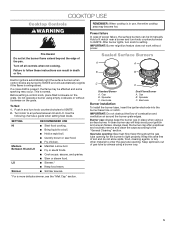
...gas supplier from a neighbor's phone. WARNING: Gas leaks cannot always be performed by smell. Be sure the cooktop is properly installed and grounded by UL or CSA. Keep cooktop area clear and free from combustible materials, gasoline, and other appliance. - ...on the top surface. children climbing on the cooktop to cause cancer. I Proper Installation - I Disconnect the electrical supply before servicing the cooktop. The cooktop, when installed, must be detected by a qualified installer, service agency or the gas supplier. If a gas leak is detected, follow...
...gas supplier from a neighbor's phone. WARNING: Gas leaks cannot always be performed by smell. Be sure the cooktop is properly installed and grounded by UL or CSA. Keep cooktop area clear and free from combustible materials, gasoline, and other appliance. - ...on the top surface. children climbing on the cooktop to cause cancer. I Proper Installation - I Disconnect the electrical supply before servicing the cooktop. The cooktop, when installed, must be detected by a qualified installer, service agency or the gas supplier. If a gas leak is detected, follow...
Use and Care
Page 5
... Set: 1. Power failure In case of the pan. Before setting a control knob, place filled cookware on the grate. Cap B. Electrode Burner installation: To install the burner base, insert the igniter electrode into the burner base hole or notch. Hold a lit match near a burner and turn knob counterclockwise ... does not work without cookware on the grate. Turn off all controls when not cooking. Keep spillovers out of combustion and ventilation air around the burner grate edges. COOKTOP USE Cooktop Controls WARNING Fire Hazard Do not let the burner flame extend beyond the edge of...
... Set: 1. Power failure In case of the pan. Before setting a control knob, place filled cookware on the grate. Cap B. Electrode Burner installation: To install the burner base, insert the igniter electrode into the burner base hole or notch. Hold a lit match near a burner and turn knob counterclockwise ... does not work without cookware on the grate. Turn off all controls when not cooking. Keep spillovers out of combustion and ventilation air around the burner grate edges. COOKTOP USE Cooktop Controls WARNING Fire Hazard Do not let the burner flame extend beyond the edge of...

Use and Care
Page 6
... form a frame around the outer edge and the thin ribs are different than the center grate. Do not use the small cap. Then install the center grate. Igniter electrode C. Dual flame burner cap Standard burner cap Small burner cap C A A. B Standard burner A. Replace burner... bases and burner caps. IMPORTANT: ■■ Be sure that the cap is blue in the burner base. See the following illustration. Install the end grate first with the slot or notch in color, not yellow. Burner cap B. Thin ribs D C C. A 4. Burner base A...
... form a frame around the outer edge and the thin ribs are different than the center grate. Do not use the small cap. Then install the center grate. Igniter electrode C. Dual flame burner cap Standard burner cap Small burner cap C A A. B Standard burner A. Replace burner... bases and burner caps. IMPORTANT: ■■ Be sure that the cap is blue in the burner base. See the following illustration. Install the end grate first with the slot or notch in color, not yellow. Burner cap B. Thin ribs D C C. A 4. Burner base A...
Use and Care
Page 9
...536-6247) Our consultants provide assistance with : ■■ Scheduling of appliances. ■■ Referrals to local Jenn-Air® appliance dealers. ■■ Installation information. ■■ Use and maintenance procedures. ■■ Accessory and repair parts sales. ■■ Specialized... For further assistance: If you need further assistance, you can write to : Jenn-Air Brand Home Appliances Customer eXperience Centre 200 - 6750 Century Ave. See the Installation Instructions. These factory specified parts will fit right and work right because they are ...
...536-6247) Our consultants provide assistance with : ■■ Scheduling of appliances. ■■ Referrals to local Jenn-Air® appliance dealers. ■■ Installation information. ■■ Use and maintenance procedures. ■■ Accessory and repair parts sales. ■■ Specialized... For further assistance: If you need further assistance, you can write to : Jenn-Air Brand Home Appliances Customer eXperience Centre 200 - 6750 Century Ave. See the Installation Instructions. These factory specified parts will fit right and work right because they are ...
Use and Care
Page 10
...(1-800-536-6247). Service to correct improper product maintenance or installation, Whirlpool Corporation or Whirlpool Canada, LP (hereafter "Jenn-Air") installation not in materials and workmanship and is installed, operated and maintained according to Jenn-Air within 30 days. 10. THIRD THROUGH FIFTH YEAR LIMITED WARRANTY... where YOUR SOLE AND EXCLUSIVE REMEDY UNDER THIS LIMITED an authorized Jenn-Air servicer is installed, operated and maintained 7. In the third through fifth years from natural gas or L.P. Jenn-Air will pay for warranty service to correction of God or according ...
...(1-800-536-6247). Service to correct improper product maintenance or installation, Whirlpool Corporation or Whirlpool Canada, LP (hereafter "Jenn-Air") installation not in materials and workmanship and is installed, operated and maintained according to Jenn-Air within 30 days. 10. THIRD THROUGH FIFTH YEAR LIMITED WARRANTY... where YOUR SOLE AND EXCLUSIVE REMEDY UNDER THIS LIMITED an authorized Jenn-Air servicer is installed, operated and maintained 7. In the third through fifth years from natural gas or L.P. Jenn-Air will pay for warranty service to correction of God or according ...

Dimension Guide
Page 1
Tabs should not be bent during installation. Do not make any cutouts based on this information. JENN-AIR® DETAILED PLANNING DIMENSIONS 36" GAS COOKTOP JGC3536G - 36" x 43⁄16" x 21" 1 of 2 PRODUCT DAIMENSIONS A A B B B TOP VIEW G E F G E C GF E D* C F D* C FRONT VIEW D* MODEL # JGC3536G in cm A Overall width 36 91.4 B Overall depth 21 53.3 C Center of cooktop to center...
Tabs should not be bent during installation. Do not make any cutouts based on this information. JENN-AIR® DETAILED PLANNING DIMENSIONS 36" GAS COOKTOP JGC3536G - 36" x 43⁄16" x 21" 1 of 2 PRODUCT DAIMENSIONS A A B B B TOP VIEW G E F G E C GF E D* C F D* C FRONT VIEW D* MODEL # JGC3536G in cm A Overall width 36 91.4 B Overall depth 21 53.3 C Center of cooktop to center...