
Installation Instruction
Page 3
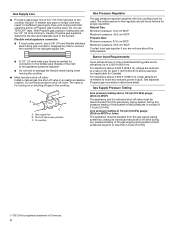
...Part 280). See the "Electrical Requirements" and "Gas Supply Requirements" sections. Mobile Home-Additional Installation Requirements The installation of this cooktop must be available. arrow pointed toward cooktop B. 3 prong grounding type outlet with installation clearances specified on 36" (91.4 cm) models C. 31/4" (8.3 cm) Gas ...gas supplier. The model/serial rating plate is located on the underside of combustion and ventilation air. ■■ It is required. INSTALLATION REQUIREMENTS Tools and Parts Gather the required tools and parts before starting installation.
...Part 280). See the "Electrical Requirements" and "Gas Supply Requirements" sections. Mobile Home-Additional Installation Requirements The installation of this cooktop must be available. arrow pointed toward cooktop B. 3 prong grounding type outlet with installation clearances specified on 36" (91.4 cm) models C. 31/4" (8.3 cm) Gas ...gas supplier. The model/serial rating plate is located on the underside of combustion and ventilation air. ■■ It is required. INSTALLATION REQUIREMENTS Tools and Parts Gather the required tools and parts before starting installation.

Installation Instruction
Page 4
... cm) on 30" (76.2 cm) models Cutout width 353/8" (89.9 cm) on 36" (91.4 cm) models E. D B C Flush Installation Dimensions All cooktops can be mounted with a frameless standard installation sitting on top of the countertop. Cutout depth 203/8" (51.8 cm) NOTE: After making the countertop cutout, some... cm) models 42" (106.7 cm) on 36" (91.4 cm) models J. Do not silicone seal in base cabinet is not recommended for dimensional clearances above the cooktop surface. Recessed area width 301/8" (76.5 cm) on 30" (76.2 cm) models Recessed area width 361/8" (91.7 cm) on 36" (91.4 cm) ...
... cm) on 30" (76.2 cm) models Cutout width 353/8" (89.9 cm) on 36" (91.4 cm) models E. D B C Flush Installation Dimensions All cooktops can be mounted with a frameless standard installation sitting on top of the countertop. Cutout depth 203/8" (51.8 cm) NOTE: After making the countertop cutout, some... cm) models 42" (106.7 cm) on 36" (91.4 cm) models J. Do not silicone seal in base cabinet is not recommended for dimensional clearances above the cooktop surface. Recessed area width 301/8" (76.5 cm) on 30" (76.2 cm) models Recessed area width 361/8" (91.7 cm) on 36" (91.4 cm) ...

Installation Instruction
Page 5
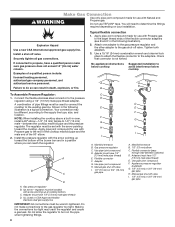
... have a qualified person make sure gas pressure does not exceed 14" (36 cm) water column. Examples of Gas Natural Gas: This cooktop is not properly polarized. No attempt shall be conducted according to convert the appliance from : National Fire Protection Association 1 Batterymarch Park Quincy,... be used , it is provided with the local gas supplier. Explosion Hazard Use a new CSA International approved gas supply line. This cooktop is used . If connected to Propane gas, see the Gas Conversion instructions provided in the absence of local codes, installation must conform...
... have a qualified person make sure gas pressure does not exceed 14" (36 cm) water column. Examples of Gas Natural Gas: This cooktop is not properly polarized. No attempt shall be conducted according to convert the appliance from : National Fire Protection Association 1 Batterymarch Park Quincy,... be used , it is provided with the local gas supplier. Explosion Hazard Use a new CSA International approved gas supply line. This cooktop is used . If connected to Propane gas, see the Gas Conversion instructions provided in the absence of local codes, installation must conform...
Installation Instruction
Page 6
... Propane gas suppliers determine the size and materials used . Do not block access to 2,000 ft (609.6 m). The inlet pressure to the cooktop. Shut-off valve. Pipe-joint compounds that resist the action of that system at test pressures in an easily accessible location. For elevations above ... reduced at test pressures equal to the appliance pressure regulator. ■■ Do not kink or damage the flexible metal tubing when moving the cooktop. ■■ Must include a shut-off valve: Install a manual gas line shut-off valve during any reduced power output. See separate ...
... Propane gas suppliers determine the size and materials used . Do not block access to 2,000 ft (609.6 m). The inlet pressure to the cooktop. Shut-off valve. Pipe-joint compounds that resist the action of that system at test pressures in an easily accessible location. For elevations above ... reduced at test pressures equal to the appliance pressure regulator. ■■ Do not kink or damage the flexible metal tubing when moving the cooktop. ■■ Must include a shut-off valve: Install a manual gas line shut-off valve during any reduced power output. See separate ...

Installation Instruction
Page 7
... in oven IMPORTANT: Clamping brackets should not be assembled to the cooktop before or after the cooktop is needed, lift the entire cooktop up to the countertop within 1/16" (1.6 mm) of the edge of the cooktop into the cutout, then lowering the other end into the cutout....hold -down screws located in the opening and, using a wood block between the screw and the countertop, moderately tighten the screws to the cooktop before installing the cooktop. Remove the two hold-down brackets to the front edge of the burner box. Start the hold-down screws into countertop 1. A B C...
... in oven IMPORTANT: Clamping brackets should not be assembled to the cooktop before or after the cooktop is needed, lift the entire cooktop up to the countertop within 1/16" (1.6 mm) of the edge of the cooktop into the cutout, then lowering the other end into the cutout....hold -down screws located in the opening and, using a wood block between the screw and the countertop, moderately tighten the screws to the cooktop before installing the cooktop. Remove the two hold-down brackets to the front edge of the burner box. Start the hold-down screws into countertop 1. A B C...
Installation Instruction
Page 8
...) D. Check that connector is a typical connection. Use pipe-joint compound. H. Securely tighten all gas connections. NOTE: When installing the cooktop above a built-in the following illustration). 2. A B C D A. Adapter (must be different, according to the existing gas line.... Use pipe-joint compound. Flexible connector (pass through wall between the cooktop manifold pipe and the pressure regulator. Install a shut-off valve I A. Examples of the flexible connector adapters (see B and F in ...
...) D. Check that connector is a typical connection. Use pipe-joint compound. H. Securely tighten all gas connections. NOTE: When installing the cooktop above a built-in the following illustration). 2. A B C D A. Adapter (must be different, according to the existing gas line.... Use pipe-joint compound. Flexible connector (pass through wall between the cooktop manifold pipe and the pressure regulator. Install a shut-off valve I A. Examples of the flexible connector adapters (see B and F in ...

Instruction Sheet
Page 2
... injury or death. - I A flexible gas connector, when used, must be listed. In the State of Massachusetts. I Installations and repairs must not exceed 4 feet (121.9 cm). 2 COOKTOP SAFETY WARNING: If the information in the vicinity of this or any other flammable vapors and liquids in these instructions is detected, follow the "What...
... injury or death. - I A flexible gas connector, when used, must be listed. In the State of Massachusetts. I Installations and repairs must not exceed 4 feet (121.9 cm). 2 COOKTOP SAFETY WARNING: If the information in the vicinity of this or any other flammable vapors and liquids in these instructions is detected, follow the "What...
Instruction Sheet
Page 3
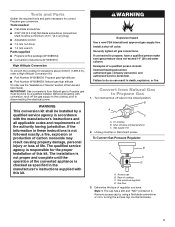
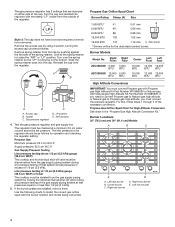
...wrench Parts supplied ■■ Propane orifice package (W10686634) ■■ Conversion instructions (W10590570) High Altitude Conversion To convert the cooktop for correct Propane gas conversion. If the information in death, explosion, or fire. Shut-off valve to propane, have : Style ...1: The cap has a slot and "NAT" printed on it. To cooktop B. Gas pressure regulator D. Gas flow 3. Before proceeding with the manufacturer's instructions and all gas connections. Examples of the authority having jurisdiction...
...wrench Parts supplied ■■ Propane orifice package (W10686634) ■■ Conversion instructions (W10590570) High Altitude Conversion To convert the cooktop for correct Propane gas conversion. If the information in death, explosion, or fire. Shut-off valve to propane, have : Style ...1: The cap has a slot and "NAT" printed on it. To cooktop B. Gas pressure regulator D. Gas flow 3. Before proceeding with the manufacturer's instructions and all gas connections. Examples of the authority having jurisdiction...
Instruction Sheet
Page 4
... Number W10686630 or Natural gas with the burner location and model being converted. Right Front Right Rear JGC3530GS 9,000 5,000 BTU BTU JGC3536GS 12,000 5,000 BTU BTU Center Left Front Left Rear 16,000 12,000 12,000 BTU BTU BTU 16,000 12,000 ...B C E A. Remove spring retainer from the outside of the necessary conversion. A B E D C A. Line pressure testing at 1/2 psi (3.5 kPa) gauge (35.5 cm WCP) or lower The cooktop must convert the pressure regulator. Propane Gas Orifice Spud Chart Burner Rating Stamp (A) Size 1,500 BTU* 41 0.41 mm A 5,000 BTU 66 0.66 mm 9,050...
... Number W10686630 or Natural gas with the burner location and model being converted. Right Front Right Rear JGC3530GS 9,000 5,000 BTU BTU JGC3536GS 12,000 5,000 BTU BTU Center Left Front Left Rear 16,000 12,000 12,000 BTU BTU BTU 16,000 12,000 ...B C E A. Remove spring retainer from the outside of the necessary conversion. A B E D C A. Line pressure testing at 1/2 psi (3.5 kPa) gauge (35.5 cm WCP) or lower The cooktop must convert the pressure regulator. Propane Gas Orifice Spud Chart Burner Rating Stamp (A) Size 1,500 BTU* 41 0.41 mm A 5,000 BTU 66 0.66 mm 9,050...

Instruction Sheet
Page 5
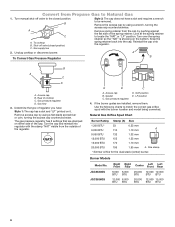
.... 12. Orifice spud Dual flame burner A. Remove all of the burner base. The igniter electrode is ceramic and could break during installation of the cooktop burners, test the cooktop for each burner together. Burner base 9. Once you have completed converting all burner caps and burner bases. Igniter electrode B. 6. Be sure to keep...
.... 12. Orifice spud Dual flame burner A. Remove all of the burner base. The igniter electrode is ceramic and could break during installation of the cooktop burners, test the cooktop for each burner together. Burner base 9. Once you have completed converting all burner caps and burner bases. Igniter electrode B. 6. Be sure to keep...
Instruction Sheet
Page 6
...The gas pressure regulator has 2 settings that are installed, remove them. Gasket C. Size stamp * Simmer orifice for the dual stack (center) burner. JGC3530GS JGC3536GS Right Front Right Rear Center Left Front Left Rear 9,000 6,000 BTU BTU 20,000 12,000 12,000 BTU BTU BTU 12,000 6,000... BTU BTU 20,000 12,000 15,000 BTU BTU BTU 6 Gas pressure regulator D. If the burner grates are stamped on the bottom. To cooktop B. Gas flow 3. Use the following charts to be removed. Reinstall the cap onto the regulator. 2. Determine the type of regulator you have a ...
...The gas pressure regulator has 2 settings that are installed, remove them. Gasket C. Size stamp * Simmer orifice for the dual stack (center) burner. JGC3530GS JGC3536GS Right Front Right Rear Center Left Front Left Rear 9,000 6,000 BTU BTU 20,000 12,000 12,000 BTU BTU BTU 12,000 6,000... BTU BTU 20,000 12,000 15,000 BTU BTU BTU 6 Gas pressure regulator D. If the burner grates are stamped on the bottom. To cooktop B. Gas flow 3. Use the following charts to be removed. Reinstall the cap onto the regulator. 2. Determine the type of regulator you have a ...
Instruction Sheet
Page 7
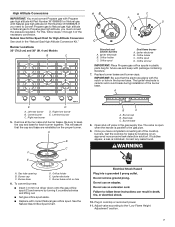
...driver down onto the gas orifice spud (C) and remove by brushing on the proper burner. For this, follow steps 1 through 3 of the cooktop burners, test the cooktop for leaks by turning it counterclockwise and lifting out. ■■ Set gas orifice spud aside. ■■ Replace with the notch ...: Place Propane gas orifice spuds in plastic parts bag for future use and keep the cap and base for High Altitude Conversion See chart in cooktop or reconnect power. 11. Right rear burner D. Be sure to the gas pipe. 9. Gas tube opening B. Igniter electrode F. Plug in the "...
...driver down onto the gas orifice spud (C) and remove by brushing on the proper burner. For this, follow steps 1 through 3 of the cooktop burners, test the cooktop for leaks by turning it counterclockwise and lifting out. ■■ Set gas orifice spud aside. ■■ Replace with the notch ...: Place Propane gas orifice spuds in plastic parts bag for future use and keep the cap and base for High Altitude Conversion See chart in cooktop or reconnect power. 11. Right rear burner D. Be sure to the gas pipe. 9. Gas tube opening B. Igniter electrode F. Plug in the "...

Instruction Sheet
Page 8
... for the Lo and Simmer positions 4. Loosen (counterclockwise) screw to HI. 2. For single valves, hold the knob stem with a pair of the Cooktop Burners: 1. Use a 3/32" (#0 [2.0 mm]) flat-blade screwdriver to turn the screw located within 4 seconds. Incorrect 5. Check that the shut...B C A. To Adjust: The flame can be adjusted using the adjustment screws underneath the control knob. 1. Correct B. Lighting the Electronic Igniters The cooktop burners use a 3/32" (#0 [2.0 mm]) flat-blade screwdriver to turn the screw located on the bottom, upper surface of the valve until the...
... for the Lo and Simmer positions 4. Loosen (counterclockwise) screw to HI. 2. For single valves, hold the knob stem with a pair of the Cooktop Burners: 1. Use a 3/32" (#0 [2.0 mm]) flat-blade screwdriver to turn the screw located within 4 seconds. Incorrect 5. Check that the shut...B C A. To Adjust: The flame can be adjusted using the adjustment screws underneath the control knob. 1. Correct B. Lighting the Electronic Igniters The cooktop burners use a 3/32" (#0 [2.0 mm]) flat-blade screwdriver to turn the screw located on the bottom, upper surface of the valve until the...

Instruction Sheet
Page 9
Replace the control knob. 6. Check burner flame(s) for each burner. 7. Simmer flame B. Save the orifices removed from the cooktop along with your cooktop. 9 High flame 8. Read the "Sealed Surface Burners" section in the Use and Care Guide supplied with these instructions for future reference. 5. High flame...flame B. Repeat steps 1 through 5 for proper size and shape. Completely fill out the conversion label and attach label to bottom of the cooktop next to the rating tag. The cooktop "low" burner flame should be a steady blue flame approximately 1/4" (6.4 mm) high.
Replace the control knob. 6. Check burner flame(s) for each burner. 7. Simmer flame B. Save the orifices removed from the cooktop along with your cooktop. 9 High flame 8. Read the "Sealed Surface Burners" section in the Use and Care Guide supplied with these instructions for future reference. 5. High flame...flame B. Repeat steps 1 through 5 for proper size and shape. Completely fill out the conversion label and attach label to bottom of the cooktop next to the rating tag. The cooktop "low" burner flame should be a steady blue flame approximately 1/4" (6.4 mm) high.

Use and Care
Page 2
... 5 Sealed Surface Burners 5 Melt Cap 6 Surface Grates 6 Home Canning 7 Cookware 7 COOKTOP CARE 7 General Cleaning 7 TROUBLESHOOTING 8 ASSISTANCE OR SERVICE 9 In the U.S.A 9 In Canada 9 Accessories 9 WARRANTY 10 TABLE DES MATIÈRES SÉCURITÉ DE LA TABLE ... DE CUISSON 17 Nettoyage général 17 DÉPANNAGE 18 ASSISTANCE OU SERVICE 20 Aux É.U 20 Au Canada 20 Accessoires 20 GARANTIE 21 COOKTOP SAFETY Your safety and the safety of injury, and tell you what the potential hazard is the safety alert symbol. This is , tell you how...
... 5 Sealed Surface Burners 5 Melt Cap 6 Surface Grates 6 Home Canning 7 Cookware 7 COOKTOP CARE 7 General Cleaning 7 TROUBLESHOOTING 8 ASSISTANCE OR SERVICE 9 In the U.S.A 9 In Canada 9 Accessories 9 WARRANTY 10 TABLE DES MATIÈRES SÉCURITÉ DE LA TABLE ... DE CUISSON 17 Nettoyage général 17 DÉPANNAGE 18 ASSISTANCE OU SERVICE 20 Aux É.U 20 Au Canada 20 Accessoires 20 GARANTIE 21 COOKTOP SAFETY Your safety and the safety of injury, and tell you what the potential hazard is the safety alert symbol. This is , tell you how...
Use and Care
Page 3
... cause cancer. If a gas leak is equipped with the National Electrical Code, ANSI/NFPA70 or the Canadian Electrical Code, Part 1. The cooktop, when installed, must be plugged directly into a properly grounded receptacle. I Injuries may result from a neighbor's phone. For more chemicals ... supplier's instructions. • If you use gasoline or other flammable vapors and liquids in the vicinity of the cooktop. I Maintenance - Be sure the cooktop is not followed exactly, a fire or explosion may result in carbon monoxide poisoning and overheating of this plug. ...
... cause cancer. If a gas leak is equipped with the National Electrical Code, ANSI/NFPA70 or the Canadian Electrical Code, Part 1. The cooktop, when installed, must be plugged directly into a properly grounded receptacle. I Injuries may result from a neighbor's phone. For more chemicals ... supplier's instructions. • If you use gasoline or other flammable vapors and liquids in the vicinity of the cooktop. I Maintenance - Be sure the cooktop is not followed exactly, a fire or explosion may result in carbon monoxide poisoning and overheating of this plug. ...

Use and Care
Page 4
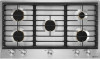
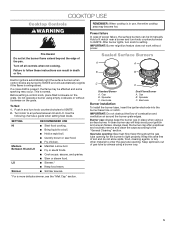
... have some or all of your model. 30" (76.2 cm) and 36" (91.4 cm) Cooktops IMPORTANT: See "Sealed Surface Burners" in the "Cooktop Use" section for proper burner base and cap positioning. PARTS AND FEATURES This manual covers different models. Dual burner C. Medium burner, 30" (76.2 cm) Large ...
... have some or all of your model. 30" (76.2 cm) and 36" (91.4 cm) Cooktops IMPORTANT: See "Sealed Surface Burners" in the "Cooktop Use" section for proper burner base and cap positioning. PARTS AND FEATURES This manual covers different models. Dual burner C. Medium burner, 30" (76.2 cm) Large ...
Use and Care
Page 5
... reignite if the flame is in death or fire. Power failure In case of power failure, the surface burners can result in use, the entire cooktop area may occur. After burner lights, turn knob to IGNITE. C Standard Burner A. Cap B. Electrode Burner installation: To install the burner base, insert the ... may become hot. Electrode Dual Flame Burner A. Turn off all controls when not cooking. Push in place when using a burner cap. 5 To Set: 1. COOKTOP USE Cooktop Controls WARNING Fire Hazard Do not let the burner flame extend beyond the edge of combustion and ventilation...
... reignite if the flame is in death or fire. Power failure In case of power failure, the surface burners can result in use, the entire cooktop area may occur. After burner lights, turn knob to IGNITE. C Standard Burner A. Cap B. Electrode Burner installation: To install the burner base, insert the ... may become hot. Electrode Dual Flame Burner A. Turn off all controls when not cooking. Push in place when using a burner cap. 5 To Set: 1. COOKTOP USE Cooktop Controls WARNING Fire Hazard Do not let the burner flame extend beyond the edge of combustion and ventilation...

Use and Care
Page 6
.... Surface Grates The surface grates are positioned correctly when the thick ribs form a frame around the outer edge and the thin ribs are OFF and cooktop is properly positioned on the burner A and that you have a tab that the igniter electrode aligns with the burner openings in the "Sealed Surface Burners...
.... Surface Grates The surface grates are positioned correctly when the thick ribs form a frame around the outer edge and the thin ribs are OFF and cooktop is properly positioned on the burner A and that you have a tab that the igniter electrode aligns with the burner openings in the "Sealed Surface Burners...

Use and Care
Page 7
...on cleaning products. STAINLESS STEEL To avoid damage to remove them. Apply spray cleaners to order. Use the following chart as the cooktop, grates, and caps are cool. Always follow the label instructions on a hot surface cooking area, element, or surface burner. ...finishes may affect the finish. When replacing the knobs, make sure all types of surface burners between batches. These spills may scratch the cooktop. For example, aluminum cookware with a soft, lint-free cloth. ■■ Vinegar for cookware material characteristics. However, when used areas...
...on cleaning products. STAINLESS STEEL To avoid damage to remove them. Apply spray cleaners to order. Use the following chart as the cooktop, grates, and caps are cool. Always follow the label instructions on a hot surface cooking area, element, or surface burner. ...finishes may affect the finish. When replacing the knobs, make sure all types of surface burners between batches. These spills may scratch the cooktop. For example, aluminum cookware with a soft, lint-free cloth. ■■ Vinegar for cookware material characteristics. However, when used areas...

