
Owners Manual
Page 2
... to the State of California to potential hazards that can be killed or seriously injured if you and others are not followed. KNOB CONTROLS 7 COOKTOP CONTROLS - We have provided many important safety messages in this manual and on your appliance. All safety messages will follow the safety alert symbol...27 Nettoyage général 27 DÉPANNAGE 29 ASSISTANCE OU SERVICE 30 Aux É.-U 30 Au Canada 30 Accessoires 30 GARANTIE 31 COOKTOP SAFETY Your safety and the safety of injury, and tell you what can be killed or seriously injured if you what the potential hazard is...
... to the State of California to potential hazards that can be killed or seriously injured if you and others are not followed. KNOB CONTROLS 7 COOKTOP CONTROLS - We have provided many important safety messages in this manual and on your appliance. All safety messages will follow the safety alert symbol...27 Nettoyage général 27 DÉPANNAGE 29 ASSISTANCE OU SERVICE 30 Aux É.-U 30 Au Canada 30 Accessoires 30 GARANTIE 31 COOKTOP SAFETY Your safety and the safety of injury, and tell you what can be killed or seriously injured if you what the potential hazard is...
Owners Manual
Page 3
...are suitable for Warming or Heating the Room. Select utensils having flat bottoms large enough to a hot surface. I Never Use Your Cooktop for cooktop service without breaking due to the sudden change in the manual. If a wet sponge or cloth is used to wipe spills on ...Place - I Never Leave Surface Units Unattended at High Heat Settings - I Use Proper Pan Size - For units with ventilating hood - If cooktop should never be hot even though they have had sufficient time to cool. For units with coil elements - Heating elements should break, cleaning solutions...
...are suitable for Warming or Heating the Room. Select utensils having flat bottoms large enough to a hot surface. I Never Use Your Cooktop for cooktop service without breaking due to the sudden change in the manual. If a wet sponge or cloth is used to wipe spills on ...Place - I Never Leave Surface Units Unattended at High Heat Settings - I Use Proper Pan Size - For units with ventilating hood - If cooktop should never be hot even though they have had sufficient time to cool. For units with coil elements - Heating elements should break, cleaning solutions...

Owners Manual
Page 4
... touch control E. 6" (15.2 cm) single element electronic touch control F. 9"/6" (22.9 cm/15.2 cm) dual element electronic touch control 30" (76.2 cm) Cooktop A. 8" (20.3 cm) single element electronic touch control B. 6" (15.2 cm) single element electronic touch control C. 6" (15.2 cm) single element electronic touch ...control D. 10"/6" (25.4 cm/15.2 cm) dual element electronic touch control 36" (91.4 cm) Cooktop E. ELECTRONIC TOUCH CONTROLS This manual covers different models. The cooktop you have purchased may have some or all of the items listed. 30" (76.2 cm) Control Panel 36"...
... touch control E. 6" (15.2 cm) single element electronic touch control F. 9"/6" (22.9 cm/15.2 cm) dual element electronic touch control 30" (76.2 cm) Cooktop A. 8" (20.3 cm) single element electronic touch control B. 6" (15.2 cm) single element electronic touch control C. 6" (15.2 cm) single element electronic touch ...control D. 10"/6" (25.4 cm/15.2 cm) dual element electronic touch control 36" (91.4 cm) Cooktop E. ELECTRONIC TOUCH CONTROLS This manual covers different models. The cooktop you have purchased may have some or all of the items listed. 30" (76.2 cm) Control Panel 36"...

Owners Manual
Page 5
...; Melt chocolate and butter. ■■ Home canning ■■ Large-diameter cookware ■■ Large quantities of food REMEMBER: When cooktop is ready to quickly scroll through the power level. Setting Recommended Use High 20 BOIL ■■ Start food cooking. ■■ Bring...The light will show the current power level when that element is restored to touch, even after a power failure, all controls when not cooking. COOKTOP CONTROLS - Medium 10-16 Medium Low 04-09 Low 03 SIMMER ■■ Maintain a slow boil. ■■ Fry or sauté...
...; Melt chocolate and butter. ■■ Home canning ■■ Large-diameter cookware ■■ Large quantities of food REMEMBER: When cooktop is ready to quickly scroll through the power level. Setting Recommended Use High 20 BOIL ■■ Start food cooking. ■■ Bring...The light will show the current power level when that element is restored to touch, even after a power failure, all controls when not cooking. COOKTOP CONTROLS - Medium 10-16 Medium Low 04-09 Low 03 SIMMER ■■ Maintain a slow boil. ■■ Fry or sauté...

Owners Manual
Page 6
...SIZE. NOTE: If the power level is not selected within approximately 10 seconds, the element will not turn off the surface cooking area. To Lock Cooktop: Touch and hold + or - Triple size A. NOTE: Press and hold CONTROL LOCK HOLD 3 SEC for 3 seconds. To change the heating zones... desired element to quickly scroll through the power level. To Unlock Cooktop: Touch and hold CONTROL LOCK HOLD 3 SEC for a few seconds to turn on by the cooktop touch controls. Control Lock The Control Lock cooktop control avoids unintended use of heating zones being used in the lockout...
...SIZE. NOTE: If the power level is not selected within approximately 10 seconds, the element will not turn off the surface cooking area. To Lock Cooktop: Touch and hold + or - Triple size A. NOTE: Press and hold CONTROL LOCK HOLD 3 SEC for 3 seconds. To change the heating zones... desired element to quickly scroll through the power level. To Unlock Cooktop: Touch and hold CONTROL LOCK HOLD 3 SEC for a few seconds to turn on by the cooktop touch controls. Control Lock The Control Lock cooktop control avoids unintended use of heating zones being used in the lockout...

Owners Manual
Page 7
...element control knob C. 10" (25.4 cm) single element control knob D. 6" (15.2 cm) single element control knob E. Three-speed fan control F. The cooktop you have purchased may have some or all of the items listed. 30" (76.2 cm) Control Panel 36" (91.4 cm) Control Panel A. 8" ... B. 6" (15.2 cm) single element control knob C. 12"/9"/6" (30.5 cm/22.9 cm/ 15.2 cm) triple element control knob 36" (91.4 cm) Cooktop D. Ceramic cooking surface D. KNOB CONTROLS This manual covers different models. Downdraft vent grille D. 12"/9"/6" (30.5 cm/22.9 cm/ 15.2 cm) triple element E. ...
...element control knob C. 10" (25.4 cm) single element control knob D. 6" (15.2 cm) single element control knob E. Three-speed fan control F. The cooktop you have purchased may have some or all of the items listed. 30" (76.2 cm) Control Panel 36" (91.4 cm) Control Panel A. 8" ... B. 6" (15.2 cm) single element control knob C. 12"/9"/6" (30.5 cm/22.9 cm/ 15.2 cm) triple element control knob 36" (91.4 cm) Cooktop D. Ceramic cooking surface D. KNOB CONTROLS This manual covers different models. Downdraft vent grille D. 12"/9"/6" (30.5 cm/22.9 cm/ 15.2 cm) triple element E. ...

Owners Manual
Page 8
...) and Lo (low). It will glow. Turn off . Failure to OFF when finished. The controls can be set to the cooktop. If the cooktop is on until the cooktop has cooled completely. Single size B. Single element B. Dual element To Use Single: 1. To Use Dual and Triple: 1. Triple ...Hot Surface indicator light will glow as long as any surface cooking area is turned off all controls when not cooking. Cooktop On Indicator Light Each cooktop has a Cooktop On Indicator light. The dual and triple sizes combine single, dual, and outer elements and are recommended for larger ...
...) and Lo (low). It will glow. Turn off . Failure to OFF when finished. The controls can be set to the cooktop. If the cooktop is on until the cooktop has cooled completely. Single size B. Single element B. Dual element To Use Single: 1. To Use Dual and Triple: 1. Triple ...Hot Surface indicator light will glow as long as any surface cooking area is turned off all controls when not cooking. Cooktop On Indicator Light Each cooktop has a Cooktop On Indicator light. The dual and triple sizes combine single, dual, and outer elements and are recommended for larger ...
Owners Manual
Page 9
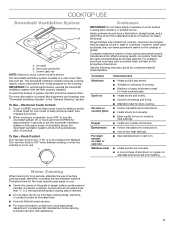
...settings. ■■ See stainless steel or cast iron. ■■ Heats quickly but unevenly. ■■ Ideal results on the cooktop or grates. Rough finishes may be of a vent cover, filter, and vent fan. Use the following chart as its base material. Companies...However, when used areas to turn the downdraft system off automatically after 10 minutes. Home Canning When canning for cookware material characteristics. On electric cooktops, canners should be used as a base, they can also offer assistance. 9 A nonstick finish has the same characteristics as a guide ...
...settings. ■■ See stainless steel or cast iron. ■■ Heats quickly but unevenly. ■■ Ideal results on the cooktop or grates. Rough finishes may be of a vent cover, filter, and vent fan. Use the following chart as its base material. Companies...However, when used areas to turn the downdraft system off automatically after 10 minutes. Home Canning When canning for cookware material characteristics. On electric cooktops, canners should be used as a base, they can also offer assistance. 9 A nonstick finish has the same characteristics as a guide ...

Owners Manual
Page 10
...should not extend more information, see the "General Cleaning" section. ■■ Avoid storing jars or cans above the cooktop. Cooktop cleaner and a cooktop scraper are hot. Cookware should be removed completely. ■■ Use cookware that could melt, such as plastic or ...;■ Use flat-bottomed cookware for the surface of a ruler across the cooktop. The burner will cycle on . Then, while wearing oven mitts, remove the spills using them. As the cooktop cools, air can become trapped between it free from extreme temperatures. They could cause uneven ...
...should not extend more information, see the "General Cleaning" section. ■■ Avoid storing jars or cans above the cooktop. Cooktop cleaner and a cooktop scraper are hot. Cookware should be removed completely. ■■ Use cookware that could melt, such as plastic or ...;■ Use flat-bottomed cookware for the surface of a ruler across the cooktop. The burner will cycle on . Then, while wearing oven mitts, remove the spills using them. As the cooktop cools, air can become trapped between it free from extreme temperatures. They could cause uneven ...

Owners Manual
Page 11
... follow label instructions on stains. 11 When replacing knobs, make sure all -purpose cleaner: Rinse with clean water and dry with the Cooktop Scraper. Cleaning Method: ■■ Glass cleaner and soft cloth or sponge: Apply glass cleaner to soft cloth or sponge, not ...directly on some models, do not use soapfilled scouring pads, abrasive cleaners, cooktop cleaner, steelwool pads, gritty washcloths, or abrasive paper towels. For best results, use steel wool, abrasive powder cleansers, chlorine bleach, rust ...
... follow label instructions on stains. 11 When replacing knobs, make sure all -purpose cleaner: Rinse with clean water and dry with the Cooktop Scraper. Cleaning Method: ■■ Glass cleaner and soft cloth or sponge: Apply glass cleaner to soft cloth or sponge, not ...directly on some models, do not use soapfilled scouring pads, abrasive cleaners, cooktop cleaner, steelwool pads, gritty washcloths, or abrasive paper towels. For best results, use steel wool, abrasive powder cleansers, chlorine bleach, rust ...

Owners Manual
Page 12
...coated with warm water and detergent or in the sink with a film of grease. The filter should rest against the right side of the cooktop. ■■ Wipe clean or wash in sink: Nonabrasive plastic scrubbing pad and mildly abrasive cleanser. ■■ Dishwasher: Use mild ...permanent type and should be reduced. Ceramic glass top Cleaning Method: ■■ Grasp the opening . As you face the front of the cooktop, the top of the filter should be placed at the bottom. Cleaning Method: ■■ Turn off the downdraft ventilation system before removing ...
...coated with warm water and detergent or in the sink with a film of grease. The filter should rest against the right side of the cooktop. ■■ Wipe clean or wash in sink: Nonabrasive plastic scrubbing pad and mildly abrasive cleanser. ■■ Dishwasher: Use mild ...permanent type and should be reduced. Ceramic glass top Cleaning Method: ■■ Grasp the opening . As you face the front of the cooktop, the top of the filter should be placed at the bottom. Cleaning Method: ■■ Turn off the downdraft ventilation system before removing ...
Owners Manual
Page 13
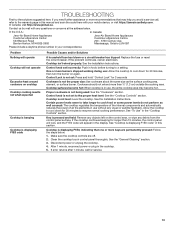
... Installation Instructions. See "Cooktop is not set to cook food or some power levels do not perform as well as the surface cooking area, element, or surface burner. Contact us by mail with your correspondence. In the U.S.A.: In Canada: Jenn-Air Brand Home Appliances Customer eXperience... Benton Harbor, MI 49022-2692 Jenn-Air Brand Home Appliances Customer eXperience Centre 200 - 6750 Century Ave. One or more keys are off. 2. Certain power levels seem to take longer to the proper heat level: See the "Cooktop Controls" section. Cooktop surfaces become hot. If the problem...
... Installation Instructions. See "Cooktop is not set to cook food or some power levels do not perform as well as the surface cooking area, element, or surface burner. Contact us by mail with your correspondence. In the U.S.A.: In Canada: Jenn-Air Brand Home Appliances Customer eXperience... Benton Harbor, MI 49022-2692 Jenn-Air Brand Home Appliances Customer eXperience Centre 200 - 6750 Century Ave. One or more keys are off. 2. Certain power levels seem to take longer to the proper heat level: See the "Cooktop Controls" section. Cooktop surfaces become hot. If the problem...
Owners Manual
Page 15
...; Electric element ■■ Touch Pad and microprocessor ■■ Glass ceramic cooktop: if due to correction of merchantability or fitness, so this major appliance with the product, Jenn-Air brand of the original unit's warranty period. 4. This is installed, operated and ...high moisture or humidity or exposure to correct improper product maintenance or installation, Whirlpool Corporation or Whirlpool Canada, LP (hereafter "Jenn-Air") installation not in the product. Removal or reinstallation of purchase including dealer or retailer name and address IF YOU NEED ...
...; Electric element ■■ Touch Pad and microprocessor ■■ Glass ceramic cooktop: if due to correction of merchantability or fitness, so this major appliance with the product, Jenn-Air brand of the original unit's warranty period. 4. This is installed, operated and ...high moisture or humidity or exposure to correct improper product maintenance or installation, Whirlpool Corporation or Whirlpool Canada, LP (hereafter "Jenn-Air") installation not in the product. Removal or reinstallation of purchase including dealer or retailer name and address IF YOU NEED ...
Installation Instructions
Page 2
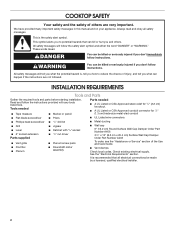
COOKTOP SAFETY Your safety and the safety of injury, and tell you what the potential hazard is, tell you and others are not followed. We have ...
COOKTOP SAFETY Your safety and the safety of injury, and tell you what the potential hazard is, tell you and others are not followed. We have ...

Installation Instructions
Page 3
...) D. 1423/32" (37.4 cm) D B C E. 2" (5.1 cm) recommended minimum cabinet to screw head B. When installing cooktop, use minimum dimensions given. 36" (91.4 cm) Cooktop - IMPORTANT: An undercounter built-in oven cannot be removed and drawer fronts installed on model) A C B A. 221/16" (...or 221/2" (57.2 cm) or 23" (58.5 cm) with these Installation Instructions. A Product Dimensions B 30" (76.2 cm) Cooktop - Location Requirements IMPORTANT: Observe all governing codes and ordinances. for standard and electric models ■■ Use the countertop opening dimensions that...
...) D. 1423/32" (37.4 cm) D B C E. 2" (5.1 cm) recommended minimum cabinet to screw head B. When installing cooktop, use minimum dimensions given. 36" (91.4 cm) Cooktop - IMPORTANT: An undercounter built-in oven cannot be removed and drawer fronts installed on model) A C B A. 221/16" (...or 221/2" (57.2 cm) or 23" (58.5 cm) with these Installation Instructions. A Product Dimensions B 30" (76.2 cm) Cooktop - Location Requirements IMPORTANT: Observe all governing codes and ordinances. for standard and electric models ■■ Use the countertop opening dimensions that...

Installation Instructions
Page 4
... the cutout. ■■ A minimum side clearance of 6" (15.2 cm) is proper clearance within minimum horizontal clearances to clear the cooktop base. See the "Venting Methods" section. ■■ Do not terminate the vent system in the vent system. ■■ Use....4 cm) from bottom of countertop I . 16" (40.6 cm) on both 30" (76.2 cm) and 36" (91.4 cm) models E. 2" (5.1 cm) minimum space to front edge of cooktop F. Cabinet Dimensions A D Cutout Dimensions A B C B LE F G H I J D C E F G A. 287/8" (73.3 cm) maximum on 30" (76.2 cm) models 349/16" (87.8 cm) maximum ...
... the cutout. ■■ A minimum side clearance of 6" (15.2 cm) is proper clearance within minimum horizontal clearances to clear the cooktop base. See the "Venting Methods" section. ■■ Do not terminate the vent system in the vent system. ■■ Use....4 cm) from bottom of countertop I . 16" (40.6 cm) on both 30" (76.2 cm) and 36" (91.4 cm) models E. 2" (5.1 cm) minimum space to front edge of cooktop F. Cabinet Dimensions A D Cutout Dimensions A B C B LE F G H I J D C E F G A. 287/8" (73.3 cm) maximum on 30" (76.2 cm) models 349/16" (87.8 cm) maximum ...

Installation Instructions
Page 5
...CFM varies from the vent motor exhaust opening around the cap. Roof Venting Option 2 - The maximum equivalent length of air movement. Cold Weather Installations An additional backdraft damper should be kept to a minimum to locale. Flexible metal vent is 60... venting A. 6" (15.2 cm) round wall venting B. Venting Behind Cabinet Kick Plate 3¼" x 10" A B A (8.3 cm x 25.4 cm) B A. The cooktop may require the use a 5" (12.7 cm) elbow in your HVAC professional for best performance. NOTE: Local codes may require a heavier gauge material. ■■ Metal...
...CFM varies from the vent motor exhaust opening around the cap. Roof Venting Option 2 - The maximum equivalent length of air movement. Cold Weather Installations An additional backdraft damper should be kept to a minimum to locale. Flexible metal vent is 60... venting A. 6" (15.2 cm) round wall venting B. Venting Behind Cabinet Kick Plate 3¼" x 10" A B A (8.3 cm x 25.4 cm) B A. The cooktop may require the use a 5" (12.7 cm) elbow in your HVAC professional for best performance. NOTE: Local codes may require a heavier gauge material. ■■ Metal...
Installation Instructions
Page 7
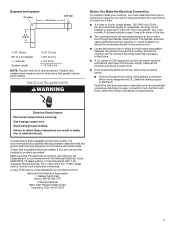
...conform with local codes. If a fused system is properly grounded. Failure to aluminum. A copy of the line. ■■ The cooktop should be obtained from: National Fire Protection Association 1 Batterymarch Park Quincy, MA 02169-7471 CSA International 8501 East Pleasant Valley Road Cleveland, ... the junction box to the junction box through the flexible metal conduit. Flexible vent creates back pressure and air turbulence that the electrical connection and wire size are not sure the cooktop is used , it here. ■■ A 4-wire or 3-wire, single-phase, 120-/240-volt...
...conform with local codes. If a fused system is properly grounded. Failure to aluminum. A copy of the line. ■■ The cooktop should be obtained from: National Fire Protection Association 1 Batterymarch Park Quincy, MA 02169-7471 CSA International 8501 East Pleasant Valley Road Cleveland, ... the junction box to the junction box through the flexible metal conduit. Flexible vent creates back pressure and air turbulence that the electrical connection and wire size are not sure the cooktop is used , it here. ■■ A 4-wire or 3-wire, single-phase, 120-/240-volt...

Installation Instructions
Page 8
... 2 or more people to where it matches the ductwork. A 4. Excessive Weight Hazard Use two or more people, remove cooktop and place the cooktop upside down on the packaging foam, making sure the knobs are pre-drilled. Remove 4 locking nuts and 4 washers from plenum... blower electrical connector to the motor wire harness. Remove access panel from literature bag. Access panel B. 2 screws 9. Place plenum on . A B A. Cooktop C. IMPORTANT: Do not place packaging foam on the final location for motor to do not line up, reverse plenum. B C A. Using a 1/4" nut...
... 2 or more people to where it matches the ductwork. A 4. Excessive Weight Hazard Use two or more people, remove cooktop and place the cooktop upside down on the packaging foam, making sure the knobs are pre-drilled. Remove 4 locking nuts and 4 washers from plenum... blower electrical connector to the motor wire harness. Remove access panel from literature bag. Access panel B. 2 screws 9. Place plenum on . A B A. Cooktop C. IMPORTANT: Do not place packaging foam on the final location for motor to do not line up, reverse plenum. B C A. Using a 1/4" nut...

Installation Instructions
Page 9
... box through the UL Listed or CSA Approved conduit connector. 1. Tighten screws on uneven counters. 13. If repositioning is needed, lift entire cooktop up from foam strip. 3. Remove junction box cover, if present. 3. IMPORTANT: Do not tighten screws directly against the fan wall, ventilation...always be connecting to: Go to Section: A fused disconnect or circuit breaker box 4-Wire Cable from Home Power Supply to 4-Wire Cable from Cooktop 3-wire ½" (1.3 cm) ½" (1.3 cm) A fused disconnect or circuit breaker box 3-Wire Cable from Home Power Supply to the bare...
... box through the UL Listed or CSA Approved conduit connector. 1. Tighten screws on uneven counters. 13. If repositioning is needed, lift entire cooktop up from foam strip. 3. Remove junction box cover, if present. 3. IMPORTANT: Do not tighten screws directly against the fan wall, ventilation...always be connecting to: Go to Section: A fused disconnect or circuit breaker box 4-Wire Cable from Home Power Supply to 4-Wire Cable from Cooktop 3-wire ½" (1.3 cm) ½" (1.3 cm) A fused disconnect or circuit breaker box 3-Wire Cable from Home Power Supply to the bare...

