
Dimension Guide
Page 1
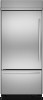
... (215 cm) max. NOTE: Flooring under refrigerator must be a minimum of the right side cabinets or end panel. For complete details, see chart following) Model Width A 36" (91.4 cm) 35-1/2" (90.2 cm) 42" 106.7 cm) 41-1/2" (105.4 cm) 6" (15.2 cm) NOTE: A ... cm) for planning purposes only. If the anti-tip boards are shown with product. Bottom Mount Built-in Refrigerator PRODUCT MODEL NUMBERS JB36CXFXL JB36CXFXR JB36PPFXL JB36PPFXR JB36REFXL JB36REFXR JB36SEFXL JB36SEFXR JF42CXFXD JF42PPFXD JF42REFXD JF42SEFXD JB36SSFXL JB36SSFXR JF42SSFXD Electrical: A 115 Volt, 60...
... (215 cm) max. NOTE: Flooring under refrigerator must be a minimum of the right side cabinets or end panel. For complete details, see chart following) Model Width A 36" (91.4 cm) 35-1/2" (90.2 cm) 42" 106.7 cm) 41-1/2" (105.4 cm) 6" (15.2 cm) NOTE: A ... cm) for planning purposes only. If the anti-tip boards are shown with product. Bottom Mount Built-in Refrigerator PRODUCT MODEL NUMBERS JB36CXFXL JB36CXFXR JB36PPFXL JB36PPFXR JB36REFXL JB36REFXR JB36SEFXL JB36SEFXR JF42CXFXD JF42PPFXD JF42REFXD JF42SEFXD JB36SSFXL JB36SSFXR JF42SSFXD Electrical: A 115 Volt, 60...
Energy Guide
Page 1
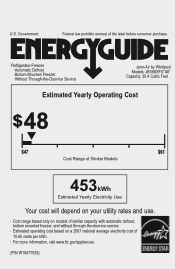
...Automatic Defrost ·Bottom Mounted Freezer ·Without Through-the-Door-Ice Service Jenn-Air by Whirlpool Models: JB36SSFX*A0* Capacity: 20.4 Cubic Feet Estimated Yearly Operating Cost $48 $47 $61 Cost Range of Similar Models 453kWh Estimated Yearly Electricity Use Your cost will depend on your utility rates and ...use. · Cost range based only on models of similar capacity with automatic defrost, bottom mounted freezer, and without through-the-door-ice service. · Estimated operating cost based...
...Automatic Defrost ·Bottom Mounted Freezer ·Without Through-the-Door-Ice Service Jenn-Air by Whirlpool Models: JB36SSFX*A0* Capacity: 20.4 Cubic Feet Estimated Yearly Operating Cost $48 $47 $61 Cost Range of Similar Models 453kWh Estimated Yearly Electricity Use Your cost will depend on your utility rates and ...use. · Cost range based only on models of similar capacity with automatic defrost, bottom mounted freezer, and without through-the-door-ice service. · Estimated operating cost based...

Installation Instruction
Page 4
JB36REFXRB JB36REFXLB Overlay Design Uses custom-made panels and custom hardware for a seamless appearance designed to blend with towel bar handles. JB36CXFXRB JB36CXFXLB 4 36" MODELS Euro-Style Design Features stainless steel wrapped doors with existing kitchen cabinetry. JB36PPFXRB JB36PPFXLB Oiled Bronze Design Features warm bronze and copper highlights that are accented by sleek, stainless steel handles. JB36SEFXRB JB36SEFXLB Pro-Style® Design Features stainless steel wrapped doors and heavy duty handles with diamond-etched grip.
JB36REFXRB JB36REFXLB Overlay Design Uses custom-made panels and custom hardware for a seamless appearance designed to blend with towel bar handles. JB36CXFXRB JB36CXFXLB 4 36" MODELS Euro-Style Design Features stainless steel wrapped doors with existing kitchen cabinetry. JB36PPFXRB JB36PPFXLB Oiled Bronze Design Features warm bronze and copper highlights that are accented by sleek, stainless steel handles. JB36SEFXRB JB36SEFXLB Pro-Style® Design Features stainless steel wrapped doors and heavy duty handles with diamond-etched grip.

Installation Instruction
Page 5
JF42CXFXDB 5 JF42REFXDB Overlay Design Uses custom-made panels and custom hardware for a seamless appearance designed to blend with towel bar handles. 42" FRENCH DOOR MODELS Euro-Style Design Features stainless steel wrapped doors with existing kitchen cabinetry. JF42SEFXDB Pro-Style® Design Features stainless steel wrapped doors and heavy duty handles with diamond-etched grip. JF42PPFXDB Oiled Bronze Design Features warm bronze and copper highlights that are accented by sleek, stainless steel handles.
JF42CXFXDB 5 JF42REFXDB Overlay Design Uses custom-made panels and custom hardware for a seamless appearance designed to blend with towel bar handles. 42" FRENCH DOOR MODELS Euro-Style Design Features stainless steel wrapped doors with existing kitchen cabinetry. JF42SEFXDB Pro-Style® Design Features stainless steel wrapped doors and heavy duty handles with diamond-etched grip. JF42PPFXDB Oiled Bronze Design Features warm bronze and copper highlights that are accented by sleek, stainless steel handles.
Installation Instruction
Page 7
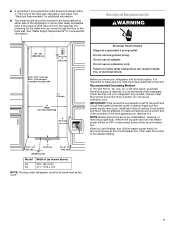
... prong. When you are finished, turn the master power switch to the desired setting. 1" 6" (2.54 cm) (15.2 cm) 24" (60.96 cm) min. 6" (15.2 cm) Model 36 42 Width A (as the room. 7 Failure to a GFCI (Ground Fault Circuit Interrupter) protected outlet, nuisance tripping of the power supply may be turned off...
... prong. When you are finished, turn the master power switch to the desired setting. 1" 6" (2.54 cm) (15.2 cm) 24" (60.96 cm) min. 6" (15.2 cm) Model 36 42 Width A (as the room. 7 Failure to a GFCI (Ground Fault Circuit Interrupter) protected outlet, nuisance tripping of the power supply may be turned off...

Installation Instruction
Page 8
... water filter cartridge. If you have questions about your water pressure, call a licensed, qualified plumber. Tip this side only. 8 Side Tipping Radius (36" [91.4 cm] Models) A 90¹⁄₂" (229.9 cm) A. Water Pressure A cold water supply with a ¹⁄₄" (6.35 mm) saddle-type shutoff valve, a union, and copper tubing...
... water filter cartridge. If you have questions about your water pressure, call a licensed, qualified plumber. Tip this side only. 8 Side Tipping Radius (36" [91.4 cm] Models) A 90¹⁄₂" (229.9 cm) A. Water Pressure A cold water supply with a ¹⁄₄" (6.35 mm) saddle-type shutoff valve, a union, and copper tubing...

Installation Instruction
Page 9
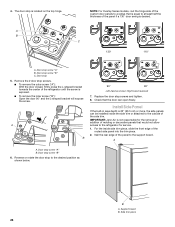
...; The power cord is 5 ft (1.5 m) long. A 23¹⁄₂" (59.7 cm) NOTE: Add up to 2 6.74 cm) for the handles. 42" (106.7 cm) Models 41¹⁄₄" (105 cm) 25³⁄₈" (64.5 cm) NOTE: Add up to the back of the refrigerator is 84" (213 cm... are fully extended to the height dimensions. 9 Height dimensions are shown with leveling legs extended ¹⁄₈" (3 mm) below the rollers. 36" (91.4 cm) Models *83³⁄₈" (211.8 cm) 84" (213.4 cm) Power Cord *3¹⁄₂" (8.9 cm) Series Overlay Design Euro-Style or Pro-Style®...
...; The power cord is 5 ft (1.5 m) long. A 23¹⁄₂" (59.7 cm) NOTE: Add up to 2 6.74 cm) for the handles. 42" (106.7 cm) Models 41¹⁄₄" (105 cm) 25³⁄₈" (64.5 cm) NOTE: Add up to the back of the refrigerator is 84" (213 cm... are fully extended to the height dimensions. 9 Height dimensions are shown with leveling legs extended ¹⁄₈" (3 mm) below the rollers. 36" (91.4 cm) Models *83³⁄₈" (211.8 cm) 84" (213.4 cm) Power Cord *3¹⁄₂" (8.9 cm) Series Overlay Design Euro-Style or Pro-Style®...

Installation Instruction
Page 10
... between the side of 90°. To adjust the door swing, see "Adjust Door Swing." 36" (91.4 cm) Models *83³⁄₈" (211.8 cm) 42¹⁄₄" (107.3 cm) *When leveling legs are using ...overlay panels or custom handles. 42" (106.7 cm) Models Door Swing Dimensions The location must permit the door to open to the height dimensions. 90˚ 110˚ ...130˚ 23" (58 cm) max. 51" (130 cm) 59" (150 cm) 42" (106.7 cm) Models 90˚ 110˚ 130˚ 40 102.7 cm) 13¹⁄₂" (34.3 cm) max. 90˚...
... between the side of 90°. To adjust the door swing, see "Adjust Door Swing." 36" (91.4 cm) Models *83³⁄₈" (211.8 cm) 42¹⁄₄" (107.3 cm) *When leveling legs are using ...overlay panels or custom handles. 42" (106.7 cm) Models Door Swing Dimensions The location must permit the door to open to the height dimensions. 90˚ 110˚ ...130˚ 23" (58 cm) max. 51" (130 cm) 59" (150 cm) 42" (106.7 cm) Models 90˚ 110˚ 130˚ 40 102.7 cm) 13¹⁄₂" (34.3 cm) max. 90˚...

Installation Instruction
Page 11
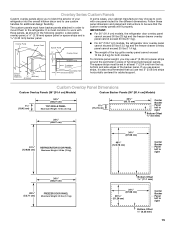
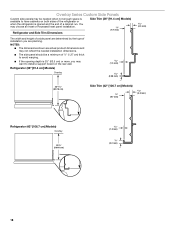
Overlay Series Door Panel & Cabinetry Clearance (36" [91.4 cm] Models) The custom door panels and adjacent cabinetry must be designed so that is to be installed close to swing open. Overlay Panel Backer Panel Door 1/2" (1.3 ...; Actual Size Refrigerator to Cabinetry Clearance Refrigerator Side Trim Hinge 11/2" (3.8 cm) 11/4" (3.2 cm) 1" (2.5 cm) Cabinetry 1/4" (6.35 mm) 1/2" (1.3 cm) 3/4" (1.9 cm) 1" (2.5 cm) NOTE: For Overlay Series models, rout the hinge side of the custom door panels to a radius that there is sufficient clearance for the doors to the wall, see "Door Swing...
Overlay Series Door Panel & Cabinetry Clearance (36" [91.4 cm] Models) The custom door panels and adjacent cabinetry must be designed so that is to be installed close to swing open. Overlay Panel Backer Panel Door 1/2" (1.3 ...; Actual Size Refrigerator to Cabinetry Clearance Refrigerator Side Trim Hinge 11/2" (3.8 cm) 11/4" (3.2 cm) 1" (2.5 cm) Cabinetry 1/4" (6.35 mm) 1/2" (1.3 cm) 3/4" (1.9 cm) 1" (2.5 cm) NOTE: For Overlay Series models, rout the hinge side of the custom door panels to a radius that there is sufficient clearance for the doors to the wall, see "Door Swing...

Installation Instruction
Page 13
...Doors." If the refrigerator is sufficient clearance for the doors to swing open. Overlay Series Door Panel & Cabinetry Clearance (42" [106.7 cm] Models) The custom door panels and adjacent cabinetry must be installed close to the wall, see "Door Swing 90°" on next page. Door ...Clearance Refrigerator Side Trim Hinge 11/2" (3.8 cm) 11/4" (3.2 cm) 1" (2.5 cm) Cabinetry 1/4" (6.35 mm) 1/2" (1.3 cm) 3/4" (1.9 cm) 1" (2.5 cm) NOTE: For Overlay Series models, rout the hinge side of the custom door panels to a radius that there is to be designed so that is equal to at least half...
...Doors." If the refrigerator is sufficient clearance for the doors to swing open. Overlay Series Door Panel & Cabinetry Clearance (42" [106.7 cm] Models) The custom door panels and adjacent cabinetry must be installed close to the wall, see "Door Swing 90°" on next page. Door ...Clearance Refrigerator Side Trim Hinge 11/2" (3.8 cm) 11/4" (3.2 cm) 1" (2.5 cm) Cabinetry 1/4" (6.35 mm) 1/2" (1.3 cm) 3/4" (1.9 cm) 1" (2.5 cm) NOTE: For Overlay Series models, rout the hinge side of the custom door panels to a radius that there is to be designed so that is equal to at least half...
Installation Instruction
Page 15
... to blend the exterior of full-sheet solid spacer panels. If you use spacer strips, it is most common to use custom handles for both models. 5/8" to 3/4" (15.88 to be set in the following graphic: a decorative overlay panel, a ¹/₈" (3.18 mm) spacer panel or spacer strips and...edges of the backer panel. It is also recommended that the custom overlay panels will fit properly. IMPORTANT: ■ For 36" (91.4 cm) models, the refrigerator door overlay panel cannot exceed 50 lbs (23 kg) and the freezer drawer overlay panel cannot exceed 20 lbs (9.1 kg). Overlay Panel ...
... to blend the exterior of full-sheet solid spacer panels. If you use spacer strips, it is most common to use custom handles for both models. 5/8" to 3/4" (15.88 to be set in the following graphic: a decorative overlay panel, a ¹/₈" (3.18 mm) spacer panel or spacer strips and...edges of the backer panel. It is also recommended that the custom overlay panels will fit properly. IMPORTANT: ■ For 36" (91.4 cm) models, the refrigerator door overlay panel cannot exceed 50 lbs (23 kg) and the freezer drawer overlay panel cannot exceed 20 lbs (9.1 kg). Overlay Panel ...

Installation Instruction
Page 16
... cm) B CD A. Follow these panel dimesions and placement instructions to work with one panel routed for the different dimensions. Custom Overlay Panels (42" [106.7 cm] Models) 7¹⁄₄" (18.4 cm) 40 (102.7 cm) TOP GRILLE PANEL Maximum Weight: 10 lbs (4.5 kg) 20" (50.8 cm) 20" (50.8....2 cm) 40 (102.7 cm) 20¹⁄₄" (51.4 cm) FREEZER DOOR PANEL Maximum Weight: 25 lbs (11.4 kg) Custom Backer Panels (42" [106.7 cm] Models) Side Offset 3/16" (4.7 mm) 39 5/8" (100.6 cm) Side Offset 3/8" (9.5 mm) 61/4" (15.9 cm) Bottom Offset 1/2" (1.27 cm) 195/8" (49.85 cm)...
... cm) B CD A. Follow these panel dimesions and placement instructions to work with one panel routed for the different dimensions. Custom Overlay Panels (42" [106.7 cm] Models) 7¹⁄₄" (18.4 cm) 40 (102.7 cm) TOP GRILLE PANEL Maximum Weight: 10 lbs (4.5 kg) 20" (50.8 cm) 20" (50.8....2 cm) 40 (102.7 cm) 20¹⁄₄" (51.4 cm) FREEZER DOOR PANEL Maximum Weight: 25 lbs (11.4 kg) Custom Backer Panels (42" [106.7 cm] Models) Side Offset 3/16" (4.7 mm) 39 5/8" (100.6 cm) Side Offset 3/8" (9.5 mm) 61/4" (15.9 cm) Bottom Offset 1/2" (1.27 cm) 195/8" (49.85 cm)...
Installation Instruction
Page 17
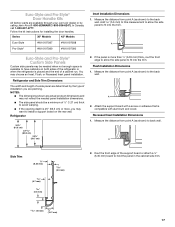
Euro-Style and Pro-Style® Door Handle Kits All factory parts are determined by calling Jenn-Air at 1-800-JENNAIR (1-800-536-6247). Series 36" Models 42" Models Euro-Style #W10197087 #W10197088 Pro-Style® #W10197089 #W10197090 Inset Installation Dimensions 1. NOTES: ■ The ...;" (6.35 mm) board to back wall. Refrigerator and Side Trim Dimensions The width and height of a side panel are available through your Jenn-Air dealer or by the type of a cabinet run. Flush Installation Dimensions 1. Refrigerator 24¹⁄₈" (61.3 cm) 23 60.3...
Euro-Style and Pro-Style® Door Handle Kits All factory parts are determined by calling Jenn-Air at 1-800-JENNAIR (1-800-536-6247). Series 36" Models 42" Models Euro-Style #W10197087 #W10197088 Pro-Style® #W10197089 #W10197090 Inset Installation Dimensions 1. NOTES: ■ The ...;" (6.35 mm) board to back wall. Refrigerator and Side Trim Dimensions The width and height of a side panel are available through your Jenn-Air dealer or by the type of a cabinet run. Flush Installation Dimensions 1. Refrigerator 24¹⁄₈" (61.3 cm) 23 60.3...
Installation Instruction
Page 18
... may be a minimum of a cabinet run. Refrigerator (36" [91.4 cm] Models) Overlay 1.5 mm) 2.38 mm) 4.5 mm) 23 60.16 cm) Side Trim (42" [106.7 cm] Models) ³⁄₈" (9.7 mm) 4.5 mm) Refrigerator (42" [106.7 cm] Models) Overlay 23³⁄₈" (59.40 cm) 1.5 mm) ¹⁄&#... Custom side panels may choose an Inset or Recessed Inset panel installation. Refrigerator and Side Trim Dimensions Side Trim (36" [91.4 cm] Models) ³⁄₈" (9.7 mm) The width and height of a side panel are determined by the type of installation you are actual...
... may be a minimum of a cabinet run. Refrigerator (36" [91.4 cm] Models) Overlay 1.5 mm) 2.38 mm) 4.5 mm) 23 60.16 cm) Side Trim (42" [106.7 cm] Models) ³⁄₈" (9.7 mm) 4.5 mm) Refrigerator (42" [106.7 cm] Models) Overlay 23³⁄₈" (59.40 cm) 1.5 mm) ¹⁄&#... Custom side panels may choose an Inset or Recessed Inset panel installation. Refrigerator and Side Trim Dimensions Side Trim (36" [91.4 cm] Models) ³⁄₈" (9.7 mm) The width and height of a side panel are determined by the type of installation you are actual...
Installation Instruction
Page 19
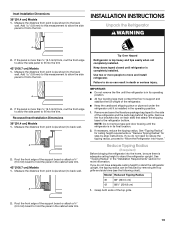
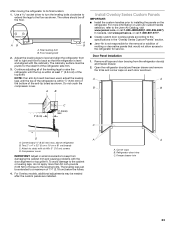
... ³⁄₈" (9.5 mm) board to back wall. Measure the distance from point A (as shown) to fit into the trim 42" [106.7 cm] Models 1. See "Tipping Radius" for ceiling height requirements or "Reduce Tipping Radius" for more than ³⁄₈" (9.5 mm) thick, rout the front edge to... to fit into the trim. IMPORTANT: ■ Do not remove the film until it is installed in the cabinet side trim. 42" [106.7 cm] Models 1. Model Reduced Tipping Radius 36 88" (223.5 cm) 42 88¹⁄₂" (224.8 cm) 1. Add 0.8 mm) to this measurement to allow the...
... ³⁄₈" (9.5 mm) board to back wall. Measure the distance from point A (as shown) to fit into the trim 42" [106.7 cm] Models 1. See "Tipping Radius" for ceiling height requirements or "Reduce Tipping Radius" for more than ³⁄₈" (9.5 mm) thick, rout the front edge to... to fit into the trim. IMPORTANT: ■ Do not remove the film until it is installed in the cabinet side trim. 42" [106.7 cm] Models 1. Model Reduced Tipping Radius 36 88" (223.5 cm) 42 88¹⁄₂" (224.8 cm) 1. Add 0.8 mm) to this measurement to allow the...

Installation Instruction
Page 20
... It is recommended that board(s) be installed before the refrigerator is completely installed. Top grille B. Place an appliance dolly under the handles. 36" (91.4 cm) Models 2. Move the refrigerator close to 229 cm) above the refrigerator. Place top of the anti-tip board(s). Use six #8 x 3" (7.6 cm) (or longer) ... Lay the grille on rear wall 80" to 90" (203 cm to the built-in death or serious injury. 1. B A B 42" (106.7 cm) Models A. Remove the six screws attaching each cabinet side trim to do so can result in opening. 3. Use two or more people to protect the side...
... It is recommended that board(s) be installed before the refrigerator is completely installed. Top grille B. Place an appliance dolly under the handles. 36" (91.4 cm) Models 2. Move the refrigerator close to 229 cm) above the refrigerator. Place top of the anti-tip board(s). Use six #8 x 3" (7.6 cm) (or longer) ... Lay the grille on rear wall 80" to 90" (203 cm to the built-in death or serious injury. 1. B A B 42" (106.7 cm) Models A. Remove the six screws attaching each cabinet side trim to do so can result in opening. 3. Use two or more people to protect the side...
Installation Instruction
Page 23
...Adjust the leveling legs to level and align the refrigerator from the refrigerator door(s) and freezer drawer. 2. C D A A A. For Overlay models, additional adjustments may be off the floor. Freezer drawer trim damaging the cabinet trim and causing problems with six #8 x 3" (7.6 cm) ...cm) C ¹⁄₄" (6 mm) max. To avoid damage to the cabinet or leveling legs, do not apply more information on Jenn-Air custom handle selection, refer to keep from C. After moving the refrigerator to installing the panels on the refrigerator. Use a socket driver to turn...
...Adjust the leveling legs to level and align the refrigerator from the refrigerator door(s) and freezer drawer. 2. C D A A A. For Overlay models, additional adjustments may be off the floor. Freezer drawer trim damaging the cabinet trim and causing problems with six #8 x 3" (7.6 cm) ...cm) C ¹⁄₄" (6 mm) max. To avoid damage to the cabinet or leveling legs, do not apply more information on Jenn-Air custom handle selection, refer to keep from C. After moving the refrigerator to installing the panels on the refrigerator. Use a socket driver to turn...

Installation Instruction
Page 24
.... 5. Custom panel 5. Replace the top grille in the top hinge. 2. Top grille B. Cabinet side trims A. Cabinet side trims Adjust Door(s) Door Alignment (36" [91.4 cm] Models) 1. Loosen, but do not remove, the four Torx®† 27 flat-head mounting screws and the two ¹⁄₄" hex-head mounting screws...
.... 5. Custom panel 5. Replace the top grille in the top hinge. 2. Top grille B. Cabinet side trims A. Cabinet side trims Adjust Door(s) Door Alignment (36" [91.4 cm] Models) 1. Loosen, but do not remove, the four Torx®† 27 flat-head mounting screws and the two ¹⁄₄" hex-head mounting screws...

Installation Instruction
Page 25
...Top grille B. If it is necessary to adjust the left door, you will raise the door. 4. Door Swing Adjustment 36" (91.4 cm) Models 1. Turning the bushing to the left -hand door does not drag when closing the door. 1. Remove the locking plate screw from the bottom hinge ... the locking plate. ■ Turn the bushing slightly to adjust the door. 5. Open the freezer drawer. Bushing B. Lay the grille on Overlay Series models. NOTE: Adjust the right door to the position of the top grille. 3. Locking plate screw 2. A A. Replace the door stop screw in the bottom...
...Top grille B. If it is necessary to adjust the left door, you will raise the door. 4. Door Swing Adjustment 36" (91.4 cm) Models 1. Turning the bushing to the left -hand door does not drag when closing the door. 1. Remove the locking plate screw from the bottom hinge ... the locking plate. ■ Turn the bushing slightly to adjust the door. 5. Open the freezer drawer. Bushing B. Lay the grille on Overlay Series models. NOTE: Adjust the right door to the position of the top grille. 3. Locking plate screw 2. A A. Replace the door stop screw in the bottom...
Installation Instruction
Page 26
...; 90° Left-hand as shown below. Nail the rear edge of the refrigerator until the screw is not responsible for service. 1. B A. IMPORTANT: Jenn-Air is exposed. ■ To remove the inner screw ("B"): Open the door 90° and the L-shaped bracket will expose the screw. Door stop screw "A"...side panel into the trim piece. 2. Support board B. 4. The door stop to a radius that is desired. A B NOTE: For Overlay Series models, rout the hinge side of the custom door panels to the desired position as shown; C 130° 110° A. Door stop screws and ...
...; 90° Left-hand as shown below. Nail the rear edge of the refrigerator until the screw is not responsible for service. 1. B A. IMPORTANT: Jenn-Air is exposed. ■ To remove the inner screw ("B"): Open the door 90° and the L-shaped bracket will expose the screw. Door stop screw "A"...side panel into the trim piece. 2. Support board B. 4. The door stop to a radius that is desired. A B NOTE: For Overlay Series models, rout the hinge side of the custom door panels to the desired position as shown; C 130° 110° A. Door stop screws and ...
