Instructions
Page 1
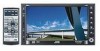
...;. FRANÇAIS ESPAÑOL ENGLISH DVD RECEIVER WITH MONITOR KW-AVX706 RECEPTOR DVD CON MONITOR KW-AVX706 RÉCEPTEUR DVD ET MONITEUR KW-AVX706 EXTRA MONITOR CONTROL MODE ASPECT MENU DVD / RECEIVER CONTROL ATT ZOOM SOURCE BAND DUAL... VOL 2nd VOL SHIFT +10 -100 +100 ASPECT 1 TOP M 4 7 SETUP -10 DISC+ 2 5 ENTER DISC- 8 0 DIRECT OSD 3 MENU 6 9 RETURN SURROUND RM-RK240 For canceling the display demonstration, see page 5. Para la instalación y las conexiones, refiérase al manual...
...;. FRANÇAIS ESPAÑOL ENGLISH DVD RECEIVER WITH MONITOR KW-AVX706 RECEPTOR DVD CON MONITOR KW-AVX706 RÉCEPTEUR DVD ET MONITEUR KW-AVX706 EXTRA MONITOR CONTROL MODE ASPECT MENU DVD / RECEIVER CONTROL ATT ZOOM SOURCE BAND DUAL... VOL 2nd VOL SHIFT +10 -100 +100 ASPECT 1 TOP M 4 7 SETUP -10 DISC+ 2 5 ENTER DISC- 8 0 DIRECT OSD 3 MENU 6 9 RETURN SURROUND RM-RK240 For canceling the display demonstration, see page 5. Para la instalación y las conexiones, refiérase al manual...

Instructions
Page 8
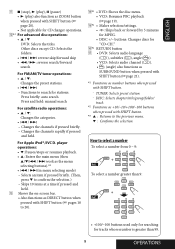
... tools. • Wrap the battery with SHIFT button ( page 24). 8*1 • DVD: Shows the disc menu. • VCD: Resumes PBC playback ( page 19). 9*1 Not used as SETUP button for a JVC monitor-KV-MR9010, or KV-MH6510. IMPORTANT: If Dual Zone is activated ( page 24), ... steering wheel remote control function. • See the Installation/Connection Manual (separate volume) for operating the DVD/CD player. Remote controller (RM-RK240) Installing the lithium coin battery (CR2025) Main elements and features EXTRA MONITOR CONTROL MODE ASPECT MENU Before using the remote controller: • ...
... tools. • Wrap the battery with SHIFT button ( page 24). 8*1 • DVD: Shows the disc menu. • VCD: Resumes PBC playback ( page 19). 9*1 Not used as SETUP button for a JVC monitor-KV-MR9010, or KV-MH6510. IMPORTANT: If Dual Zone is activated ( page 24), ... steering wheel remote control function. • See the Installation/Connection Manual (separate volume) for operating the DVD/CD player. Remote controller (RM-RK240) Installing the lithium coin battery (CR2025) Main elements and features EXTRA MONITOR CONTROL MODE ASPECT MENU Before using the remote controller: • ...
Instructions
Page 9
...SHIFT button. - TUNER: Selects preset station. - Press briefly: auto search Press and hold: manual search For satellite radio operations: • 5 / ∞: Changes the categories. • ... by 5 minutes for tracks whose number is greater than 99. 9 OPERATIONS y*1 RETURN button u • DVD: Selects audio language ( ), subtitles ( ), angle ( ). • VCD: Selects audio channel ( )....SHIFT button ( pages 18 to 20). Changes the channels rapidly if pressed and held . player operations: • ∞: Pauses/stops or resumes playback. • 5: Enters the main...174;/JVC D.
...SHIFT button. - TUNER: Selects preset station. - Press briefly: auto search Press and hold: manual search For satellite radio operations: • 5 / ∞: Changes the categories. • ... by 5 minutes for tracks whose number is greater than 99. 9 OPERATIONS y*1 RETURN button u • DVD: Selects audio language ( ), subtitles ( ), angle ( ). • VCD: Selects audio channel ( )....SHIFT button ( pages 18 to 20). Changes the channels rapidly if pressed and held . player operations: • ∞: Pauses/stops or resumes playback. • 5: Enters the main...174;/JVC D.

Instructions
Page 10
... FLAT MO LO 3: 45 PM FM1 P1 ABC Radio 87.5 MHz 87.5 MHz ABC Radio 88.3 MHz DEF FM 88.7 MHz GHI Radio 91.5 MHz JVC FM 93.1 MHz JKL Radio 95.3 MHz MNO FM Preset list-frequency/ assigned station names ~ Select "TUNER." Ÿ Select the bands. ! Search for a station-Auto... Search. • Manual Search: Hold either to the radio POWER]ON page 38. Tuner indicators Preset No. If no name is hard to receive 1 Setup Surround Equalizer Sound...
... FLAT MO LO 3: 45 PM FM1 P1 ABC Radio 87.5 MHz 87.5 MHz ABC Radio 88.3 MHz DEF FM 88.7 MHz GHI Radio 91.5 MHz JVC FM 93.1 MHz JKL Radio 95.3 MHz MNO FM Preset list-frequency/ assigned station names ~ Select "TUNER." Ÿ Select the bands. ! Search for a station-Auto... Search. • Manual Search: Hold either to the radio POWER]ON page 38. Tuner indicators Preset No. If no name is hard to receive 1 Setup Surround Equalizer Sound...

Instructions
Page 12
Setup Surround Equalizer Sound Mode List Setup Surround Equalizer Mode List 12 ENGLISH Manual presetting Ex.: Storing FM station of 92.5 MHz into preset number 4 of the FM1 band. 1 2 FM1 NO NAME 92.5 MHz 3 87.5 MHZ 88.3 MHz 88.7 ...
Setup Surround Equalizer Sound Mode List Setup Surround Equalizer Mode List 12 ENGLISH Manual presetting Ex.: Storing FM station of 92.5 MHz into preset number 4 of the FM1 band. 1 2 FM1 NO NAME 92.5 MHz 3 87.5 MHZ 88.3 MHz 88.7 ...

Instructions
Page 34
... no name is displayed. 3: 45 PM ~ Select "TV." Ÿ Search for a station to listen-Auto Search. • Manual Search: Hold either to left or right until "Manual Search" appears on the rear. If no . 4 TV BBC1 FLAT Assigned name appears. POWER]ON page 38. BBC1 BBC2 ABCTV ...8226; Preset List can also be accessed through = ( page 35). 3 Select a preset number. Manual presetting 1 Select a station to preset. 2 JVCTV 2 Display the Preset list. ENGLISH Watching TV You can connect JVC's KV-C1000 Tuner Unit to the AV BUS terminal on the display, then push it repeatedly. &#...
... no name is displayed. 3: 45 PM ~ Select "TV." Ÿ Search for a station to listen-Auto Search. • Manual Search: Hold either to left or right until "Manual Search" appears on the rear. If no . 4 TV BBC1 FLAT Assigned name appears. POWER]ON page 38. BBC1 BBC2 ABCTV ...8226; Preset List can also be accessed through = ( page 35). 3 Select a preset number. Manual presetting 1 Select a station to preset. 2 JVCTV 2 Display the Preset list. ENGLISH Watching TV You can connect JVC's KV-C1000 Tuner Unit to the AV BUS terminal on the display, then push it repeatedly. &#...
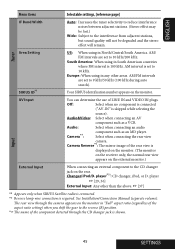
Instructions
Page 45
... is required. Your SIRIUS identification number appears on the rear. Audio&Video: Select when connecting an AV component such as an MD player. Camera Reverse*9: The mirror image of LINE IN and VIDEO IN plugs. AM/ FM intervals are set to 9 kHz/50 kHz... when no component is connected ("AV-IN" is shown. 45 SETTINGS See Installation/Connection Manual (separate volume). Select when connecting the rear view camera. the normal rear view appears on the external monitor.) Input External Input When connecting an external component to the reverse (R) position. *10 The...
... is required. Your SIRIUS identification number appears on the rear. Audio&Video: Select when connecting an AV component such as an MD player. Camera Reverse*9: The mirror image of LINE IN and VIDEO IN plugs. AM/ FM intervals are set to 9 kHz/50 kHz... when no component is connected ("AV-IN" is shown. 45 SETTINGS See Installation/Connection Manual (separate volume). Select when connecting the rear view camera. the normal rear view appears on the external monitor.) Input External Input When connecting an external component to the reverse (R) position. *10 The...

Instructions
Page 50
...also stops without ejecting the disc. Changing the source • If you change the aspect ratio to "Just," both sides of the picture to the monitor size. No other characters can also turn on the power. FM/AM Storing stations in No. 1 (lowest frequency) to protect it has been ... not removed within 15 seconds, the disc is automatically inserted again into the loading slot to No. 6 (highest frequency). Disc General • In this manual, words "track" and "file" are interchangeably used. • This unit can also play starts from white to black to indicate no sound comes through...
...also stops without ejecting the disc. Changing the source • If you change the aspect ratio to "Just," both sides of the picture to the monitor size. No other characters can also turn on the power. FM/AM Storing stations in No. 1 (lowest frequency) to protect it has been ... not removed within 15 seconds, the disc is automatically inserted again into the loading slot to No. 6 (highest frequency). Disc General • In this manual, words "track" and "file" are interchangeably used. • This unit can also play starts from white to black to indicate no sound comes through...
Instructions
Page 54
...not inserted fully. Deactivate Dual Zone ( page 24). (While Dual Zone is activated, the remote controller only functions for operating the DVD/CD player.) • The monitor is used for surround playback. Adjust "Bright" and "Contrast" of the center speaker. Reset the unit ( page 2). •... back. • Tracks on the Recordable/Rewritable discs cannot be trouble is not connected properly. ( Installation/Connection Manual.) • "Region Error Please Eject" appears on the monitor when you used only for recording. Unlock the disc ( page 17). • Insert a finalized disc. &#...
...not inserted fully. Deactivate Dual Zone ( page 24). (While Dual Zone is activated, the remote controller only functions for operating the DVD/CD player.) • The monitor is used for surround playback. Adjust "Bright" and "Contrast" of the center speaker. Reset the unit ( page 2). •... back. • Tracks on the Recordable/Rewritable discs cannot be trouble is not connected properly. ( Installation/Connection Manual.) • "Region Error Please Eject" appears on the monitor when you used only for recording. Unlock the disc ( page 17). • Insert a finalized disc. &#...
