
Instructions
Page 10
...[Hold]. • You can enter by matching the polarity (+ and -) correctly. Replace only with the steering wheel remote control function. • See the Installation/Connection Manual (separate volume) for connection. 1 • Turns on the power. • Turns off the power [Hold]. • Attenuates the sound (when the power is ...incorrectly replaced. Before using the remote controller: • Aim the remote controller directly at the remote sensor on the unit. 5 • DVD: Displays the disc menu. • VCD: Resumes PBC playback (☞ page 23). •...
...[Hold]. • You can enter by matching the polarity (+ and -) correctly. Replace only with the steering wheel remote control function. • See the Installation/Connection Manual (separate volume) for connection. 1 • Turns on the power. • Turns off the power [Hold]. • Attenuates the sound (when the power is ...incorrectly replaced. Before using the remote controller: • Aim the remote controller directly at the remote sensor on the unit. 5 • DVD: Displays the disc menu. • VCD: Resumes PBC playback (☞ page 23). •...
Instructions
Page 11
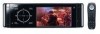
... Searches for stations. - Manual Search [Hold] "HD Radio": • 5 / ∞: Selects multicast channels. • 4 / ¢: Searches for stations. - DVD-VR: Selects the program/play list. - Reverse skip/forward skip - Skips 10 items at a time [Hold]. u • DVD Video: Displays the disc ... and o). 9 Displays the display information. Selects channels. - Selects channels rapidly. [Hold] "Disc" and "Changer": • 5 / ∞: - Manual Search [Hold] "Satellite Radio": • 5 / ∞: Selects categories. • 4 / ¢: - Reverse skip/forward skip - Reverse skip/...
... Searches for stations. - Manual Search [Hold] "HD Radio": • 5 / ∞: Selects multicast channels. • 4 / ¢: Searches for stations. - DVD-VR: Selects the program/play list. - Reverse skip/forward skip - Skips 10 items at a time [Hold]. u • DVD Video: Displays the disc ... and o). 9 Displays the display information. Selects channels. - Selects channels rapidly. [Hold] "Disc" and "Changer": • 5 / ∞: - Manual Search [Hold] "Satellite Radio": • 5 / ∞: Selects categories. • 4 / ¢: - Reverse skip/forward skip - Reverse skip/...
Instructions
Page 12
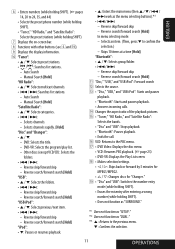
ENGLISH Listening to the radio A Band B Sound mode (☞ page 49) C Preset no. D Frequency E Assigned station name (☞ page 50) F FM reception indicator ~ Select "Tuner." Ÿ Select the band. ! Search for a station-Auto Search. • Manual Search: Hold either or until "Manual Search" appears on the monitor, then touch it repeatedly. • The ST indicator lights up when receiving an FM stereo broadcast with sufficient signal strength. 12
ENGLISH Listening to the radio A Band B Sound mode (☞ page 49) C Preset no. D Frequency E Assigned station name (☞ page 50) F FM reception indicator ~ Select "Tuner." Ÿ Select the band. ! Search for a station-Auto Search. • Manual Search: Hold either or until "Manual Search" appears on the monitor, then touch it repeatedly. • The ST indicator lights up when receiving an FM stereo broadcast with sufficient signal strength. 12
Instructions
Page 14
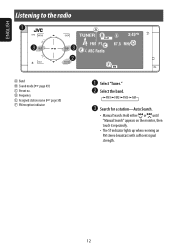
... FM: Each time you hold 5 / ∞ , you can change the bands. 3 Select the preset number. The Preset List can also be accessed through = . 14 ENGLISH Manual presetting Ex.: Storing the FM station of 92.5 MHz into preset number 4 of the FM1 band. 1 2 Tune in preset number 4. The Preset List can also...
... FM: Each time you hold 5 / ∞ , you can change the bands. 3 Select the preset number. The Preset List can also be accessed through = . 14 ENGLISH Manual presetting Ex.: Storing the FM station of 92.5 MHz into preset number 4 of the FM1 band. 1 2 Tune in preset number 4. The Preset List can also...
Instructions
Page 32
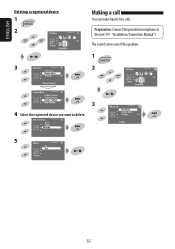
ENGLISH Deleting a registered device 1 2 3 Making a call You can make hands-free calls. Preparation: Connect the provided microphone to the unit. (☞ "Installation/Connection Manual") The sound comes out of the speakers. 1 2 3 4 Select the registered device you want to delete. 5 32
ENGLISH Deleting a registered device 1 2 3 Making a call You can make hands-free calls. Preparation: Connect the provided microphone to the unit. (☞ "Installation/Connection Manual") The sound comes out of the speakers. 1 2 3 4 Select the registered device you want to delete. 5 32
Instructions
Page 33
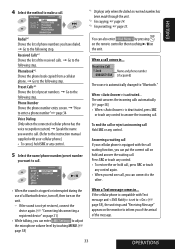
...stopped or interrupted during the use of a Bluetooth device, turn off, then turn on the unit. - Answering a waiting call . (Refer to the instruction manual supplied with your cellular phone is automatically changed to adjust the microphone volume level by pressing on the remote controller then touching 6 on page 31...the call waiting function, you can put the current call on hold call, press SRC or touch any control. • To restore the on the monitor to make a call . 4 Select the method to inform you of the arrival of the message. 33 OPERATIONS Press SRC or touch any control ...
...stopped or interrupted during the use of a Bluetooth device, turn off, then turn on the unit. - Answering a waiting call . (Refer to the instruction manual supplied with your cellular phone is automatically changed to adjust the microphone volume level by pressing on the remote controller then touching 6 on page 31...the call waiting function, you can put the current call on hold call, press SRC or touch any control. • To restore the on the monitor to make a call . 4 Select the method to inform you of the arrival of the message. 33 OPERATIONS Press SRC or touch any control ...
Instructions
Page 35
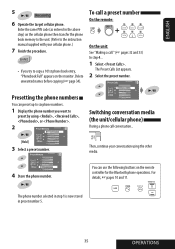
...up to six phone numbers. 1 Display the phone number you try to copy a 101st phone book entry, "Phonebook Full" appears on the monitor. ENGLISH 5 6 Operate the target cellular phone. The phone number selected in step 1 is now stored in the above step) on the ...Preset Calls List appears. 2 Select the preset number. Then, continue your cellular phone.) 7 Finish the procedure. • If you want to the instruction manual supplied with your conversation using , , , or . 2 Switching conversation media (the unit/cellular phone) During a phone call ." (☞ pages 32 and 33) ...
...up to six phone numbers. 1 Display the phone number you try to copy a 101st phone book entry, "Phonebook Full" appears on the monitor. ENGLISH 5 6 Operate the target cellular phone. The phone number selected in step 1 is now stored in the above step) on the ...Preset Calls List appears. 2 Select the preset number. Then, continue your cellular phone.) 7 Finish the procedure. • If you want to the instruction manual supplied with your conversation using , , , or . 2 Switching conversation media (the unit/cellular phone) During a phone call ." (☞ pages 32 and 33) ...
Instructions
Page 53
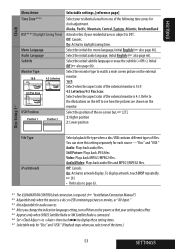
...or XM Satellite Radio is 4:3. ENGLISH Clock Menu items Time Zone*5*6 DST*5*6 (Daylight Saving Time) Menu Language Audio Language Subtitle Monitor Type OSD Position Selectable settings, [reference page] Select your residential area from one of the items.) 53 SETTINGS Initial Off (&#...touch DISP repeatedly. ☞ [9] • Refer also to page 63. *1 The ILLUMINATION CONTROL lead connection is required. (☞ "Installation/Connection Manual") *2 Adjustable only when the source is a disc or USB containing pictures or movies, or "AV Input." *3 Not adjustable for audio sources. ...
...or XM Satellite Radio is 4:3. ENGLISH Clock Menu items Time Zone*5*6 DST*5*6 (Daylight Saving Time) Menu Language Audio Language Subtitle Monitor Type OSD Position Selectable settings, [reference page] Select your residential area from one of the items.) 53 SETTINGS Initial Off (&#...touch DISP repeatedly. ☞ [9] • Refer also to page 63. *1 The ILLUMINATION CONTROL lead connection is required. (☞ "Installation/Connection Manual") *2 Adjustable only when the source is a disc or USB containing pictures or movies, or "AV Input." *3 Not adjustable for audio sources. ...

Instructions
Page 55
...phone. The rear view through the CD changer jack is shown. *7 The TEL MUTING lead connection is required. ☞ "Installation/Connection Manual." 55 SETTINGS On: Activates the key-touch tone. Proximity/Motion: Lights up when your hand moves close to the controls. touches the.... Off: Cancels. moves close to the controls. Off: Cancels. You can turn off the touch pad controls and monitor lights while turning on the unit. ☞ [5] Touch pad controls Monitor Normal: Always lights. Touch Pad: Touch Pad-LCD: Lights up when your finger touches the controls.
...phone. The rear view through the CD changer jack is shown. *7 The TEL MUTING lead connection is required. ☞ "Installation/Connection Manual." 55 SETTINGS On: Activates the key-touch tone. Proximity/Motion: Lights up when your hand moves close to the controls. touches the.... Off: Cancels. moves close to the controls. Off: Cancels. You can turn off the touch pad controls and monitor lights while turning on the unit. ☞ [5] Touch pad controls Monitor Normal: Always lights. Touch Pad: Touch Pad-LCD: Lights up when your finger touches the controls.

Instructions
Page 58
...displaying "Receiving Message." Delete the registered devices, ☞ [32] Enter the PIN code to the instructions supplied with ... Answer the calls manually. On: The unit answers the incoming calls automatically. Off: The unit does not inform you wish to receive more information about Bluetooth, visit... the following JVC web site: (English website only) When operating the Bluetooth device, refer also to establish the connection, ☞ [31] Once the ...
...displaying "Receiving Message." Delete the registered devices, ☞ [32] Enter the PIN code to the instructions supplied with ... Answer the calls manually. On: The unit answers the incoming calls automatically. Off: The unit does not inform you wish to receive more information about Bluetooth, visit... the following JVC web site: (English website only) When operating the Bluetooth device, refer also to establish the connection, ☞ [31] Once the ...

Instructions
Page 60
...playing. • This unit can play back multi-session discs; Playing DVD-VR • For details about this unit General Turning on the ...This unit can recognize a total 25 characters for the MPEG2 files recorded by JVC Everio camcorders. Playing Recordable/Rewritable discs • This unit can recognize a total...code , , or *. * is 4 Mbps. 60 Disc General • In this manual, words "track" and "file" are interchangeably used for file/ folder names. •... "Cannot play this disc Check the disc" appears on the monitor. File playback Playing MPEG1/MPEG2 files • This unit can ...
...playing. • This unit can play back multi-session discs; Playing DVD-VR • For details about this unit General Turning on the ...This unit can recognize a total 25 characters for the MPEG2 files recorded by JVC Everio camcorders. Playing Recordable/Rewritable discs • This unit can recognize a total...code , , or *. * is 4 Mbps. 60 Disc General • In this manual, words "track" and "file" are interchangeably used for file/ folder names. •... "Cannot play this disc Check the disc" appears on the monitor. File playback Playing MPEG1/MPEG2 files • This unit can ...
Instructions
Page 67
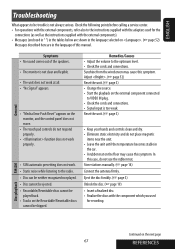
...Tracks on . (☞ page 52) Messages described here are in the car. • A rubber mat on the floor may cause this manual. Store stations manually. (☞ page 14) Connect the antenna firmly. ENGLISH Troubleshooting What appears to the optimum level. • Check the cords and connections. ...magnetic items near the unit. • Leave the unit until the temperature becomes stable in the language of the speakers. • The monitor is too weak. Check the following points before calling a service center. • For operations with the external components, refer also to...
...Tracks on . (☞ page 52) Messages described here are in the car. • A rubber mat on the floor may cause this manual. Store stations manually. (☞ page 14) Connect the antenna firmly. ENGLISH Troubleshooting What appears to the optimum level. • Check the cords and connections. ...magnetic items near the unit. • Leave the unit until the temperature becomes stable in the language of the speakers. • The monitor is too weak. Check the following points before calling a service center. • For operations with the external components, refer also to...

Instructions
Page 68
...Installation/Connection Manual") • No picture appears on the external monitor. • Connect the video cord correctly. • Select the correct input on the external monitor. • "Eject Error" or "Loading Error" appears on Changing the source by pressing SRC will solve this error. other players. This is... again. • Region code of the DVD is not correct. (☞ page 4) • The format of files is not supported by how the tracks are recorded. • "Not Support" appears on the monitor and The track is unplayable. the monitor. • Disc cannot be played back....
...Installation/Connection Manual") • No picture appears on the external monitor. • Connect the video cord correctly. • Select the correct input on the external monitor. • "Eject Error" or "Loading Error" appears on Changing the source by pressing SRC will solve this error. other players. This is... again. • Region code of the DVD is not correct. (☞ page 4) • The format of files is not supported by how the tracks are recorded. • "Not Support" appears on the monitor and The track is unplayable. the monitor. • Disc cannot be played back....
Instructions
Page 69
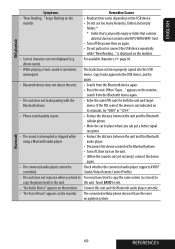
..."1234." • Phone sound quality is not indicated on the USB device. keeps flashing on the • Readout time varies depending on its manuals, try again. • Bluetooth device does not detect the unit. • Search from the Bluetooth device again. • The unit does ...is poor. • Reduce the distance between the unit and the Bluetooth using a Bluetooth audio player. Connect this unit and the Bluetooth audio player correctly. • "No Voice Device" appears on the monitor, search from the Bluetooth device again. • Reset the unit. device. the unit. ...
..."1234." • Phone sound quality is not indicated on the USB device. keeps flashing on the • Readout time varies depending on its manuals, try again. • Bluetooth device does not detect the unit. • Search from the Bluetooth device again. • The unit does ...is poor. • Reduce the distance between the unit and the Bluetooth using a Bluetooth audio player. Connect this unit and the Bluetooth audio player correctly. • "No Voice Device" appears on the monitor, search from the Bluetooth device again. • Reset the unit. device. the unit. ...
