Instructions
Page 2
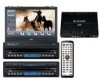
...If this will not occur in a particular installation. Consult the dealer or an experienced radio/TV technician for a Class B digital device, pursuant to radio or television reception, which the receiver...CLASS 1 LASER PRODUCT 2. This equipment generates, uses, and can be erased. • The monitor will reset the built-in microcomputer. This will go into an outlet on a circuit different ...high temperature and humidity. ENGLISH Thank you have parked the car for purchasing a JVC product. These limits are no guarantee that to correct the interference by turning the...
...If this will not occur in a particular installation. Consult the dealer or an experienced radio/TV technician for a Class B digital device, pursuant to radio or television reception, which the receiver...CLASS 1 LASER PRODUCT 2. This equipment generates, uses, and can be erased. • The monitor will reset the built-in microcomputer. This will go into an outlet on a circuit different ...high temperature and humidity. ENGLISH Thank you have parked the car for purchasing a JVC product. These limits are no guarantee that to correct the interference by turning the...
Instructions
Page 4
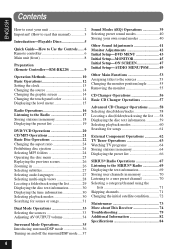
...iEQ) Operations 39 Selecting preset sound modes 40 Storing your own sound modes 40 Other Sound Adjustments 41 Monitor Adjustments 42 Initial Setup-DVD MENU 43 Initial Setup-MONITOR 45 Initial Setup-ON SCREEN 47 Initial Setup-AUDIO MENU/PSM .......... 49 Other Main Functions 53 Assigning titles........ 58 Displaying the disc text information 59 Selecting playback modes 60 Searching for songs 61 External Component Operations 62 TV Tuner Operations 63 Watching TV programs 64 Storing stations in memory 64 Displaying the preset list 66 SIRIUS® Radio Operations 67 Listening to ...
...iEQ) Operations 39 Selecting preset sound modes 40 Storing your own sound modes 40 Other Sound Adjustments 41 Monitor Adjustments 42 Initial Setup-DVD MENU 43 Initial Setup-MONITOR 45 Initial Setup-ON SCREEN 47 Initial Setup-AUDIO MENU/PSM .......... 49 Other Main Functions 53 Assigning titles........ 58 Displaying the disc text information 59 Selecting playback modes 60 Searching for songs 61 External Component Operations 62 TV Tuner Operations 63 Watching TV programs 64 Storing stations in memory 64 Displaying the preset list 66 SIRIUS® Radio Operations 67 Listening to ...

Instructions
Page 6
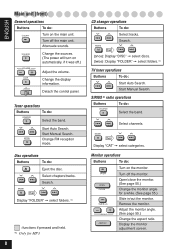
... AVOUT VOL TOPMENU RETURN AV 3 6 9 TUNER DISC AV VOLUME MAIN SUB ZOOM DUAL AVOUT VOL ASPECT Attenuate sounds. Select the band. Select external components: TV = AV1 = AV2 = Adjust the volume. Select "TUNER" and "SIRIUS." Adjust the AV output level (with MAIN/SUB set to SUB). Display Setup Menus... *1 Turn on the MAIN/SUB setting. *2 Only for MP3 *3 While playing a DVD, chapter is selected before or after playback. 6 Tuner operations Buttons To do: TUNER Select the band. Display the monitor adjustment screen. 10 11/0 12/+10 VOLUME GUI SET UP Display and erase GUI screen...
... AVOUT VOL TOPMENU RETURN AV 3 6 9 TUNER DISC AV VOLUME MAIN SUB ZOOM DUAL AVOUT VOL ASPECT Attenuate sounds. Select the band. Select external components: TV = AV1 = AV2 = Adjust the volume. Select "TUNER" and "SIRIUS." Adjust the AV output level (with MAIN/SUB set to SUB). Display Setup Menus... *1 Turn on the MAIN/SUB setting. *2 Only for MP3 *3 While playing a DVD, chapter is selected before or after playback. 6 Tuner operations Buttons To do: TUNER Select the band. Display the monitor adjustment screen. 10 11/0 12/+10 VOLUME GUI SET UP Display and erase GUI screen...
Instructions
Page 7
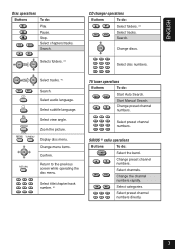
... Select disc numbers. Select chapters/tracks. Search. Select channels. Stop. Change menu items. OK Confirm. Start Manual Search. Change preset channel numbers. Select audio language. TV tuner operations Buttons To do : Select folders. *2 Select tracks. Select categories. 1 2 3 4 5 6 Select preset channel numbers directly. 7 RETURN 1 2 3 4 5 6 7 8 9 10 11/0 12/+10 Return to the previous...
... Select disc numbers. Select chapters/tracks. Search. Select channels. Stop. Change menu items. OK Confirm. Start Manual Search. Change preset channel numbers. Select audio language. TV tuner operations Buttons To do : Select folders. *2 Select tracks. Select categories. 1 2 3 4 5 6 Select preset channel numbers directly. 7 RETURN 1 2 3 4 5 6 7 8 9 10 11/0 12/+10 Return to the previous...
Instructions
Page 8
... (See page 55.) Slide in/out the monitor. Adjust the monitor angle. (See page 55.) Change the aspect ratio. Turn off the monitor. Start Manual Search. Open/close the monitor. (See page 55.) Change the monitor angle for MP3 Monitor operations Buttons To do : Select the band....Start Manual Search. SIRIUS ® radio operations Buttons To do : Turn on the monitor. Select channels. Disc operations Buttons To do : Start Auto Search. Tuner operations Buttons To do: TV tuner operations Buttons To do : Eject the disc. Search. ENGLISH ○Main ○...
... (See page 55.) Slide in/out the monitor. Adjust the monitor angle. (See page 55.) Change the aspect ratio. Turn off the monitor. Start Manual Search. Open/close the monitor. (See page 55.) Change the monitor angle for MP3 Monitor operations Buttons To do : Select the band....Start Manual Search. SIRIUS ® radio operations Buttons To do : Turn on the monitor. Select channels. Disc operations Buttons To do : Start Auto Search. Tuner operations Buttons To do: TV tuner operations Buttons To do : Eject the disc. Search. ENGLISH ○Main ○...
Instructions
Page 12
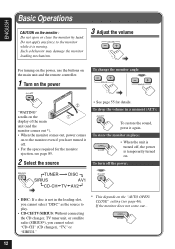
...: Hold 2 "WAITING" scrolls on the 1 display of the main unit (and the monitor comes out *). • When the monitor comes out, power comes on to the monitor even if you cannot select "CD-CH" (CD changer), "TV," or "SIRIUS." * This depends on the "AUTO OPEN/ CLOSE" setting (see page 85. 2 Select ...force to play. • CD-CH/TV/SIRIUS: Without connecting the CD changer, TV tuner unit, or satellite radio (SIRIUS®), you have turned it again. To drop the volume in the loading slot, you cannot select "DISC" as the source to the monitor while it is temporarily turned on the...
...: Hold 2 "WAITING" scrolls on the 1 display of the main unit (and the monitor comes out *). • When the monitor comes out, power comes on to the monitor even if you cannot select "CD-CH" (CD changer), "TV," or "SIRIUS." * This depends on the "AUTO OPEN/ CLOSE" setting (see page 85. 2 Select ...force to play. • CD-CH/TV/SIRIUS: Without connecting the CD changer, TV tuner unit, or satellite radio (SIRIUS®), you have turned it again. To drop the volume in the loading slot, you cannot select "DISC" as the source to the monitor while it is temporarily turned on the...

Instructions
Page 13
... exactly from 00 second. To display the clock time: When the unit is turned off, the clock time is displayed on the monitor, touch the center portion of the monitor screen. 2 *1 3 *2 *1 Appears only when SIRIUS radio is turned on the display of the main unit for some sources. ...main unit changes. TUNER: Frequency = Clock = Band&Preset no. = DISC: Play time = Clock = Title/Chapter/Folder/Track no. = AV1/AV2: Source name = Clock = TV: Channel = Clock = TV&Preset no. = CD-CH: Elapsed time = Clock = Disc no. = Folder/Track no. = SAT (SIRIUS): Channel no. = Clock = Band&Preset no. = *1 It...
... exactly from 00 second. To display the clock time: When the unit is turned off, the clock time is displayed on the monitor, touch the center portion of the monitor screen. 2 *1 3 *2 *1 Appears only when SIRIUS radio is turned on the display of the main unit for some sources. ...main unit changes. TUNER: Frequency = Clock = Band&Preset no. = DISC: Play time = Clock = Title/Chapter/Folder/Track no. = AV1/AV2: Source name = Clock = TV: Channel = Clock = TV&Preset no. = CD-CH: Elapsed time = Clock = Disc no. = Folder/Track no. = SAT (SIRIUS): Channel no. = Clock = Band&Preset no. = *1 It...
Instructions
Page 44
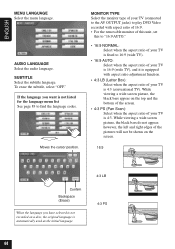
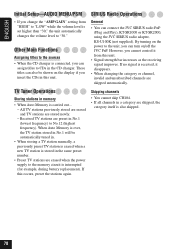
... language. however, the left and right edges of your TV is not listed for the language menu list See page 83 to find the language codes. MONITOR TYPE Select the monitor type of your TV (connected to the AV OUTPUT jacks) to play DVD Video recorded with aspect ratio of 16:9. • For... the removable monitor of this unit, set this to "16:9 AUTO." • 16:9 NORMAL...
... language. however, the left and right edges of your TV is not listed for the language menu list See page 83 to find the language codes. MONITOR TYPE Select the monitor type of your TV (connected to the AV OUTPUT jacks) to play DVD Video recorded with aspect ratio of 16:9. • For... the removable monitor of this unit, set this to "16:9 AUTO." • 16:9 NORMAL...
Instructions
Page 46
...off the power, the monitor will not come out next time you operate on it. 1 Upper/lower portions: Adjust the volume. 2 Left/right portions: • Skips the chapters/tracks for DVD/VCD. • Searches the chapters/tracks for DVD/VCD. • Searches for TV channels for TV (see page 63).... 3 Center portion: Turns on and off the on-screen icons. (This also works even if "BLIND CONTROL" is correctly done for particular functions. The boundaries cannot be shown on the monitor. 1 2 3 2 1 ...
...off the power, the monitor will not come out next time you operate on it. 1 Upper/lower portions: Adjust the volume. 2 Left/right portions: • Skips the chapters/tracks for DVD/VCD. • Searches the chapters/tracks for DVD/VCD. • Searches for TV channels for TV (see page 63).... 3 Center portion: Turns on and off the on-screen icons. (This also works even if "BLIND CONTROL" is correctly done for particular functions. The boundaries cannot be shown on the monitor. 1 2 3 2 1 ...

Instructions
Page 48
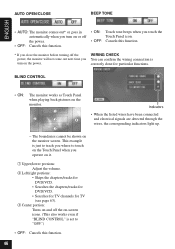
...or close the curtain. • OFF: Cancels this function. When the TV tuner unit (KV-C1000) is connected, its onscreen display will be shown. CLOCK • ON: Display the clock time on the monitor while operating the built-in disc player. - GUIDE • ON: • OFF: On-screen guide icons... (see page 75) and messages are displayed on the monitor. MESSAGE • ON: Speaker/signal indicators (see page 23) are ...
...or close the curtain. • OFF: Cancels this function. When the TV tuner unit (KV-C1000) is connected, its onscreen display will be shown. CLOCK • ON: Display the clock time on the monitor while operating the built-in disc player. - GUIDE • ON: • OFF: On-screen guide icons... (see page 75) and messages are displayed on the monitor. MESSAGE • ON: Speaker/signal indicators (see page 23) are ...

Instructions
Page 49
... and Preferred Setting Modes (PSM). • You cannot select "AUDIO MENU" when the subsidiary source operation screen is connected. Appears when TV tuner unit KV-C1000 is displayed on the monitor (with Dual Mode turned on; See page 13. Appears only when SIRIUS radio is connected (see also page 72). 5 Change the...
... and Preferred Setting Modes (PSM). • You cannot select "AUDIO MENU" when the subsidiary source operation screen is connected. Appears when TV tuner unit KV-C1000 is displayed on the monitor (with Dual Mode turned on; See page 13. Appears only when SIRIUS radio is connected (see also page 72). 5 Change the...

Instructions
Page 52
...watch the rear view, select "AV2" for viewing the playback picture through the rear view camera is automatically displayed on the monitor when you change the aspect ratio and make monitor adjustments-see pages 24 and 42.) • AUTO: Dims the display when you cannot change the gear to the back .... (In this case, you turn on the headlights. • ON: Activates dimmer. • OFF: Cancels this function. 52 TV CHANNEL AREA This appears when TV tuner unit KV-C1000 is connected. • No setting is "AV2," this setting cannot be lost .) • WIDE: Subject to the interference from ...
...watch the rear view, select "AV2" for viewing the playback picture through the rear view camera is automatically displayed on the monitor when you change the aspect ratio and make monitor adjustments-see pages 24 and 42.) • AUTO: Dims the display when you cannot change the gear to the back .... (In this case, you turn on the headlights. • ON: Activates dimmer. • OFF: Cancels this function. 52 TV CHANNEL AREA This appears when TV tuner unit KV-C1000 is connected. • No setting is "AV2," this setting cannot be lost .) • WIDE: Subject to the interference from ...

Instructions
Page 54
... unit and in the CD changer: Select "CD-CH," then select a disc number. • For TV stations: Change "TV," then select a TV station. Delete unwanted names before assignment. • You cannot assign a title to 30 FM/AM, 30 TV stations, and 40 CDs (both in this unit: Insert a CD. • For CDs in the...
... unit and in the CD changer: Select "CD-CH," then select a disc number. • For TV stations: Change "TV," then select a TV station. Delete unwanted names before assignment. • You cannot assign a title to 30 FM/AM, 30 TV stations, and 40 CDs (both in this unit: Insert a CD. • For CDs in the...
Instructions
Page 62
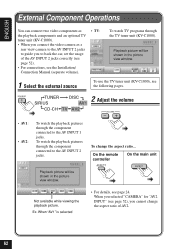
... be shown in the picture view window. Playback picture will be shown in the picture view window. 1 Select the external source To use the TV tuner unit (KV-C1000), see the following pages. To change the aspect ratio of the AV INPUT 2 jacks correctly (see page 52). •...through the component connected to the AV INPUT 2 jacks. TUNER SIRIUS DISC 2 Adjust the volume AV1 CD-CH TV AV2 • AV1: • AV2: To watch TV programs through the TV tuner unit (KV-C1000). Ex. ENGLISH External Component Operations You can connect two video components as the playback ...
... be shown in the picture view window. Playback picture will be shown in the picture view window. 1 Select the external source To use the TV tuner unit (KV-C1000), see the following pages. To change the aspect ratio of the AV INPUT 2 jacks correctly (see page 52). •...through the component connected to the AV INPUT 2 jacks. TUNER SIRIUS DISC 2 Adjust the volume AV1 CD-CH TV AV2 • AV1: • AV2: To watch TV programs through the TV tuner unit (KV-C1000). Ex. ENGLISH External Component Operations You can connect two video components as the playback ...

Instructions
Page 63
Available only after pressing "M" (below this icon). See pages 43 - 52. Dual Mode indicator (see page 33) SOURCE icon (see page 36) Playback picture will be shown in the picture view window. See page 53. See page 15. (Not available while viewing the playback picture.) See page 39. Search mode Sound mode (see page 39) Surround/DSP mode (see pages 14 and 33) Current preset no . See page 14. See page 14. ENGLISH TV Tuner Operations Volume level appears when adjusted. Back to the beginning 63 Channel no .
Available only after pressing "M" (below this icon). See pages 43 - 52. Dual Mode indicator (see page 33) SOURCE icon (see page 36) Playback picture will be shown in the picture view window. See page 53. See page 15. (Not available while viewing the playback picture.) See page 39. Search mode Sound mode (see page 39) Surround/DSP mode (see pages 14 and 33) Current preset no . See page 14. See page 14. ENGLISH TV Tuner Operations Volume level appears when adjusted. Back to the beginning 63 Channel no .

Instructions
Page 64
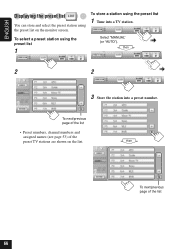
...icon repeatedly until a station you want is selected. then Local TV stations with the strongest signals are searched and stored automatically. 64 MANUAL: To start Auto Search. ENGLISH Watching TV programs 3 Tune in to a TV station • To tune in to a station using Preset Search..., first store your favorite TV stations into a preset station, see "Watching TV programs." Storing stations in memory You can preset 12 TV stations. • To tune...
...icon repeatedly until a station you want is selected. then Local TV stations with the strongest signals are searched and stored automatically. 64 MANUAL: To start Auto Search. ENGLISH Watching TV programs 3 Tune in to a TV station • To tune in to a station using Preset Search..., first store your favorite TV stations into a preset station, see "Watching TV programs." Storing stations in memory You can preset 12 TV stations. • To tune...

Instructions
Page 65
To select the rest of the preset stations then To select the rest of the preset stations Preset station information will be displayed. 65 then To tune in to a preset station • See also "Watching TV programs" on page 64. 1 Select "MANUAL" (or "AUTO"). 2 Store the station into a TV station. ENGLISH Manual presetting 1 Tune into a preset number. 2 Select a preset number.
To select the rest of the preset stations then To select the rest of the preset stations Preset station information will be displayed. 65 then To tune in to a preset station • See also "Watching TV programs" on page 64. 1 Select "MANUAL" (or "AUTO"). 2 Store the station into a TV station. ENGLISH Manual presetting 1 Tune into a preset number. 2 Select a preset number.
Instructions
Page 66
then 2 2 3 Store the station into a TV station. To select a preset station using the preset list 1 Tune into a preset number. ENGLISH Displaying the preset list To store a station using the preset list 1 Select "MANUAL" (or "AUTO"). To next/previous page of the list • Preset numbers, channel numbers and assigned names (see page 53) of the list 66 You can store and select the preset station using the preset list on the list. then To next/previous page of the preset TV stations are shown on the monitor screen.
then 2 2 3 Store the station into a TV station. To select a preset station using the preset list 1 Tune into a preset number. ENGLISH Displaying the preset list To store a station using the preset list 1 Select "MANUAL" (or "AUTO"). To next/previous page of the list • Preset numbers, channel numbers and assigned names (see page 53) of the list 66 You can store and select the preset station using the preset list on the list. then To next/previous page of the preset TV stations are shown on the monitor screen.
Instructions
Page 78
... Auto Memory is also skipped. 78 All TV stations previously stored are erased and TV stations are skipped, the category itself is carried out... - When Auto Memory is over, the TV station stored in No.1 will be shown on /off the JVC PnP. Received TV stations are TV Tuner Operations skipped automatically. Skipping channels Storing stations...
... Auto Memory is also skipped. 78 All TV stations previously stored are erased and TV stations are skipped, the category itself is carried out... - When Auto Memory is over, the TV station stored in No.1 will be shown on /off the JVC PnP. Received TV stations are TV Tuner Operations skipped automatically. Skipping channels Storing stations...
Instructions
Page 79
...are skipped or playback stops suddenly. ] Disc is warped or sticker on the additionally purchased monitor (KV-MAV7001) in use, you cannot watch the playback pictures on the disc comes off....8226; Disc cannot be played back. ] Disc is inserted upside down. • Tracks on a conventional TV (aspect ratio 4:3). Select "4:3 LB." • Audio language or subtitle language cannot be trouble is not ...service center. Disc playback-CD/CD-R/CD-RW • Sounds are too weak. Disc playback-DVD/VCD Hold Hold • You cannot watch the playback picture while driving. 79 Unlock the ...
...are skipped or playback stops suddenly. ] Disc is warped or sticker on the additionally purchased monitor (KV-MAV7001) in use, you cannot watch the playback pictures on the disc comes off....8226; Disc cannot be played back. ] Disc is inserted upside down. • Tracks on a conventional TV (aspect ratio 4:3). Select "4:3 LB." • Audio language or subtitle language cannot be trouble is not ...service center. Disc playback-CD/CD-R/CD-RW • Sounds are too weak. Disc playback-DVD/VCD Hold Hold • You cannot watch the playback picture while driving. 79 Unlock the ...