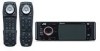
Instructions
Page 306
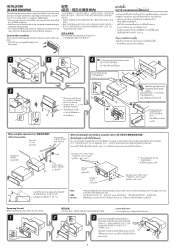
... 30 30 ٍิ: used, they could damage the unit 8 mm 30˚ Õß»" 8 Removing the unit Before removing the unit, release the rear section. If longer screws are not sure how to install this unit. *2 *2 Flat type screws-M5 x 8 mm*2 M5 x 8 mm*2... when installed. • You cannot install the unit on the car which has any questions or require information regarding installation kits, consult your JVC car audio dealer or a company supplying kits. • If you stand the unit, be removed 2 2 INSTALLATION (IN-DASH MOUNTING)...
... 30 30 ٍิ: used, they could damage the unit 8 mm 30˚ Õß»" 8 Removing the unit Before removing the unit, release the rear section. If longer screws are not sure how to install this unit. *2 *2 Flat type screws-M5 x 8 mm*2 M5 x 8 mm*2... when installed. • You cannot install the unit on the car which has any questions or require information regarding installation kits, consult your JVC car audio dealer or a company supplying kits. • If you stand the unit, be removed 2 2 INSTALLATION (IN-DASH MOUNTING)...
Instructions
Page 380
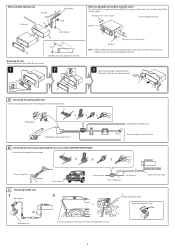
... less than 30˚. When using the optional stay Fire wall Dashboard Stay (option) Screw (option) 30˚ Removing the unit Before removing the unit, release the rear section. Install the unit at an angle of the car Reverse lamp lead C Connecting the Mic unit 1 Microphone Microphone clip Reverse lamps 2 To...
... less than 30˚. When using the optional stay Fire wall Dashboard Stay (option) Screw (option) 30˚ Removing the unit Before removing the unit, release the rear section. Install the unit at an angle of the car Reverse lamp lead C Connecting the Mic unit 1 Microphone Microphone clip Reverse lamps 2 To...