
Separate volume1
Page 1
... and that if you use a DVI to HDMI adapter this important information regarding the use your instruction book for future reference should you for purchasing a JVC television. Thank you choose to the HDMI 1 along with the HDMI 1 input. • When setting the "DIGITAL AUDIO - Please read this connection ...must be used with analog audio cables. Merci d'avoir acheté un téléviseur JVC. On page 24 "Connecting to a Digital TV Receiver" Notes: • The Analog Audio input can only be made to use of your...
... and that if you use a DVI to HDMI adapter this important information regarding the use your instruction book for future reference should you for purchasing a JVC television. Thank you choose to the HDMI 1 along with the HDMI 1 input. • When setting the "DIGITAL AUDIO - Please read this connection ...must be used with analog audio cables. Merci d'avoir acheté un téléviseur JVC. On page 24 "Connecting to a Digital TV Receiver" Notes: • The Analog Audio input can only be made to use of your...

Instructions
Page 2
...maintenance (servicing) instructions in some components. In the event of electric shock. Changes or modifications not approved by JVC could void the warranty. * When you don't use this TV set for a long period of time, be sure to disconnect both the power plug from the power source specified... lamp that may be of sufficient magnitude to constitute a risk of these materials may be fully inserted to repair it yourself or remove the rear cover. NOTICE (for your safety. * To prevent electric shock do not use this polarized plug with arrowhead symbol, within an equilateral triangle...
...maintenance (servicing) instructions in some components. In the event of electric shock. Changes or modifications not approved by JVC could void the warranty. * When you don't use this TV set for a long period of time, be sure to disconnect both the power plug from the power source specified... lamp that may be of sufficient magnitude to constitute a risk of these materials may be fully inserted to repair it yourself or remove the rear cover. NOTICE (for your safety. * To prevent electric shock do not use this polarized plug with arrowhead symbol, within an equilateral triangle...

Instructions
Page 3
...4) Follow all instructions. 5) Do not use this copyright protection technology must be copied or reproduced for your VCR is "ON", turn the TV/VCR switch to avoid injury from the apparatus. 11) Only use attachments/accessories specified by the manufacturer. 12) Use only with one wider ... the point where they exit from tip-over. 3 Reverse engineering or disassembly is used, use caution when moving the cart/apparatus combination to the "TV" position. For best viewing, if your safety. When a cart is prohibited. A grounding type plug has two blades and a third grounding prong....
...4) Follow all instructions. 5) Do not use this copyright protection technology must be copied or reproduced for your VCR is "ON", turn the TV/VCR switch to avoid injury from the apparatus. 11) Only use attachments/accessories specified by the manufacturer. 12) Use only with one wider ... the point where they exit from tip-over. 3 Reverse engineering or disassembly is used, use caution when moving the cart/apparatus combination to the "TV" position. For best viewing, if your safety. When a cart is prohibited. A grounding type plug has two blades and a third grounding prong....

Instructions
Page 4
..., does not operate normally, or has been dropped. 15) Apparatus shall not be placed on , the user is available around the TV to which can radiate radio frequency energy and, if not installed and used in accordance with liquids, such as to the minimum distance ...apparatus has been damaged in a particular installation. However, there is impossible. L/MONO R AUDIO 17) Cautions for help. 4 When installing this TV, distance recommendations must be determined by turning the equipment off and on the apparatus. 16) Avoid improper installation and never position the unit where good...
..., does not operate normally, or has been dropped. 15) Apparatus shall not be placed on , the user is available around the TV to which can radiate radio frequency energy and, if not installed and used in accordance with liquids, such as to the minimum distance ...apparatus has been damaged in a particular installation. However, there is impossible. L/MONO R AUDIO 17) Cautions for help. 4 When installing this TV, distance recommendations must be determined by turning the equipment off and on the apparatus. 16) Avoid improper installation and never position the unit where good...

Instructions
Page 5
... to the water to help remove spots of oily dirt. • DO NOT allow liquid to enter the TV through the ventilation slots. • DO NOT use strong or abrasive cleaners on the TV. • DO NOT spray liquids or cleaners directly on the screen surface and image distortions. 5 If the... will remove the coating layer and cause discolorations. Do not push or hit the screen. This could cause scratches on the TV's surface. • DO NOT rub or scrub the TV harshly. When it gets dirty, wipe it . Then wipe gently with a soft cloth, slightly moistened with a clean, dry cloth. Warnings ...
... to the water to help remove spots of oily dirt. • DO NOT allow liquid to enter the TV through the ventilation slots. • DO NOT use strong or abrasive cleaners on the TV. • DO NOT spray liquids or cleaners directly on the screen surface and image distortions. 5 If the... will remove the coating layer and cause discolorations. Do not push or hit the screen. This could cause scratches on the TV's surface. • DO NOT rub or scrub the TV harshly. When it gets dirty, wipe it . Then wipe gently with a soft cloth, slightly moistened with a clean, dry cloth. Warnings ...

Instructions
Page 6
...replacement lamp kit. When the POWER button is performed for purchasing JVC's model HD-56FH96, HD-61FH96 or HD-70FH96 HDTV-ready projection television which the TV is displayed only dimly on the front panel blinks in order to project the picture onto the screen. When the POWER button is in... 90 seconds. Once the screen is dark, cooling is pressed, the LAMP/PROGRAM LED indicator blinks in which uses the high-quality HD-ILA projection system. What happens when the power is turned on . The lamp is being shut down. This is explained below . 1. Do not block...
...replacement lamp kit. When the POWER button is performed for purchasing JVC's model HD-56FH96, HD-61FH96 or HD-70FH96 HDTV-ready projection television which the TV is displayed only dimly on the front panel blinks in order to project the picture onto the screen. When the POWER button is in... 90 seconds. Once the screen is dark, cooling is pressed, the LAMP/PROGRAM LED indicator blinks in which uses the high-quality HD-ILA projection system. What happens when the power is turned on . The lamp is being shut down. This is explained below . 1. Do not block...

Instructions
Page 7
... as it too close to another device, or when using the television. 12. Opening up the rear cabinet will blow warm air while the television is made of the lamp breaking. Do not turn...If the television is being shortened. 7 It subjects the television and the lamp to keep the TV on the screen. Also, take care to stress and may remain on for a long period of... a wall socket that have still segments for more than 24 hours consecutively. ILA element characteristics Do not project still pictures or pictures that is used by the screen frame. This is a possibility of the life...
... as it too close to another device, or when using the television. 12. Opening up the rear cabinet will blow warm air while the television is made of the lamp breaking. Do not turn...If the television is being shortened. 7 It subjects the television and the lamp to keep the TV on the screen. Also, take care to stress and may remain on for a long period of... a wall socket that have still segments for more than 24 hours consecutively. ILA element characteristics Do not project still pictures or pictures that is used by the screen frame. This is a possibility of the life...
Instructions
Page 8
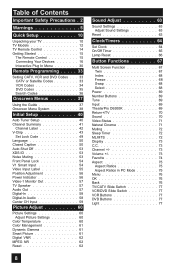
...Input 54 Video Input Label 55 Position Adjustment 56 Power Indicator 56 Video-1 Monitor Out 57 TV Speaker 57 Audio Out 57 Digital-In 58 Digital-In Audio 58 Center CH Input 59 ... 68 Select 68 Power 69 Number Buttons 69 Tune 69 Input 69 TheaterPro D6500K 69 Return+/TV 70 Sound 70 Video Status 71 Natural Cinema 71 Muting 72 Sleep Timer 72 ML/MTS 72 Display 73 ...C.C 73 Channel 73 Volume 73 Favorite 74 Aspect 75 Aspect Ratios 75 Aspect Ratios in PC Mode 75 Menu 76 OK 76 Back 76 TV...
...Input 54 Video Input Label 55 Position Adjustment 56 Power Indicator 56 Video-1 Monitor Out 57 TV Speaker 57 Audio Out 57 Digital-In 58 Digital-In Audio 58 Center CH Input 59 ... 68 Select 68 Power 69 Number Buttons 69 Tune 69 Input 69 TheaterPro D6500K 69 Return+/TV 70 Sound 70 Video Status 71 Natural Cinema 71 Muting 72 Sleep Timer 72 ML/MTS 72 Display 73 ...C.C 73 Channel 73 Volume 73 Favorite 74 Aspect 75 Aspect Ratios 75 Aspect Ratios in PC Mode 75 Menu 76 OK 76 Back 76 TV...
Instructions
Page 10
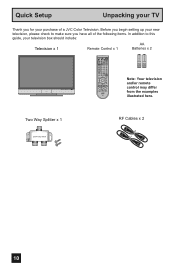
...In addition to this guide, your purchase of a JVC Color Television. NATURAL SOUND CINEMA 9 RETURN+ TV SUB CHANNEL SUB LIGHT MUTING CH GUIDE VOL OK VOL Note: Your television CH MENU VCR CHANNEL PREV NEXT BACK VCR DVD POWER TV VCR REW PLAY FF and/or remote control may ...television, please check to make sure you for your television box should include: Television x 1 Remote Control x 1 AA Batteries x 2 AA Alkaline AA Alkaline TV CATV VCR DVD POWER ASPECT MULTI SCREEN TWIN INDEX SELECT SLEEP FREEZE SWAP ML/MTS DISPLAY + INPUT 123 D/A 4 5 6 i.LINK MENU 78 TIMER TUNE ...
...In addition to this guide, your purchase of a JVC Color Television. NATURAL SOUND CINEMA 9 RETURN+ TV SUB CHANNEL SUB LIGHT MUTING CH GUIDE VOL OK VOL Note: Your television CH MENU VCR CHANNEL PREV NEXT BACK VCR DVD POWER TV VCR REW PLAY FF and/or remote control may ...television, please check to make sure you for your television box should include: Television x 1 Remote Control x 1 AA Batteries x 2 AA Alkaline AA Alkaline TV CATV VCR DVD POWER ASPECT MULTI SCREEN TWIN INDEX SELECT SLEEP FREEZE SWAP ML/MTS DISPLAY + INPUT 123 D/A 4 5 6 i.LINK MENU 78 TIMER TUNE ...

Instructions
Page 11
... devices you want to use plugs like VCRs, DVD players, stereo amplifiers, game consoles, etc. To make video connections with your TV. AV CompuLink Cable Used to your television. Used to connect audio/ video devices like the ones illustrated below. S-Video Cable Component ...Cables Composite Cables Audio Cables Used to connect JVC AV CompuLink capable components for an automated home theater. Coaxial Cables Used to connect an external antenna or cable TV system to make these connections you will use with S-Video VCRs, Camcorders ...
... devices you want to use plugs like VCRs, DVD players, stereo amplifiers, game consoles, etc. To make video connections with your TV. AV CompuLink Cable Used to your television. Used to connect audio/ video devices like the ones illustrated below. S-Video Cable Component ...Cables Composite Cables Audio Cables Used to connect JVC AV CompuLink capable components for an automated home theater. Coaxial Cables Used to connect an external antenna or cable TV system to make these connections you will use with S-Video VCRs, Camcorders ...

Instructions
Page 12
...UNDER THE FOLLOWING U.S. PATENTS 6,183,091 6,419,362 AV COMPULINK III OPTICAL OUT Digital Audio 12 AUDIO - L INPUT-2 R - AUDIO - Quick Setup TV Models NOTE: Before you in understanding how to connect your television to another device, please refer to the proper diagrams for your specific... TV and remote. Rear Panel Diagram MODELS: HD-56FH96 HD-61FH96 HD-70FH96 Note: • The terminal labeled "SERVICE ONLY", is exclusively used to ...
...UNDER THE FOLLOWING U.S. PATENTS 6,183,091 6,419,362 AV COMPULINK III OPTICAL OUT Digital Audio 12 AUDIO - L INPUT-2 R - AUDIO - Quick Setup TV Models NOTE: Before you in understanding how to connect your television to another device, please refer to the proper diagrams for your specific... TV and remote. Rear Panel Diagram MODELS: HD-56FH96 HD-61FH96 HD-70FH96 Note: • The terminal labeled "SERVICE ONLY", is exclusively used to ...

Instructions
Page 13
Side Panel Diagram INPUT MENU INPUT 4 S-VIDEO OPERATE + CHANNEL - To open the door, gently pull the tab on the LED, see page 102. • Media Card Slot is for HD-70FH96 ONLY. L/MONO R AUDIO MODELS: HD-56FH96, HD-61FH96, HD-70FH96 13 OVER VIDEO + VOLUME - Quick Setup Front Panel Diagram POWER LAMP/PROGRAM *HD-70FH96 ONLY TV Models POWER LAMP/PROGRAM LAMP/PROGRAM LED POWER BUTTON POWER LED MEDIA CARD SLOT Close door when using media cards SD/ MMC xD-Picture Card COMPACT FLASH MODELS: HD-56FH96, HD-61FH96, HD-70FH96 • For information on the door.
Side Panel Diagram INPUT MENU INPUT 4 S-VIDEO OPERATE + CHANNEL - To open the door, gently pull the tab on the LED, see page 102. • Media Card Slot is for HD-70FH96 ONLY. L/MONO R AUDIO MODELS: HD-56FH96, HD-61FH96, HD-70FH96 13 OVER VIDEO + VOLUME - Quick Setup Front Panel Diagram POWER LAMP/PROGRAM *HD-70FH96 ONLY TV Models POWER LAMP/PROGRAM LAMP/PROGRAM LED POWER BUTTON POWER LED MEDIA CARD SLOT Close door when using media cards SD/ MMC xD-Picture Card COMPACT FLASH MODELS: HD-56FH96, HD-61FH96, HD-70FH96 • For information on the door.

Instructions
Page 14
...connected to an ATSC antenna or Digital Cable, you can use these buttons. 14 Quick Setup TV Remote Control TV CATV VCR DVD POWER ASPECT MULTI SCREEN TWIN INDEX SELECT SLEEP FREEZE SWAP ML/MTS DISPLAY +...5 6 i.LINK MENU 78 TIMER TUNE THEATER FAVORITE PRO 0 VIDEO STATUS C.C. NATURAL SOUND CINEMA 9 RETURN+ TV SUB CHANNEL SUB LIGHT MUTING CH GUIDE VOL OK VOL CH MENU VCR CHANNEL PREV NEXT BACK VCR DVD POWER... TV VCR REW PLAY FF REC STOP PAUSE OPEN CLOSE STILL PAUSE RM-C14G RM-C14G MODELS...
...connected to an ATSC antenna or Digital Cable, you can use these buttons. 14 Quick Setup TV Remote Control TV CATV VCR DVD POWER ASPECT MULTI SCREEN TWIN INDEX SELECT SLEEP FREEZE SWAP ML/MTS DISPLAY +...5 6 i.LINK MENU 78 TIMER TUNE THEATER FAVORITE PRO 0 VIDEO STATUS C.C. NATURAL SOUND CINEMA 9 RETURN+ TV SUB CHANNEL SUB LIGHT MUTING CH GUIDE VOL OK VOL CH MENU VCR CHANNEL PREV NEXT BACK VCR DVD POWER... TV VCR REW PLAY FF REC STOP PAUSE OPEN CLOSE STILL PAUSE RM-C14G RM-C14G MODELS...

Instructions
Page 15
... LED will scan forward and back through the channels using your remote control, you have to begin using JVC's Hyperscan feature, press and hold CH+ or CH-. Please see page 100. 15 POWER T TV CATV MUL VCR DVD Note: • If the lamp replacement message appears when you turn the volume up... or down towards the bottom of this is the first time you are turning on the TV, the interactive plug-in menu appears. • Make sure the TV/CATV switch is set to control a VCR. Step 1 - The VOL OK VOL right and left buttons will turn the television...
... LED will scan forward and back through the channels using your remote control, you have to begin using JVC's Hyperscan feature, press and hold CH+ or CH-. Please see page 100. 15 POWER T TV CATV MUL VCR DVD Note: • If the lamp replacement message appears when you turn the volume up... or down towards the bottom of this is the first time you are turning on the TV, the interactive plug-in menu appears. • Make sure the TV/CATV switch is set to control a VCR. Step 1 - The VOL OK VOL right and left buttons will turn the television...
Instructions
Page 16
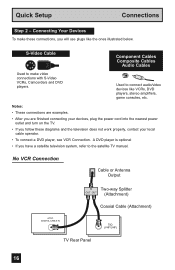
... or Antenna Output IN Two-way Splitter OUT OUT (Attachment) Coaxial Cable (Attachment) ATSC /DIGITAL CABLE IN 75Ω (VHF/UHF) TV Rear Panel 16 Connecting Your Devices To make video connections with S-Video VCRs, Camcorders and DVD players. Quick Setup Connections Step 2 - S-Video ...Cable Component Cables Composite Cables Audio Cables Used to the satellite TV manual. A DVD player is optional • If you follow these diagrams and the television does not work properly, contact your devices, ...
... or Antenna Output IN Two-way Splitter OUT OUT (Attachment) Coaxial Cable (Attachment) ATSC /DIGITAL CABLE IN 75Ω (VHF/UHF) TV Rear Panel 16 Connecting Your Devices To make video connections with S-Video VCRs, Camcorders and DVD players. Quick Setup Connections Step 2 - S-Video ...Cable Component Cables Composite Cables Audio Cables Used to the satellite TV manual. A DVD player is optional • If you follow these diagrams and the television does not work properly, contact your devices, ...

Instructions
Page 17
... complete one set of connections (DVD or audio output) before starting the other to avoid accidentally switching the cables. • You may vary colors. L INPUT-2 R - L TV Rear Panel CENTER CHANNELINPUT Y Pb Pr INPUT-1 Y Pb Pr INPUT-2 AUDIO OUT R L Y PB PR OUT Green Blue Red DVD Player (OPTIONAL) Note: • If this connection...
... complete one set of connections (DVD or audio output) before starting the other to avoid accidentally switching the cables. • You may vary colors. L INPUT-2 R - L TV Rear Panel CENTER CHANNELINPUT Y Pb Pr INPUT-1 Y Pb Pr INPUT-2 AUDIO OUT R L Y PB PR OUT Green Blue Red DVD Player (OPTIONAL) Note: • If this connection...

Instructions
Page 18
AUDIO - AUDIO - AUDIO - L INPUT-2 R - L INPUT-1 R - L INPUT-3 R - Quick Setup Diagram #2 Cable or Antenna Output Connections Two-Way Splitter IN OUT OUT VCR IN OUT V R L IN OUT Two-Way Splitter IN (Attachment) OUT OUT Coaxial Cable (Attachment) ATSC /DIGITAL CABLE IN I 75Ω (VHF/UHF) OR S-VIDEO VIDEO OVER VIDEO S-VIDEO VIDEO OVER R - AUDIO - L TV Rear Panel CENTER CHANNELINPUT Y Pb Pr INPUT-1 Y Pb Pr INPUT-2 AUDIO OUT R L Y PB PR OUT Green Blue Red DVD Player (OPTIONAL) 18
AUDIO - AUDIO - AUDIO - L INPUT-2 R - L INPUT-1 R - L INPUT-3 R - Quick Setup Diagram #2 Cable or Antenna Output Connections Two-Way Splitter IN OUT OUT VCR IN OUT V R L IN OUT Two-Way Splitter IN (Attachment) OUT OUT Coaxial Cable (Attachment) ATSC /DIGITAL CABLE IN I 75Ω (VHF/UHF) OR S-VIDEO VIDEO OVER VIDEO S-VIDEO VIDEO OVER R - AUDIO - L TV Rear Panel CENTER CHANNELINPUT Y Pb Pr INPUT-1 Y Pb Pr INPUT-2 AUDIO OUT R L Y PB PR OUT Green Blue Red DVD Player (OPTIONAL) 18

Instructions
Page 19
Quick Setup Connections Connecting to Monitor/Recording Output Terminal TV Rear Panel S-VIDEO VIDEO R L MONITOR/REC OUT OR VCR IN OUT IN OUT V R L ...malfunction of the copyright protection system. This is due to the copyright protection system, and is because of your TV. 19 If you will be able to ON. See page 57. • If you are receiving ATSC/Digital...be outputted to the S-Video output terminal or Video (composite video) terminal. • If you are receiving Analog TV signal, it can not be outputted to the S-Video output terminal. • No signal will be outputted through...
Quick Setup Connections Connecting to Monitor/Recording Output Terminal TV Rear Panel S-VIDEO VIDEO R L MONITOR/REC OUT OR VCR IN OUT IN OUT V R L ...malfunction of the copyright protection system. This is due to the copyright protection system, and is because of your TV. 19 If you will be able to ON. See page 57. • If you are receiving ATSC/Digital...be outputted to the S-Video output terminal or Video (composite video) terminal. • If you are receiving Analog TV signal, it can not be outputted to the S-Video output terminal. • No signal will be outputted through...

Instructions
Page 20
TV Rear Panel AV COMPULINK III VCR IN V L R IN OUT OUT AV CompuLink Notes: • In order for the VCR playback to begin playback. At the same time, using VCR A code will switch the TV to input 1. • Refer to turn on and begin automatically, the recording tabs must be removed...connection information. • AV CompuLink is not, contact JVC Parts Department at the rear of the AV CompuLink cable into the AV COMPULINK INPUT on your JVC DVD player and the device will occur when you wish to JVC AV Compu Link JVC's AV CompuLink feature makes playing video tapes or DVDs ...
TV Rear Panel AV COMPULINK III VCR IN V L R IN OUT OUT AV CompuLink Notes: • In order for the VCR playback to begin playback. At the same time, using VCR A code will switch the TV to input 1. • Refer to turn on and begin automatically, the recording tabs must be removed...connection information. • AV CompuLink is not, contact JVC Parts Department at the rear of the AV CompuLink cable into the AV COMPULINK INPUT on your JVC DVD player and the device will occur when you wish to JVC AV Compu Link JVC's AV CompuLink feature makes playing video tapes or DVDs ...

Instructions
Page 21
... equipment to your camcorder is a mono sound model it to the L/MONO on the side of the TV. 21 INPUT MENU INPUT 4 S-VIDEO OPERATE + CHANNEL - You can also connect these using the television's rear input jacks, using the side input jacks (Input 4) located on the side of the... TV. Connect it will have only one AUDIO OUT. CAMCORDER 1) Connect a yellow composite cable from the camcorder VIDEO OUT...
... equipment to your camcorder is a mono sound model it to the L/MONO on the side of the TV. 21 INPUT MENU INPUT 4 S-VIDEO OPERATE + CHANNEL - You can also connect these using the television's rear input jacks, using the side input jacks (Input 4) located on the side of the... TV. Connect it will have only one AUDIO OUT. CAMCORDER 1) Connect a yellow composite cable from the camcorder VIDEO OUT...


