
Instructions
Page 6
...like the ones illustrated below. AV Compu Link Cable Used to this guide, your television box should include: 1 Television 1 Remote Control Two AA Batteries A matching TV stand is to connect it to your antenna/cable or satellite system and to connect the audio/video devices you want to use... can learn about your new television's many great features. Once you have all of the following items. In addition to connect JVC AV Compu Link capable components for your purchase of a JVC Color Television. S-Video Plug Used to connect a coaxial cable from the example illustrated here.
...like the ones illustrated below. AV Compu Link Cable Used to this guide, your television box should include: 1 Television 1 Remote Control Two AA Batteries A matching TV stand is to connect it to your antenna/cable or satellite system and to connect the audio/video devices you want to use... can learn about your new television's many great features. Once you have all of the following items. In addition to connect JVC AV Compu Link capable components for your purchase of a JVC Color Television. S-Video Plug Used to connect a coaxial cable from the example illustrated here.
Instructions
Page 8
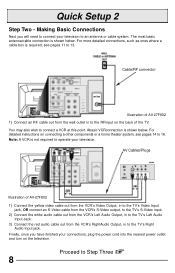
... the VCR's S-Video output, to the TV's S-Video input. 2) Connect the white audio cable out from the VCR's Left Audio Output, in to the TV's Left Audio Input Jack. 3) Connect the red audio cable out from the VCR's RightAudio Output, in to the TV's Right Audio Input jack. AV Cables/Plugs Illustration of the TV. Note: A VCR is shown below...
... the VCR's S-Video output, to the TV's S-Video input. 2) Connect the white audio cable out from the VCR's Left Audio Output, in to the TV's Left Audio Input Jack. 3) Connect the red audio cable out from the VCR's RightAudio Output, in to the TV's Right Audio Input jack. AV Cables/Plugs Illustration of the TV. Note: A VCR is shown below...
Instructions
Page 9
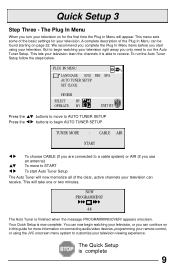
... the Plug In Menu will appear. This lets your television viewing experience. The Quick Setup is able to START To start using the JVC onscreen menu system to run the Auto Tuner Setup follow the steps below. PLUG IN MENU LANGUAGE ENG FRE SPA AUTO TUNER SETUP SET...complete description of the clear, active channels your television. This will now memorize all of the Plug In Menu can be found starting on connecting audio/video devices, programming your remote control, or using your television can continue on in this guide for more information on page 22. NOW PROGRAMMING!...
... the Plug In Menu will appear. This lets your television viewing experience. The Quick Setup is able to START To start using the JVC onscreen menu system to run the Auto Tuner Setup follow the steps below. PLUG IN MENU LANGUAGE ENG FRE SPA AUTO TUNER SETUP SET...complete description of the clear, active channels your television. This will now memorize all of the Plug In Menu can be found starting on connecting audio/video devices, programming your remote control, or using your television can continue on in this guide for more information on page 22. NOW PROGRAMMING!...
Instructions
Page 10
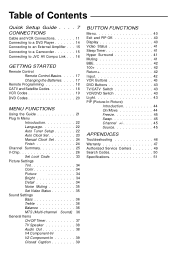
.... . . . 7 CONNECTIONS Cable and VCR Connections 11 Connecting to a DVD Player 14 Connecting to an External Amplifier . . . 15 Connecting to a Camcorder 15 Connecting to JVC AV Compu Link . . . 16 GETTING STARTED Remote Control Remote Control Basics. . . . . 17 Changing the Batteries. . . . . 17 Remote Programming 18 CATV and Satellite...Status 35 Sound Settings Bass 36 Treble 36 Balance 36 MTS (Multi-channel Sound) 36 General Items On/Off Timer 37 TV Speaker 38 Audio Out 38 V4 Component-In/ V2 Component-In 39 Closed Caption 39 BUTTON FUNCTIONS Menu 40 Exit and PIP Off 40...
.... . . . 7 CONNECTIONS Cable and VCR Connections 11 Connecting to a DVD Player 14 Connecting to an External Amplifier . . . 15 Connecting to a Camcorder 15 Connecting to JVC AV Compu Link . . . 16 GETTING STARTED Remote Control Remote Control Basics. . . . . 17 Changing the Batteries. . . . . 17 Remote Programming 18 CATV and Satellite...Status 35 Sound Settings Bass 36 Treble 36 Balance 36 MTS (Multi-channel Sound) 36 General Items On/Off Timer 37 TV Speaker 38 Audio Out 38 V4 Component-In/ V2 Component-In 39 Closed Caption 39 BUTTON FUNCTIONS Menu 40 Exit and PIP Off 40...
Instructions
Page 11
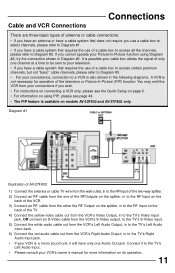
... input. 5) Connect the white audio cable out from the VCR's Left Audio Output, in to the TV's Left Audio Input Jack. 6) Connect the red audio cable out from your connections if you cannot operate your VCR is not necessary for more information on models AV-32F802 and AV-27F802 only. Connect it will ...have a cable system that requires the use of a cable box to access all the channels, please refer to the TV's Right Audio Input jack. • If your Picture-In-Picture function...
... input. 5) Connect the white audio cable out from the VCR's Left Audio Output, in to the TV's Left Audio Input Jack. 6) Connect the red audio cable out from your connections if you cannot operate your VCR is not necessary for more information on models AV-32F802 and AV-27F802 only. Connect it will ...have a cable system that requires the use of a cable box to access all the channels, please refer to the TV's Right Audio Input jack. • If your Picture-In-Picture function...

Instructions
Page 12
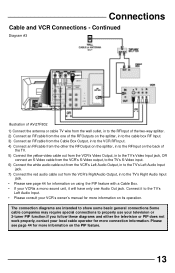
Connections Cable and VCR Connections - Continued Diagram #2 Illustration of AV-27F802 1) Connect the antenna or cable TV wire from the wall outlet, in to the RFInput of the cable box. 2) Connect an RF cable from the RF Output of the cable box, ... S-Video cable from the VCR's S-Video output, to the TV's S-Video input. 5) Connect the white audio cable out from the VCR's Left Audio Output, in to the TV's Left Audio Input Jack. 6) Connect the red audio cable out from the VCR's Right Audio Output, in to the TV's Right Audio Input jack. • Please see page 44 for more...
Connections Cable and VCR Connections - Continued Diagram #2 Illustration of AV-27F802 1) Connect the antenna or cable TV wire from the wall outlet, in to the RFInput of the cable box. 2) Connect an RF cable from the RF Output of the cable box, ... S-Video cable from the VCR's S-Video output, to the TV's S-Video input. 5) Connect the white audio cable out from the VCR's Left Audio Output, in to the TV's Left Audio Input Jack. 6) Connect the red audio cable out from the VCR's Right Audio Output, in to the TV's Right Audio Input jack. • Please see page 44 for more...
Instructions
Page 13
... of AV-27F802 1) Connect the antenna or cable TV wire from the wall outlet, in to the RFInput of the TV. 5) Connect the yellow video cable out from the VCR's Video Output, in to the TV's Video Input jack, OR connect an S-Video cable from the VCR's S-Video output, to the TV's S-...Cable and VCR Connections - The connection diagrams are intended to show some basic general connections.Some cable companies may require special connections to the TV's Left Audio Input. • Please consult your local cable operator for more information on the back of the two-way splitter. 2) Connect an RFcable...
... of AV-27F802 1) Connect the antenna or cable TV wire from the wall outlet, in to the RFInput of the TV. 5) Connect the yellow video cable out from the VCR's Video Output, in to the TV's Video Input jack, OR connect an S-Video cable from the VCR's S-Video output, to the TV's S-...Cable and VCR Connections - The connection diagrams are intended to show some basic general connections.Some cable companies may require special connections to the TV's Left Audio Input. • Please consult your local cable operator for more information on the back of the two-way splitter. 2) Connect an RFcable...
Instructions
Page 14
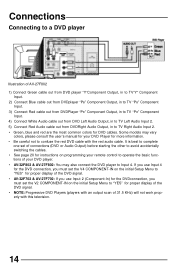
... Red cable out from DVDPlayer "PR" Component Output, in to TV "PR" Component Input. 4) Connect White Audio cable out from DVD Left Audio Output, in to TV Left Audio Input 2. 5) Connect Red Audio cable out from DVDRight Audio Output, in to TV Right Audio Input 2. • Green, blue and red are the most ...initial Setup Menu to "YES" for proper display of the DVD signal. • AV-32F702 & AV-27F702: If you use Input 2 (Component-In) for the DVDconnection, you must set of connections (DVD or Audio Output) before starting the other to avoid accidentally switching the cables. • See page...
... Red cable out from DVDPlayer "PR" Component Output, in to TV "PR" Component Input. 4) Connect White Audio cable out from DVD Left Audio Output, in to TV Left Audio Input 2. 5) Connect Red Audio cable out from DVDRight Audio Output, in to TV Right Audio Input 2. • Green, blue and red are the most ...initial Setup Menu to "YES" for proper display of the DVD signal. • AV-32F702 & AV-27F702: If you use Input 2 (Component-In) for the DVDconnection, you must set of connections (DVD or Audio Output) before starting the other to avoid accidentally switching the cables. • See page...

Instructions
Page 15
... will have only one audio jack. Illustration of AV-27F802 1) Connect the white audio cable from the TV's Left Audio Output jack to the Amplifier's Left Audio Input jack. 2) Connect the red audio cable from the Camcorder's Right Audio Output, in to the TV's Left Audio Input jack. 3) Connect the red audio cable out from the TV's Right Audio Output jack to the...
... will have only one audio jack. Illustration of AV-27F802 1) Connect the white audio cable from the TV's Left Audio Output jack to the Amplifier's Left Audio Input jack. 2) Connect the red audio cable from the Camcorder's Right Audio Output, in to the TV's Left Audio Input jack. 3) Connect the red audio cable out from the TV's Right Audio Output jack to the...
Instructions
Page 36
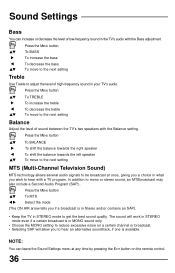
...bass To move to the next setting MTS (Multi-Channel Television Sound) MTS technology allows several audio signals to be broadcast at any time by pressing the EXIT button on a certain channel or ...broadcast is available. NOTE: You can increase or decrease the level of low-frequency sound in the TV's audio with the Balance setting. Sound Settings Bass You can leave the Sound Settings menu at once, giving... AIR arrow tells you wish to hear an alternative soundtrack, if one is in your TV's audio. Press the MENU button To BALANCE To shift the balance towards the right speaker To shift...
...bass To move to the next setting MTS (Multi-Channel Television Sound) MTS technology allows several audio signals to be broadcast at any time by pressing the EXIT button on a certain channel or ...broadcast is available. NOTE: You can increase or decrease the level of low-frequency sound in the TV's audio with the Balance setting. Sound Settings Bass You can leave the Sound Settings menu at once, giving... AIR arrow tells you wish to hear an alternative soundtrack, if one is in your TV's audio. Press the MENU button To BALANCE To shift the balance towards the right speaker To shift...
Instructions
Page 38
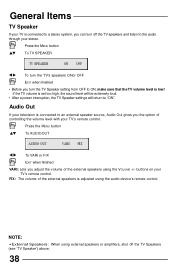
... gives you the option of the external speakers is low! Press the MENU button To AUDIOOUT AUDIO OUT VARI FIX To VARI or FIX EXIT when finished VARI: Lets you turn the TV's speakers ONor OFF EXIT when finished • Before you adjust the volume of the external speakers ...using external speakers or amplifiers, shut off the TV speakers and listen to the audio through your TV's remote control. buttons on your stereo. If the TV volume is set too high, the sound level will be extremely loud. • After a power interruption...
... gives you the option of the external speakers is low! Press the MENU button To AUDIOOUT AUDIO OUT VARI FIX To VARI or FIX EXIT when finished VARI: Lets you turn the TV's speakers ONor OFF EXIT when finished • Before you adjust the volume of the external speakers ...using external speakers or amplifiers, shut off the TV speakers and listen to the audio through your TV's remote control. buttons on your stereo. If the TV volume is set too high, the sound level will be extremely loud. • After a power interruption...
Instructions
Page 41
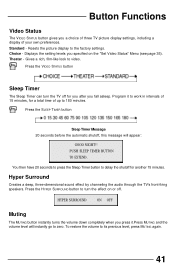
... you after you fall asleep. Press the HYPER SURROUND button to turn the TV off . Theater - Hyper Surround Creates a deep, three-dimensional sound effect by channeling the audio through the TV's front-firing speakers. Resets the picture display to video. Button Functions Video ...Status The VIDEO STATUS button gives you a choice of three TV picture display settings, including a display of up to 180 ...
... you after you fall asleep. Press the HYPER SURROUND button to turn the TV off . Theater - Hyper Surround Creates a deep, three-dimensional sound effect by channeling the audio through the TV's front-firing speakers. Resets the picture display to video. Button Functions Video ...Status The VIDEO STATUS button gives you a choice of three TV picture display settings, including a display of up to 180 ...

Instructions
Page 42
...Selects the signal input source for the television: TV (for Antenna or Cable) or Video-1, 2, 3, or 4 for three seconds RETURN CHANNEL PROGRAMMED ! For Canada, licensed from BBE Sound, Inc. Returns to directly access channels above Channel 99. IN P U T •AV-32F702 & AV-27F702 do not have a Video-4 input.... does not affect the PIP channel (AV-32F802 & AV-27F802 only). Now scan through the channels using the CH+ and CH- buttons. NOTE: • BBE is a registered trademark of BBESound, Inc. Button Functions BBE BBE high definition audio adds natural, clear and extraordinary sound ...
...Selects the signal input source for the television: TV (for Antenna or Cable) or Video-1, 2, 3, or 4 for three seconds RETURN CHANNEL PROGRAMMED ! For Canada, licensed from BBE Sound, Inc. Returns to directly access channels above Channel 99. IN P U T •AV-32F702 & AV-27F702 do not have a Video-4 input.... does not affect the PIP channel (AV-32F802 & AV-27F802 only). Now scan through the channels using the CH+ and CH- buttons. NOTE: • BBE is a registered trademark of BBESound, Inc. Button Functions BBE BBE high definition audio adds natural, clear and extraordinary sound ...

Instructions
Page 47
... covered in the Owner's Manual, normal maintenance , video and audio head cleaning; 4) Damage that occurs in your JVCProduct, please contact our Customer Relations Department. Service locations can also be covered on a carry-in service will require clear access to the original owner. JVC COMPANYOF AMERICA warrants this product and all parts thereof...
... covered in the Owner's Manual, normal maintenance , video and audio head cleaning; 4) Damage that occurs in your JVCProduct, please contact our Customer Relations Department. Service locations can also be covered on a carry-in service will require clear access to the original owner. JVC COMPANYOF AMERICA warrants this product and all parts thereof...


