

Owners Manual
Page 1
For more information regarding Invacare products, parts, and services, please visit www.invacare.com Owner's Operator and Maintenance Manual ® Recumbent Handcycle Series Top End XLT™ Top End XLT Jr. Top End XLT Pro Top End XLT Gold Top End Force™ DEALER: This manual MUST be given to the user of the handcycle. USER: BEFORE using this handcycle, read this manual and save for future reference.
For more information regarding Invacare products, parts, and services, please visit www.invacare.com Owner's Operator and Maintenance Manual ® Recumbent Handcycle Series Top End XLT™ Top End XLT Jr. Top End XLT Pro Top End XLT Gold Top End Force™ DEALER: This manual MUST be given to the user of the handcycle. USER: BEFORE using this handcycle, read this manual and save for future reference.
Owners Manual
Page 5
...CONTENTS SECTION 8-SERVICE PROCEDURES 46 Replacing the Fork/Crank Assembly ...46 Replacing the Crank Arms - XLT Gold, XLT PRO and Top End Force 49 Replacing the Left Side Crank Arms 49 Replacing the Right Side Crank...Removing Road Crown Compensator 51 Adjusting Road Crown Compensator 51 Installing/Removing/Adjusting the Steering Dampener For Top End XLT Gold and Force Only 52 Installing Steering Dampener...52 Removing Steering Dampener ...52 Adjusting Steering Dampener ...52 ...Wide Back Upholstery...59 Replacing Narrow Back Upholstery 59 Part No 1114850 5 Recumbent Handcycle Series
...CONTENTS SECTION 8-SERVICE PROCEDURES 46 Replacing the Fork/Crank Assembly ...46 Replacing the Crank Arms - XLT Gold, XLT PRO and Top End Force 49 Replacing the Left Side Crank Arms 49 Replacing the Right Side Crank...Removing Road Crown Compensator 51 Adjusting Road Crown Compensator 51 Installing/Removing/Adjusting the Steering Dampener For Top End XLT Gold and Force Only 52 Installing Steering Dampener...52 Removing Steering Dampener ...52 Adjusting Steering Dampener ...52 ...Wide Back Upholstery...59 Replacing Narrow Back Upholstery 59 Part No 1114850 5 Recumbent Handcycle Series
Owners Manual
Page 7
...with product information, maintenance tips and industry news. XLT Gold, XLT Pro and XLT with Road Crown Compensator ...68 Removing the Fork ...68 Installing the Fork...68 Removing/Installing the Fork - Register ONLINE at warranty.invacare.com Please have your model number and purchase date...include: 1. Travel Ready XLT PRO Equipped with Speed Cassette Chain ...70 Removing the Front Wheel...70 Installing the Front Wheel ...71 Assembling/Using/Adjusting the Handcycle Rack 71 Assembling the Handcycle Rack ...71 Using the Handcycle Rack...72 Adjusting the Handcycle Rack...73 Using the ...
...with product information, maintenance tips and industry news. XLT Gold, XLT Pro and XLT with Road Crown Compensator ...68 Removing the Fork ...68 Installing the Fork...68 Removing/Installing the Fork - Register ONLINE at warranty.invacare.com Please have your model number and purchase date...include: 1. Travel Ready XLT PRO Equipped with Speed Cassette Chain ...70 Removing the Front Wheel...70 Installing the Front Wheel ...71 Assembling/Using/Adjusting the Handcycle Rack 71 Assembling the Handcycle Rack ...71 Using the Handcycle Rack...72 Adjusting the Handcycle Rack...73 Using the ...

Owners Manual
Page 11
...(Wide) 18 inches (Narrow, Tall) Footrest: Adjustable Fore and Aft Adjustable Fore and Aft Side - Part No 1114850 11 Recumbent Handcycle Series Parking brake on handpedal for lower derailler, Manual shifter right handpedal for lower derailler, Manual for upper derailler/chainrings. Precision Black ... on Top End V crankset Ergonomic, Vertical, Ovalized Aluminum mounted on pedal. Standard 9° - TYPICAL PRODUCT PARAMETERS TOP END XLT PRO TOP END XLT GOLD Seat Width: 14 to 18 inches 14 to 18 inches Seat Depth: 15 inches 15 inches Seat-to approximately 1‐inch.
...(Wide) 18 inches (Narrow, Tall) Footrest: Adjustable Fore and Aft Adjustable Fore and Aft Side - Part No 1114850 11 Recumbent Handcycle Series Parking brake on handpedal for lower derailler, Manual shifter right handpedal for lower derailler, Manual for upper derailler/chainrings. Precision Black ... on Top End V crankset Ergonomic, Vertical, Ovalized Aluminum mounted on pedal. Standard 9° - TYPICAL PRODUCT PARAMETERS TOP END XLT PRO TOP END XLT GOLD Seat Width: 14 to 18 inches 14 to 18 inches Seat Depth: 15 inches 15 inches Seat-to approximately 1‐inch.
Owners Manual
Page 13
....) Give pedestrians the right of the handcycle is a positioning belt only. Invacare products are not recommended for use of an handcycle may be replaced immediately. Part No 1114850 13 Recumbent Handcycle Series If ordered without a parking brake, the handcycle MUST be positioned securely against a stable... aircraft safety belts. Top End XLT Pro Model Only ‐ This model may result in conjunction with an ice or oil film. It is an option on this equipment by means of this handcycle (you from operating the handcycle properly. Inasmuch as an additional...
....) Give pedestrians the right of the handcycle is a positioning belt only. Invacare products are not recommended for use of an handcycle may be replaced immediately. Part No 1114850 13 Recumbent Handcycle Series If ordered without a parking brake, the handcycle MUST be positioned securely against a stable... aircraft safety belts. Top End XLT Pro Model Only ‐ This model may result in conjunction with an ice or oil film. It is an option on this equipment by means of this handcycle (you from operating the handcycle properly. Inasmuch as an additional...
Owners Manual
Page 16
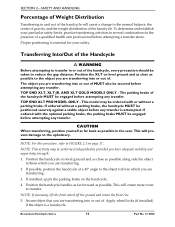
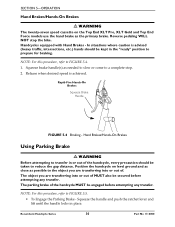
...a qualified health care professional before attempting any transfer is attempted. Transferring Into/Out of the Handcycle ƽ WARNING Before attempting to transfer in or out of . TOP END XLT, XLT JR. AND XLT GOLD MODELS ONLY - If ordered without a parking brake. CAUTION When transferring, position yourself ...the object to/from which you are transferring. 2. TOP END XLT PRO MODEL ONLY - This will cause a change to the normal balance, the center of gravity, and the weight distribution of the handcycle. Position the handcycle on level ground and as close as possible to the object...
...a qualified health care professional before attempting any transfer is attempted. Transferring Into/Out of the Handcycle ƽ WARNING Before attempting to transfer in or out of . TOP END XLT, XLT JR. AND XLT GOLD MODELS ONLY - If ordered without a parking brake. CAUTION When transferring, position yourself ...the object to/from which you are transferring. 2. TOP END XLT PRO MODEL ONLY - This will cause a change to the normal balance, the center of gravity, and the weight distribution of the handcycle. Position the handcycle on level ground and as close as possible to the object...
Owners Manual
Page 24
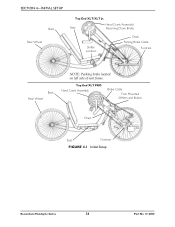
SECTION 4-INITIAL SETUP Back Rear Wheel Top End XLT/XLT Jr. Hand Crank Assembly/ Seat Reversing Drum Brake Shifter Location Chain Parking Brake Cable Footrest Back Rear Wheel NOTE: Parking brake located on left side of seat frame. Top End XLT PRO Hand Crank Assembly Brake Cable Fork Mounted Shifters and Brakes Chain Seat Footrest FIGURE 4.1 Initial Setup Recumbent Handcycle Series 24 Part No 1114850
SECTION 4-INITIAL SETUP Back Rear Wheel Top End XLT/XLT Jr. Hand Crank Assembly/ Seat Reversing Drum Brake Shifter Location Chain Parking Brake Cable Footrest Back Rear Wheel NOTE: Parking brake located on left side of seat frame. Top End XLT PRO Hand Crank Assembly Brake Cable Fork Mounted Shifters and Brakes Chain Seat Footrest FIGURE 4.1 Initial Setup Recumbent Handcycle Series 24 Part No 1114850
Owners Manual
Page 28
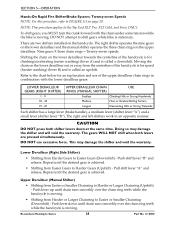
... bike is moving . • Shifting from Harder Gears to the Top End XLT Pro, XLT Gold, and Force ONLY. The gears WILL NOT shift when both shifter levers down until chain runs smoothly over the chain ring teeth while the handcycle is stationary. SECTION 5-OPERATION Hands-On Rapid Fire Shifter/Brake System: Twenty-seven...
... bike is moving . • Shifting from Harder Gears to the Top End XLT Pro, XLT Gold, and Force ONLY. The gears WILL NOT shift when both shifter levers down until chain runs smoothly over the chain ring teeth while the handcycle is stationary. SECTION 5-OPERATION Hands-On Rapid Fire Shifter/Brake System: Twenty-seven...

Owners Manual
Page 29
...) or external gearing (24 or 27 speeds). Part No 1114850 29 Recumbent Handcycle Series Reversing Drum Brakes NOTE: Top End XLT and XLT Jr. with reversing drum brakes. When backing up . Apply by pedaling in the XLT PRO, XLT Gold and Force models, take care not to avoid this problem. Hands-On... Rapid Fire Shifter/Brake System: Twenty-seven Speeds Backing-Up Use the rear wheels (i.e. like a manual handcycle) to a complete stop. Lift the pedals up in...
...) or external gearing (24 or 27 speeds). Part No 1114850 29 Recumbent Handcycle Series Reversing Drum Brakes NOTE: Top End XLT and XLT Jr. with reversing drum brakes. When backing up . Apply by pedaling in the XLT PRO, XLT Gold and Force models, take care not to avoid this problem. Hands-On... Rapid Fire Shifter/Brake System: Twenty-seven Speeds Backing-Up Use the rear wheels (i.e. like a manual handcycle) to a complete stop. Lift the pedals up in...
Owners Manual
Page 30
... speed is advised (heavy traffic, intersections, etc.) hands should be taken to the object you are transferring into or out of . Position the handcycle on the Top End XLT Pro, XLT Gold and Top End Force models use the hand brake as possible to reduce the gap distance. NOTE: For this procedure, refer to...
... speed is advised (heavy traffic, intersections, etc.) hands should be taken to the object you are transferring into or out of . Position the handcycle on the Top End XLT Pro, XLT Gold and Top End Force models use the hand brake as possible to reduce the gap distance. NOTE: For this procedure, refer to...

Owners Manual
Page 32
... mounting clamp. Footrest B. Clamp, Hex, Bolt and Locknut Leg Guard Replacement/Adjustment 5. Repeat STEPS 1‐5 for Top End XLT, XLT Jr., and XLT Pro ONLY. 1. Remove existing leg guard from Fork clamp. Insert new leg guard into clamp. 3. Leg Guard Mounting Clamp FIGURE ... brake cable. Brake Cable Allen Screws 2. Position each mounting clamp securely. If replacing footrest perform the following : 3. Recumbent Handcycle Series 32 Part No 1114850 Adjust leg guard to the fork. 2. otherwise injury or damage may result. Remove the hex ...
... mounting clamp. Footrest B. Clamp, Hex, Bolt and Locknut Leg Guard Replacement/Adjustment 5. Repeat STEPS 1‐5 for Top End XLT, XLT Jr., and XLT Pro ONLY. 1. Remove existing leg guard from Fork clamp. Insert new leg guard into clamp. 3. Leg Guard Mounting Clamp FIGURE ... brake cable. Brake Cable Allen Screws 2. Position each mounting clamp securely. If replacing footrest perform the following : 3. Recumbent Handcycle Series 32 Part No 1114850 Adjust leg guard to the fork. 2. otherwise injury or damage may result. Remove the hex ...

Owners Manual
Page 49
... crank arm is evenly aligned with the left determined from as if seated on page 50. XLT Gold, XLT PRO and Top End Force NOTE: For this procedure, refer to FIGURE 8.2 on the handcycle. Remove socket screw and cap from the existing crank arm clamp. 3. SECTION 8-SERVICE PROCEDURES... Replacing the Crank Arms - Part No 1114850 49 Recumbent Handcycle Series Position the new crank arm onto the...
... crank arm is evenly aligned with the left determined from as if seated on page 50. XLT Gold, XLT PRO and Top End Force NOTE: For this procedure, refer to FIGURE 8.2 on the handcycle. Remove socket screw and cap from the existing crank arm clamp. 3. SECTION 8-SERVICE PROCEDURES... Replacing the Crank Arms - Part No 1114850 49 Recumbent Handcycle Series Position the new crank arm onto the...
Owners Manual
Page 50
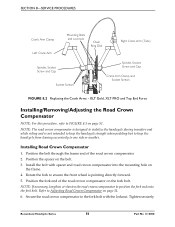
... 51. 6. NOTE: The road crown compensator is designed to stabilize the handcycle during transfers and while riding and is pointing directly forward. 5. Rotate the fork to FIGURE 8.3 on page 51. XLT Gold, XLT PRO and Top End Force Installing/Removing/Adjusting the Road Crown Compensator NOTE: For... this procedure, refer to ensure the front wheel is not intended to keep the handcycle straight when pedaling but to keep the handcycle from leaning excessively to position...
... 51. 6. NOTE: The road crown compensator is designed to stabilize the handcycle during transfers and while riding and is pointing directly forward. 5. Rotate the fork to FIGURE 8.3 on page 51. XLT Gold, XLT PRO and Top End Force Installing/Removing/Adjusting the Road Crown Compensator NOTE: For... this procedure, refer to ensure the front wheel is not intended to keep the handcycle straight when pedaling but to keep the handcycle from leaning excessively to position...
Owners Manual
Page 67
... be quickly and easily disassembled for Top End XLT Pro, Gold, and Top End Force models only. Perform one of the following • Adjustable Angle Seat on page 42. 2. The travel . NOTE: Reverse the steps below . 1. Refer to reassemble the handcycle. 1. Refer to FIGURE 9.14 on XLT Gold) Camber Bar Socket Screws Frame Clamp...
... be quickly and easily disassembled for Top End XLT Pro, Gold, and Top End Force models only. Perform one of the following • Adjustable Angle Seat on page 42. 2. The travel . NOTE: Reverse the steps below . 1. Refer to reassemble the handcycle. 1. Refer to FIGURE 9.14 on XLT Gold) Camber Bar Socket Screws Frame Clamp...
Owners Manual
Page 68
...5. Position the road crown compensator onto the fork bolt. 5. Position the plate on to Adjusting Road Crown Compensator on page 71. 7. Recumbent Handcycle Series 68 Part No 1114850 Remove the front wheel from each fork clamp. 4. Refer to the fork. 3. Install the front wheel. Remove ...socket screws from the fork.Refer to Removing the Front Wheel on page 69. Test drive handcycle, if handcycle pulls to FIGURE 9.15 on page 70. Removing the Fork 1. Travel Ready XLT PRO Equipped with Road Crown Compensator NOTE: For this procedure, refer to the left or right ...
...5. Position the road crown compensator onto the fork bolt. 5. Position the plate on to Adjusting Road Crown Compensator on page 71. 7. Recumbent Handcycle Series 68 Part No 1114850 Remove the front wheel from each fork clamp. 4. Refer to the fork. 3. Install the front wheel. Remove ...socket screws from the fork.Refer to Removing the Front Wheel on page 69. Test drive handcycle, if handcycle pulls to FIGURE 9.15 on page 70. Removing the Fork 1. Travel Ready XLT PRO Equipped with Road Crown Compensator NOTE: For this procedure, refer to the left or right ...
Owners Manual
Page 69
Remove the locknut securing the steering dampener to the handcycle frame. 3. Remove the dampener clamp from the handcycle frame and the lower threaded post of the fork. 6. Remove the two socket screws from the frame. 7. Removing the Fork 1. Remove the two ... Crown Compensator Removing/Installing the Fork - Remove the front wheel from the top of the steering dampener. 4. Part No 1114850 69 Recumbent Handcycle Series Travel Ready XLT PRO Equipped with Steering Dampener NOTE: For this procedure, refer to FIGURE 9.16 on to Removing the Front Wheel on page 70. Remove the...
Remove the locknut securing the steering dampener to the handcycle frame. 3. Remove the dampener clamp from the handcycle frame and the lower threaded post of the fork. 6. Remove the two socket screws from the frame. 7. Removing the Fork 1. Remove the two ... Crown Compensator Removing/Installing the Fork - Remove the front wheel from the top of the steering dampener. 4. Part No 1114850 69 Recumbent Handcycle Series Travel Ready XLT PRO Equipped with Steering Dampener NOTE: For this procedure, refer to FIGURE 9.16 on to Removing the Front Wheel on page 70. Remove the...
Owners Manual
Page 70
...dampener clamp to Installing the Front Wheel on page 52. Refer to the handcycle frame. 6. Remove the wheel from the front wheel. Using a locknut, secure the steering dampener to the frame. 4. XLT Gold, and Top End Force Equipped with Speed Cassette Chain NOTE: For this... Socket Screws Fork Clamp Dampener Clamp Handcycle Frame Fork Clamp Fork FIGURE 9.16 Removing/Installing the Fork - Using the fork clamp and two socket screws, secure the bottom of the plate to the dampener clamp. 7. XLT Gold, XLT Pro and XLT with Steering Dampener Removing/Installing the Front...
...dampener clamp to Installing the Front Wheel on page 52. Refer to the handcycle frame. 6. Remove the wheel from the front wheel. Using a locknut, secure the steering dampener to the frame. 4. XLT Gold, and Top End Force Equipped with Speed Cassette Chain NOTE: For this... Socket Screws Fork Clamp Dampener Clamp Handcycle Frame Fork Clamp Fork FIGURE 9.16 Removing/Installing the Fork - Using the fork clamp and two socket screws, secure the bottom of the plate to the dampener clamp. 7. XLT Gold, XLT Pro and XLT with Steering Dampener Removing/Installing the Front...
Owners Manual
Page 71
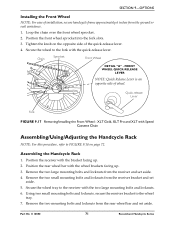
...fork slots. 3. FRONT WHEEL QUICK-RELEASE LEVER NOTE: Quick Release Lever is an opposite side of wheel. XLT Gold, XLT Pro and XLT with Speed Cassette Chain Assembling/Using/Adjusting the Handcycle Rack NOTE: For this procedure, refer to the fork with the wheel brackets facing up . 2. Remove... - Position the rear wheel bar with the quick‐release lever. Loop the chain over the front wheel sprocket. 2. Assembling the Handcycle Rack 1. Using two small mounting bolts and locknuts, secure the receiver bracket to the receiver with the bracket facing up . 3. Position...
...fork slots. 3. FRONT WHEEL QUICK-RELEASE LEVER NOTE: Quick Release Lever is an opposite side of wheel. XLT Gold, XLT Pro and XLT with Speed Cassette Chain Assembling/Using/Adjusting the Handcycle Rack NOTE: For this procedure, refer to the fork with the wheel brackets facing up . 2. Remove... - Position the rear wheel bar with the quick‐release lever. Loop the chain over the front wheel sprocket. 2. Assembling the Handcycle Rack 1. Using two small mounting bolts and locknuts, secure the receiver bracket to the receiver with the bracket facing up . 3. Position...