

Owners Manual
Page 1
Owner's Operator and Maintenance Manual ® Recumbent Handcycle Series Top End XLT™ Top End XLT Jr. Top End XLT Pro Top End XLT Gold Top End Force™ DEALER: This manual MUST be given to the user of the handcycle. USER: BEFORE using this handcycle, read this manual and save for future reference. For more information regarding Invacare products, parts, and services, please visit www.invacare.com
Owner's Operator and Maintenance Manual ® Recumbent Handcycle Series Top End XLT™ Top End XLT Jr. Top End XLT Pro Top End XLT Gold Top End Force™ DEALER: This manual MUST be given to the user of the handcycle. USER: BEFORE using this handcycle, read this manual and save for future reference. For more information regarding Invacare products, parts, and services, please visit www.invacare.com
Owners Manual
Page 5
... OF CONTENTS TABLE OF CONTENTS SECTION 8-SERVICE PROCEDURES 46 Replacing the Fork/Crank Assembly ...46 Replacing the Crank Arms - XLT Gold, XLT PRO and Top End Force 49 Replacing the Left Side Crank Arms 49 Replacing the Right Side Crank Arms 49 Installing/Removing/... Road Crown Compensator 50 Removing Road Crown Compensator 51 Adjusting Road Crown Compensator 51 Installing/Removing/Adjusting the Steering Dampener For Top End XLT Gold and Force Only 52 Installing Steering Dampener...52 Removing Steering Dampener ...52 Adjusting Steering Dampener ...52 Installing Seven Speed Shifter Cable...
... OF CONTENTS TABLE OF CONTENTS SECTION 8-SERVICE PROCEDURES 46 Replacing the Fork/Crank Assembly ...46 Replacing the Crank Arms - XLT Gold, XLT PRO and Top End Force 49 Replacing the Left Side Crank Arms 49 Replacing the Right Side Crank Arms 49 Installing/Removing/... Road Crown Compensator 50 Removing Road Crown Compensator 51 Adjusting Road Crown Compensator 51 Installing/Removing/Adjusting the Steering Dampener For Top End XLT Gold and Force Only 52 Installing Steering Dampener...52 Removing Steering Dampener ...52 Adjusting Steering Dampener ...52 Installing Seven Speed Shifter Cable...
Owners Manual
Page 7
...investment. 2. Safeguarding your registration. XLT Gold, XLT Pro and XLT with Road Crown Compensator ...68 Removing the Fork ...68 Installing the Fork...68 Removing/Installing the Fork - Any registration information you submit will only be used by Invacare Corporation and protected as required by ...with product information, maintenance tips and industry news. Ensuring long-term maintenance and servicing of registering include: 1. Travel Ready XLT PRO Equipped with Speed Cassette Chain ...70 Removing the Front Wheel...70 Installing the Front Wheel ...71 Assembling/Using/Adjusting the...
...investment. 2. Safeguarding your registration. XLT Gold, XLT Pro and XLT with Road Crown Compensator ...68 Removing the Fork ...68 Installing the Fork...68 Removing/Installing the Fork - Any registration information you submit will only be used by Invacare Corporation and protected as required by ...with product information, maintenance tips and industry news. Ensuring long-term maintenance and servicing of registering include: 1. Travel Ready XLT PRO Equipped with Speed Cassette Chain ...70 Removing the Front Wheel...70 Installing the Front Wheel ...71 Assembling/Using/Adjusting the...

Owners Manual
Page 11
Parking brake on pedal. Precision Black Anodized w/½-inch REAR - TYPICAL PRODUCT PARAMETERS TOP END XLT PRO TOP END XLT GOLD Seat Width: 14 to 18 inches 14 to 18 inches Seat Depth: 15 inches 15 inches Seat-to approximately 1‐inch. Standard 9° - Shimano/...
Parking brake on pedal. Precision Black Anodized w/½-inch REAR - TYPICAL PRODUCT PARAMETERS TOP END XLT PRO TOP END XLT GOLD Seat Width: 14 to 18 inches 14 to 18 inches Seat Depth: 15 inches 15 inches Seat-to approximately 1‐inch. Standard 9° - Shimano/...
Owners Manual
Page 13
.... DO NOT attempt to lift the handcycle by a bicycle professional. ALWAYS wear your view or prohibit you may result in conjunction with Invacare accessories. Avoid all street intersections and observe to the left again before attempting any riders. Use proper hand signals when turning. Doing so...curbs or obstacles or speed bumps. it is an option on this equipment by Invacare and are specifically designed and manufactured for use in injury to the user or damage to restraints - Top End XLT Pro Model Only ‐ This model may include the use of a safety lights ...
.... DO NOT attempt to lift the handcycle by a bicycle professional. ALWAYS wear your view or prohibit you may result in conjunction with Invacare accessories. Avoid all street intersections and observe to the left again before attempting any riders. Use proper hand signals when turning. Doing so...curbs or obstacles or speed bumps. it is an option on this equipment by Invacare and are specifically designed and manufactured for use in injury to the user or damage to restraints - Top End XLT Pro Model Only ‐ This model may include the use of a safety lights ...
Owners Manual
Page 16
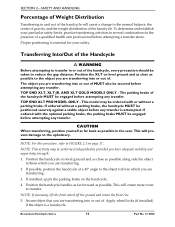
...Secure object that you are transferring into or out of. Apply wheel locks (if installed) if the object is attempted. TOP END XLT PRO MODEL ONLY - Proper positioning is essential for your particular safety limits, practice transferring activities in several combinations in and out of the ...handcycle will cause a change to transfer in the seat. TOP END XLT, XLT JR. AND XLT GOLD MODELS ONLY - This will create more room to the upholstery. This will prevent damage to transfer. NOTE: For this procedure,...
...Secure object that you are transferring into or out of. Apply wheel locks (if installed) if the object is attempted. TOP END XLT PRO MODEL ONLY - Proper positioning is essential for your particular safety limits, practice transferring activities in several combinations in and out of the ...handcycle will cause a change to transfer in the seat. TOP END XLT, XLT JR. AND XLT GOLD MODELS ONLY - This will create more room to the upholstery. This will prevent damage to transfer. NOTE: For this procedure,...
Owners Manual
Page 24
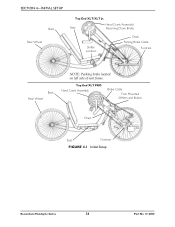
SECTION 4-INITIAL SETUP Back Rear Wheel Top End XLT/XLT Jr. Hand Crank Assembly/ Seat Reversing Drum Brake Shifter Location Chain Parking Brake Cable Footrest Back Rear Wheel NOTE: Parking brake located on left side of seat frame. Top End XLT PRO Hand Crank Assembly Brake Cable Fork Mounted Shifters and Brakes Chain Seat Footrest FIGURE 4.1 Initial Setup Recumbent Handcycle Series 24 Part No 1114850
SECTION 4-INITIAL SETUP Back Rear Wheel Top End XLT/XLT Jr. Hand Crank Assembly/ Seat Reversing Drum Brake Shifter Location Chain Parking Brake Cable Footrest Back Rear Wheel NOTE: Parking brake located on left side of seat frame. Top End XLT PRO Hand Crank Assembly Brake Cable Fork Mounted Shifters and Brakes Chain Seat Footrest FIGURE 4.1 Initial Setup Recumbent Handcycle Series 24 Part No 1114850
Owners Manual
Page 28
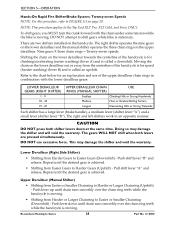
... the handcycle is for speed (harder cranking) (lever B) and is moving. Lower Derailleur (Right Side Shifter) • Shifting from Harder Gears to the Top End XLT Pro, XLT Gold, and Force ONLY. Repeat until chain runs smoothly over the chain ring teeth while the handcycle is moving . Recumbent Handcycle Series 28 Part No...
... the handcycle is for speed (harder cranking) (lever B) and is moving. Lower Derailleur (Right Side Shifter) • Shifting from Harder Gears to the Top End XLT Pro, XLT Gold, and Force ONLY. Repeat until chain runs smoothly over the chain ring teeth while the handcycle is moving . Recumbent Handcycle Series 28 Part No...

Owners Manual
Page 29
...rear wheels (i.e. When backing up in reverse. CAUTION If backing up , keep the front wheel straight. Reversing Drum Brakes NOTE: Top End XLT and XLT Jr. with reversing drum brakes. Part No 1114850 29 Recumbent Handcycle Series Use the brakes intermittently on your handcycle to bring it to backup.... may engage the reversing drum brakes (Top End XLT and XLT jr. models ONLY) while backing up to tangle the cables. Lift the pedals up . External geared handcycles (24 or 27 speeds) have hand brakes. Apply by pedaling in the XLT PRO, XLT Gold and Force models, take care not to ...
...rear wheels (i.e. When backing up in reverse. CAUTION If backing up , keep the front wheel straight. Reversing Drum Brakes NOTE: Top End XLT and XLT Jr. with reversing drum brakes. Part No 1114850 29 Recumbent Handcycle Series Use the brakes intermittently on your handcycle to bring it to backup.... may engage the reversing drum brakes (Top End XLT and XLT jr. models ONLY) while backing up to tangle the cables. Lift the pedals up . External geared handcycles (24 or 27 speeds) have hand brakes. Apply by pedaling in the XLT PRO, XLT Gold and Force models, take care not to ...
Owners Manual
Page 30
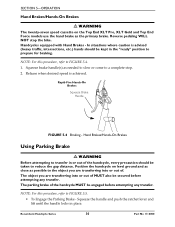
... No 1114850 Hand Brakes/Hands-On Brakes Using Parking Brake ƽ WARNING Before attempting to transfer in place. Position the handcycle on the Top End XLT Pro, XLT Gold and Top End Force models use the hand brake as the primary brake. Squeeze brake handle(s) as needed to slow or come to FIGURE...
... No 1114850 Hand Brakes/Hands-On Brakes Using Parking Brake ƽ WARNING Before attempting to transfer in place. Position the handcycle on the Top End XLT Pro, XLT Gold and Top End Force models use the hand brake as the primary brake. Squeeze brake handle(s) as needed to slow or come to FIGURE...

Owners Manual
Page 32
NOTE: If replacing footrest or leg guard, take note of the front tire. 6. Footrest B. Repeat STEPS 1‐5 for Top End XLT, XLT Jr., and XLT Pro ONLY. 1. Brake Cable Allen Screws 2. Insert new leg guard into clamp. 3. NOTE: The leg guard should surround, but not touch, the rear of current position. ...
NOTE: If replacing footrest or leg guard, take note of the front tire. 6. Footrest B. Repeat STEPS 1‐5 for Top End XLT, XLT Jr., and XLT Pro ONLY. 1. Brake Cable Allen Screws 2. Insert new leg guard into clamp. 3. NOTE: The leg guard should surround, but not touch, the rear of current position. ...

Owners Manual
Page 49
... from the existing crank arm clamp. 3. Re install the socket screw and cap from the spindle. 5. Replacing the Left Side Crank Arms 1. Securely tighten. XLT Gold, XLT PRO and Top End Force NOTE: For this procedure, refer to the chain ring disk. 7. Remove the existing crank arm from the spindle. Replacing the Right...
... from the existing crank arm clamp. 3. Re install the socket screw and cap from the spindle. 5. Replacing the Left Side Crank Arms 1. Securely tighten. XLT Gold, XLT PRO and Top End Force NOTE: For this procedure, refer to the chain ring disk. 7. Remove the existing crank arm from the spindle. Replacing the Right...
Owners Manual
Page 50
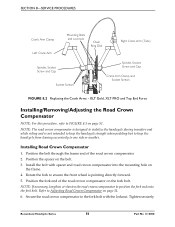
... (Tabs) Spindle, Socket Screw and Cap Socket Screws Spindle, Socket Screw and Cap Crank Arm Clamp and Socket Screws FIGURE 8.2 Replacing the Crank Arms - XLT Gold, XLT PRO and Top End Force Installing/Removing/Adjusting the Road Crown Compensator NOTE: For this procedure, refer to one side or another. Install the bolt with...
... (Tabs) Spindle, Socket Screw and Cap Socket Screws Spindle, Socket Screw and Cap Crank Arm Clamp and Socket Screws FIGURE 8.2 Replacing the Crank Arms - XLT Gold, XLT PRO and Top End Force Installing/Removing/Adjusting the Road Crown Compensator NOTE: For this procedure, refer to one side or another. Install the bolt with...
Owners Manual
Page 67
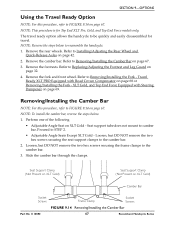
... Handcycle Series Refer to Removing/Installing the Fork ‐ Travel Ready XLT PRO Equipped with Road Crown Compensator on page 68 or Removing/Installing the Fork ‐ XLT Gold, and Top End Force Equipped with Steering Dampener on XLT Gold ‐ Seat support tube does not mount to camber bar.... Leg Guard on page 67. NOTE: To install the camber bar, reverse the steps below to be quickly and easily disassembled for Top End XLT Pro, Gold, and Top End Force models only. Remove the fork and front wheel. SECTION 9-OPTIONS Using the Travel Ready Option NOTE: For this...
... Handcycle Series Refer to Removing/Installing the Fork ‐ Travel Ready XLT PRO Equipped with Road Crown Compensator on page 68 or Removing/Installing the Fork ‐ XLT Gold, and Top End Force Equipped with Steering Dampener on XLT Gold ‐ Seat support tube does not mount to camber bar.... Leg Guard on page 67. NOTE: To install the camber bar, reverse the steps below to be quickly and easily disassembled for Top End XLT Pro, Gold, and Top End Force models only. Remove the fork and front wheel. SECTION 9-OPTIONS Using the Travel Ready Option NOTE: For this...
Owners Manual
Page 68
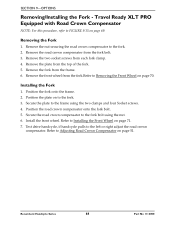
... 70. Remove the two socket screws from the fork bolt. 3. Refer to the fork bolt using the two clamps and four Socket screws. 4. Travel Ready XLT PRO Equipped with Road Crown Compensator NOTE: For this procedure, refer to the fork. 3. Remove the plate from the frame. 6. SECTION 9-OPTIONS Removing/Installing the Fork...
... 70. Remove the two socket screws from the fork bolt. 3. Refer to the fork bolt using the two clamps and four Socket screws. 4. Travel Ready XLT PRO Equipped with Road Crown Compensator NOTE: For this procedure, refer to the fork. 3. Remove the plate from the frame. 6. SECTION 9-OPTIONS Removing/Installing the Fork...
Owners Manual
Page 69
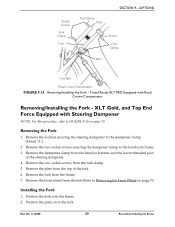
...fork.Refer to the dampener clamp (Detail ʺAʺ). 2. Remove the front wheel from the top of the steering dampener. 4. Travel Ready XLT PRO Equipped with Steering Dampener NOTE: For this procedure, refer to FIGURE 9.16 on to the handcycle frame. 3. Remove the two socket screws securing... the dampener clamp to the fork. Position the plate on page 70. Installing the Fork 1. XLT Gold, and Top End Force Equipped with Road Crown Compensator Removing/Installing the Fork - Remove the two socket screws from the frame. 7. ...
...fork.Refer to the dampener clamp (Detail ʺAʺ). 2. Remove the front wheel from the top of the steering dampener. 4. Travel Ready XLT PRO Equipped with Steering Dampener NOTE: For this procedure, refer to FIGURE 9.16 on to the handcycle frame. 3. Remove the two socket screws securing... the dampener clamp to the fork. Position the plate on page 70. Installing the Fork 1. XLT Gold, and Top End Force Equipped with Road Crown Compensator Removing/Installing the Fork - Remove the two socket screws from the frame. 7. ...
Owners Manual
Page 70
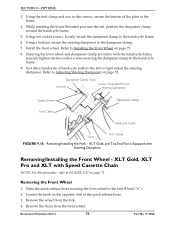
... dampener clamp are inline with the handcycle frame, securely tighten the two socket screws securing the dampener clamp to the handcycle frame. 6. XLT Gold, and Top End Force Equipped with Speed Cassette Chain NOTE: For this procedure, refer to the fork (Detail ʺAʺ). ...No 1114850 Dampener Clamp (Tab) Locknut Lower Threaded Post of the quick‐release lever. 3. Loosen the knob on page 71. XLT Gold, XLT Pro and XLT with Steering Dampener Removing/Installing the Front Wheel - Install the front wheel. Removing the Front Wheel 1. Remove the chain from the fork...
... dampener clamp are inline with the handcycle frame, securely tighten the two socket screws securing the dampener clamp to the handcycle frame. 6. XLT Gold, and Top End Force Equipped with Speed Cassette Chain NOTE: For this procedure, refer to the fork (Detail ʺAʺ). ...No 1114850 Dampener Clamp (Tab) Locknut Lower Threaded Post of the quick‐release lever. 3. Loosen the knob on page 71. XLT Gold, XLT Pro and XLT with Steering Dampener Removing/Installing the Front Wheel - Install the front wheel. Removing the Front Wheel 1. Remove the chain from the fork...
Owners Manual
Page 71
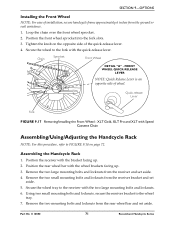
... Handcycle Rack 1. Remove the two small mounting bolts and locknuts from the rear wheel bar and set aside. Tighten the knob on page 72. XLT Gold, XLT Pro and XLT with Speed Cassette Chain Assembling/Using/Adjusting the Handcycle Rack NOTE: For this procedure, refer to the receiver with the quick‐release lever...
... Handcycle Rack 1. Remove the two small mounting bolts and locknuts from the rear wheel bar and set aside. Tighten the knob on page 72. XLT Gold, XLT Pro and XLT with Speed Cassette Chain Assembling/Using/Adjusting the Handcycle Rack NOTE: For this procedure, refer to the receiver with the quick‐release lever...