

Owners Manual
Page 1
For more information regarding Invacare products, parts, and services, please visit www.invacare.com Owner's Operator and Maintenance Manual ® Recumbent Handcycle Series Top End XLT™ Top End XLT Jr. Top End XLT Pro Top End XLT Gold Top End Force™ DEALER: This manual MUST be given to the user of the handcycle. USER: BEFORE using this handcycle, read this manual and save for future reference.
For more information regarding Invacare products, parts, and services, please visit www.invacare.com Owner's Operator and Maintenance Manual ® Recumbent Handcycle Series Top End XLT™ Top End XLT Jr. Top End XLT Pro Top End XLT Gold Top End Force™ DEALER: This manual MUST be given to the user of the handcycle. USER: BEFORE using this handcycle, read this manual and save for future reference.
Owners Manual
Page 5
TABLE OF CONTENTS TABLE OF CONTENTS SECTION 8-SERVICE PROCEDURES 46 Replacing the Fork/Crank Assembly ...46 Replacing the Crank Arms - XLT Gold, XLT PRO and Top End Force 49 Replacing the Left Side Crank Arms 49 Replacing the Right Side Crank Arms 49 Installing/Removing/Adjusting the Road Crown Compensator 50 Installing ...
TABLE OF CONTENTS TABLE OF CONTENTS SECTION 8-SERVICE PROCEDURES 46 Replacing the Fork/Crank Assembly ...46 Replacing the Crank Arms - XLT Gold, XLT PRO and Top End Force 49 Replacing the Left Side Crank Arms 49 Replacing the Right Side Crank Arms 49 Installing/Removing/Adjusting the Road Crown Compensator 50 Installing ...
Owners Manual
Page 7
Safeguarding your investment. 2. XLT Gold, XLT Pro and XLT with Steering Dampener...69 Removing the Fork ...69 Installing the Fork...69 Removing/Installing the Front Wheel - Register ONLINE at warranty.invacare.com Please have your model number and purchase date available to Mountain Drive Transmission .../Installing the Fork - Any registration information you submit will only be used by Invacare Corporation and protected as required by applicable laws and regulations. XLT Gold, and Top End Force Equipped with Speed Cassette Chain ...70 Removing the Front Wheel...70 Installing the...
Safeguarding your investment. 2. XLT Gold, XLT Pro and XLT with Steering Dampener...69 Removing the Fork ...69 Installing the Fork...69 Removing/Installing the Front Wheel - Register ONLINE at warranty.invacare.com Please have your model number and purchase date available to Mountain Drive Transmission .../Installing the Fork - Any registration information you submit will only be used by Invacare Corporation and protected as required by applicable laws and regulations. XLT Gold, and Top End Force Equipped with Speed Cassette Chain ...70 Removing the Front Wheel...70 Installing the...

Owners Manual
Page 11
TYPICAL PRODUCT PARAMETERS TOP END XLT PRO TOP END XLT GOLD Seat Width: 14 to 18 inches 14 to 18 inches Seat Depth: 15 inches 15 inches Seat-to approximately 1‐inch. Standard 9° - Optional ... - Wheel Clearance: 2 inches - * 2½ inches 2 inches - 2½ inches Rear Axle: Quick-Release or Threaded Quick-Release or Threaded Rear Wheel Camber: 15° - Shimano/Top End Components FRONT - Standard Wheels/Tires: 26-inch Spoke High Performance 24-inch Cruiser or *Knobby 26-inch Spoke High Performance. 24-inch Cruiser or *Knobby...
TYPICAL PRODUCT PARAMETERS TOP END XLT PRO TOP END XLT GOLD Seat Width: 14 to 18 inches 14 to 18 inches Seat Depth: 15 inches 15 inches Seat-to approximately 1‐inch. Standard 9° - Optional ... - Wheel Clearance: 2 inches - * 2½ inches 2 inches - 2½ inches Rear Axle: Quick-Release or Threaded Quick-Release or Threaded Rear Wheel Camber: 15° - Shimano/Top End Components FRONT - Standard Wheels/Tires: 26-inch Spoke High Performance 24-inch Cruiser or *Knobby 26-inch Spoke High Performance. 24-inch Cruiser or *Knobby...
Owners Manual
Page 13
...harm or damage to the handcycle. Top End XLT Pro Model Only ‐ This model may result in conjunction with or without a parking brake, the handcycle MUST be positioned securely against a stable object before proceeding. Lifting by Invacare and are specifically designed and manufactured for ... SECTION 1-GENERAL GUIDELINES Top End XLT, XLT jr., and XLT Gold Models Only ‐ The parking brake of the handcycle MUST be engaged before attempting any transfer. Doing so may obstruct your view or prohibit you may include the use with Invacare products. DO NOT carry...
...harm or damage to the handcycle. Top End XLT Pro Model Only ‐ This model may result in conjunction with or without a parking brake, the handcycle MUST be positioned securely against a stable object before proceeding. Lifting by Invacare and are specifically designed and manufactured for ... SECTION 1-GENERAL GUIDELINES Top End XLT, XLT jr., and XLT Gold Models Only ‐ The parking brake of the handcycle MUST be engaged before attempting any transfer. Doing so may obstruct your view or prohibit you may include the use with Invacare products. DO NOT carry...
Owners Manual
Page 16
TOP END XLT, XLT JR. AND XLT GOLD MODELS ONLY - This model may be performed independently provided you are transferring into or out of MUST also be secured before attempting any transfer. ... adequate mobility and upper body strength. 1. If installed, apply the parking brake on page 17. Position the XLT on level ground and as close as possible along side the object to the upholstery. TOP END XLT PRO MODEL ONLY - Secure object that you are transferring into or out of the handcycle, every precaution should...
TOP END XLT, XLT JR. AND XLT GOLD MODELS ONLY - This model may be performed independently provided you are transferring into or out of MUST also be secured before attempting any transfer. ... adequate mobility and upper body strength. 1. If installed, apply the parking brake on page 17. Position the XLT on level ground and as close as possible along side the object to the upholstery. TOP END XLT PRO MODEL ONLY - Secure object that you are transferring into or out of the handcycle, every precaution should...
Owners Manual
Page 24
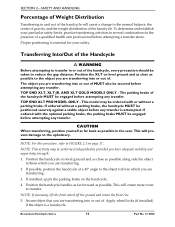
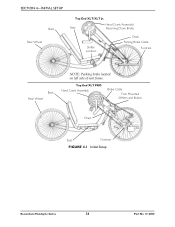
SECTION 4-INITIAL SETUP Back Rear Wheel Top End XLT/XLT Jr. Hand Crank Assembly/ Seat Reversing Drum Brake Shifter Location Chain Parking Brake Cable Footrest Back Rear Wheel NOTE: Parking brake located on left side of seat frame. Top End XLT PRO Hand Crank Assembly Brake Cable Fork Mounted Shifters and Brakes Chain Seat Footrest FIGURE 4.1 Initial Setup Recumbent Handcycle Series 24 Part No 1114850
SECTION 4-INITIAL SETUP Back Rear Wheel Top End XLT/XLT Jr. Hand Crank Assembly/ Seat Reversing Drum Brake Shifter Location Chain Parking Brake Cable Footrest Back Rear Wheel NOTE: Parking brake located on left side of seat frame. Top End XLT PRO Hand Crank Assembly Brake Cable Fork Mounted Shifters and Brakes Chain Seat Footrest FIGURE 4.1 Initial Setup Recumbent Handcycle Series 24 Part No 1114850
Owners Manual
Page 28
... page 29. NOTE: This procedure applies to shift gears while bike is for an explanation and use excessive force. DO NOT attempt to the Top End XLT Pro, XLT Gold, and Force ONLY. Moving the chain on the upper derailleur. Repeat until the desired gear is achieved. • Shifting from the centerline of the...
... page 29. NOTE: This procedure applies to shift gears while bike is for an explanation and use excessive force. DO NOT attempt to the Top End XLT Pro, XLT Gold, and Force ONLY. Moving the chain on the upper derailleur. Repeat until the desired gear is achieved. • Shifting from the centerline of the...

Owners Manual
Page 29
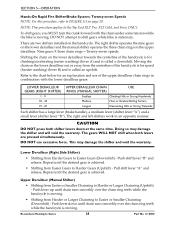
.... Internal geared handcycles (7 speeds) are equipped with the seven speed hub have reversing drum brakes. Reversing Drum Brakes NOTE: Top End XLT and XLT Jr. with reversing drum brakes. Part No 1114850 29 Recumbent Handcycle Series CAUTION If backing up , keep the front wheel straight....End XLT Handcycles have hand brakes. External geared handcycles (24 or 27 speeds) have either internal gearing (7 speeds) or external gearing (24 or 27 speeds). Use the brakes intermittently on your handcycle to bring it to backup. Lift the pedals up . Apply by pedaling in the XLT PRO, XLT...
.... Internal geared handcycles (7 speeds) are equipped with the seven speed hub have reversing drum brakes. Reversing Drum Brakes NOTE: Top End XLT and XLT Jr. with reversing drum brakes. Part No 1114850 29 Recumbent Handcycle Series CAUTION If backing up , keep the front wheel straight....End XLT Handcycles have hand brakes. External geared handcycles (24 or 27 speeds) have either internal gearing (7 speeds) or external gearing (24 or 27 speeds). Use the brakes intermittently on your handcycle to bring it to backup. Lift the pedals up . Apply by pedaling in the XLT PRO, XLT...
Owners Manual
Page 30
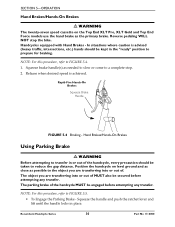
...; Squeeze the handle and push the ratchet lever and lift until the handle locks in or out of . Position the handcycle on the Top End XLT Pro, XLT Gold and Top End Force models use the hand brake as the primary brake. Handcycles equipped with Hand Brakes - SECTION 5-OPERATION Hand Brakes/Hands-On Brakes ƽ...
...; Squeeze the handle and push the ratchet lever and lift until the handle locks in or out of . Position the handcycle on the Top End XLT Pro, XLT Gold and Top End Force models use the hand brake as the primary brake. Handcycles equipped with Hand Brakes - SECTION 5-OPERATION Hand Brakes/Hands-On Brakes ƽ...

Owners Manual
Page 32
... 2. NOTE: The leg guard should surround, but not touch, the rear of current position. Reinstall hex bolt and locknut. Repeat STEPS 1‐5 for Top End XLT, XLT Jr., and XLT Pro ONLY. 1. Insert new leg guard into clamp. 3. Position each mounting clamp securely. Adjust leg guard to desired position. 4. Tighten the two allen screws on...
... 2. NOTE: The leg guard should surround, but not touch, the rear of current position. Reinstall hex bolt and locknut. Repeat STEPS 1‐5 for Top End XLT, XLT Jr., and XLT Pro ONLY. 1. Insert new leg guard into clamp. 3. Position each mounting clamp securely. Adjust leg guard to desired position. 4. Tighten the two allen screws on...

Owners Manual
Page 49
.... Remove the two socket screws from the spindle. 3. Ensure the new crank arm is evenly aligned with the left determined from the spindle. 4. XLT Gold, XLT PRO and Top End Force NOTE: For this procedure, refer to the spindle. Replacing the Left Side Crank Arms 1. Remove socket screw and cap from the existing crank...
.... Remove the two socket screws from the spindle. 3. Ensure the new crank arm is evenly aligned with the left determined from the spindle. 4. XLT Gold, XLT PRO and Top End Force NOTE: For this procedure, refer to the spindle. Replacing the Left Side Crank Arms 1. Remove socket screw and cap from the existing crank...
Owners Manual
Page 50
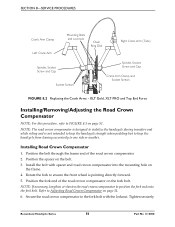
...crown compensator on the fork bolt. Install the bolt with the locknut. Refer to FIGURE 8.3 on page 51. 6. Tighten securely. XLT Gold, XLT PRO and Top End Force Installing/Removing/Adjusting the Road Crown Compensator NOTE: For this procedure, refer to Adjusting Road Crown Compensator on page 51. NOTE... spacer and road crown compensator into the mounting hole on the bolt. 3. Recumbent Handcycle Series 50 Part No 1114850 Position the fork end of the road crown compensator. 2. Installing Road Crown Compensator 1. Rotate the fork to ensure the front wheel is not intended to ...
...crown compensator on the fork bolt. Install the bolt with the locknut. Refer to FIGURE 8.3 on page 51. 6. Tighten securely. XLT Gold, XLT PRO and Top End Force Installing/Removing/Adjusting the Road Crown Compensator NOTE: For this procedure, refer to Adjusting Road Crown Compensator on page 51. NOTE... spacer and road crown compensator into the mounting hole on the bolt. 3. Recumbent Handcycle Series 50 Part No 1114850 Position the fork end of the road crown compensator. 2. Installing Road Crown Compensator 1. Rotate the fork to ensure the front wheel is not intended to ...
Owners Manual
Page 67
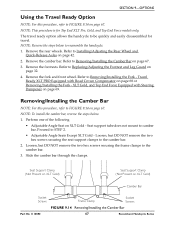
... Guard on page 32. 4. Refer to Removing/Installing the Fork ‐ Travel Ready XLT PRO Equipped with Road Crown Compensator on page 68 or Removing/Installing the Fork ‐ XLT Gold, and Top End Force Equipped with Steering Dampener on page 69. Remove the footrests. Remove the fork and... front wheel. NOTE: To install the camber bar, reverse the steps below to be quickly and easily disassembled for Top End XLT Pro, Gold, and Top End Force models only. Refer to Installing/Adjusting the Rear Wheel and Quick‐Release Axles on page 42. 2. Refer to the...
... Guard on page 32. 4. Refer to Removing/Installing the Fork ‐ Travel Ready XLT PRO Equipped with Road Crown Compensator on page 68 or Removing/Installing the Fork ‐ XLT Gold, and Top End Force Equipped with Steering Dampener on page 69. Remove the footrests. Remove the fork and... front wheel. NOTE: To install the camber bar, reverse the steps below to be quickly and easily disassembled for Top End XLT Pro, Gold, and Top End Force models only. Refer to Installing/Adjusting the Rear Wheel and Quick‐Release Axles on page 42. 2. Refer to the...
Owners Manual
Page 69
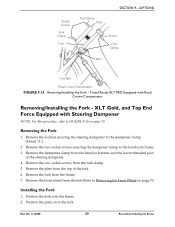
Travel Ready XLT PRO Equipped with Steering Dampener NOTE: For this procedure, refer to FIGURE 9.16 on to the handcycle frame. 3. XLT Gold, and Top End Force Equipped with Road Crown Compensator Removing/Installing the Fork - Remove the locknut securing the steering dampener to Removing the Front Wheel on page 70. ...
Travel Ready XLT PRO Equipped with Steering Dampener NOTE: For this procedure, refer to FIGURE 9.16 on to the handcycle frame. 3. XLT Gold, and Top End Force Equipped with Road Crown Compensator Removing/Installing the Fork - Remove the locknut securing the steering dampener to Removing the Front Wheel on page 70. ...
Owners Manual
Page 70
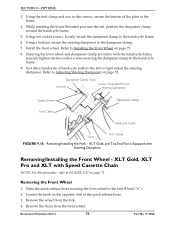
... Front Wheel 1. Loosen the knob on page 52. Recumbent Handcycle Series 70 Part No 1114850 XLT Gold, and Top End Force Equipped with Speed Cassette Chain NOTE: For this procedure, refer to the handcycle frame. 9. XLT Gold, XLT Pro and XLT with Steering Dampener Removing/Installing the Front Wheel - Remove the chain from the fork. 4. Remove...
... Front Wheel 1. Loosen the knob on page 52. Recumbent Handcycle Series 70 Part No 1114850 XLT Gold, and Top End Force Equipped with Speed Cassette Chain NOTE: For this procedure, refer to the handcycle frame. 9. XLT Gold, XLT Pro and XLT with Steering Dampener Removing/Installing the Front Wheel - Remove the chain from the fork. 4. Remove...
