

Owners Manual
Page 1
USER: BEFORE using this handcycle, read this manual and save for future reference. For more information regarding Invacare products, parts, and services, please visit www.invacare.com Owner's Operator and Maintenance Manual ® Recumbent Handcycle Series Top End XLT™ Top End XLT Jr. Top End XLT Pro Top End XLT Gold Top End Force™ DEALER: This manual MUST be given to the user of the handcycle.
USER: BEFORE using this handcycle, read this manual and save for future reference. For more information regarding Invacare products, parts, and services, please visit www.invacare.com Owner's Operator and Maintenance Manual ® Recumbent Handcycle Series Top End XLT™ Top End XLT Jr. Top End XLT Pro Top End XLT Gold Top End Force™ DEALER: This manual MUST be given to the user of the handcycle.
Owners Manual
Page 5
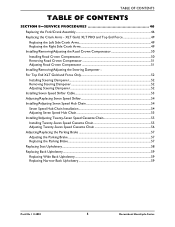
... OF CONTENTS TABLE OF CONTENTS SECTION 8-SERVICE PROCEDURES 46 Replacing the Fork/Crank Assembly ...46 Replacing the Crank Arms - XLT Gold, XLT PRO and Top End Force 49 Replacing the Left Side Crank Arms 49 Replacing the Right Side Crank Arms 49 Installing/Removing/... Road Crown Compensator 50 Removing Road Crown Compensator 51 Adjusting Road Crown Compensator 51 Installing/Removing/Adjusting the Steering Dampener For Top End XLT Gold and Force Only 52 Installing Steering Dampener...52 Removing Steering Dampener ...52 Adjusting Steering Dampener ...52 Installing Seven Speed Shifter Cable...
... OF CONTENTS TABLE OF CONTENTS SECTION 8-SERVICE PROCEDURES 46 Replacing the Fork/Crank Assembly ...46 Replacing the Crank Arms - XLT Gold, XLT PRO and Top End Force 49 Replacing the Left Side Crank Arms 49 Replacing the Right Side Crank Arms 49 Installing/Removing/... Road Crown Compensator 50 Removing Road Crown Compensator 51 Adjusting Road Crown Compensator 51 Installing/Removing/Adjusting the Steering Dampener For Top End XLT Gold and Force Only 52 Installing Steering Dampener...52 Removing Steering Dampener ...52 Adjusting Steering Dampener ...52 Installing Seven Speed Shifter Cable...
Owners Manual
Page 7
...the Fork ...69 Installing the Fork...69 Removing/Installing the Front Wheel - XLT Gold, and Top End Force Equipped with product information, maintenance tips and industry news. Register ONLINE at warranty.invacare.com Please have your model number and purchase date available to Mountain Drive ... Models Made After 7/12/07 ...65 Installing Gloves ...66 Mountain Drive Transmission Option 66 Switching to complete your registration. XLT Gold, XLT Pro and XLT with Road Crown Compensator ...68 Removing the Fork ...68 Installing the Fork...68 Removing/Installing the Fork - Travel Ready...
...the Fork ...69 Installing the Fork...69 Removing/Installing the Front Wheel - XLT Gold, and Top End Force Equipped with product information, maintenance tips and industry news. Register ONLINE at warranty.invacare.com Please have your model number and purchase date available to Mountain Drive ... Models Made After 7/12/07 ...65 Installing Gloves ...66 Mountain Drive Transmission Option 66 Switching to complete your registration. XLT Gold, XLT Pro and XLT with Road Crown Compensator ...68 Removing the Fork ...68 Installing the Fork...68 Removing/Installing the Fork - Travel Ready...

Owners Manual
Page 11
... on handpedal for lower derailler, Manual shifter right handpedal for lower derailler, Manual for upper derailler/chainrings. Standard 9° - TYPICAL PRODUCT PARAMETERS TOP END XLT PRO TOP END XLT GOLD Seat Width: 14 to 18 inches 14 to 18 inches Seat Depth: 15 inches 15 inches Seat-to approximately 1‐inch. shifter for...
... on handpedal for lower derailler, Manual shifter right handpedal for lower derailler, Manual for upper derailler/chainrings. Standard 9° - TYPICAL PRODUCT PARAMETERS TOP END XLT PRO TOP END XLT GOLD Seat Width: 14 to 18 inches 14 to 18 inches Seat Depth: 15 inches 15 inches Seat-to approximately 1‐inch. shifter for...
Owners Manual
Page 13
... seat/chest positioning strap is a positioning belt only. DO NOT attempt to the handcycle. Part No 1114850 13 Recumbent Handcycle Series Top End XLT Pro Model Only ‐ This model may include the use of a safety lights and reflectors for use as a safety device withstanding high stress ...wear appear, belt MUST be positioned securely against a stable object before any riders. DO NOT carry any items that may order with Invacare accessories. Care MUST be ordered with the optional parking brake, the parking brake MUST be engaged before attempting any transfer. The seat ...
... seat/chest positioning strap is a positioning belt only. DO NOT attempt to the handcycle. Part No 1114850 13 Recumbent Handcycle Series Top End XLT Pro Model Only ‐ This model may include the use of a safety lights and reflectors for use as a safety device withstanding high stress ...wear appear, belt MUST be positioned securely against a stable object before any riders. DO NOT carry any items that may order with Invacare accessories. Care MUST be ordered with the optional parking brake, the parking brake MUST be engaged before attempting any transfer. The seat ...
Owners Manual
Page 16
... brake of the handcycle MUST be ordered with the optional parking brake, the parking brake MUST be taken to reduce the gap distance. TOP END XLT PRO MODEL ONLY - CAUTION When transferring, position yourself as far back as possible. Position the handcycle handles as far forward as possible in or out... level ground and as close as possible along side the object to transfer. Proper positioning is a handcycle. TOP END XLT, XLT JR. AND XLT GOLD MODELS ONLY - If ordered without a parking brake. This will create more room to /from which you are transferring into or out of the...
... brake of the handcycle MUST be ordered with the optional parking brake, the parking brake MUST be taken to reduce the gap distance. TOP END XLT PRO MODEL ONLY - CAUTION When transferring, position yourself as far back as possible. Position the handcycle handles as far forward as possible in or out... level ground and as close as possible along side the object to transfer. Proper positioning is a handcycle. TOP END XLT, XLT JR. AND XLT GOLD MODELS ONLY - If ordered without a parking brake. This will create more room to /from which you are transferring into or out of the...
Owners Manual
Page 24
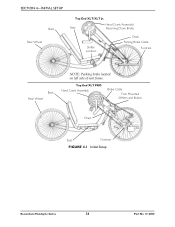
SECTION 4-INITIAL SETUP Back Rear Wheel Top End XLT/XLT Jr. Hand Crank Assembly/ Seat Reversing Drum Brake Shifter Location Chain Parking Brake Cable Footrest Back Rear Wheel NOTE: Parking brake located on left side of seat frame. Top End XLT PRO Hand Crank Assembly Brake Cable Fork Mounted Shifters and Brakes Chain Seat Footrest FIGURE 4.1 Initial Setup Recumbent Handcycle Series 24 Part No 1114850
SECTION 4-INITIAL SETUP Back Rear Wheel Top End XLT/XLT Jr. Hand Crank Assembly/ Seat Reversing Drum Brake Shifter Location Chain Parking Brake Cable Footrest Back Rear Wheel NOTE: Parking brake located on left side of seat frame. Top End XLT PRO Hand Crank Assembly Brake Cable Fork Mounted Shifters and Brakes Chain Seat Footrest FIGURE 4.1 Initial Setup Recumbent Handcycle Series 24 Part No 1114850
Owners Manual
Page 28
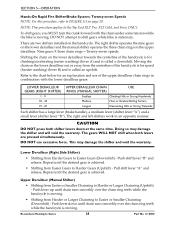
... on the upper derailleur. SECTION 5-OPERATION Hands-On Rapid Fire Shifter/Brake System: Twenty-seven Speeds NOTE: For this procedure, refer to the Top End XLT Pro, XLT Gold, and Force ONLY. To shift gears, you MUST turn the crank forward with the lower derailleur gears: LOWER DERAILLEUR GEARS (RIGHT SHIFTER) 1 - 9 10 - 18...
... on the upper derailleur. SECTION 5-OPERATION Hands-On Rapid Fire Shifter/Brake System: Twenty-seven Speeds NOTE: For this procedure, refer to the Top End XLT Pro, XLT Gold, and Force ONLY. To shift gears, you MUST turn the crank forward with the lower derailleur gears: LOWER DERAILLEUR GEARS (RIGHT SHIFTER) 1 - 9 10 - 18...

Owners Manual
Page 29
Hands-On Rapid Fire Shifter/Brake System: Twenty-seven Speeds - When backing up . Apply by pedaling in the XLT PRO, XLT Gold and Force models, take care not to avoid this problem. Hands-On Rapid Fire Shifter/Brake System: Twenty-seven Speeds Backing-Up.... with reversing drum brakes. Internal geared handcycles (7 speeds) are equipped with the seven speed hub have reversing drum brakes. Braking Top End XLT Handcycles have hand brakes. SECTION 5-OPERATION Shift Lever "B" Shift Lever "A" FIGURE 5.3 Shifting Gears - Part No 1114850 29 Recumbent Handcycle Series Lift the ...
Hands-On Rapid Fire Shifter/Brake System: Twenty-seven Speeds - When backing up . Apply by pedaling in the XLT PRO, XLT Gold and Force models, take care not to avoid this problem. Hands-On Rapid Fire Shifter/Brake System: Twenty-seven Speeds Backing-Up.... with reversing drum brakes. Internal geared handcycles (7 speeds) are equipped with the seven speed hub have reversing drum brakes. Braking Top End XLT Handcycles have hand brakes. SECTION 5-OPERATION Shift Lever "B" Shift Lever "A" FIGURE 5.3 Shifting Gears - Part No 1114850 29 Recumbent Handcycle Series Lift the ...
Owners Manual
Page 30
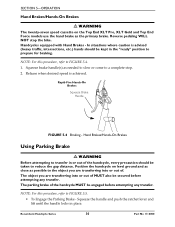
... push the ratchet lever and lift until the handle locks in the "ready" position to prepare for braking. Position the handcycle on the Top End XLT Pro, XLT Gold and Top End Force models use the hand brake as possible to the object you are transferring into or out of the handcycle, every...
... push the ratchet lever and lift until the handle locks in the "ready" position to prepare for braking. Position the handcycle on the Top End XLT Pro, XLT Gold and Top End Force models use the hand brake as possible to the object you are transferring into or out of the handcycle, every...

Owners Manual
Page 32
... from clamps. 4. Clamp, Hex, Bolt and Locknut Leg Guard Replacement/Adjustment 5. Recumbent Handcycle Series 32 Part No 1114850 Repeat STEPS 1‐5 for Top End XLT, XLT Jr., and XLT Pro ONLY. 1. NOTE: The leg guard should surround, but not touch, the rear of current position. Remove the hex bolt and locknut that secure the...
... from clamps. 4. Clamp, Hex, Bolt and Locknut Leg Guard Replacement/Adjustment 5. Recumbent Handcycle Series 32 Part No 1114850 Repeat STEPS 1‐5 for Top End XLT, XLT Jr., and XLT Pro ONLY. 1. NOTE: The leg guard should surround, but not touch, the rear of current position. Remove the hex bolt and locknut that secure the...

Owners Manual
Page 49
... over tighten. 6. Replacing the Right Side Crank Arms 1. Re install the socket screw and cap from the spindle. Part No 1114850 49 Recumbent Handcycle Series XLT Gold, XLT PRO and Top End Force NOTE: For this procedure, refer to FIGURE 8.2 on the handcycle. Using the two socket screws, secure the new crank arm...
... over tighten. 6. Replacing the Right Side Crank Arms 1. Re install the socket screw and cap from the spindle. Part No 1114850 49 Recumbent Handcycle Series XLT Gold, XLT PRO and Top End Force NOTE: For this procedure, refer to FIGURE 8.2 on the handcycle. Using the two socket screws, secure the new crank arm...
Owners Manual
Page 50
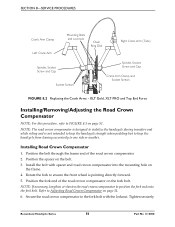
XLT Gold, XLT PRO and Top End Force Installing/Removing/Adjusting the Road Crown Compensator NOTE: For this procedure, refer to the fork bolt with spacer and road crown ...
XLT Gold, XLT PRO and Top End Force Installing/Removing/Adjusting the Road Crown Compensator NOTE: For this procedure, refer to the fork bolt with spacer and road crown ...
Owners Manual
Page 67
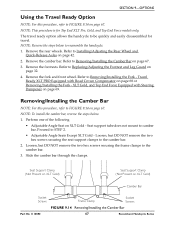
...footrests. Loosen, but DO NOT remove the two hex screws securing the seat support clamps to be quickly and easily disassembled for Top End XLT Pro, Gold, and Top End Force models only. SECTION 9-OPTIONS Using the Travel Ready Option NOTE: For this procedure, refer to FIGURE 9.14 on.../Installing the Camber Bar on page 69. Refer to Removing/Installing the Fork ‐ Travel Ready XLT PRO Equipped with Road Crown Compensator on page 68 or Removing/Installing the Fork ‐ XLT Gold, and Top End Force Equipped with Steering Dampener on page 67. 3. Removing/Installing the Camber...
...footrests. Loosen, but DO NOT remove the two hex screws securing the seat support clamps to be quickly and easily disassembled for Top End XLT Pro, Gold, and Top End Force models only. SECTION 9-OPTIONS Using the Travel Ready Option NOTE: For this procedure, refer to FIGURE 9.14 on.../Installing the Camber Bar on page 69. Refer to Removing/Installing the Fork ‐ Travel Ready XLT PRO Equipped with Road Crown Compensator on page 68 or Removing/Installing the Fork ‐ XLT Gold, and Top End Force Equipped with Steering Dampener on page 67. 3. Removing/Installing the Camber...
Owners Manual
Page 68
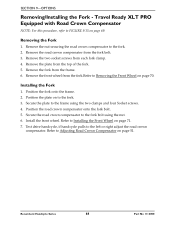
Remove the nut securing the road crown compensator to Adjusting Road Crown Compensator on page 51. Installing the Fork 1. Refer to the fork. 2. Travel Ready XLT PRO Equipped with Road Crown Compensator NOTE: For this procedure, refer to the frame using the nut. 6. Remove the fork from the fork bolt. 3. Position the ...
Remove the nut securing the road crown compensator to Adjusting Road Crown Compensator on page 51. Installing the Fork 1. Refer to the fork. 2. Travel Ready XLT PRO Equipped with Road Crown Compensator NOTE: For this procedure, refer to the frame using the nut. 6. Remove the fork from the fork bolt. 3. Position the ...
Owners Manual
Page 69
... dampener to Removing the Front Wheel on page 70. Remove the plate from the fork.Refer to the dampener clamp (Detail ʺAʺ). 2. XLT Gold, and Top End Force Equipped with Road Crown Compensator Removing/Installing the Fork - Remove the fork from the fork clamp. 5. Travel Ready... XLT PRO Equipped with Steering Dampener NOTE: For this procedure, refer to FIGURE 9.16 on to the handcycle frame. 3. Removing the Fork 1. Remove the front ...
... dampener to Removing the Front Wheel on page 70. Remove the plate from the fork.Refer to the dampener clamp (Detail ʺAʺ). 2. XLT Gold, and Top End Force Equipped with Road Crown Compensator Removing/Installing the Fork - Remove the fork from the fork clamp. 5. Travel Ready... XLT PRO Equipped with Steering Dampener NOTE: For this procedure, refer to FIGURE 9.16 on to the handcycle frame. 3. Removing the Fork 1. Remove the front ...
Owners Manual
Page 70
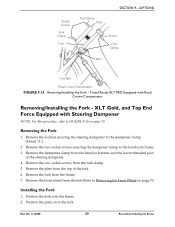
...the opposite side of Steering Dampener Socket Screws Fork Clamp Dampener Clamp Handcycle Frame Fork Clamp Fork FIGURE 9.16 Removing/Installing the Fork - XLT Gold, XLT Pro and XLT with Speed Cassette Chain NOTE: For this procedure, refer to the dampener clamp. 7. Removing the Front Wheel 1. Remove the wheel ...dampener. Using the fork clamp and two socket screws, secure the bottom of the plate to Installing the Front Wheel on page 52. XLT Gold, and Top End Force Equipped with the handcycle frame, securely tighten the two socket screws securing the dampener clamp to the fork ...
...the opposite side of Steering Dampener Socket Screws Fork Clamp Dampener Clamp Handcycle Frame Fork Clamp Fork FIGURE 9.16 Removing/Installing the Fork - XLT Gold, XLT Pro and XLT with Speed Cassette Chain NOTE: For this procedure, refer to the dampener clamp. 7. Removing the Front Wheel 1. Remove the wheel ...dampener. Using the fork clamp and two socket screws, secure the bottom of the plate to Installing the Front Wheel on page 52. XLT Gold, and Top End Force Equipped with the handcycle frame, securely tighten the two socket screws securing the dampener clamp to the fork ...
Owners Manual
Page 71
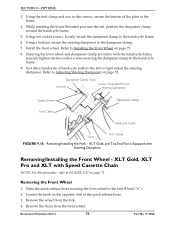
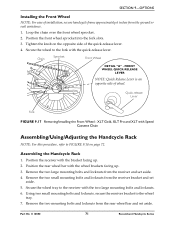
... wheel bar with the quick‐release lever. Remove the two large mounting bolts and locknuts from the rear wheel bar and set aside. XLT Gold, XLT Pro and XLT with Speed Cassette Chain Assembling/Using/Adjusting the Handcycle Rack NOTE: For this procedure, refer to the fork with the wheel brackets facing up...
... wheel bar with the quick‐release lever. Remove the two large mounting bolts and locknuts from the rear wheel bar and set aside. XLT Gold, XLT Pro and XLT with Speed Cassette Chain Assembling/Using/Adjusting the Handcycle Rack NOTE: For this procedure, refer to the fork with the wheel brackets facing up...