

Owners Manual
Page 1
USER: BEFORE using this handcycle, read this manual and save for future reference. For more information regarding Invacare products, parts, and services, please visit www.invacare.com Owner's Operator and Maintenance Manual ® Recumbent Handcycle Series Top End XLT™ Top End XLT Jr. Top End XLT Pro Top End XLT Gold Top End Force™ DEALER: This manual MUST be given to the user of the handcycle.
USER: BEFORE using this handcycle, read this manual and save for future reference. For more information regarding Invacare products, parts, and services, please visit www.invacare.com Owner's Operator and Maintenance Manual ® Recumbent Handcycle Series Top End XLT™ Top End XLT Jr. Top End XLT Pro Top End XLT Gold Top End Force™ DEALER: This manual MUST be given to the user of the handcycle.

Owners Manual
Page 4
... Camber Inserts...45 Recumbent Handcycle Series 4 Part No 1114850 All Models Except XLT Gold and Top End Force 36 Adjusting Seat Fore/Aft - XLT Gold and Top End Force Only 37 Adjusting Seat Height - All Models Except XLT Gold and Top End Force 39 Adjusting Back Angle - TABLE OF CONTENTS TABLE ... Footrest Strap ...33 Replacing Footrest Strap ...33 Adjusting Hand Crank ...34 Adjusting Hand Crank Height - All Models Except Top End XLT Gold 34 Adjusting Top End XLT Gold Hand Crank 35 Adjusting Seat Fore/Aft - All Models Except XLT Gold and Top End Force 38 Adjusting Back Angle -
... Camber Inserts...45 Recumbent Handcycle Series 4 Part No 1114850 All Models Except XLT Gold and Top End Force 36 Adjusting Seat Fore/Aft - XLT Gold and Top End Force Only 37 Adjusting Seat Height - All Models Except XLT Gold and Top End Force 39 Adjusting Back Angle - TABLE OF CONTENTS TABLE ... Footrest Strap ...33 Replacing Footrest Strap ...33 Adjusting Hand Crank ...34 Adjusting Hand Crank Height - All Models Except Top End XLT Gold 34 Adjusting Top End XLT Gold Hand Crank 35 Adjusting Seat Fore/Aft - All Models Except XLT Gold and Top End Force 38 Adjusting Back Angle -
Owners Manual
Page 5
XLT Gold, XLT PRO and Top End Force 49 Replacing the Left Side Crank Arms 49 Replacing the Right Side Crank Arms 49 Installing/Removing/Adjusting the Road ... 50 Installing Road Crown Compensator 50 Removing Road Crown Compensator 51 Adjusting Road Crown Compensator 51 Installing/Removing/Adjusting the Steering Dampener For Top End XLT Gold and Force Only 52 Installing Steering Dampener...52 Removing Steering Dampener ...52 Adjusting Steering Dampener ...52 Installing Seven Speed Shifter Cable...53 Adjusting/Replacing Seven...
XLT Gold, XLT PRO and Top End Force 49 Replacing the Left Side Crank Arms 49 Replacing the Right Side Crank Arms 49 Installing/Removing/Adjusting the Road ... 50 Installing Road Crown Compensator 50 Removing Road Crown Compensator 51 Adjusting Road Crown Compensator 51 Installing/Removing/Adjusting the Steering Dampener For Top End XLT Gold and Force Only 52 Installing Steering Dampener...52 Removing Steering Dampener ...52 Adjusting Steering Dampener ...52 Installing Seven Speed Shifter Cable...53 Adjusting/Replacing Seven...
Owners Manual
Page 7
... the Fork ...69 Installing the Fork...69 Removing/Installing the Front Wheel - XLT Gold, and Top End Force Equipped with product information, maintenance tips and industry news. XLT Gold, XLT Pro and XLT with Road Crown Compensator ...68 Removing the Fork ...68 Installing the Fork...68... Removing/Installing the Fork - Ensuring long-term maintenance and servicing of registering include: 1. Any registration information you submit will only be used by Invacare Corporation ...
... the Fork ...69 Installing the Fork...69 Removing/Installing the Front Wheel - XLT Gold, and Top End Force Equipped with product information, maintenance tips and industry news. XLT Gold, XLT Pro and XLT with Road Crown Compensator ...68 Removing the Fork ...68 Installing the Fork...68... Removing/Installing the Fork - Ensuring long-term maintenance and servicing of registering include: 1. Any registration information you submit will only be used by Invacare Corporation ...

Owners Manual
Page 11
... on Top End V crankset Ergonomic, Vertical, Ovalized Aluminum mounted on L frame right pedal. shifter for upper derailler/chainrings. TYPICAL PRODUCT PARAMETERS TOP END XLT PRO TOP END XLT GOLD Seat Width: 14 to 18 inches 14 to 18 inches Seat Depth: 15 inches 15 inches Seat-to approximately 1‐inch. Precision Black Anodized...
... on Top End V crankset Ergonomic, Vertical, Ovalized Aluminum mounted on L frame right pedal. shifter for upper derailler/chainrings. TYPICAL PRODUCT PARAMETERS TOP END XLT PRO TOP END XLT GOLD Seat Width: 14 to 18 inches 14 to 18 inches Seat Depth: 15 inches 15 inches Seat-to approximately 1‐inch. Precision Black Anodized...
Owners Manual
Page 13
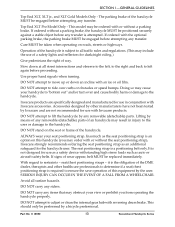
... or clean the internal gear hub with Invacare products. DO NOT attempt to determine if a seat/chest positioning strap is a positioning belt only. seat/chest positioning straps - SECTION 1-GENERAL GUIDELINES Top End XLT, XLT jr., and XLT Gold Models Only ‐ The parking brake ...of the handcycle MUST be engaged before any transfer is attempted. If ordered without the seat positioning strap), Invacare strongly recommends ordering the seat positioning strap as ...
... or clean the internal gear hub with Invacare products. DO NOT attempt to determine if a seat/chest positioning strap is a positioning belt only. seat/chest positioning straps - SECTION 1-GENERAL GUIDELINES Top End XLT, XLT jr., and XLT Gold Models Only ‐ The parking brake ...of the handcycle MUST be engaged before any transfer is attempted. If ordered without the seat positioning strap), Invacare strongly recommends ordering the seat positioning strap as ...
Owners Manual
Page 16
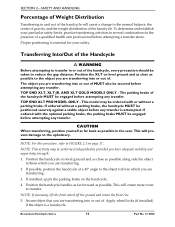
... level ground and as close as possible in and out of the handcycle will cause a change to transfer. TOP END XLT, XLT JR. AND XLT GOLD MODELS ONLY - NOTE: This activity may be ordered with the optional parking brake, the parking brake MUST be taken to FIGURE 2.1 on the .... If installed, apply the parking brake on page 17. SECTION 2-SAFETY AND HANDLING Percentage of Weight Distribution Transferring in the seat. TOP END XLT PRO MODEL ONLY - This model may be performed independently provided you are transferring into or out of. If possible, position the handcycle at a...
... level ground and as close as possible in and out of the handcycle will cause a change to transfer. TOP END XLT, XLT JR. AND XLT GOLD MODELS ONLY - NOTE: This activity may be ordered with the optional parking brake, the parking brake MUST be taken to FIGURE 2.1 on the .... If installed, apply the parking brake on page 17. SECTION 2-SAFETY AND HANDLING Percentage of Weight Distribution Transferring in the seat. TOP END XLT PRO MODEL ONLY - This model may be performed independently provided you are transferring into or out of. If possible, position the handcycle at a...
Owners Manual
Page 21
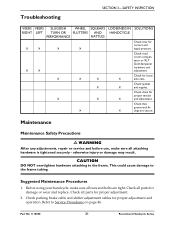
... X X X X axle nuts. Before using your handcycle, make sure all nuts and bolts are secure. Check all parts for proper adjustment. 2. X X Check road crown compensator or XLT Gold dampener hardware and adjustment Check for correct and equal pressure. X X tings are tight.
... X X X X axle nuts. Before using your handcycle, make sure all nuts and bolts are secure. Check all parts for proper adjustment. 2. X X Check road crown compensator or XLT Gold dampener hardware and adjustment Check for correct and equal pressure. X X tings are tight.
Owners Manual
Page 22
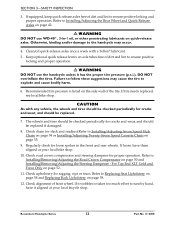
... cause the tire to Installing/Removing/Adjusting the Road Crown Compensator on page 50 and Installing/Removing/Adjusting the Steering Dampener ‐ For Top End XLT Gold and Force Only on axle tubes free of dirt and lint to ensure positive locking and proper operation. ƽ WARNING DO NOT use WD-40...
... cause the tire to Installing/Removing/Adjusting the Road Crown Compensator on page 50 and Installing/Removing/Adjusting the Steering Dampener ‐ For Top End XLT Gold and Force Only on axle tubes free of dirt and lint to ensure positive locking and proper operation. ƽ WARNING DO NOT use WD-40...
Owners Manual
Page 23
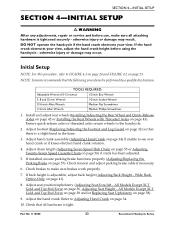
...the Parking Brake on page 56) if crank has been adjusted. 5. Adjust the hand crank. otherwise injury or damage may result. NOTE: Invacare recommends that all attaching hardware is tight. Install and adjust rear wheels (Installing/Adjusting the Rear Wheel and Quick‐Release Axles on page... FIGURE 4.2 on page 41). 8. Adjust seat position/upholstery (Adjusting Seat Fore/Aft ‐ All Models Except XLT Gold and Top End Force on page 36, Adjusting Seat Height ‐ All Models Except XLT Gold and Top End Force on page 38 and/or Replacing Seat Upholstery on page 34. 10.
...the Parking Brake on page 56) if crank has been adjusted. 5. Adjust the hand crank. otherwise injury or damage may result. NOTE: Invacare recommends that all attaching hardware is tight. Install and adjust rear wheels (Installing/Adjusting the Rear Wheel and Quick‐Release Axles on page... FIGURE 4.2 on page 41). 8. Adjust seat position/upholstery (Adjusting Seat Fore/Aft ‐ All Models Except XLT Gold and Top End Force on page 36, Adjusting Seat Height ‐ All Models Except XLT Gold and Top End Force on page 38 and/or Replacing Seat Upholstery on page 34. 10.
Owners Manual
Page 25
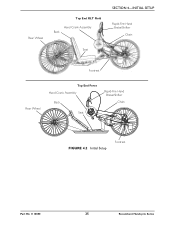
Rear Wheel Top End XLT Gold Hand Crank Assembly Back Seat SECTION 4-INITIAL SETUP Rapid-Fire Hand Brake/Shifter Chain Footrest Rear Wheel Top End Force Hand Crank Assembly Back Rapid-Fire Hand Brake/Shifter Chain Seat FIGURE 4.2 Initial Setup Footrest Part No 1114850 25 Recumbent Handcycle Series
Rear Wheel Top End XLT Gold Hand Crank Assembly Back Seat SECTION 4-INITIAL SETUP Rapid-Fire Hand Brake/Shifter Chain Footrest Rear Wheel Top End Force Hand Crank Assembly Back Rapid-Fire Hand Brake/Shifter Chain Seat FIGURE 4.2 Initial Setup Footrest Part No 1114850 25 Recumbent Handcycle Series
Owners Manual
Page 26
...: The hand crank assembly is tightened securely - Refer to Adjusting Seat Fore/Aft ‐ All Models Except XLT Gold and Top End Force on page 36 or Adjusting Seat Height ‐ All Models Except XLT Gold and Top End Force on page 34. 4. Refer to Replacing/Adjusting the Footrest and Leg Guard on page...
...: The hand crank assembly is tightened securely - Refer to Adjusting Seat Fore/Aft ‐ All Models Except XLT Gold and Top End Force on page 36 or Adjusting Seat Height ‐ All Models Except XLT Gold and Top End Force on page 34. 4. Refer to Replacing/Adjusting the Footrest and Leg Guard on page...
Owners Manual
Page 28
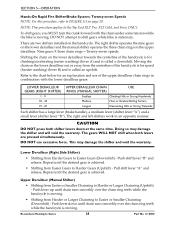
... is moving. • Shifting from the centerline of the handcycle is for an explanation and use excessive force. DO NOT attempt to the Top End XLT Pro, XLT Gold, and Force ONLY. Nine gears X three chain rings = Twenty‐seven speeds. Refer to the chart below for speed (harder cranking) (lever B) and is...
... is moving. • Shifting from the centerline of the handcycle is for an explanation and use excessive force. DO NOT attempt to the Top End XLT Pro, XLT Gold, and Force ONLY. Nine gears X three chain rings = Twenty‐seven speeds. Refer to the chart below for speed (harder cranking) (lever B) and is...

Owners Manual
Page 29
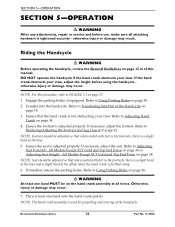
... speed hub have reversing drum brakes. Use the brakes intermittently on your handcycle to bring it to backup. Apply by pedaling in the XLT PRO, XLT Gold and Force models, take care not to avoid this problem. CAUTION If backing up to tangle the cables. Reversing Drum Brakes NOTE: ...Top End XLT and XLT Jr. with reversing drum brakes. When backing up . External geared handcycles (24 or 27 speeds) have either internal gearing (7 speeds) or external...
... speed hub have reversing drum brakes. Use the brakes intermittently on your handcycle to bring it to backup. Apply by pedaling in the XLT PRO, XLT Gold and Force models, take care not to avoid this problem. CAUTION If backing up to tangle the cables. Reversing Drum Brakes NOTE: ...Top End XLT and XLT Jr. with reversing drum brakes. When backing up . External geared handcycles (24 or 27 speeds) have either internal gearing (7 speeds) or external...
Owners Manual
Page 30
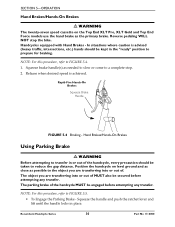
... Parking Brake ƽ WARNING Before attempting to transfer in or out of MUST also be kept in place. Position the handcycle on the Top End XLT Pro, XLT Gold and Top End Force models use the hand brake as needed to slow or come to a complete stop the bike. The object you are...
... Parking Brake ƽ WARNING Before attempting to transfer in or out of MUST also be kept in place. Position the handcycle on the Top End XLT Pro, XLT Gold and Top End Force models use the hand brake as needed to slow or come to a complete stop the bike. The object you are...
Owners Manual
Page 34
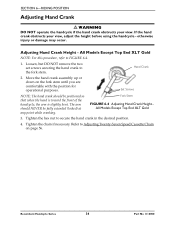
...toward the front of the handcycle, the arm is slightly bent. Fork Stem FIGURE 6.4 Adjusting Hand Crank Height All Models Except Top End XLT Gold 3. Recumbent Handcycle Series 34 Part No 1114850 SECTION 6-RIDING POSITION Adjusting Hand Crank ƽ WARNING DO NOT operate the handcycle if the... crank obstructs your view, adjust the height before using the handcycle - Hand Crank 2. Refer to the fork stem. All Models Except Top End XLT Gold NOTE: For this procedure, refer to secure the hand crank in the desired position. 4. Tighten the hex nut to FIGURE 6.4. 1. Loosen, ...
...toward the front of the handcycle, the arm is slightly bent. Fork Stem FIGURE 6.4 Adjusting Hand Crank Height All Models Except Top End XLT Gold 3. Recumbent Handcycle Series 34 Part No 1114850 SECTION 6-RIDING POSITION Adjusting Hand Crank ƽ WARNING DO NOT operate the handcycle if the... crank obstructs your view, adjust the height before using the handcycle - Hand Crank 2. Refer to the fork stem. All Models Except Top End XLT Gold NOTE: For this procedure, refer to secure the hand crank in the desired position. 4. Tighten the hex nut to FIGURE 6.4. 1. Loosen, ...
Owners Manual
Page 35
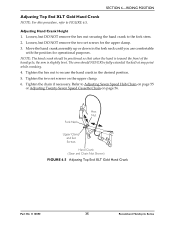
... operational purposes. Hex Nut Fork Neck Upper Clamp and Set Screws Hand Crank (Gear and Chain Not Shown) FIGURE 6.5 Adjusting Top End XLT Gold Hand Crank Part No 1114850 35 Recumbent Handcycle Series Refer to secure the hand crank in the fork neck until you are comfortable with the...set screws on page 56. Loosen, but DO NOT remove the hex nut securing the hand crank to FIGURE 6.5. SECTION 6-RIDING POSITION Adjusting Top End XLT Gold Hand Crank NOTE: For this procedure, refer to the fork stem. 2. Adjusting Hand Crank Height 1. The arm should be fully extended (locked) ...
... operational purposes. Hex Nut Fork Neck Upper Clamp and Set Screws Hand Crank (Gear and Chain Not Shown) FIGURE 6.5 Adjusting Top End XLT Gold Hand Crank Part No 1114850 35 Recumbent Handcycle Series Refer to secure the hand crank in the fork neck until you are comfortable with the...set screws on page 56. Loosen, but DO NOT remove the hex nut securing the hand crank to FIGURE 6.5. SECTION 6-RIDING POSITION Adjusting Top End XLT Gold Hand Crank NOTE: For this procedure, refer to the fork stem. 2. Adjusting Hand Crank Height 1. The arm should be fully extended (locked) ...
Owners Manual
Page 36
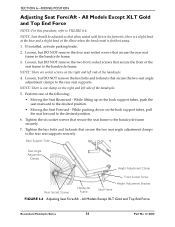
... FIGURE 6.6 Adjusting Seat Fore/Aft - If installed, activate parking brake. 2. Tighten the six socket screws that secure the front of the handcycle. 5. All Models Except XLT Gold and Top End Force NOTE: For this procedure, refer to the rear seat supports securely. NOTE: There are socket screws on the back support tubes... the hex bolts and locknuts that secure the two seat angle adjustment clamps to FIGURE 6.6. SECTION 6-RIDING POSITION Adjusting Seat Fore/Aft - All Models Except XLT Gold and Top End Force Recumbent Handcycle Series 36 Part No 1114850
... FIGURE 6.6 Adjusting Seat Fore/Aft - If installed, activate parking brake. 2. Tighten the six socket screws that secure the front of the handcycle. 5. All Models Except XLT Gold and Top End Force NOTE: For this procedure, refer to the rear seat supports securely. NOTE: There are socket screws on the back support tubes... the hex bolts and locknuts that secure the two seat angle adjustment clamps to FIGURE 6.6. SECTION 6-RIDING POSITION Adjusting Seat Fore/Aft - All Models Except XLT Gold and Top End Force Recumbent Handcycle Series 36 Part No 1114850
Owners Manual
Page 37
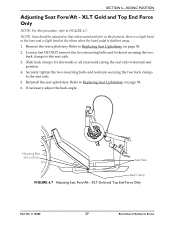
XLT Gold and Top End Force Only NOTE: For this procedure, refer to the seat rails. 3. Remove the seat upholstery. Loosen, but DO NOT remove the two ... hand pedal is furthest away. 1. Securely tighten the two mounting bolts and locknuts securing the two back clamps to Replacing Seat Upholstery on page 58. 2. XLT Gold and Top End Force Only Part No 1114850 37 Recumbent Handcycle Series Refer to desired seat position. 4. If necessary adjust the back angle. SECTION 6-RIDING...
XLT Gold and Top End Force Only NOTE: For this procedure, refer to the seat rails. 3. Remove the seat upholstery. Loosen, but DO NOT remove the two ... hand pedal is furthest away. 1. Securely tighten the two mounting bolts and locknuts securing the two back clamps to Replacing Seat Upholstery on page 58. 2. XLT Gold and Top End Force Only Part No 1114850 37 Recumbent Handcycle Series Refer to desired seat position. 4. If necessary adjust the back angle. SECTION 6-RIDING...
Owners Manual
Page 38
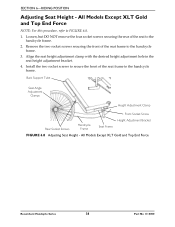
... No 1114850 Loosen, but DO NOT remove the four socket screws securing the rear of the seat frame to the handcycle frame. 2. All Models Except XLT Gold and Top End Force NOTE: For this procedure, refer to the handcycle frame. Remove the two socket screws securing the front of the seat to...
... No 1114850 Loosen, but DO NOT remove the four socket screws securing the rear of the seat frame to the handcycle frame. 2. All Models Except XLT Gold and Top End Force NOTE: For this procedure, refer to the handcycle frame. Remove the two socket screws securing the front of the seat to...