Owners Manual
Page 8
... - TDX SP with Elevating Seat Only 102 Using the Proper Batteries ...103 Battery Wiring Harness - FDX with Vent Tray Option 112 Preparing the Ventilator Tray for Use ...113 8 TROUBLESHOOTING 115 Electrical ...115 All Joysticks ...115 SPJ™+, SPJ+ w/PSS or SPJ+ w/ACC Joysticks ...116 CMPJ™+, PSR+, PSF+ Joysticks or Displays ...118 NOTES 121 Invacare®...
... - TDX SP with Elevating Seat Only 102 Using the Proper Batteries ...103 Battery Wiring Harness - FDX with Vent Tray Option 112 Preparing the Ventilator Tray for Use ...113 8 TROUBLESHOOTING 115 Electrical ...115 All Joysticks ...115 SPJ™+, SPJ+ w/PSS or SPJ+ w/ACC Joysticks ...116 CMPJ™+, PSR+, PSF+ Joysticks or Displays ...118 NOTES 121 Invacare®...
Owners Manual
Page 93
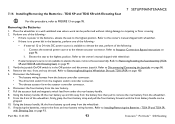
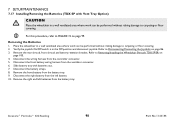
... page 96. Refer to the highest position. Disconnect the front battery from under the rear battery handle. 8. Part No 1143155 93 Invacare® Formula™ CG Seating Elevate the seat to Actuator Connection Bypass Instructions on page 95. From the front of the following... the front and rear battery wiring harness. 7.16 Installing/Removing the Batteries - TDX SP and TDX SR with wheelchair. • If external power source is no power left in the Off position and disconnect joystick. Removing the Batteries 1. Refer to the owner's manual shipped with Elevating Seat...
... page 96. Refer to the highest position. Disconnect the front battery from under the rear battery handle. 8. Part No 1143155 93 Invacare® Formula™ CG Seating Elevate the seat to Actuator Connection Bypass Instructions on page 95. From the front of the following... the front and rear battery wiring harness. 7.16 Installing/Removing the Batteries - TDX SP and TDX SR with wheelchair. • If external power source is no power left in the Off position and disconnect joystick. Removing the Batteries 1. Refer to the owner's manual shipped with Elevating Seat...
Owners Manual
Page 94
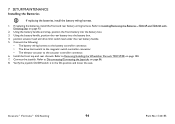
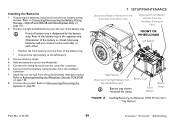
TDX SP and TDX SR with Elevating Seat on page 100. 7. Refer to Installing/Removing the Batteries - Invacare® Formula™ CG Seating 94 Part No 1143155 Using the battery handle and strap, position the front battery into the battery ...• The drive limit switch to the magnetic switch controller connector. • The elevator actuator to Removing/Installing the Wheelchair Shrouds TDX SP/SR on page 93. 2. Connect the joystick. Using the battery handle, position the rear battery into the battery box. 3. Refer to the actuator controller connector. 6. Install the...
TDX SP and TDX SR with Elevating Seat on page 100. 7. Refer to Installing/Removing the Batteries - Invacare® Formula™ CG Seating 94 Part No 1143155 Using the battery handle and strap, position the front battery into the battery ...• The drive limit switch to the magnetic switch controller connector. • The elevator actuator to Removing/Installing the Wheelchair Shrouds TDX SP/SR on page 93. 2. Connect the joystick. Using the battery handle, position the rear battery into the battery box. 3. Refer to the actuator controller connector. 6. Install the...
Owners Manual
Page 95
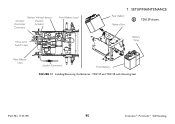
TDX SP and TDX SR with Elevating Seat Part No 1143155 95 Invacare® Formula™ CG Seating Battery Wiring Harness Actuator Elevator Controller Actuator Connector Front Battery Lead Drive Limit Switch Lead 7 SETUP/MAINTENANCE Rear Battery Battery Box TDX SP shown. Battery Strap Rear Battery Lead Joystick Connector Front Battery FIGURE 13 Installing/Removing the Batteries -
TDX SP and TDX SR with Elevating Seat Part No 1143155 95 Invacare® Formula™ CG Seating Battery Wiring Harness Actuator Elevator Controller Actuator Connector Front Battery Lead Drive Limit Switch Lead 7 SETUP/MAINTENANCE Rear Battery Battery Box TDX SP shown. Battery Strap Rear Battery Lead Joystick Connector Front Battery FIGURE 13 Installing/Removing the Batteries -

Owners Manual
Page 97
... shown. 4. Refer to Disconnecting/Connecting the Joysticks on page 86. Seat pan, socket screws and seat assembly not shown. Mounting Bolts Seat Assembly Actuator Post Locknuts FIGURE 14 Removing/Installing the Seat Assembly (TDX SP and TDX SR with Elevating Seat) 7 SETUP/MAINTENANCE...6. Removing/Installing the Seat Assembly (TDX SP and TDX SR with Elevating Seat) Part No 1143155 97 Invacare® Formula™ CG Seating Removing 1. Remove the seat pan from the actuator post and set aside. Refer to Disconnecting/Connecting the Joysticks on page 86. 2. Remove the...
... shown. 4. Refer to Disconnecting/Connecting the Joysticks on page 86. Seat pan, socket screws and seat assembly not shown. Mounting Bolts Seat Assembly Actuator Post Locknuts FIGURE 14 Removing/Installing the Seat Assembly (TDX SP and TDX SR with Elevating Seat) 7 SETUP/MAINTENANCE...6. Removing/Installing the Seat Assembly (TDX SP and TDX SR with Elevating Seat) Part No 1143155 97 Invacare® Formula™ CG Seating Removing 1. Remove the seat pan from the actuator post and set aside. Refer to Disconnecting/Connecting the Joysticks on page 86. 2. Remove the...
Owners Manual
Page 98
...be performed without risking damage to carpeting or floor covering. For this procedure, refer to carpeting or floor covering. 2. Invacare® Formula™ CG Seating 98 Part No 1143155 Disconnect the wiring harness from the battery tray. Remove the right and ...Disconnect the right battery from the battery tray. 9. Refer to Removing/Installing the Wheelchair Shrouds TDX SP/SR on page 86. 3. Place the wheelchair in the Off position and disconnect joystick. Remove the front battery from the left batteries from the controller connector. 5. Refer to Disconnecting...
...be performed without risking damage to carpeting or floor covering. For this procedure, refer to carpeting or floor covering. 2. Invacare® Formula™ CG Seating 98 Part No 1143155 Disconnect the wiring harness from the battery tray. Remove the right and ...Disconnect the right battery from the battery tray. 9. Refer to Removing/Installing the Wheelchair Shrouds TDX SP/SR on page 86. 3. Place the wheelchair in the Off position and disconnect joystick. Remove the front battery from the left batteries from the controller connector. 5. Refer to Disconnecting...
Owners Manual
Page 99
... onto the front of the battery is the opposite end. Connect the wiring harness from the ventilator connector. 7. Connect the joystick. TDX SP and TDX SR with Vent Tray Option) Part No 1143155 99 Invacare® Formula™ CG Seating Orientation of the battery tray. • Connect the right battery to Connecting/Disconnecting the Battery...
... onto the front of the battery is the opposite end. Connect the wiring harness from the ventilator connector. 7. Connect the joystick. TDX SP and TDX SR with Vent Tray Option) Part No 1143155 99 Invacare® Formula™ CG Seating Orientation of the battery tray. • Connect the right battery to Connecting/Disconnecting the Battery...


