Owners Manual
Page 4
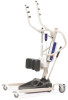
TABLE OF CONTENTS TABLE OF CONTENTS SECTION 7-MAINTENANCE 21 Maintenance Safety Inspection Checklist...21 Cleaning the Sling and the Lift...21 Detecting Wear and Damage...21 Lubricating the Lift ...22 Adjusting the Base...22 Adjusting the Knee Pad Height ...22 Replacing the Electric Actuator ...23 LIMITED WARRANTY 24 Stand Up Patient Lift 4 Part No. 1078984
TABLE OF CONTENTS TABLE OF CONTENTS SECTION 7-MAINTENANCE 21 Maintenance Safety Inspection Checklist...21 Cleaning the Sling and the Lift...21 Detecting Wear and Damage...21 Lubricating the Lift ...22 Adjusting the Base...22 Adjusting the Knee Pad Height ...22 Replacing the Electric Actuator ...23 LIMITED WARRANTY 24 Stand Up Patient Lift 4 Part No. 1078984
Owners Manual
Page 13
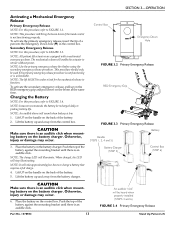
Secondary Emergency Release NOTE: For this procedure, refer to FIGURE 3.4. NOTE: All patient lift actuators are equipped with a mechanical emergency release. NOTE: Invacare recommends the battery be under a load for the mechanical release to charge a battery that requires a full charge. 4. CAUTION Make sure ...be recharged daily to retract without power. Lift the battery up and away from the control box. NOTE: This procedure will enable the actuator to prolong battery life. Place the battery on the back of a pen into the Emergency Down hole () in the control box....
Secondary Emergency Release NOTE: For this procedure, refer to FIGURE 3.4. NOTE: All patient lift actuators are equipped with a mechanical emergency release. NOTE: Invacare recommends the battery be under a load for the mechanical release to charge a battery that requires a full charge. 4. CAUTION Make sure ...be recharged daily to retract without power. Lift the battery up and away from the control box. NOTE: This procedure will enable the actuator to prolong battery life. Place the battery on the back of a pen into the Emergency Down hole () in the control box....

Owners Manual
Page 20
...Rotate RED emergency stop button pressed IN. The connecting terminals are not remedied by the suggested means, please contact your dealer or Invacare. Refer to Lubricating the Lift on page 23. Lift arms require a minimum weight load to the control box. Battery not connected... noise from the uppermost position. Refer to lift when button is bent. Replace the battery pack. Lift arms will not lower from actuator. RED emergency stop button CLOCKWISE until it pops out. Refer to control box. vice or load is required. SECTION 6-TROUBLESHOOTING SECTION...
...Rotate RED emergency stop button pressed IN. The connecting terminals are not remedied by the suggested means, please contact your dealer or Invacare. Refer to Lubricating the Lift on page 23. Lift arms require a minimum weight load to the control box. Battery not connected... noise from the uppermost position. Refer to lift when button is bent. Replace the battery pack. Lift arms will not lower from actuator. RED emergency stop button CLOCKWISE until it pops out. Refer to control box. vice or load is required. SECTION 6-TROUBLESHOOTING SECTION...
Owners Manual
Page 21
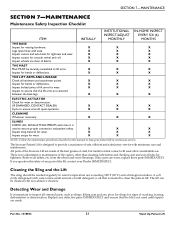
...Sling and the Lift The sling should be washed regularly in continuous service. Part No. 1078984 21 Stand Up Patient Lift X X X ELECTRIC ACTUATOR Check for bends or deflections. X X X Inspect straps for bends or deflections. Remove all hardware and attachment points. If you question the ... INSTITUTIONAL INSPECT/ADJUST MONTHLY IN-HOME INSPECT EVERY SIX (6) MONTHS THE BASE Inspect for smooth swivel and roll. All parts of the Invacare Lift are made of the best grades of lift arms for signs of cracking, fraying, deformation or deterioration. X X X CLEANING Whenever...
...Sling and the Lift The sling should be washed regularly in continuous service. Part No. 1078984 21 Stand Up Patient Lift X X X ELECTRIC ACTUATOR Check for bends or deflections. X X X Inspect straps for bends or deflections. Remove all hardware and attachment points. If you question the ... INSTITUTIONAL INSPECT/ADJUST MONTHLY IN-HOME INSPECT EVERY SIX (6) MONTHS THE BASE Inspect for smooth swivel and roll. All parts of the Invacare Lift are made of the best grades of lift arms for signs of cracking, fraying, deformation or deterioration. X X X CLEANING Whenever...
Owners Manual
Page 23
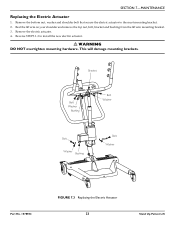
... Stand Up Patient Lift Reverse STEPS 1‐3 to the mast mounting bracket. 2. Remove the electric actuator. 4. Remove the bottom nut, washer and shoulder bolt that secure the electric actuator to install the new electric actuator. ƽ WARNING DO NOT overtighten mounting hardware. Rest the lift arm on your shoulder and remove the top...
... Stand Up Patient Lift Reverse STEPS 1‐3 to the mast mounting bracket. 2. Remove the electric actuator. 4. Remove the bottom nut, washer and shoulder bolt that secure the electric actuator to install the new electric actuator. ƽ WARNING DO NOT overtighten mounting hardware. Rest the lift arm on your shoulder and remove the top...