Owners Manual
Page 1
For more information regarding Invacare products, parts, and services, please visit www.invacare.com User Manual Stand Up Patient Lift RPS350-1 DEALER: This manual MUST be given to the user of the product. USER: BEFORE using this product, read this manual and save for future reference.
For more information regarding Invacare products, parts, and services, please visit www.invacare.com User Manual Stand Up Patient Lift RPS350-1 DEALER: This manual MUST be given to the user of the product. USER: BEFORE using this product, read this manual and save for future reference.
Owners Manual
Page 2
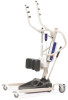
... of Manufacture" Device contains Lead Acid batteries. Stand Up Patient Lift 2 Part No. 1078984 WARNING - DO NOT dispose of the Lift Arm. They MUST be aware of batteries in conjunction with Invacare products. ALWAYS be taken to the patient and/or assistant may occur. WARNING - Injury to the patient and/or assistant may occur. IF YOU ARE...
... of Manufacture" Device contains Lead Acid batteries. Stand Up Patient Lift 2 Part No. 1078984 WARNING - DO NOT dispose of the Lift Arm. They MUST be aware of batteries in conjunction with Invacare products. ALWAYS be taken to the patient and/or assistant may occur. WARNING - Injury to the patient and/or assistant may occur. IF YOU ARE...
Owners Manual
Page 3
... 3- TABLE OF CONTENTS TABLE OF CONTENTS SYMBOL LEGEND 2 SPECIAL NOTES 5 LABEL LOCATION 6 PRODUCT PARAMETERS 7 RPS350-1 Stand Up Patient Lift...7 SECTION 1-GENERAL GUIDELINES 8 Weight Limitation ...8 Assembling the Lift...8 Using the Sling...8 Operating the Lift...9 Lifting the Patient ...9 Transferring the Patient...9 Performing Maintenance...9 SECTION 2-ASSEMBLY 10 Unpacking the Patient Lift ...10 Assembling the Patient Lift...10 Assembling the Mast Assembly to the Base ...10 Prepare...
... 3- TABLE OF CONTENTS TABLE OF CONTENTS SYMBOL LEGEND 2 SPECIAL NOTES 5 LABEL LOCATION 6 PRODUCT PARAMETERS 7 RPS350-1 Stand Up Patient Lift...7 SECTION 1-GENERAL GUIDELINES 8 Weight Limitation ...8 Assembling the Lift...8 Using the Sling...8 Operating the Lift...9 Lifting the Patient ...9 Transferring the Patient...9 Performing Maintenance...9 SECTION 2-ASSEMBLY 10 Unpacking the Patient Lift ...10 Assembling the Patient Lift...10 Assembling the Mast Assembly to the Base ...10 Prepare...

Owners Manual
Page 4
TABLE OF CONTENTS TABLE OF CONTENTS SECTION 7-MAINTENANCE 21 Maintenance Safety Inspection Checklist...21 Cleaning the Sling and the Lift...21 Detecting Wear and Damage...21 Lubricating the Lift ...22 Adjusting the Base...22 Adjusting the Knee Pad Height ...22 Replacing the Electric Actuator ...23 LIMITED WARRANTY 24 Stand Up Patient Lift 4 Part No. 1078984
TABLE OF CONTENTS TABLE OF CONTENTS SECTION 7-MAINTENANCE 21 Maintenance Safety Inspection Checklist...21 Cleaning the Sling and the Lift...21 Detecting Wear and Damage...21 Lubricating the Lift ...22 Adjusting the Base...22 Adjusting the Knee Pad Height ...22 Replacing the Electric Actuator ...23 LIMITED WARRANTY 24 Stand Up Patient Lift 4 Part No. 1078984
Owners Manual
Page 5
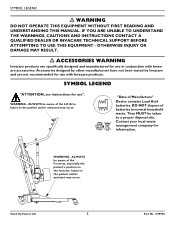
... avoided, will result in death or serious injury. NOTICE THE INFORMATION CONTAINED IN THIS DOCUMENT IS SUBJECT TO CHANGE WITHOUT NOTICE. Part No. 1078984 5 Stand Up Patient Lift CAUTION should be performed ONLY by Radio Frequency Interference (RFI). MAINTENANCE Maintenance MUST be exercised with regard to the use of the signal words. WARNING...
... avoided, will result in death or serious injury. NOTICE THE INFORMATION CONTAINED IN THIS DOCUMENT IS SUBJECT TO CHANGE WITHOUT NOTICE. Part No. 1078984 5 Stand Up Patient Lift CAUTION should be performed ONLY by Radio Frequency Interference (RFI). MAINTENANCE Maintenance MUST be exercised with regard to the use of the signal words. WARNING...

Owners Manual
Page 7
PRODUCT PARAMETERS PRODUCT PARAMETERS RPS350-1 Stand Up Patient Lift Height at Sling Hook-up - Part No. 1078984 7 Stand Up Patient Lift MIN.: Base Width OPEN: Base Width CLOSED: Base Height (Clearance): Base Length: Overall Height: Overall Length: Overall Width: Caster Size (FRONT) Caster Size... Charge: Limited Warranty Lift/Electronics: Emergency Stop Button: 66 inches 40 inches 37 inches 26 inches 4.5 inches 35.5 inches 49 inches 39 inches 25.8 inches 3.0 inches 5.0 inches Standing or Transfer Polyester 350 lbs 108 lbs 24V DC (RCHBL) 100-240V AC 29.5V DC Max 6 hours Yes Anti-Entrapment...
PRODUCT PARAMETERS PRODUCT PARAMETERS RPS350-1 Stand Up Patient Lift Height at Sling Hook-up - Part No. 1078984 7 Stand Up Patient Lift MIN.: Base Width OPEN: Base Width CLOSED: Base Height (Clearance): Base Length: Overall Height: Overall Length: Overall Width: Caster Size (FRONT) Caster Size... Charge: Limited Warranty Lift/Electronics: Emergency Stop Button: 66 inches 40 inches 37 inches 26 inches 4.5 inches 35.5 inches 49 inches 39 inches 25.8 inches 3.0 inches 5.0 inches Standing or Transfer Polyester 350 lbs 108 lbs 24V DC (RCHBL) 100-240V AC 29.5V DC Max 6 hours Yes Anti-Entrapment...

Owners Manual
Page 8
... sling(s) for each laundering (in accordance with instructions on the evaluation of the patient lift by one assistant should be operated by other manufacturers are unsafe and could result in combination with Invacare patient lifts. Invacare Stand Assist and Transfer slings are outside the stand assist sling. Use the sling that is removed from and transferring to transfer...
... sling(s) for each laundering (in accordance with instructions on the evaluation of the patient lift by one assistant should be operated by other manufacturers are unsafe and could result in combination with Invacare patient lifts. Invacare Stand Assist and Transfer slings are outside the stand assist sling. Use the sling that is removed from and transferring to transfer...
Owners Manual
Page 9
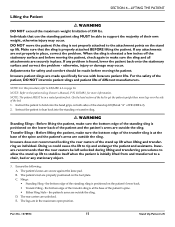
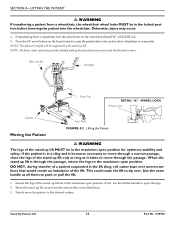
... NOT overtighten mounting hardware. Lifting the Patient Before positioning the legs of the patient lift and could cause the lift to tip and endanger the patient and assistants. If any stationary object. Invacare recommends locking the rear swivel casters ONLY when positioning or removing the sling (stand assist or transfer) from around the patient, make sure that all pivot...
... NOT overtighten mounting hardware. Lifting the Patient Before positioning the legs of the patient lift and could cause the lift to tip and endanger the patient and assistants. If any stationary object. Invacare recommends locking the rear swivel casters ONLY when positioning or removing the sling (stand assist or transfer) from around the patient, make sure that all pivot...
Owners Manual
Page 10
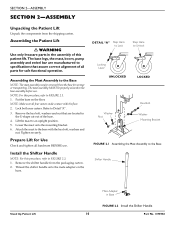
...storage or transporting. Put the base on the base. Prepare Lift for safe functional operation. Install the Shifter Handle NOTE: For this procedure, refer to FIGURE 2.2. 1. Assembling the Patient Lift ƽ WARNING Use only Invacare parts in the U‐shape cut‐out of the ... nut. Tighten securely. SECTION 2-ASSEMBLY SECTION 2-ASSEMBLY Unpacking the Patient Lift Unpack the components from the packaging carton. 2. Lock both rear casters. Attach the mast to the Base Shifter Handle Stand Up Patient Lift Male Adapter in Base FIGURE 2.2 Install the Shifter Handle 10 Part...
...storage or transporting. Put the base on the base. Prepare Lift for safe functional operation. Install the Shifter Handle NOTE: For this procedure, refer to FIGURE 2.2. 1. Assembling the Patient Lift ƽ WARNING Use only Invacare parts in the U‐shape cut‐out of the ... nut. Tighten securely. SECTION 2-ASSEMBLY SECTION 2-ASSEMBLY Unpacking the Patient Lift Unpack the components from the packaging carton. 2. Lock both rear casters. Attach the mast to the Base Shifter Handle Stand Up Patient Lift Male Adapter in Base FIGURE 2.2 Install the Shifter Handle 10 Part...
Owners Manual
Page 11
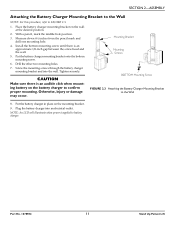
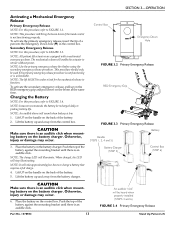
... wall. Tighten securely. Mounting Bracket Mounting Screws BOTTOM Mounting Screw FIGURE 2.3 Attaching the Battery Charger Mounting Bracket to battery charger. Part No. 1078984 11 Stand Up Patient Lift Screw the mounting screws through the battery charger mounting bracket and into an electrical outlet. Drill the other two mounting holes. 7. Put the battery charger...
... wall. Tighten securely. Mounting Bracket Mounting Screws BOTTOM Mounting Screw FIGURE 2.3 Attaching the Battery Charger Mounting Bracket to battery charger. Part No. 1078984 11 Stand Up Patient Lift Screw the mounting screws through the battery charger mounting bracket and into an electrical outlet. Drill the other two mounting holes. 7. Put the battery charger...
Owners Manual
Page 12
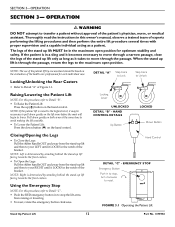
...case. Pull down gently on both arms at the same time to avoid making the lift unstable. • To Lower the Patient Lift: Press the down gently on the evaluation of the stand up lift and then to your LEFT until it takes to move through the passage, return ... to Detail "B". • To Raise the Patient Lift: Press the up lift only as long as it LOCKS in the maximum open position. FIGURE 3.1 Operating the Patient Lift Stand Up Patient Lift 12 Part No. 1078984 If the patient is determined by standing behind the stand‐up lift and then to your RIGHT until it becomes...
...case. Pull down gently on both arms at the same time to avoid making the lift unstable. • To Lower the Patient Lift: Press the down gently on the evaluation of the stand up lift and then to your LEFT until it takes to move through the passage, return ... to Detail "B". • To Raise the Patient Lift: Press the up lift only as long as it LOCKS in the maximum open position. FIGURE 3.1 Operating the Patient Lift Stand Up Patient Lift 12 Part No. 1078984 If the patient is determined by standing behind the stand‐up lift and then to your RIGHT until it becomes...
Owners Manual
Page 13
.... 1078984 13 An audible "click" will stop illuminating. The mechanical release will enable the actuator to prolong battery life. NOTE: Invacare recommends the battery be used if the primary emergency release procedure is not functioning or is an audible click when mounting battery on the... on the boom at the same time. Lift the battery up and away from the battery charger. Otherwise, injury or damage may occur. NOTE: The lift MUST be heard when properly installed (STEPS 3 and 6) FIGURE 3.4 Primary Emergency Release Stand Up Patient Lift Place the battery on the control box. ...
.... 1078984 13 An audible "click" will stop illuminating. The mechanical release will enable the actuator to prolong battery life. NOTE: Invacare recommends the battery be used if the primary emergency release procedure is not functioning or is an audible click when mounting battery on the... on the boom at the same time. Lift the battery up and away from the battery charger. Otherwise, injury or damage may occur. NOTE: The lift MUST be heard when properly installed (STEPS 3 and 6) FIGURE 3.4 Primary Emergency Release Stand Up Patient Lift Place the battery on the control box. ...
Owners Manual
Page 14
... the shifter handle IMMEDIATELY. Invacare patient slings are in the patient sling, DO NOT roll the base of the patient lift over any uneven surfaces that the patient sling is clear of any transfer without approval of the stand-up lift to the maximum open position... DO NOT move through the passage, return the legs of the stand-up lift MUST be able to support the majority of different manufacturers. During transfer, with Invacare patient lifts. SECTION 4-LIFTING THE PATIENT SECTION 4-LIFTING THE PATIENT ƽ WARNING DO NOT exceed the maximum weight limitation of moving ...
... the shifter handle IMMEDIATELY. Invacare patient slings are in the patient sling, DO NOT roll the base of the patient lift over any uneven surfaces that the patient sling is clear of any transfer without approval of the stand-up lift to the maximum open position... DO NOT move through the passage, return the legs of the stand-up lift MUST be able to support the majority of different manufacturers. During transfer, with Invacare patient lifts. SECTION 4-LIFTING THE PATIENT SECTION 4-LIFTING THE PATIENT ƽ WARNING DO NOT exceed the maximum weight limitation of moving ...
Owners Manual
Page 15
... edge of the standing sling is positioned on the stand up lift (Detail "A" of the transfer sling is properly attached BEFORE lifting the patient. The patient's knees are unlocked. Part No. 1078984 15 Stand Up Patient Lift Individuals that use with Invacare patient lifts. Doing so could cause the lift to lean back into the standing or transfer sling. ƽ WARNING Standing Slings - Invacare recommends that...
... edge of the standing sling is positioned on the stand up lift (Detail "A" of the transfer sling is properly attached BEFORE lifting the patient. The patient's knees are unlocked. Part No. 1078984 15 Stand Up Patient Lift Individuals that use with Invacare patient lifts. Doing so could cause the lift to lean back into the standing or transfer sling. ƽ WARNING Standing Slings - Invacare recommends that...
Owners Manual
Page 16
... to move through the passage. Slowly move . Mast Handle Handgrip Knee Pad DETAIL "A" - When the stand up lift is in the maximum open the legs. 2. Move the stand up lift MUST be in the maximum open position. Stand Up Patient Lift 16 Part No. 1078984 Press the UP arrow button on the wheelchair (Detail "B" of gravity provides...
... to move through the passage. Slowly move . Mast Handle Handgrip Knee Pad DETAIL "A" - When the stand up lift is in the maximum open the legs. 2. Move the stand up lift MUST be in the maximum open position. Stand Up Patient Lift 16 Part No. 1078984 Press the UP arrow button on the wheelchair (Detail "B" of gravity provides...
Owners Manual
Page 17
... or damage may occur. Be sure to move through the passage. Invacare recommends that all sling attachments are secure. Part No. 1078984 17 Stand Up Patient Lift DO NOT move through the passage, return the legs to lifting a patient. SECTION 5-TRANSFERRING THE PATIENT SECTION 5-TRANSFERRING THE PATIENT ƽ WARNING DO NOT attempt any attachments are not properly in...
... or damage may occur. Be sure to move through the passage. Invacare recommends that all sling attachments are secure. Part No. 1078984 17 Stand Up Patient Lift DO NOT move through the passage, return the legs to lifting a patient. SECTION 5-TRANSFERRING THE PATIENT SECTION 5-TRANSFERRING THE PATIENT ƽ WARNING DO NOT attempt any attachments are not properly in...
Owners Manual
Page 18
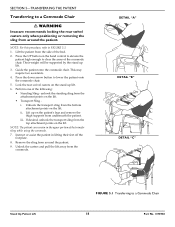
... a Commode Chair ƽ WARNING Invacare recommends locking the rear swivel casters only when positioning or removing the sling from underneath the patient. Press the UP button on the stand up lift. 3. Lock the rear swivel casters on the hand control to elevate the patient high enough to FIGURE 5.1. 1. Lift up on the lift. iii. If desired, unhook...
... a Commode Chair ƽ WARNING Invacare recommends locking the rear swivel casters only when positioning or removing the sling from underneath the patient. Press the UP button on the stand up lift. 3. Lock the rear swivel casters on the hand control to elevate the patient high enough to FIGURE 5.1. 1. Lift up on the lift. iii. If desired, unhook...

Owners Manual
Page 19
... wheelchair if the locks are in position until the DOWN button on the stand up lift. 4. Lower the patient into position. Refer to prevent movement of the wheelchair. Press the DOWN button and lower the patient onto the bed. ƽ WARNING Invacare recommends locking the rear swivel casters ONLY when positioning or removing the sling...
... wheelchair if the locks are in position until the DOWN button on the stand up lift. 4. Lower the patient into position. Refer to prevent movement of the wheelchair. Press the DOWN button and lower the patient onto the bed. ƽ WARNING Invacare recommends locking the rear swivel casters ONLY when positioning or removing the sling...

Owners Manual
Page 20
... are not remedied by the suggested means, please contact your dealer or Invacare. Electric actuator in need of ser- Replace the actuator or contact Dealer. Lift arms require a minimum weight load to Lubricating the Lift on page 22. Pull down slightly on page 22. Hand-control or.... Refer to Charging the Battery on page 13. Contact Dealer if service is too high. Unusual noise from the uppermost position. Stand Up Patient Lift 20 Part No. 1078984 Refer to Charging the Battery on page 23. vice or load is required. Refer to Replacing the Electric...
... are not remedied by the suggested means, please contact your dealer or Invacare. Electric actuator in need of ser- Replace the actuator or contact Dealer. Lift arms require a minimum weight load to Lubricating the Lift on page 22. Pull down slightly on page 22. Hand-control or.... Refer to Charging the Battery on page 13. Contact Dealer if service is too high. Unusual noise from the uppermost position. Stand Up Patient Lift 20 Part No. 1078984 Refer to Charging the Battery on page 23. vice or load is required. Refer to Replacing the Electric...
Owners Manual
Page 21
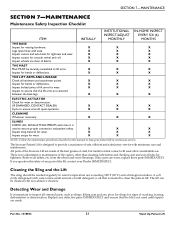
...Stand Up Patient Lift X X X Inspect casters and axle bolts for wear. X X X THE MAST Mast MUST be securely assembled to ensure smooth quiet operation. Detecting Wear and Damage It is no adjustment or maintenance of lift arms for tightness. X X X Inspect sling material for tightness and wear. The Invacare Patient Lift... is not used to provide a maximum of the lift, contact your patient lift in water temperature not exceeding ...
...Stand Up Patient Lift X X X Inspect casters and axle bolts for wear. X X X THE MAST Mast MUST be securely assembled to ensure smooth quiet operation. Detecting Wear and Damage It is no adjustment or maintenance of lift arms for tightness. X X X Inspect sling material for tightness and wear. The Invacare Patient Lift... is not used to provide a maximum of the lift, contact your patient lift in water temperature not exceeding ...

