
Owners Manual
Page 1
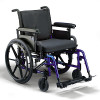
... sur les produits,les pièces et le service Invacare,consulter le: www.invacare.com USER: BEFORE using this wheelchair, read this manual and save for future reference. FOURNISSEUR: Ce manuel doit être remis à l'utilisateur du fauteuil roulant. French Canadian Patriot™ DEALER: This manual MUST be given to the user of the...
... sur les produits,les pièces et le service Invacare,consulter le: www.invacare.com USER: BEFORE using this wheelchair, read this manual and save for future reference. FOURNISSEUR: Ce manuel doit être remis à l'utilisateur du fauteuil roulant. French Canadian Patriot™ DEALER: This manual MUST be given to the user of the...
Owners Manual
Page 6
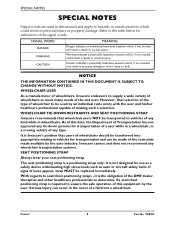
... STRAP Invacare recommends that users of wheelchairs should be replaced immediately. Patriot™ 6 Part No 1088909 SIGNAL WORD MEANING DANGER WARNING CAUTION Danger indicates an imminently hazardous situation which could result in property damage or minor injury or both. The seat positioning strap is Invacare's position that wheelchair users NOT be used in this manual and...
... STRAP Invacare recommends that users of wheelchairs should be replaced immediately. Patriot™ 6 Part No 1088909 SIGNAL WORD MEANING DANGER WARNING CAUTION Danger indicates an imminently hazardous situation which could result in property damage or minor injury or both. The seat positioning strap is Invacare's position that wheelchair users NOT be used in this manual and...
Owners Manual
Page 9
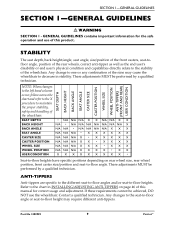
... front caster size/position and seat‐to ‐floor heights have specific positions depending on page 46 of the wheelchair. Part No 1088909 9 Patriot™ These adjustments MUST be achieved, DO NOT use of the rear wheels, correct anti‐tipper as well as... height/angle, seat angle, size/position of the front casters, seat‐to‐ floor angle, position of this manual for the safe operation and use the wheelchair. If these requirements cannot be performed by a qualified technician. These adjustments MUST be performed by a qualified technician. Contact...
... front caster size/position and seat‐to ‐floor heights have specific positions depending on page 46 of the wheelchair. Part No 1088909 9 Patriot™ These adjustments MUST be achieved, DO NOT use of the rear wheels, correct anti‐tipper as well as... height/angle, seat angle, size/position of the front casters, seat‐to‐ floor angle, position of this manual for the safe operation and use the wheelchair. If these requirements cannot be performed by a qualified technician. These adjustments MUST be performed by a qualified technician. Contact...

Owners Manual
Page 13
... of the wheelchair, resulting in maneuvering around the frequently encountered architectural barriers. Part No 1088909 13 Patriot™ DO NOT leave elevating legrests in serious bodily injury to deal with or without the seat positioning strap), Invacare strongly recommends... the wheelchair this manual. Use this manual MUST be replaced immediately. SECTION 2-SAFETY/HANDLING OF WHEELCHAIRS SECTION 2-SAFETY/HANDLING OF WHEELCHAIRS "Safety and Handling" of the wheelchair requires the close attention of the wheelchair user as well as a "basic" guide. This manual points out...
... of the wheelchair, resulting in maneuvering around the frequently encountered architectural barriers. Part No 1088909 13 Patriot™ DO NOT leave elevating legrests in serious bodily injury to deal with or without the seat positioning strap), Invacare strongly recommends... the wheelchair this manual. Use this manual MUST be replaced immediately. SECTION 2-SAFETY/HANDLING OF WHEELCHAIRS SECTION 2-SAFETY/HANDLING OF WHEELCHAIRS "Safety and Handling" of the wheelchair requires the close attention of the wheelchair user as well as a "basic" guide. This manual points out...
Owners Manual
Page 27
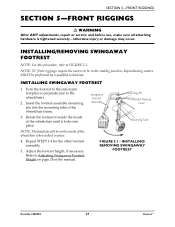
...Footrest Height on the inside of the wheelchair frame. 3. NOTE: The footplate will be on page 28 of the wheelchair when locked in the trailing position.... Refer to be performed by a qualified technician. Swingaway Footrest Assembly Mounting Pin Footrest Release Lever Mounting Tube FIGURE 5.1 - INSTALLING/ REMOVING SWINGAWAY FOOTREST Part No 1088909 27 Patriot... For this procedure, refer to the wheelchair). 2. Insert the footrest assembly mounting pin into the mounting tube of the wheelchair until it locks into place. Rotate ...
...Footrest Height on the inside of the wheelchair frame. 3. NOTE: The footplate will be on page 28 of the wheelchair when locked in the trailing position.... Refer to be performed by a qualified technician. Swingaway Footrest Assembly Mounting Pin Footrest Release Lever Mounting Tube FIGURE 5.1 - INSTALLING/ REMOVING SWINGAWAY FOOTREST Part No 1088909 27 Patriot... For this procedure, refer to the wheelchair). 2. Insert the footrest assembly mounting pin into the mounting tube of the wheelchair until it locks into place. Rotate ...
Owners Manual
Page 34
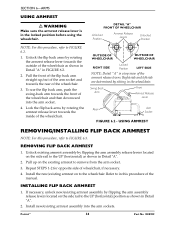
...arm, push the swing‐back arm towards the inside of the wheelchair and then downward into the arm sockets. Swing Back Arm Front Armrest Release Lever Rear Arm Socket FIGURE 6.2 - REMOVING FLIP BACK ARMREST 1. Patriot™ 34 Part No 1088909 Lock the flip back arms by rotating... the flip back arms by sitting in the locked position before using the wheelchair. INSTALLING FLIP BACK ARMREST 1. Right side and left side are determined by rotating the armrest release lever towards the rear of the manual. Refer to in Detail ʺAʺ. 2. Pull the front of the...
...arm, push the swing‐back arm towards the inside of the wheelchair and then downward into the arm sockets. Swing Back Arm Front Armrest Release Lever Rear Arm Socket FIGURE 6.2 - REMOVING FLIP BACK ARMREST 1. Patriot™ 34 Part No 1088909 Lock the flip back arms by rotating... the flip back arms by sitting in the locked position before using the wheelchair. INSTALLING FLIP BACK ARMREST 1. Right side and left side are determined by rotating the armrest release lever towards the rear of the manual. Refer to in Detail ʺAʺ. 2. Pull the front of the...
Owners Manual
Page 46
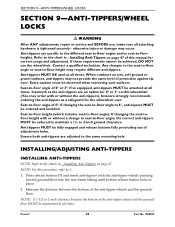
... Anti-tippers MUST be fully engaged and release buttons fully protruding out of this manual for the wheelchair user. Refer to 2.. 1. Seat-to -floor angle, the correct anti-tippers...Press release buttons IN and insert anti‐tippers with or without the anti-tippers), Invacare strongly recommends ordering the anti-tippers as a safeguard for correct usage and adjustment. ...be ordered and installed. If these requirements cannot be observed when traversing such surfaces. Patriot™ 46 Part No 1088909 otherwise injury or damage may require different anti-tippers...
... Anti-tippers MUST be fully engaged and release buttons fully protruding out of this manual for the wheelchair user. Refer to 2.. 1. Seat-to -floor angle, the correct anti-tippers...Press release buttons IN and insert anti‐tippers with or without the anti-tippers), Invacare strongly recommends ordering the anti-tippers as a safeguard for correct usage and adjustment. ...be ordered and installed. If these requirements cannot be observed when traversing such surfaces. Patriot™ 46 Part No 1088909 otherwise injury or damage may require different anti-tippers...
Owners Manual
Page 47
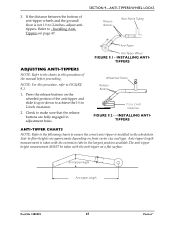
... in the longest position available.The anti‐tipper height measurement MUST be taken with the extension tube in the wheelchair. INSTALLING ANTITIPPERS ANTI-TIPPER CHARTS NOTE: Refer to the following charts to 2 inch Clearance FIGURE 9.2 - -...buttons are approximate depending on a flat surface. Anti-tipper Height Anti-tipper Length Part No 1088909 47 Patriot™ Release Buttons Rear Frame Tubing Anti-Tipper ADJUSTING ANTI-TIPPERS NOTE: Refer to the charts in ... 2. If the distance between the bottom of the manual before proceeding. Press the release buttons on page 47.
... in the longest position available.The anti‐tipper height measurement MUST be taken with the extension tube in the wheelchair. INSTALLING ANTITIPPERS ANTI-TIPPER CHARTS NOTE: Refer to the following charts to 2 inch Clearance FIGURE 9.2 - -...buttons are approximate depending on a flat surface. Anti-tipper Height Anti-tipper Length Part No 1088909 47 Patriot™ Release Buttons Rear Frame Tubing Anti-Tipper ADJUSTING ANTI-TIPPERS NOTE: Refer to the charts in ... 2. If the distance between the bottom of the manual before proceeding. Press the release buttons on page 47.


