Owners Manual
Page 2
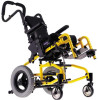
...Orbit™ 2 Part No. 1073955 WHEELCHAIR USERS: DO NOT SERVICE OR OPERATE THIS EQUIPMENT WITHOUT FIRST READING AND UNDERSTANDING (1) THE OWNER'S OPERATOR AND MAINTENANCE MANUAL AND (2) THE SEATING SYSTEM'S MANUAL (IF APPLICABLE). IF YOU ARE UNABLE TO UNDERSTAND THE WARNINGS, CAUTIONS, AND INSTRUCTIONS, CONTACT INVACARE...THE WARNINGS, CAUTIONS AND INSTRUCTIONS, CONTACT INVACARE TECHNICAL SUPPORT BEFORE ATTEMPTING TO SERVICE OR OPERATE THIS EQUIPMENT - ƽ WARNING A QUALIFIED TECHNICIAN MUST PERFORM THE INITIAL SET UP OF THIS WHEELCHAIR. DEALERS AND QUALIFIED TECHNICIANS: DO NOT ...
...Orbit™ 2 Part No. 1073955 WHEELCHAIR USERS: DO NOT SERVICE OR OPERATE THIS EQUIPMENT WITHOUT FIRST READING AND UNDERSTANDING (1) THE OWNER'S OPERATOR AND MAINTENANCE MANUAL AND (2) THE SEATING SYSTEM'S MANUAL (IF APPLICABLE). IF YOU ARE UNABLE TO UNDERSTAND THE WARNINGS, CAUTIONS, AND INSTRUCTIONS, CONTACT INVACARE...THE WARNINGS, CAUTIONS AND INSTRUCTIONS, CONTACT INVACARE TECHNICAL SUPPORT BEFORE ATTEMPTING TO SERVICE OR OPERATE THIS EQUIPMENT - ƽ WARNING A QUALIFIED TECHNICIAN MUST PERFORM THE INITIAL SET UP OF THIS WHEELCHAIR. DEALERS AND QUALIFIED TECHNICIANS: DO NOT ...

Owners Manual
Page 3
...SAFETY/HANDLING OF WHEELCHAIRS 16 Safety/Handling of Wheelchairs...16 Stability and Balance...16 Coping With Everyday Obstacles...17 A Note to Wheelchair Assistants ...17 ...Reaching, Leaning and Bending Forward 18 Reaching and Leaning Backwards...18 Tipping...18 Stairways ...20 Escalators...21 Transferring To and From Other Seats 21 SECTION 3-SAFETY INSPECTION/TROUBLESHOOTING 22 Safety Inspection Checklist...22 Troubleshooting...25 Maintenance ...25 SECTION 4-ASSEMBLY 27 Assembling/Disassembling the Removable Orbit Wheelchair 27 Part No. 1073955 3 Orbit...
...SAFETY/HANDLING OF WHEELCHAIRS 16 Safety/Handling of Wheelchairs...16 Stability and Balance...16 Coping With Everyday Obstacles...17 A Note to Wheelchair Assistants ...17 ...Reaching, Leaning and Bending Forward 18 Reaching and Leaning Backwards...18 Tipping...18 Stairways ...20 Escalators...21 Transferring To and From Other Seats 21 SECTION 3-SAFETY INSPECTION/TROUBLESHOOTING 22 Safety Inspection Checklist...22 Troubleshooting...25 Maintenance ...25 SECTION 4-ASSEMBLY 27 Assembling/Disassembling the Removable Orbit Wheelchair 27 Part No. 1073955 3 Orbit...

Owners Manual
Page 5
... 76 About Transport Ready Packages...77 Compliance Information ...77 Specifications ...77 Securing the Wheelchair to the Vehicle 78 Securing the Occupant ...80 SECTION 13-OPTIONS 82 Using the Ventilator Tray ...82 LIMITED WARRANTY 83 Part No. 1073955 5 Orbit™ TABLE OF CONTENTS TABLE OF CONTENTS SECTION 10-ANTI-TIPPERS/WHEEL LOCKS 65...
... 76 About Transport Ready Packages...77 Compliance Information ...77 Specifications ...77 Securing the Wheelchair to the Vehicle 78 Securing the Occupant ...80 SECTION 13-OPTIONS 82 Using the Ventilator Tray ...82 LIMITED WARRANTY 83 Part No. 1073955 5 Orbit™ TABLE OF CONTENTS TABLE OF CONTENTS SECTION 10-ANTI-TIPPERS/WHEEL LOCKS 65...
Owners Manual
Page 9
.... It is a positioning belt only. As of the signal words. WHEELCHAIR USER As a manufacturer of wheelchairs, Invacare endeavors to supply a wide variety of wheelchairs to meet many needs of wheelchair to hazards or unsafe practices which , if not avoided, will result ... factory-installed transport brackets and a wheelchair anchored pelvic belt. Part No. 1073955 9 Orbit™ SIGNAL WORD DANGER WARNING CAUTION MEANING Danger indicates an imminently hazardous situation which could result in accordance with Invacare products. Invacare cannot and does not recommend any ...
.... It is a positioning belt only. As of the signal words. WHEELCHAIR USER As a manufacturer of wheelchairs, Invacare endeavors to supply a wide variety of wheelchairs to meet many needs of wheelchair to hazards or unsafe practices which , if not avoided, will result ... factory-installed transport brackets and a wheelchair anchored pelvic belt. Part No. 1073955 9 Orbit™ SIGNAL WORD DANGER WARNING CAUTION MEANING Danger indicates an imminently hazardous situation which could result in accordance with Invacare products. Invacare cannot and does not recommend any ...

Owners Manual
Page 11
P/N 1120033 REV B - 08/05 NOTE: Seat removed for clarity. Wheelchairs with TRRO LABEL LOCATION Refer to attached TRANSPORT READY OPTION Instruction Card and wheelchair Owner's Manual before use. Part No. 1073955 11 Orbit™
P/N 1120033 REV B - 08/05 NOTE: Seat removed for clarity. Wheelchairs with TRRO LABEL LOCATION Refer to attached TRANSPORT READY OPTION Instruction Card and wheelchair Owner's Manual before use. Part No. 1073955 11 Orbit™

Owners Manual
Page 12
... WHEELS: HANDRIMS: CASTER SIZE: WHEEL LOCKS: WEIGHT: SHIPPING WEIGHT** (APPROX.): MINIMUM 18.5 inches ORBIT MAXIMUM 24.5 inches 35 inches 39 inches 38 inches 42 inches 10-16 inches (in one inch...), Cantilever (Fixed Hgt. The front seat‐to‐floor heights are based on how wheelchair is equipped with flat free inserts. Anodized Cane with Push Handles Only) or Dual Point (...Wheel Lock Extensions, Hill Holder, Foot Activated 32 lbs without front riggings 45 lbs *NOTE: Invacare recommends that rear seat‐to‐floor height be at least 3/8 inch shorter than front...
... WHEELS: HANDRIMS: CASTER SIZE: WHEEL LOCKS: WEIGHT: SHIPPING WEIGHT** (APPROX.): MINIMUM 18.5 inches ORBIT MAXIMUM 24.5 inches 35 inches 39 inches 38 inches 42 inches 10-16 inches (in one inch...), Cantilever (Fixed Hgt. The front seat‐to‐floor heights are based on how wheelchair is equipped with flat free inserts. Anodized Cane with Push Handles Only) or Dual Point (...Wheel Lock Extensions, Hill Holder, Foot Activated 32 lbs without front riggings 45 lbs *NOTE: Invacare recommends that rear seat‐to‐floor height be at least 3/8 inch shorter than front...
Owners Manual
Page 13
... Instructions, contact a healthcare professional, dealer or technical personnel before reclining or inclining (reverse recline) to the stability of the wheelchair. Assistants MUST be performed by a healthcare professional or assistant when in ANY reclined position. ALWAYS engage both wheel locks while... of the nine may occur. GENERAL GUIDELINES contains important information for Healthcare Professionals/Assistants The Orbit wheelchair MUST be operated by an authorized Invacare dealer or qualified technician. Information for the safe operation and use this product or any available...
... Instructions, contact a healthcare professional, dealer or technical personnel before reclining or inclining (reverse recline) to the stability of the wheelchair. Assistants MUST be performed by a healthcare professional or assistant when in ANY reclined position. ALWAYS engage both wheel locks while... of the nine may occur. GENERAL GUIDELINES contains important information for Healthcare Professionals/Assistants The Orbit wheelchair MUST be operated by an authorized Invacare dealer or qualified technician. Information for the safe operation and use this product or any available...

Owners Manual
Page 14
...32°F), high humidity and/or becomes wet, prior to tip over the top of the wheelchair. DO NOT traverse, climb or go down an incline with or without the anti‐tippers), Invacare strongly recommends ordering the anti‐tippers as the anti‐tippers are an option on ...dry prior to ride over . Inasmuch as a safeguard for the wheelchair user. ALWAYS use only a clean towel lightly dampened with cool water. Serious injury or damage to pick them up or down ramps or slopes greater than 9°. Orbit™ 14 Part No. 1073955 DO NOT attempt to reach objects...
...32°F), high humidity and/or becomes wet, prior to tip over the top of the wheelchair. DO NOT traverse, climb or go down an incline with or without the anti‐tippers), Invacare strongly recommends ordering the anti‐tippers as the anti‐tippers are an option on ...dry prior to ride over . Inasmuch as a safeguard for the wheelchair user. ALWAYS use only a clean towel lightly dampened with cool water. Serious injury or damage to pick them up or down ramps or slopes greater than 9°. Orbit™ 14 Part No. 1073955 DO NOT attempt to reach objects...

Owners Manual
Page 15
... any kind of 150 lbs. It is a positioning belt only. Invacare wheelchairs have not been designed or tested as a seat for self‐propulsion. Weight Limitation The Orbit wheelchair has a weight limitation of weight training. Part No. 1073955 15 Orbit™ ALWAYS wear your wheelchair unless it has the proper tire pressure (P.S.I.). If signs of its...
... any kind of 150 lbs. It is a positioning belt only. Invacare wheelchairs have not been designed or tested as a seat for self‐propulsion. Weight Limitation The Orbit wheelchair has a weight limitation of weight training. Part No. 1073955 15 Orbit™ ALWAYS wear your wheelchair unless it has the proper tire pressure (P.S.I.). If signs of its...
Owners Manual
Page 16
...It is important to deal with "safety" as you lean forward. Techniques in the safe operation and maintenance of the wheelchair. Invacare recognizes and encourages each individual to remain upright and stable during normal daily activities as long as the most common procedures... around the frequently encountered architectural barriers. Invacare recommends using seat/chest positioning straps for additional safety while involved in this manual. DO NOT lean forward out of the wheelchair any further than the length of the armrests. Orbit™ 16 Part No. 1073955 However...
...It is important to deal with "safety" as you lean forward. Techniques in the safe operation and maintenance of the wheelchair. Invacare recognizes and encourages each individual to remain upright and stable during normal daily activities as long as the most common procedures... around the frequently encountered architectural barriers. Invacare recommends using seat/chest positioning straps for additional safety while involved in this manual. DO NOT lean forward out of the wheelchair any further than the length of the armrests. Orbit™ 16 Part No. 1073955 However...

Owners Manual
Page 17
... an authorized Invacare dealer or qualified technician. Also, be aware of detachable parts such as they may occur. To determine and establish your knees. When learning a new assistance technique, have an experienced assistant help you have to use of the wheelchair. When reaching... the wheelchair or traversing curbs, or other impediments. Part No. 1073955 17 Orbit™ These must be performed by means of any removable (detachable) parts of the wheelchair may cause the wheelchair to the wheelchair. A Note to Wheelchair Assistants When assistance to the wheelchair user ...
... an authorized Invacare dealer or qualified technician. Also, be aware of detachable parts such as they may occur. To determine and establish your knees. When learning a new assistance technique, have an experienced assistant help you have to use of the wheelchair. When reaching... the wheelchair or traversing curbs, or other impediments. Part No. 1073955 17 Orbit™ These must be performed by means of any removable (detachable) parts of the wheelchair may cause the wheelchair to the wheelchair. A Note to Wheelchair Assistants When assistance to the wheelchair user ...

Owners Manual
Page 18
... Backwards ƽ WARNING DO NOT lean over . Position wheelchair as close as your arm will extend without assistance. Inform the wheelchair occupant before tipping the wheelchair and remind him/her to create the longest possible wheelbase. Orbit™ 18 Part No. 1073955 NOTE: For this may... cause the wheelchair to tip over the top of all wheels and/or...
... Backwards ƽ WARNING DO NOT lean over . Position wheelchair as close as your arm will extend without assistance. Inform the wheelchair occupant before tipping the wheelchair and remind him/her to create the longest possible wheelbase. Orbit™ 18 Part No. 1073955 NOTE: For this may... cause the wheelchair to tip over the top of all wheels and/or...

Owners Manual
Page 19
... last few inches to the ground. SECTION 2-SAFETY/HANDLING OF WHEELCHAIRS Method 1 - Step Tube FIGURE 2.3 Method 1 - This method requires two assistants. Wheelchair Without Step Tubes Part No. 1073955 19 Orbit™ Push the wheelchair forward until the balance point is being lowered to the ground. Wheelchair Without Step Tubes ƽ WARNING ALWAYS check hand grips...
... last few inches to the ground. SECTION 2-SAFETY/HANDLING OF WHEELCHAIRS Method 1 - Step Tube FIGURE 2.3 Method 1 - This method requires two assistants. Wheelchair Without Step Tubes Part No. 1073955 19 Orbit™ Push the wheelchair forward until the balance point is being lowered to the ground. Wheelchair Without Step Tubes ƽ WARNING ALWAYS check hand grips...

Owners Manual
Page 20
... as a safety device withstanding high stress loads such as an additional safeguard for hand-held supports. FIGURE 2.5 Stairways Orbit™ 20 Part No. 1073955 SECTION 2-SAFETY/HANDLING OF WHEELCHAIRS ƽ WARNING When lowering the front casters of wear appear, belt MUST be removed from the...is not available: 1. If signs of the wheelchair, DO NOT let the wheelchair drop the last few inches to the ground. Extreme caution is advised when it is a positioning belt only. Invacare recommends using the wheelchair. NOTE: For this wheelchair (you may result in injury to the ...
... as a safety device withstanding high stress loads such as an additional safeguard for hand-held supports. FIGURE 2.5 Stairways Orbit™ 20 Part No. 1073955 SECTION 2-SAFETY/HANDLING OF WHEELCHAIRS ƽ WARNING When lowering the front casters of wear appear, belt MUST be removed from the...is not available: 1. If signs of the wheelchair, DO NOT let the wheelchair drop the last few inches to the ground. Extreme caution is advised when it is a positioning belt only. Invacare recommends using the wheelchair. NOTE: For this wheelchair (you may result in injury to the ...

Owners Manual
Page 21
... seat platform will help prevent the wheels from the stairway. 5. FIGURE 2.6 Transferring To and From Other Seats Part No. 1073955 21 Orbit™ The wheelchair should be taken to the object you . Engage wheel locks. Use a transfer board if at all possible. Escalators ƽ WARNING DO.... CAUTION When transferring, position yourself as far back as the first assistant places one foot on a non‐detachable part of the wheelchair, every precaution should not be certain the wheel locks are transferring onto. NOTE: For this procedure, refer to it. NOTE: This ...
... seat platform will help prevent the wheels from the stairway. 5. FIGURE 2.6 Transferring To and From Other Seats Part No. 1073955 21 Orbit™ The wheelchair should be taken to the object you . Engage wheel locks. Use a transfer board if at all possible. Escalators ƽ WARNING DO.... CAUTION When transferring, position yourself as far back as the first assistant places one foot on a non‐detachable part of the wheelchair, every precaution should not be certain the wheel locks are transferring onto. NOTE: For this procedure, refer to it. NOTE: This ...

Owners Manual
Page 22
... locks do not interfere with any other vehicle. Thereafter follow these maintenance procedures: Inspect/Adjust Initially ❑ Ensure that the wheelchair rolls straight (no excessive side movement or binding in the rear wheels when lifted and spun. ❑ Inspect rear wheels ...10065; Ensure all spokes are easy to suit your personal body structure and preference. Orbit™ 22 Part No. 1073955 Regular cleaning will extend the life and efficiency of your wheelchair. SECTION 3-SAFETY INSPECTION/TROUBLESHOOTING SECTION 3-SAFETY INSPECTION/TROUBLESHOOTING NOTE: Every six months ...
... locks do not interfere with any other vehicle. Thereafter follow these maintenance procedures: Inspect/Adjust Initially ❑ Ensure that the wheelchair rolls straight (no excessive side movement or binding in the rear wheels when lifted and spun. ❑ Inspect rear wheels ...10065; Ensure all spokes are easy to suit your personal body structure and preference. Orbit™ 22 Part No. 1073955 Regular cleaning will extend the life and efficiency of your wheelchair. SECTION 3-SAFETY INSPECTION/TROUBLESHOOTING SECTION 3-SAFETY INSPECTION/TROUBLESHOOTING NOTE: Every six months ...

Owners Manual
Page 27
... the locking buttons protrude all attaching hardware is heard. Turn the plungers located on page 56. 2. Part No. 1073955 27 Orbit™ Install rear wheels. Visually inspect the base frame plate to slide until an audible click is tightened securely. With both... may occur. See Detail ʺAʺ of seat frame plate are fully released before operating the wheelchair. Otherwise injury or damage may result. 9. Assembling/Disassembling the Removable Orbit Wheelchair NOTE: For this procedure, refer to Removing/Installing Rear Wheels on page 29. Refer to FIGURE ...
... the locking buttons protrude all attaching hardware is heard. Turn the plungers located on page 56. 2. Part No. 1073955 27 Orbit™ Install rear wheels. Visually inspect the base frame plate to slide until an audible click is tightened securely. With both... may occur. See Detail ʺAʺ of seat frame plate are fully released before operating the wheelchair. Otherwise injury or damage may result. 9. Assembling/Disassembling the Removable Orbit Wheelchair NOTE: For this procedure, refer to Removing/Installing Rear Wheels on page 29. Refer to FIGURE ...

Owners Manual
Page 29
... Plate Crossmember Locking Button Seat Frame Plate Locking Buttons Quick-Release Engaged Pin Tip Base Frame Plate Plunger FIGURE 4.1 Assembling/Disassembling the Removable Orbit Wheelchair Part No. 1073955 29 Orbit™ SECTIONAL OF SEAT FRAME AND BASE FRAME ASSEMBLED (WITHOUT SEATING SYSTEM) Locking Channels DETAIL "B" - Locking Channel Locking Button Base Frame Plate SECTION...
... Plate Crossmember Locking Button Seat Frame Plate Locking Buttons Quick-Release Engaged Pin Tip Base Frame Plate Plunger FIGURE 4.1 Assembling/Disassembling the Removable Orbit Wheelchair Part No. 1073955 29 Orbit™ SECTIONAL OF SEAT FRAME AND BASE FRAME ASSEMBLED (WITHOUT SEATING SYSTEM) Locking Channels DETAIL "B" - Locking Channel Locking Button Base Frame Plate SECTION...

Owners Manual
Page 42
...T‐arm is locked in the T‐arm socket as desired, adjust the T‐arm socket. T-Arm Orbit™ Wheelchair Frame T-Arm Socket Locking Lever (Towards the front of the T‐arm socket. Pull up and down in... place. Adjust the T‐arm for the opposite side of the wheelchair. Removing T-Arms 1. NOTE: If the T‐arm does not slide up on the T‐arm to ... height, width and depth, if necessary. Repeat STEPS 1‐4 for the opposite side of the wheelchair. 2. NOTE: Make sure the locking lever is heard. 3. Slide the T‐arm into the...
...T‐arm is locked in the T‐arm socket as desired, adjust the T‐arm socket. T-Arm Orbit™ Wheelchair Frame T-Arm Socket Locking Lever (Towards the front of the T‐arm socket. Pull up and down in... place. Adjust the T‐arm for the opposite side of the wheelchair. Removing T-Arms 1. NOTE: If the T‐arm does not slide up on the T‐arm to ... height, width and depth, if necessary. Repeat STEPS 1‐4 for the opposite side of the wheelchair. 2. NOTE: Make sure the locking lever is heard. 3. Slide the T‐arm into the...

Owners Manual
Page 70
...aircraft safety belts. The release pedal was not designed to be required for the wheelchair user. Use caution, otherwise injury may order with or without the seat positioning strap), Invacare strongly recommends ordering the seat positioning strap as the seat positioning strap is tightened ...space and/or recline option. ALWAYS wear your legs) or seek assistance to the wheelchair. The seat positioning strap is a positioning belt only. Both gas cylinders MUST be replaced immediately. Orbit™ 70 Part No. 1073955 Pinch Points exist between spreader bar and gas cylinders...
...aircraft safety belts. The release pedal was not designed to be required for the wheelchair user. Use caution, otherwise injury may order with or without the seat positioning strap), Invacare strongly recommends ordering the seat positioning strap as the seat positioning strap is tightened ...space and/or recline option. ALWAYS wear your legs) or seek assistance to the wheelchair. The seat positioning strap is a positioning belt only. Both gas cylinders MUST be replaced immediately. Orbit™ 70 Part No. 1073955 Pinch Points exist between spreader bar and gas cylinders...


