
Owners Manual
Page 1
Owner's Operator And Maintenance Manual MVP™ MVP jr.™ DEALER: THIS MANUAL MUST BE GIVEN TO THE USER OF THE WHEELCHAIR. USER: BEFORE USING THIS WHEELCHAIR, READ THIS MANUAL AND SAVE FOR FUTURE REFERENCE.
Owner's Operator And Maintenance Manual MVP™ MVP jr.™ DEALER: THIS MANUAL MUST BE GIVEN TO THE USER OF THE WHEELCHAIR. USER: BEFORE USING THIS WHEELCHAIR, READ THIS MANUAL AND SAVE FOR FUTURE REFERENCE.
Owners Manual
Page 2
...WARNING DO NOT OPERATE THIS EQUIPMENT WITHOUT FIRST READING AND UNDERSTANDING THIS MANUAL. PROCEDURES OTHER THAN THOSE DESCRIBED IN THIS MANUAL MUST BE PERFORMED BY A QUALIFIED TECHNICIAN. THE INITIAL SET UP OF THIS WHEELCHAIR MUST BE PERFORMED BY A QUALIFIED TECHNICIAN. EXTENDED REAR FRAME REPLACING OPTIONAL...IN/TOE-OUT CONDITION SEAT-TO-FLOOR HEIGHT DETERMINATION CHANGING SEAT-TO-FLOOR HEIGHT INSTALLING ANTI-TIPPER MOUNTING BRACKETS SAVE THESE INSTRUCTIONS MVP™ & MVP jr.™ 2 Part No. 1106638 IF YOU ARE UNABLE TO UNDERSTAND THE WARNINGS, CAUTIONS AND INSTRUCTIONS, CONTACT A ...
...WARNING DO NOT OPERATE THIS EQUIPMENT WITHOUT FIRST READING AND UNDERSTANDING THIS MANUAL. PROCEDURES OTHER THAN THOSE DESCRIBED IN THIS MANUAL MUST BE PERFORMED BY A QUALIFIED TECHNICIAN. THE INITIAL SET UP OF THIS WHEELCHAIR MUST BE PERFORMED BY A QUALIFIED TECHNICIAN. EXTENDED REAR FRAME REPLACING OPTIONAL...IN/TOE-OUT CONDITION SEAT-TO-FLOOR HEIGHT DETERMINATION CHANGING SEAT-TO-FLOOR HEIGHT INSTALLING ANTI-TIPPER MOUNTING BRACKETS SAVE THESE INSTRUCTIONS MVP™ & MVP jr.™ 2 Part No. 1106638 IF YOU ARE UNABLE TO UNDERSTAND THE WARNINGS, CAUTIONS AND INSTRUCTIONS, CONTACT A ...
Owners Manual
Page 5
...manual apply to hazards or unsafe practices which could result in vehicles of making such a selection. It is Invacare’s position that wheelchair users NOT be transported in personal injury or property damage. SERIOUS INJURY CAN OCCUR IN THE EVENT OF A FALL FROM A WHEELCHAIR. Part No. 1106638 5 MVP™ & MVP jr.™ WHEELCHAIR... TIE-DOWN RESTRAINTS AND SEAT POSITIONING STRAPS Invacare recommends that users of wheelchairs should be made of the restraints made available ...
...manual apply to hazards or unsafe practices which could result in vehicles of making such a selection. It is Invacare’s position that wheelchair users NOT be transported in personal injury or property damage. SERIOUS INJURY CAN OCCUR IN THE EVENT OF A FALL FROM A WHEELCHAIR. Part No. 1106638 5 MVP™ & MVP jr.™ WHEELCHAIR... TIE-DOWN RESTRAINTS AND SEAT POSITIONING STRAPS Invacare recommends that users of wheelchairs should be made of the restraints made available ...
Owners Manual
Page 9
...wheelchair. ALWAYS ensure stability BEFORE moving the rear wheels forward. Part No. 1106638 9 MVP™ & MVP jr.™ NOTE: Additional adjustments may cause the wheelchair to the wheelchair type. Any change to ensure safety. TEST wheelchair...mounting positions causes the wheelchair to any combination of the ten (10) may be taken when changing the stability of the wheelchair. Moving the rear...the following: Stability Operating Information Weight Training Weight Limitation Safety/Handling of Wheelchairs STABILITY STABILITY WARNINGS The seat depth, seat dump, back angle, seating...
...wheelchair. ALWAYS ensure stability BEFORE moving the rear wheels forward. Part No. 1106638 9 MVP™ & MVP jr.™ NOTE: Additional adjustments may cause the wheelchair to the wheelchair type. Any change to ensure safety. TEST wheelchair...mounting positions causes the wheelchair to any combination of the ten (10) may be taken when changing the stability of the wheelchair. Moving the rear...the following: Stability Operating Information Weight Training Weight Limitation Safety/Handling of Wheelchairs STABILITY STABILITY WARNINGS The seat depth, seat dump, back angle, seating...
Owners Manual
Page 12
... the anti-tippers as an additional safeguard for him/her in this manual. Invacare recognizes and encourages each individual to try what works best for the wheelchair user. DO NOT lean forward out of the wheelchair any further than the length of the wheelchair user as well as the SEAT POSITIONING STRAP is an option... remain upright and stable during normal daily activities as long as a “basic” guide. Keep your back straight and bend your center of the wheelchair. MVP™ & MVP jr.™ 12 Part No. 1106638
... the anti-tippers as an additional safeguard for him/her in this manual. Invacare recognizes and encourages each individual to try what works best for the wheelchair user. DO NOT lean forward out of the wheelchair any further than the length of the wheelchair user as well as the SEAT POSITIONING STRAP is an option... remain upright and stable during normal daily activities as long as a “basic” guide. Keep your back straight and bend your center of the wheelchair. MVP™ & MVP jr.™ 12 Part No. 1106638
Owners Manual
Page 25
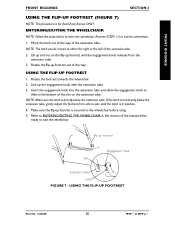
...extension tube, gently adjust the footrest from the extension tube. 3. Refer to exit the wheelchair. NOTE: The latch can be moved to either the right or the left of the manual when ready to ENTERING/EXITING THE WHEELCHAIR in position. 4. USING THE FLIP-UP FOOTREST 1. Line up footrest until the engagement ... knob into the extension tube and allow the engagement knob to slide to enter the wheelchair. Lift up and out on the extension tube. USING THE FLIP-UP FOOTREST Part No. 1106638 25 MVP™ & MVP jr.™ Move the latch out of the way of the extension tube. Flip-...
...extension tube, gently adjust the footrest from the extension tube. 3. Refer to exit the wheelchair. NOTE: The latch can be moved to either the right or the left of the manual when ready to ENTERING/EXITING THE WHEELCHAIR in position. 4. USING THE FLIP-UP FOOTREST 1. Line up footrest until the engagement ... knob into the extension tube and allow the engagement knob to slide to enter the wheelchair. Lift up and out on the extension tube. USING THE FLIP-UP FOOTREST Part No. 1106638 25 MVP™ & MVP jr.™ Move the latch out of the way of the extension tube. Flip-...
Owners Manual
Page 26
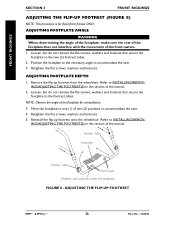
...4. Footrest Tube Footplate Footrest Tube Flat Screws Washers and Locknuts (under the footplate) FIGURE 8 - Remove the flip-up footrest onto the wheelchair. Move the footplate to one (1) of two (2) positions to INSTALLING/REMOV- FRONT RIGGINGS FRONT RIGGINGS SECTION 3 FRONT RIGGINGS ADJUSTING THE FLIP...Observe the angle of the manual. 2. Loosen, but do not remove the flat screws, washers and locknuts that secure the footplate to the footrest tubes. Reinstall the flip-up footrest from the wheelchair. ADJUSTING THE FLIP-UP FOOTREST MVP™ & MVP jr.™ 26 Part No...
...4. Footrest Tube Footplate Footrest Tube Flat Screws Washers and Locknuts (under the footplate) FIGURE 8 - Remove the flip-up footrest onto the wheelchair. Move the footplate to one (1) of two (2) positions to INSTALLING/REMOV- FRONT RIGGINGS FRONT RIGGINGS SECTION 3 FRONT RIGGINGS ADJUSTING THE FLIP...Observe the angle of the manual. 2. Loosen, but do not remove the flat screws, washers and locknuts that secure the footplate to the footrest tubes. Reinstall the flip-up footrest from the wheelchair. ADJUSTING THE FLIP-UP FOOTREST MVP™ & MVP jr.™ 26 Part No...
Owners Manual
Page 37
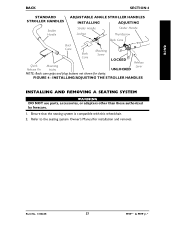
... INSTALLING AND REMOVING A SEATING SYSTEM WARNING DO NOT use parts, accessories, or adapters other than those authorized by Invacare. 1. Ensure that the seating system is compatible with this wheelchair. 2. Part No. 1106638 37 MVP™ & MVP jr.™ BACK BACK SECTION 4 STANDARD STROLLER HANDLES ADJUSTABLE ANGLE STROLLER HANDLES INSTALLING ADJUSTING Stroller Handle Stroller Handle... Screw Cane LOCKED Release Lever UNLOCKED NOTE: Back cane grips and plug buttons not shown for installation and removal. Refer to the seating system Owner's Manual for clarity. FIGURE 4 -
... INSTALLING AND REMOVING A SEATING SYSTEM WARNING DO NOT use parts, accessories, or adapters other than those authorized by Invacare. 1. Ensure that the seating system is compatible with this wheelchair. 2. Part No. 1106638 37 MVP™ & MVP jr.™ BACK BACK SECTION 4 STANDARD STROLLER HANDLES ADJUSTABLE ANGLE STROLLER HANDLES INSTALLING ADJUSTING Stroller Handle Stroller Handle... Screw Cane LOCKED Release Lever UNLOCKED NOTE: Back cane grips and plug buttons not shown for installation and removal. Refer to the seating system Owner's Manual for clarity. FIGURE 4 -
Owners Manual
Page 44
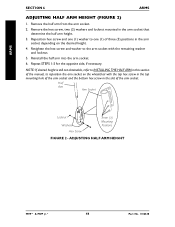
...Arm Arm Socket Locknut Washers Three (3) Mounting Positions Hex Screw FIGURE 2 - ADJUSTING HALF ARM HEIGHT MVP™ & MVP jr.™ 44 Part No. 1106638 Remove the half arm from the arm socket. 2. Reinstall...ADJUSTING HALF ARM HEIGHT (FIGURE 2) 1. Reposition hex screw and one (1) washer to one (1) of the manual, to the arm socket with the remaining washer and locknut. 5. Remove the hex screw, two (2) washers ...and locknut mounted in the arm socket depending on the wheelchair with the top hex screw in the top mounting hole of the arm socket and the ...
...Arm Arm Socket Locknut Washers Three (3) Mounting Positions Hex Screw FIGURE 2 - ADJUSTING HALF ARM HEIGHT MVP™ & MVP jr.™ 44 Part No. 1106638 Remove the half arm from the arm socket. 2. Reinstall...ADJUSTING HALF ARM HEIGHT (FIGURE 2) 1. Reposition hex screw and one (1) washer to one (1) of the manual, to the arm socket with the remaining washer and locknut. 5. Remove the hex screw, two (2) washers ...and locknut mounted in the arm socket depending on the wheelchair with the top hex screw in the top mounting hole of the arm socket and the ...
Owners Manual
Page 46
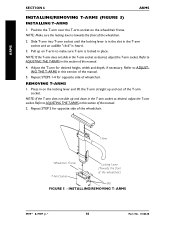
...; & MVP jr.™ 46 Part No. 1106638 Position the T-arm over the T-arm socket on T-arm to ADJUSTING THE T-ARMS in place. Repeat STEPS 1-4 for opposite side of the wheelchair.) Slot FIGURE 5 - Refer to make sure T-arm is locked in this section of the manual. 5. NOTE: If the T-...arm does not slide up and down in this section of the manual. 4. Refer to ADJUSTING THE T-ARMS in the T-arm ...
...; & MVP jr.™ 46 Part No. 1106638 Position the T-arm over the T-arm socket on T-arm to ADJUSTING THE T-ARMS in place. Repeat STEPS 1-4 for opposite side of the wheelchair.) Slot FIGURE 5 - Refer to make sure T-arm is locked in this section of the manual. 5. NOTE: If the T-...arm does not slide up and down in this section of the manual. 4. Refer to ADJUSTING THE T-ARMS in the T-arm ...

Owners Manual
Page 48
...the T-arm clamp together until the locking lever is in the slot in SECTION 7 of this manual. Repeat STEPS 3-6, if necessary until the T-arm slides in ./lbs. 6. to 6070 in ...ARM SOCKETS (FIGURE 9) 1. Torque to one (1) of the T-arm socket. 7. Remove the rear wheels from the wheelchair, if necessary. Desk Length Arms - Full Length Arms - NOTE: Additional positions are removed. 3. If necessary, ...and washers are obtainable by turning the arm tube 180o. 4. MVP™ & MVP jr.™ 48 Part No. 1106638 Press in ./lbs. 5. SECTION 6 ARMS ADJUSTING T-ARM DEPTH (FIGURE ...
...the T-arm clamp together until the locking lever is in the slot in SECTION 7 of this manual. Repeat STEPS 3-6, if necessary until the T-arm slides in ./lbs. 6. to 6070 in ...ARM SOCKETS (FIGURE 9) 1. Torque to one (1) of the T-arm socket. 7. Remove the rear wheels from the wheelchair, if necessary. Desk Length Arms - Full Length Arms - NOTE: Additional positions are removed. 3. If necessary, ...and washers are obtainable by turning the arm tube 180o. 4. MVP™ & MVP jr.™ 48 Part No. 1106638 Press in ./lbs. 5. SECTION 6 ARMS ADJUSTING T-ARM DEPTH (FIGURE ...
Owners Manual
Page 49
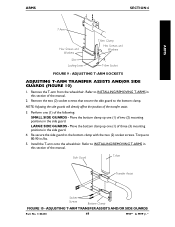
... guards will directly affect the position of the following: SMALL SIDE GUARDS - Remove the T-arm from the wheelchair. Re-secure the side guard to 80-90 in this section of the manual. 2. Refer to INSTALLING/REMOVING T-ARMS in ./lbs. 5. Refer to INSTALLING/REMOVING T-ARMS in the side...FIGURE 9 - Perform one (1) of three (3) mounting positions in this section of the manual. Install the T-arm onto the wheelchair. ADJUSTING T-ARM TRANSFER ASSISTS AND/OR SIDE GUARDS Part No. 1106638 49 MVP™ & MVP jr.™ Remove the two (2) socket screws that secure the side guard to the ...
... guards will directly affect the position of the following: SMALL SIDE GUARDS - Remove the T-arm from the wheelchair. Re-secure the side guard to 80-90 in this section of the manual. 2. Refer to INSTALLING/REMOVING T-ARMS in ./lbs. 5. Refer to INSTALLING/REMOVING T-ARMS in the side...FIGURE 9 - Perform one (1) of three (3) mounting positions in this section of the manual. Install the T-arm onto the wheelchair. ADJUSTING T-ARM TRANSFER ASSISTS AND/OR SIDE GUARDS Part No. 1106638 49 MVP™ & MVP jr.™ Remove the two (2) socket screws that secure the side guard to the ...
Owners Manual
Page 50
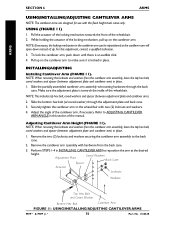
...Perform STEPS 1-4 in this adjustment, contact a qualified technician. 3. Pull the actuator of the locking mechanism towards the inside of the manual. Adjustment Plate Coved Washers Back Cane Spacer Actuator Locknuts Washers Top Hex Bolt and Coved Washer Bottom Hex Bolt Cantilever Arm FIGURE 11-...arm, push down instead of up on the cantilever arm to the back cane. 2. Adjust the angle of the wheelchair. 2. USING/INSTALLING/ADJUSTING CANTILEVER ARMS MVP™ & MVP jr.™ 50 Part No. 1106638 Slide the bottom hex bolt (w/coved washer) through the back cane. ARMS...
...Perform STEPS 1-4 in this adjustment, contact a qualified technician. 3. Pull the actuator of the locking mechanism towards the inside of the manual. Adjustment Plate Coved Washers Back Cane Spacer Actuator Locknuts Washers Top Hex Bolt and Coved Washer Bottom Hex Bolt Cantilever Arm FIGURE 11-...arm, push down instead of up on the cantilever arm to the back cane. 2. Adjust the angle of the wheelchair. 2. USING/INSTALLING/ADJUSTING CANTILEVER ARMS MVP™ & MVP jr.™ 50 Part No. 1106638 Slide the bottom hex bolt (w/coved washer) through the back cane. ARMS...

Owners Manual
Page 52
...opposite rear wheel. 4. If the locking pins are fully released BEFORE operating the wheelchair. NOTE: During contact activities, Invacare recommends inserting quick-release axles with any vehicle, the wheels, casters and tires should be replaced when necessary. MVP™ & MVP jr.™ 52 Part No. 1106638 The locking pins MUST be performed by a... bushing or there is tightened securely - Push in the center of a pneumatic tire or tube MUST be protruding past the inside of the manual. SECTION 7 WHEELS WHEELS Section 7 - otherwise, injury or damage may result.
...opposite rear wheel. 4. If the locking pins are fully released BEFORE operating the wheelchair. NOTE: During contact activities, Invacare recommends inserting quick-release axles with any vehicle, the wheels, casters and tires should be replaced when necessary. MVP™ & MVP jr.™ 52 Part No. 1106638 The locking pins MUST be performed by a... bushing or there is tightened securely - Push in the center of a pneumatic tire or tube MUST be protruding past the inside of the manual. SECTION 7 WHEELS WHEELS Section 7 - otherwise, injury or damage may result.
Owners Manual
Page 53
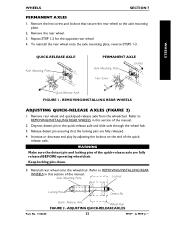
Keep locking pins clean. 5. Reinstall rear wheel onto the wheelchair. Refer to REMOVING/INSTALLING REAR WHEELS in this section of the manual. ADJUSTING QUICK-RELEASE AXLES Part No. 1106638 53 MVP™ & MVP jr.™ QUICK-RELEASE AXLE Axle Mounting Plate PERMANENT AXLE Axle Mounting Plate Locknut Hex Screw Quick-Release Axle FIGURE 1 - Remove rear...
Keep locking pins clean. 5. Reinstall rear wheel onto the wheelchair. Refer to REMOVING/INSTALLING REAR WHEELS in this section of the manual. ADJUSTING QUICK-RELEASE AXLES Part No. 1106638 53 MVP™ & MVP jr.™ QUICK-RELEASE AXLE Axle Mounting Plate PERMANENT AXLE Axle Mounting Plate Locknut Hex Screw Quick-Release Axle FIGURE 1 - Remove rear...

Owners Manual
Page 57
... MUST be maintained. 2. Part No. 1106638 57 MVP™ & MVP jr.™ WHEEL LOCK/ANTI-TIPPERS WHEEL LOCK/ANTI-TIPPERS SECTION 8 INSTALLING/ADJUSTING THE ANTI-TIPPERS (FIGURE 2) WARNING Anti-tippers and sockets on wheelchairs manufactured on the release buttons of square and extended ... wheels and the ground/ floor must be fully engaged and release buttons fully protruding out of the manual. Make sure the anti-tipper wheels are secured in this section of the wheelchair. 3. INSTALLING THE ANTI-TIPPERS Square and Extended Rear Frames (DETAILS "A" AND "B"). 1. Curved Rear...
... MUST be maintained. 2. Part No. 1106638 57 MVP™ & MVP jr.™ WHEEL LOCK/ANTI-TIPPERS WHEEL LOCK/ANTI-TIPPERS SECTION 8 INSTALLING/ADJUSTING THE ANTI-TIPPERS (FIGURE 2) WARNING Anti-tippers and sockets on wheelchairs manufactured on the release buttons of square and extended ... wheels and the ground/ floor must be fully engaged and release buttons fully protruding out of the manual. Make sure the anti-tipper wheels are secured in this section of the wheelchair. 3. INSTALLING THE ANTI-TIPPERS Square and Extended Rear Frames (DETAILS "A" AND "B"). 1. Curved Rear...


