
Owners Manual
Page 5
... ...43 Depth ...44 SECTION 9-FRONT RIGGINGS 45 Installing/Removing Front Riggings ...45 PW93, PH904A and PHAL4A...45 70° and 70° Taper...46 Adjusting Footrest Height ...46 Model PHWH93, PW93 and 70° ...46 70° Taper ...47 Model PH904A and PHAL4A...47 Raising/Lowering Elevating Front Riggings 48 Adjusting......53 Removing ...53 Raising/Lowering Elevating Legrests and/or Adjusting Calfpads 54 Raising/Lowering Elevating Legrests 54 Adjusting Calfpads...54 Part No 1141450 5 Pronto® M91™ with SureStep®
... ...43 Depth ...44 SECTION 9-FRONT RIGGINGS 45 Installing/Removing Front Riggings ...45 PW93, PH904A and PHAL4A...45 70° and 70° Taper...46 Adjusting Footrest Height ...46 Model PHWH93, PW93 and 70° ...46 70° Taper ...47 Model PH904A and PHAL4A...47 Raising/Lowering Elevating Front Riggings 48 Adjusting......53 Removing ...53 Raising/Lowering Elevating Legrests and/or Adjusting Calfpads 54 Raising/Lowering Elevating Legrests 54 Adjusting Calfpads...54 Part No 1141450 5 Pronto® M91™ with SureStep®
Owners Manual
Page 11
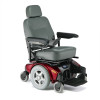
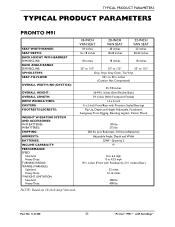
...lbs (w/Batteries) Adjustable Angle, Depth and Width 22NF - Part No 1141450 11 Pronto® M91™ with SureStep® TYPICAL PRODUCT PARAMETERS TYPICAL PRODUCT PARAMETERS PRONTO M91 SEAT WIDTH RANGE: SEAT DEPTH: BACK HEIGHT W/O HEADREST SEMI RECLINE: BACK ANGLE RANGE SEMI RECLINE...: UPHOLSTERY: SEAT-TO-FLOOR: OVERALL WIDTH (NO JOYSTICK): OVERALL HEIGHT: OVERALL LENGTH: DRIVE WHEELS/TIRES: CASTERS: FOOTRESTS/LEGRESTS: WEIGHT W/SEATING SYSTEM ...
...lbs (w/Batteries) Adjustable Angle, Depth and Width 22NF - Part No 1141450 11 Pronto® M91™ with SureStep® TYPICAL PRODUCT PARAMETERS TYPICAL PRODUCT PARAMETERS PRONTO M91 SEAT WIDTH RANGE: SEAT DEPTH: BACK HEIGHT W/O HEADREST SEMI RECLINE: BACK ANGLE RANGE SEMI RECLINE...: UPHOLSTERY: SEAT-TO-FLOOR: OVERALL WIDTH (NO JOYSTICK): OVERALL HEIGHT: OVERALL LENGTH: DRIVE WHEELS/TIRES: CASTERS: FOOTRESTS/LEGRESTS: WEIGHT W/SEATING SYSTEM ...
Owners Manual
Page 14
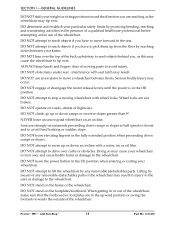
... leave the power button in the On position when entering or exiting your wheelchair to turn over . DO NOT stand on an incline. Pronto® M91™ with a water, ice or oil film. DO NOT store items under seat ‐ interference with wheel locks. DO NOT engage or disengage... the motor release levers until the power is in the upward position or swing the footrests towards the outside of moving wheelchair with seat latch may cause the wheelchair to tip over curbs or obstacles. Invacare strongly recommends proceeding down ramps or slopes. DO NOT stand on roads, streets or ...
... leave the power button in the On position when entering or exiting your wheelchair to turn over . DO NOT stand on an incline. Pronto® M91™ with a water, ice or oil film. DO NOT store items under seat ‐ interference with wheel locks. DO NOT engage or disengage... the motor release levers until the power is in the upward position or swing the footrests towards the outside of moving wheelchair with seat latch may cause the wheelchair to tip over curbs or obstacles. Invacare strongly recommends proceeding down ramps or slopes. DO NOT stand on roads, streets or ...
Owners Manual
Page 45
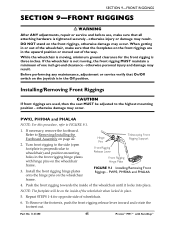
... footplate will be adjusted to wheelchair) and position mounting holes in the upward position or moved out of one inch ground clearance - To Remove the footrests, push the front rigging release lever inward and rotate the footrest out. Part No 1141450 45 Pronto® M91™ with hinge pins on page 42. 2.
... footplate will be adjusted to wheelchair) and position mounting holes in the upward position or moved out of one inch ground clearance - To Remove the footrests, push the front rigging release lever inward and rotate the footrest out. Part No 1141450 45 Pronto® M91™ with hinge pins on page 42. 2.
Owners Manual
Page 46
... locked in place. 4. Insert footrest mounting pin into place. Pronto® M91™ with SureStep® 46 Part No 1141450 Lift up on the inside of the wheelchair footrest, if necessary. To remove the footrest, push the footrest release lever inward, rotate footrest outward. 6. Remove the footrest from the footrest(s). 2. Reposition the lower footrest to wheelchair). Repeat STEPS 1‐...
... locked in place. 4. Insert footrest mounting pin into place. Pronto® M91™ with SureStep® 46 Part No 1141450 Lift up on the inside of the wheelchair footrest, if necessary. To remove the footrest, push the footrest release lever inward, rotate footrest outward. 6. Remove the footrest from the footrest(s). 2. Reposition the lower footrest to wheelchair). Repeat STEPS 1‐...
Owners Manual
Page 47
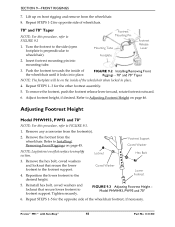
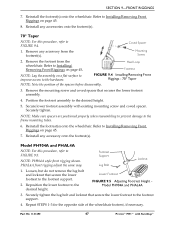
.../Removing Front Riggings on page 45. 8. Refer to the desired height. 5. PHAL4A front rigging adjust the same way. Reposition the lower footrest to FIGURE 9.5. Part No 1141450 47 Pronto® M91™ with existing mounting screw and coved spacer. FIGURE 9.4 Installing/Removing Front Riggings - 70° Taper NOTE: Note the position of...
.../Removing Front Riggings on page 45. 8. Refer to the desired height. 5. PHAL4A front rigging adjust the same way. Reposition the lower footrest to FIGURE 9.5. Part No 1141450 47 Pronto® M91™ with existing mounting screw and coved spacer. FIGURE 9.4 Installing/Removing Front Riggings - 70° Taper NOTE: Note the position of...
Owners Manual
Page 50
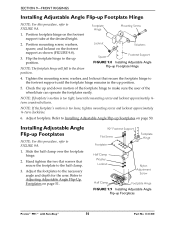
... refer to the half clamp. 3. Refer to Installing Adjustable Angle Flip‐up Footplates on page 51. 90° Footrest Support Flat Screw Footplate Footplate Hinge Half Clamp Washer Locknut Nylon Adjustment Screw Half Clamp Footplate Hinge FIGURE 9.9 Installing Adjustable Angle ...Flip-up Footplates Pronto® M91™ with SureStep® 50 Part No 1141450 Position footplate hinge on the footrest support as shown (FIGURE 9.8). 3. Position mounting screw, washers, spacer, and locknut on the footrest support tube at the desired height. 2. Adjust ...
... refer to the half clamp. 3. Refer to Installing Adjustable Angle Flip‐up Footplates on page 51. 90° Footrest Support Flat Screw Footplate Footplate Hinge Half Clamp Washer Locknut Nylon Adjustment Screw Half Clamp Footplate Hinge FIGURE 9.9 Installing Adjustable Angle ...Flip-up Footplates Pronto® M91™ with SureStep® 50 Part No 1141450 Position footplate hinge on the footrest support as shown (FIGURE 9.8). 3. Position mounting screw, washers, spacer, and locknut on the footrest support tube at the desired height. 2. Adjust ...
Owners Manual
Page 51
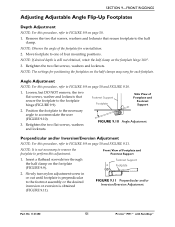
...50. 1. FIGURE 9.10 Angle Adjustment Perpendicular and/or Inversion/Eversion Adjustment NOTE: For this procedure, refer to the half clamp. Footrest Support Footplate 2. Position the footplate to the necessary angle to FIGURE 9.9 on page 50 and FIGURE 9.10. 1. Retighten the ...9.9). Retighten the two flat screws, washers and locknuts. Footrest Support Footplate Side View of Footplate and Footrest Support 1. FIGURE 9.11 Perpendicular and/or Inversion/Eversion Adjustment Part No 1141450 51 Pronto® M91™ with SureStep® SECTION 9-FRONT RIGGINGS Adjusting Adjustable...
...50. 1. FIGURE 9.10 Angle Adjustment Perpendicular and/or Inversion/Eversion Adjustment NOTE: For this procedure, refer to the half clamp. Footrest Support Footplate 2. Position the footplate to the necessary angle to FIGURE 9.9 on page 50 and FIGURE 9.10. 1. Retighten the ...9.9). Retighten the two flat screws, washers and locknuts. Footrest Support Footplate Side View of Footplate and Footrest Support 1. FIGURE 9.11 Perpendicular and/or Inversion/Eversion Adjustment Part No 1141450 51 Pronto® M91™ with SureStep® SECTION 9-FRONT RIGGINGS Adjusting Adjustable...
Owners Manual
Page 52
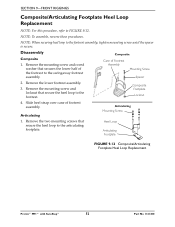
.... Heel Loop Articulating Footplate FIGURE 9.12 Composite/Articulating Footplate Heel Loop Replacement Pronto® M91™ with SureStep® 52 Part No 1141450 Remove the mounting screw and coved washer that secures the lower half of the footrest to FIGURE 9.12. SECTION 9-FRONT RIGGINGS Composite/Articulating Footplate Heel Loop Replacement NOTE: For...
.... Heel Loop Articulating Footplate FIGURE 9.12 Composite/Articulating Footplate Heel Loop Replacement Pronto® M91™ with SureStep® 52 Part No 1141450 Remove the mounting screw and coved washer that secures the lower half of the footrest to FIGURE 9.12. SECTION 9-FRONT RIGGINGS Composite/Articulating Footplate Heel Loop Replacement NOTE: For...
Owners Manual
Page 53
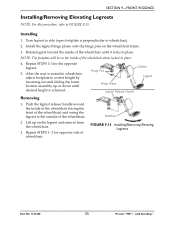
.... Rotate legrest toward the inside of the wheelchair) and swing the legrest to correct height by loosening nut and sliding the lower footrest assembly up on the legrest and remove from the wheelchair. 3. Hinge Pins Calfpad Legrest Hinge Plates Legrest Release Handle Removing 1. Repeat...front of the wheelchair until desired height is achieved. Bolt/Nut FIGURE 9.13 Installing/Removing Elevating Legrests Part No 1141450 53 Pronto® M91™ with SureStep® Repeat STEPS 1‐3 for opposite side of the wheelchair. 2. Turn legrest to side (open footplate is ...
.... Rotate legrest toward the inside of the wheelchair) and swing the legrest to correct height by loosening nut and sliding the lower footrest assembly up on the legrest and remove from the wheelchair. 3. Hinge Pins Calfpad Legrest Hinge Plates Legrest Release Handle Removing 1. Repeat...front of the wheelchair until desired height is achieved. Bolt/Nut FIGURE 9.13 Installing/Removing Elevating Legrests Part No 1141450 53 Pronto® M91™ with SureStep® Repeat STEPS 1‐3 for opposite side of the wheelchair. 2. Turn legrest to side (open footplate is ...