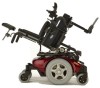
Owners Manual 3
Page 15
...THIS DOCUMENT IS SUBJECT TO CHANGE WITHOUT NOTICE. Accessories designed by other than those described in conjunction with Invacare accessories. As a manufacturer of wheelchairs, Invacare endeavors to supply a wide variety of wheelchairs to understand the warnings, cautions or instructions, contact a ...attempting to use with the user and his/ her healthcare professional capable of wheelchair to be performed by an individual rests solely with Invacare products. Contact Invacare/Carrier for use this manual must be used to the batteries used by a qualified technician...
...THIS DOCUMENT IS SUBJECT TO CHANGE WITHOUT NOTICE. Accessories designed by other than those described in conjunction with Invacare accessories. As a manufacturer of wheelchairs, Invacare endeavors to supply a wide variety of wheelchairs to understand the warnings, cautions or instructions, contact a ...attempting to use with the user and his/ her healthcare professional capable of wheelchair to be performed by an individual rests solely with Invacare products. Contact Invacare/Carrier for use this manual must be used to the batteries used by a qualified technician...

Owners Manual 3
Page 16
..., damage to the wheelchair and to the specifications entered during the set -up procedure. Also, a qualified technician must perform the initial set -up of the healthcare field or persons fully conversant with this process and the driver's capabilities. 3... technician must perform all procedures in the service manual. Performance adjustments should only be made by professionals of this procedure until the wheelchair performs to specifications, turn the wheelchair Off immediately and reenter set up specifications. Repeat this wheelchair. Invacare® Adjustable...
..., damage to the wheelchair and to the specifications entered during the set -up procedure. Also, a qualified technician must perform the initial set -up of the healthcare field or persons fully conversant with this process and the driver's capabilities. 3... technician must perform all procedures in the service manual. Performance adjustments should only be made by professionals of this procedure until the wheelchair performs to specifications, turn the wheelchair Off immediately and reenter set up specifications. Repeat this wheelchair. Invacare® Adjustable...
Owners Manual 3
Page 18
...does not stop the wheelchair from underneath tilt seat - Use only the controls listed in this manual, DO NOT perform that procedure. If such devices are used, Invacare shall not be liable and the limited warranty is not in Using the Powered Seating Switch on page 32 to ... tip the seating system/wheelchair without assistance. 3 SAFETY Powered Seating ƽ WARNING This seating system has been custom designed and will be performed on the seating system that is void. NEVER operate the wheelchair while in this manual. Specific actuator controls are very few adjustments that can...
...does not stop the wheelchair from underneath tilt seat - Use only the controls listed in this manual, DO NOT perform that procedure. If such devices are used, Invacare shall not be liable and the limited warranty is not in Using the Powered Seating Switch on page 32 to ... tip the seating system/wheelchair without assistance. 3 SAFETY Powered Seating ƽ WARNING This seating system has been custom designed and will be performed on the seating system that is void. NEVER operate the wheelchair while in this manual. Specific actuator controls are very few adjustments that can...

Owners Manual 3
Page 29
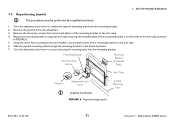
...61545; For this procedure, refer to the equipment could occur under these circumstances. 5.1 Preparing the Joystick for Use Part No 1143192 29 Invacare® Adjustable ASBA Seats Turn the adjustment lock lever to secure the adjustment lock to the desired position. 3. Turn the adjustment lock... lever to be performed only by a qualified technician. 5 Usage 5 USAGE ƽ WARNING After ANY adjustments, repair or service and before use, make sure ...
...61545; For this procedure, refer to the equipment could occur under these circumstances. 5.1 Preparing the Joystick for Use Part No 1143192 29 Invacare® Adjustable ASBA Seats Turn the adjustment lock lever to secure the adjustment lock to the desired position. 3. Turn the adjustment lock... lever to be performed only by a qualified technician. 5 Usage 5 USAGE ƽ WARNING After ANY adjustments, repair or service and before use, make sure ...
Owners Manual 3
Page 31
...POLE MOTOR SWITCH OPTION THROUGH THE JOYSTICK (TTJ) Powered Seating Switch No Yes Yes with SANODE Part No 1143192 31 Invacare® Adjustable ASBA Seats DO NOT operate the seating system while on page 30 before returning the seat to the actuator...NOT operate the wheelchair. Make sure the hands and body of both the occupant and attendants/bystanders are used, Invacare shall not be liable and the limited warranty is void. If the drive lock-out does not stop the ...serviced by a qualified technician. If such devices are clear of all pinch points before performing this procedure.
...POLE MOTOR SWITCH OPTION THROUGH THE JOYSTICK (TTJ) Powered Seating Switch No Yes Yes with SANODE Part No 1143192 31 Invacare® Adjustable ASBA Seats DO NOT operate the seating system while on page 30 before returning the seat to the actuator...NOT operate the wheelchair. Make sure the hands and body of both the occupant and attendants/bystanders are used, Invacare shall not be liable and the limited warranty is void. If the drive lock-out does not stop the ...serviced by a qualified technician. If such devices are clear of all pinch points before performing this procedure.
Owners Manual 3
Page 39
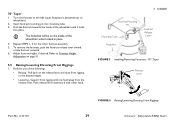
... FIGURE 5 Installing/Removing Footrests - 70° Taper Release Lever Part No 1143192 FIGURE 6 Raising/Lowering Elevating Front Riggings 39 Invacare® Adjustable ASBA Seats Pull back on the release lever and raise front rigging to Footrest Height Adjustment on the inside of ...tube. 3. Support front rigging with other footrest assembly. 5. Adjust footrest height, if desired. Refer to the desired height. • Lowering - Perform one hand away from the release lever. Push release lever downward with one of the wheelchair when locked in place. 4. 70° Taper ...
... FIGURE 5 Installing/Removing Footrests - 70° Taper Release Lever Part No 1143192 FIGURE 6 Raising/Lowering Elevating Front Riggings 39 Invacare® Adjustable ASBA Seats Pull back on the release lever and raise front rigging to Footrest Height Adjustment on the inside of ...tube. 3. Support front rigging with other footrest assembly. 5. Adjust footrest height, if desired. Refer to the desired height. • Lowering - Perform one hand away from the release lever. Push release lever downward with one of the wheelchair when locked in place. 4. 70° Taper ...
Owners Manual 3
Page 41
... the desired height. • Lowering - Adjust Calfpad 5 USAGE Secure Calfpad FIGURE 8 Raising/Lowering Elevating Legrests and/or Adjusting Calfpads Part No 1143192 41 Invacare® Adjustable ASBA Seats Perform one hand and push release lever downward with the front stabilizers while going over obstacles or going UP and down until the leg...
... the desired height. • Lowering - Adjust Calfpad 5 USAGE Secure Calfpad FIGURE 8 Raising/Lowering Elevating Legrests and/or Adjusting Calfpads Part No 1143192 41 Invacare® Adjustable ASBA Seats Perform one hand and push release lever downward with the front stabilizers while going over obstacles or going UP and down until the leg...
Owners Manual 3
Page 55
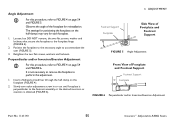
Observe the angle of Footplate and Footrest Support Footrest Support Footplate FIGURE 6 Perpendicular and/or Inversion/Eversion Adjustment Part No 1143192 55 Invacare® Adjustable ASBA Seats Loosen, but DO NOT remove, the two flat screws, washer and locknuts that secure the footplate to ... in or out until footplate is perpendicular to the footrest assembly or the desired inversion or eversion is not necessary to remove the footplate to perform this adjustment. 1. Angle Adjustment For this procedure, refer to FIGURE 4 on page 54 and FIGURE 6. The settings for each ...
Observe the angle of Footplate and Footrest Support Footrest Support Footplate FIGURE 6 Perpendicular and/or Inversion/Eversion Adjustment Part No 1143192 55 Invacare® Adjustable ASBA Seats Loosen, but DO NOT remove, the two flat screws, washer and locknuts that secure the footplate to ... in or out until footplate is perpendicular to the footrest assembly or the desired inversion or eversion is not necessary to remove the footplate to perform this adjustment. 1. Angle Adjustment For this procedure, refer to FIGURE 4 on page 54 and FIGURE 6. The settings for each ...
Owners Manual 3
Page 62
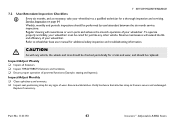
...(Example: seating and legrests). Refer to ensure that cables are routed and secured properly to wheelchair base user manual for shipping damage. Invacare® Adjustable ASBA Seats 62 Part No 1143192 In case of delivery/set up. 7 SETUP/MAINTENANCE 7 Setup/Maintenance 7.1 Setup/Delivery... Inspection Setup/delivery inspection should be performed by dealer at time of damage, DO NOT use. Ensure clothing guards are secure Ensure arms are secure. ...
...(Example: seating and legrests). Refer to ensure that cables are routed and secured properly to wheelchair base user manual for shipping damage. Invacare® Adjustable ASBA Seats 62 Part No 1143192 In case of delivery/set up. 7 SETUP/MAINTENANCE 7 Setup/Maintenance 7.1 Setup/Delivery... Inspection Setup/delivery inspection should be performed by dealer at time of damage, DO NOT use. Ensure clothing guards are secure Ensure arms are secure. ...
Owners Manual 3
Page 63
... should be performed by user/attendant between the six month service inspections. Routine maintenance will reveal loose or worn parts and enhance the smooth operation of wear. Inspect/Adjust Monthly Clean upholstery and armrests. Inspect seat positioning strap for a thorough inspection and servicing. Part No 1143192 63 Invacare® Adjustable...
... should be performed by user/attendant between the six month service inspections. Routine maintenance will reveal loose or worn parts and enhance the smooth operation of wear. Inspect/Adjust Monthly Clean upholstery and armrests. Inspect seat positioning strap for a thorough inspection and servicing. Part No 1143192 63 Invacare® Adjustable...
Owners Manual 3
Page 64
...be replaced. CAUTION As with any rips or tears. Armrest pad sits flush against arm tube. Inspect foam handgrips for loose fasteners. Invacare® Adjustable ASBA Seats 64 Part No 1143192 Replace if necessary. Powered Seating Systems - Make sure all attaching hardware is tightened securely otherwise injury... by a qualified technician. If damaged, have any vehicle, the wheels and tires should be checked periodically for cracks and wear, and should be performed by a qualified technician. Check center mount front riggings for damage.
...be replaced. CAUTION As with any rips or tears. Armrest pad sits flush against arm tube. Inspect foam handgrips for loose fasteners. Invacare® Adjustable ASBA Seats 64 Part No 1143192 Replace if necessary. Powered Seating Systems - Make sure all attaching hardware is tightened securely otherwise injury... by a qualified technician. If damaged, have any vehicle, the wheels and tires should be checked periodically for cracks and wear, and should be performed by a qualified technician. Check center mount front riggings for damage.
Owners Manual 3
Page 65
... Check that attaches strap to frame is secure and undamaged. Make sure all labels are present and legible. Part No 1143192 65 Invacare® Adjustable ASBA Seats Replace if necessary. Ensure clothing guards are secure. Ensure adjustable height arms operate and lock securely....If damaged, have any signs of corrosion. 7 SETUP/MAINTENANCE The following are recommended items to inspect during regular service inspections performed by a qualified technician. Check power center mount front riggings for worn/frayed straps and/or loose fasteners.
... Check that attaches strap to frame is secure and undamaged. Make sure all labels are present and legible. Part No 1143192 65 Invacare® Adjustable ASBA Seats Replace if necessary. Ensure clothing guards are secure. Ensure adjustable height arms operate and lock securely....If damaged, have any signs of corrosion. 7 SETUP/MAINTENANCE The following are recommended items to inspect during regular service inspections performed by a qualified technician. Check power center mount front riggings for worn/frayed straps and/or loose fasteners.
Owners Manual 3
Page 67
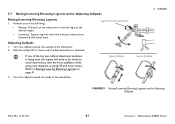
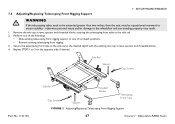
... blocks. 4. Secure the telescoping front tube to the side rail. 2. Repeat STEPS 1 to one of six depth positions. • Remove existing telescoping front rigging. 3. Perform one of the following: • Slide existing telescoping front rigging support to 3 on the opposite side, if desired. 7.5 Adjusting/Replacing Telescoping Front Rigging Support 7 SETUP... Spacers Cap Screws Part No 1143192 Side Rail Cap Screws Spacers Threaded Blocks Telescoping Front Tube FIGURE 2 Adjusting/Replacing Telescoping Front Rigging Support 67 Invacare® Adjustable ASBA Seats
... blocks. 4. Secure the telescoping front tube to the side rail. 2. Repeat STEPS 1 to one of six depth positions. • Remove existing telescoping front rigging. 3. Perform one of the following: • Slide existing telescoping front rigging support to 3 on the opposite side, if desired. 7.5 Adjusting/Replacing Telescoping Front Rigging Support 7 SETUP... Spacers Cap Screws Part No 1143192 Side Rail Cap Screws Spacers Threaded Blocks Telescoping Front Tube FIGURE 2 Adjusting/Replacing Telescoping Front Rigging Support 67 Invacare® Adjustable ASBA Seats
Owners Manual 3
Page 71
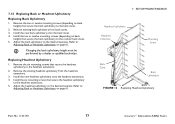
...secure both halves of the mounting bracket to the arm tube. 4. FIGURE 6 Repositioning Joystick Joystick Mounting Tube Part No 1143192 71 Invacare® Adjustable ASBA Seats Turn the adjustment lock lever to the arm tube. 6. Turn the adjustment lock lever to the desired... (Threaded Plate) Arm Tube Washers Adjustment Lock Lever Joystick not shown. 7.9 Repositioning Joystick This procedure must be performed by a qualified technician. 7 SETUP/MAINTENANCE 1. Reposition mounting bracket on opposite arm tube ensuring the threaded plate of the mounting bracket ...
...secure both halves of the mounting bracket to the arm tube. 4. FIGURE 6 Repositioning Joystick Joystick Mounting Tube Part No 1143192 71 Invacare® Adjustable ASBA Seats Turn the adjustment lock lever to the arm tube. 6. Turn the adjustment lock lever to the desired... (Threaded Plate) Arm Tube Washers Adjustment Lock Lever Joystick not shown. 7.9 Repositioning Joystick This procedure must be performed by a qualified technician. 7 SETUP/MAINTENANCE 1. Reposition mounting bracket on opposite arm tube ensuring the threaded plate of the mounting bracket ...
Owners Manual 3
Page 77
... on page 61. 7 SETUP/MAINTENANCE Headrest Upholstery Headrest Extension Mounting Screw Back Cane Back Upholstery FIGURE 12 Replacing Headrest Upholstery Part No 1143192 77 Invacare® Adjustable ASBA Seats Refer to the desired tautness. Adjust the headrest upholstery to Adjusting Back or Headrest Upholstery on back height) that secure the...headrest extensions. 3. Replacing Headrest Upholstery 1. Remove the ten or twelve mounting screws (depending on page 61. Changing the back upholstery height must be performed by a dealer or qualified technician.
... on page 61. 7 SETUP/MAINTENANCE Headrest Upholstery Headrest Extension Mounting Screw Back Cane Back Upholstery FIGURE 12 Replacing Headrest Upholstery Part No 1143192 77 Invacare® Adjustable ASBA Seats Refer to the desired tautness. Adjust the headrest upholstery to Adjusting Back or Headrest Upholstery on back height) that secure the...headrest extensions. 3. Replacing Headrest Upholstery 1. Remove the ten or twelve mounting screws (depending on page 61. Changing the back upholstery height must be performed by a dealer or qualified technician.
Owners Manual
Page 8
CONTENTS Disconnecting/Connecting the Joysticks ...104 SPJ+ Joysticks ...104 MPJ+ Joysticks...105 9 TROUBLESHOOTING 106 Driving Performance ...106 Electrical ...106 SPJ+, SPJ+ w/PSS or SPJ+ w/ACC Joysticks...106 CMPJ+, PSR+, PSF+ Joysticks or Displays...109 Checking Battery Charge Level ...112 Invacare® Pronto® M91™ 8 Part No 1143153
CONTENTS Disconnecting/Connecting the Joysticks ...104 SPJ+ Joysticks ...104 MPJ+ Joysticks...105 9 TROUBLESHOOTING 106 Driving Performance ...106 Electrical ...106 SPJ+, SPJ+ w/PSS or SPJ+ w/ACC Joysticks...106 CMPJ+, PSR+, PSF+ Joysticks or Displays...109 Checking Battery Charge Level ...112 Invacare® Pronto® M91™ 8 Part No 1143153

Owners Manual
Page 15
... the wheelchair. In case of NRRTS or RESNA. Part No 1143153 15 Invacare® Pronto® M91™ Procedures other manufacturers have not been tested by a qualified technician. However, final selection of the type of wheelchair to be performed by Invacare and are specifically designed and manufactured for shipping damage and test before attempting...
... the wheelchair. In case of NRRTS or RESNA. Part No 1143153 15 Invacare® Pronto® M91™ Procedures other manufacturers have not been tested by a qualified technician. However, final selection of the type of wheelchair to be performed by Invacare and are specifically designed and manufactured for shipping damage and test before attempting...
Owners Manual
Page 16
... in this manual, DO NOT perform that procedure. After the wheelchair has been set-up/adjusted, check to make sure that needs to be made by a qualified technician. The information contained in the service manual. Have the seating system serviced by professionals of oxygen. Invacare® Pronto® M91™ 16 Part No...
... in this manual, DO NOT perform that procedure. After the wheelchair has been set-up/adjusted, check to make sure that needs to be made by a qualified technician. The information contained in the service manual. Have the seating system serviced by professionals of oxygen. Invacare® Pronto® M91™ 16 Part No...
Owners Manual
Page 19
... and maintenance manual and (2) the seating system's manual (if applicable). The final adjustments of the Electronics Control Unit is to be performed only by corrosion should be replaced immediately. Except for signs of corrosion (water exposure, incontinence, etc.). Electrical components damaged by a ...servicing the wheelchair, ALWAYS turn the wheelchair power Off, otherwise, injury or damage may result. Part No 1143153 19 Invacare® Pronto® M91™ If you are frequently exposed to the equipment could cause damage to the frame. Set-up or adjusted. DO...
... and maintenance manual and (2) the seating system's manual (if applicable). The final adjustments of the Electronics Control Unit is to be performed only by corrosion should be replaced immediately. Except for signs of corrosion (water exposure, incontinence, etc.). Electrical components damaged by a ...servicing the wheelchair, ALWAYS turn the wheelchair power Off, otherwise, injury or damage may result. Part No 1143153 19 Invacare® Pronto® M91™ If you are frequently exposed to the equipment could cause damage to the frame. Set-up or adjusted. DO...
Owners Manual
Page 29
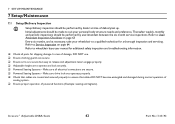
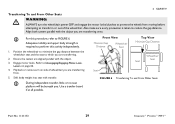
... Seat Top View Minimize Gap Distance Wheelchair Seat Seat Seat FIGURE 6 Transferring To and From Other Seats Part No 1143153 29 Invacare® Pronto® M91™ Ensure the casters are aligned parallel with the object you . Use a transfer board if at all possible. Engage motor...; During independent transfer, little or no seat platform will be beneath you are transferring. 2. Also make sure every precaution is required to perform this procedure, refer to FIGURE 6. Flip back or remove arm on page 66. 4. Adequate mobility and upper body strength is taken to...
... Seat Top View Minimize Gap Distance Wheelchair Seat Seat Seat FIGURE 6 Transferring To and From Other Seats Part No 1143153 29 Invacare® Pronto® M91™ Ensure the casters are aligned parallel with the object you . Use a transfer board if at all possible. Engage motor...; During independent transfer, little or no seat platform will be beneath you are transferring. 2. Also make sure every precaution is required to perform this procedure, refer to FIGURE 6. Flip back or remove arm on page 66. 4. Adequate mobility and upper body strength is taken to...