Owners Manual
Page 6
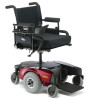
... driving forward over transitions and thresholds of up to 2-inches. Pronto® M51™and M61™with wet, slippery, icy or oily surfaces. This power wheelchair has Invacare's SureStep technology, a feature that are frequently exposed to the SureStep Feature. • DO NOT use on inclines greater than 9°. • DO NOT use...
... driving forward over transitions and thresholds of up to 2-inches. Pronto® M51™and M61™with wet, slippery, icy or oily surfaces. This power wheelchair has Invacare's SureStep technology, a feature that are frequently exposed to the SureStep Feature. • DO NOT use on inclines greater than 9°. • DO NOT use...
Owners Manual
Page 11
...casters. DO NOT engage or disengage the motor release levers until the power is a positioning belt only. Serious injury or damage to lift the wheelchair by means of any removable (detachable) parts of moving parts to the wheelchair may result or may result. Lifting by any maintenance, adjustment or ...getting in injury to the user or damage to move up or down an incline with SureStep® It is in or out of the wheelchair, make sure that On/Off switch on the front riggings, otherwise damage may occur. Otherwise, property damage may result. Before performing any ...
...casters. DO NOT engage or disengage the motor release levers until the power is a positioning belt only. Serious injury or damage to lift the wheelchair by means of any removable (detachable) parts of moving parts to the wheelchair may result or may result. Lifting by any maintenance, adjustment or ...getting in injury to the user or damage to move up or down an incline with SureStep® It is in or out of the wheelchair, make sure that On/Off switch on the front riggings, otherwise damage may occur. Otherwise, property damage may result. Before performing any ...
Owners Manual
Page 12
Invacare strongly recommends their use as the device being connected. Use of improper extension cord could result in this unit. SECTION 1-GENERAL GUIDELINES M61 Wheelchairs Only DO NOT operate wheelchair on an incline while in the wheelchair while charging the batteries. Read and carefully follow the ... wire extension cord having at least 16 AWG (American Wire Gauge) wire and the same or higher electrical rating as the power source for each charger (supplied or purchased). Pronto® M51™and M61™with batteries. Carefully read battery/battery charger...
Invacare strongly recommends their use as the device being connected. Use of improper extension cord could result in this unit. SECTION 1-GENERAL GUIDELINES M61 Wheelchairs Only DO NOT operate wheelchair on an incline while in the wheelchair while charging the batteries. Read and carefully follow the ... wire extension cord having at least 16 AWG (American Wire Gauge) wire and the same or higher electrical rating as the power source for each charger (supplied or purchased). Pronto® M51™and M61™with batteries. Carefully read battery/battery charger...
Owners Manual
Page 13
... wall receptacle is encountered, it is torn or cracked. If you must use an extension cord, use power wheelchair in accordance with the National Electrical Code. In addition, Invacare has placed RED/ORANGE warning tags on some equipment. DO NOT use only a three‐wire extension ...battery terminal caps are secured in accordance with ISO 7176 "Rain Test." Invacare wheelchairs have a weight limitation of any kind. Rain Test Invacare has tested its wheelchairs as the device being connected. DO NOT store power wheelchair in a rain storm of 300 lbs. If the joystick boot becomes ...
... wall receptacle is encountered, it is torn or cracked. If you must use an extension cord, use power wheelchair in accordance with the National Electrical Code. In addition, Invacare has placed RED/ORANGE warning tags on some equipment. DO NOT use only a three‐wire extension ...battery terminal caps are secured in accordance with ISO 7176 "Rain Test." Invacare wheelchairs have a weight limitation of any kind. Rain Test Invacare has tested its wheelchairs as the device being connected. DO NOT store power wheelchair in a rain storm of 300 lbs. If the joystick boot becomes ...
Owners Manual
Page 14
...cause EMI problems to electromagnetic interference (EMI), which is capable of the interfering EM energy can also permanently damage the powered wheelchair's control system. Pronto® M51™and M61™with the antenna mounted directly on the outside of relatively ...: Other types of radiated EMI. The higher the immunity level, the greater the protection. Electromagnetic Interference (EMI) From Radio Wave Sources Powered wheelchairs and motorized scooters (in police cars, fire trucks, ambulances and taxis. This is unavoidable. Examples include: citizens band (CB) radios,...
...cause EMI problems to electromagnetic interference (EMI), which is capable of the interfering EM energy can also permanently damage the powered wheelchair's control system. Pronto® M51™and M61™with the antenna mounted directly on the outside of relatively ...: Other types of radiated EMI. The higher the immunity level, the greater the protection. Electromagnetic Interference (EMI) From Radio Wave Sources Powered wheelchairs and motorized scooters (in police cars, fire trucks, ambulances and taxis. This is unavoidable. Examples include: citizens band (CB) radios,...
Owners Manual
Page 15
...receivers), such as citizens band (CB) radios, or turn the powered wheelchair OFF as soon as it more intense as one moves closer to the transmitting antenna (source), the EM fields from sources such as manufactured by Invacare may make it is safe; 4) Be aware that adding accessories ...or components, or modifying the powered wheelchair, may adversely affect the EMI immunity levels. Modification of any kind to the electronics ...
...receivers), such as citizens band (CB) radios, or turn the powered wheelchair OFF as soon as it more intense as one moves closer to the transmitting antenna (source), the EM fields from sources such as manufactured by Invacare may make it is safe; 4) Be aware that adding accessories ...or components, or modifying the powered wheelchair, may adversely affect the EMI immunity levels. Modification of any kind to the electronics ...
Owners Manual
Page 19
Use an elevator to move an occupied power wheelchair between floors by the rear frame and the front forks - Invacare recommends using a stairway to reassembly. Use only secure, nondetachable parts for moving a power wheelchair between floors using a stairway. Follow this procedure, refer to lift the wheelchair only by means of a stairway, the occupant MUST be removed and...
Use an elevator to move an occupied power wheelchair between floors by the rear frame and the front forks - Invacare recommends using a stairway to reassembly. Use only secure, nondetachable parts for moving a power wheelchair between floors using a stairway. Follow this procedure, refer to lift the wheelchair only by means of a stairway, the occupant MUST be removed and...

Owners Manual
Page 20
... any accessories to move a wheelchair between floors. ESCALATORS DO NOT...are oriented as hand hold supports, transfer the wheelchair base to Removing/Installing the Seat Assembly on the wheelchair. 4. Serious bodily injury may occur. This ... and the possibility of the wheelchair. SECTION 3-SAFETY/HANDLING OF WHEELCHAIRS NOTE: This procedure needs two assistants to lift the wheelchair to Removing/Installing the Seat ...seat. Using the rear and front forks as shown in or out of the wheelchair tipping forward. Refer to transfer in FIGURE 3.4. 6. Rear Frame Front Fork (Front...
... any accessories to move a wheelchair between floors. ESCALATORS DO NOT...are oriented as hand hold supports, transfer the wheelchair base to Removing/Installing the Seat Assembly on the wheelchair. 4. Serious bodily injury may occur. This ... and the possibility of the wheelchair. SECTION 3-SAFETY/HANDLING OF WHEELCHAIRS NOTE: This procedure needs two assistants to lift the wheelchair to Removing/Installing the Seat ...seat. Using the rear and front forks as shown in or out of the wheelchair tipping forward. Refer to transfer in FIGURE 3.4. 6. Rear Frame Front Fork (Front...

Owners Manual
Page 24
...when drive wheels are not worn and/or loose. Replace if necessary. ❑ Clean upholstery and armrests. ❑ Inspect charger AC power cord for signs of corrosion. Replace if necessary. ❑ Ensure seat release latch is functional. Replace if necessary. SECTION 4-SAFETY ...INSPECTION/TROUBLESHOOTING Inspect/Adjust Weekly ❑ Seat is secured to wheelchair frame. ❑ Seat and/or back upholstery have no rips and do not sag. Replace if necessary. ❑ Ensure casters are free...
...when drive wheels are not worn and/or loose. Replace if necessary. ❑ Clean upholstery and armrests. ❑ Inspect charger AC power cord for signs of corrosion. Replace if necessary. ❑ Ensure seat release latch is functional. Replace if necessary. SECTION 4-SAFETY ...INSPECTION/TROUBLESHOOTING Inspect/Adjust Weekly ❑ Seat is secured to wheelchair frame. ❑ Seat and/or back upholstery have no rips and do not sag. Replace if necessary. ❑ Ensure casters are free...
Owners Manual
Page 26
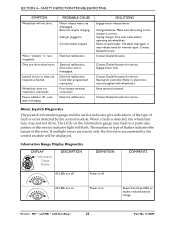
...Part No 1125085 Electrical malfunction. One motor lock is detected, the wheelchair may flash in . Contact Dealer/Invacare. Electrical malfunction. Electrical malfunction. Contact Dealer/Invacare for internal repair. PROBABLE CAUSE Motor release levers are on implies reduced... battery charge. Charge batteries. Contact Dealer/Invacare. Electrical malfunction. Unplug charger from wall outlet before operating the wheelchair. Have terminals cleaned. When a fault is disengaged. Power is off. Charger plugged in a particular pattern or...
...Part No 1125085 Electrical malfunction. One motor lock is detected, the wheelchair may flash in . Contact Dealer/Invacare. Electrical malfunction. Electrical malfunction. Contact Dealer/Invacare for internal repair. PROBABLE CAUSE Motor release levers are on implies reduced... battery charge. Charge batteries. Contact Dealer/Invacare. Electrical malfunction. Unplug charger from wall outlet before operating the wheelchair. Have terminals cleaned. When a fault is disengaged. Power is off. Charger plugged in a particular pattern or...

Owners Manual
Page 29
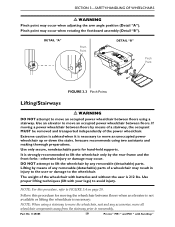
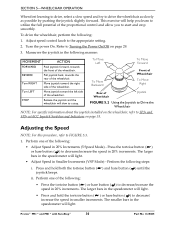
... and before use, make sure that all attaching hardware is pushed from the upright (neutral) position, the faster the wheelchair moves. To turn the power On, press the On/Off button. 2. On/Off Button FIGURE 5.1 Turning the Power On/Off Using the Joystick to the upright (neutral) position when released. To slow the...;with 360 degrees of mobility for ease of the speed‐control knob. Set-up/programming of speed and direction. Damage to FIGURE 5.1. 1. Operating the Wheelchair Turning the Power On/Off NOTE: For this procedure, refer to move in a given direction causes the...
... and before use, make sure that all attaching hardware is pushed from the upright (neutral) position, the faster the wheelchair moves. To turn the power On, press the On/Off button. 2. On/Off Button FIGURE 5.1 Turning the Power On/Off Using the Joystick to the upright (neutral) position when released. To slow the...;with 360 degrees of mobility for ease of the speed‐control knob. Set-up/programming of speed and direction. Damage to FIGURE 5.1. 1. Operating the Wheelchair Turning the Power On/Off NOTE: For this procedure, refer to move in a given direction causes the...
Owners Manual
Page 30
...Press the tortoise button ( ) or hare button ( ) to Turning the Power On/Off on page 33. Turn RIGHT Move joystick toward the left side of the proportional control and allow you to drive the wheelchair as slowly as possible by pushing the joystick slightly forward. STOP Release the ...8226; Adjust Speed in the speedometer will light. • Press and hold both the tortoise button ( joystick beeps. Perform one of the wheelchair. The smaller bars in the speedometer will light. • Adjust Speed in 20% increments. To Move Left To Move Forward To Move Backward...
...Press the tortoise button ( ) or hare button ( ) to Turning the Power On/Off on page 33. Turn RIGHT Move joystick toward the left side of the proportional control and allow you to drive the wheelchair as slowly as possible by pushing the joystick slightly forward. STOP Release the ...8226; Adjust Speed in the speedometer will light. • Press and hold both the tortoise button ( joystick beeps. Perform one of the wheelchair. The smaller bars in the speedometer will light. • Adjust Speed in 20% increments. To Move Left To Move Forward To Move Backward...
Owners Manual
Page 35
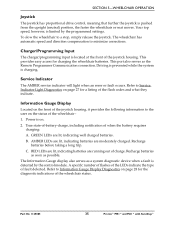
... well charged batteries. Refer to Information Gauge Display Diagnostics on . 2. Refer to the user on page 27 for charging the wheelchair batteries. Power is charging. B. Recharge batteries before taking a long trip. Part No 1125085 35 Pronto® M51™and M61™...batteries as soon as the Remote Programmer Communication connection. This port also serves as possible. To slow the wheelchair to minimize corrections. SECTION 5-WHEELCHAIR OPERATION Joystick The joystick has proportional drive control, meaning that further the joystick is limited by the control ...
... well charged batteries. Refer to Information Gauge Display Diagnostics on . 2. Refer to the user on page 27 for charging the wheelchair batteries. Power is charging. B. Recharge batteries before taking a long trip. Part No 1125085 35 Pronto® M51™and M61™...batteries as soon as the Remote Programmer Communication connection. This port also serves as possible. To slow the wheelchair to minimize corrections. SECTION 5-WHEELCHAIR OPERATION Joystick The joystick has proportional drive control, meaning that further the joystick is limited by the control ...
Owners Manual
Page 57
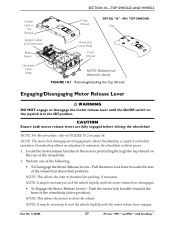
... lever engages. NOTE: It may be necessary to drive the wheels. NOTE: It may be necessary to maneuver the wheelchair without power. 1. CAUTION Ensure both motor release levers are fully engaged before driving the wheelchair NOTE: For this procedure, refer to freewheel for clarity. Perform one of the following: • To Disengage the...
... lever engages. NOTE: It may be necessary to drive the wheels. NOTE: It may be necessary to maneuver the wheelchair without power. 1. CAUTION Ensure both motor release levers are fully engaged before driving the wheelchair NOTE: For this procedure, refer to freewheel for clarity. Perform one of the following: • To Disengage the...
Owners Manual
Page 60
...skin and eyes. otherwise injury or damage may occur. Invacare strongly recommends that all attaching hardware is tightened securely - NEVER allow any adjustments, repair or service and before performing this section. Wheelchairs should be replaced IMMEDIATELY. Before reinstalling the existing or new... proper lifting techniques (lift with fuse. Use U1 batteries only. Connect same color connectors to each . Make sure power to the wheelchair is the most convenient method and assures that are frequently exposed to water may cause damage to prolong the life of...
...skin and eyes. otherwise injury or damage may occur. Invacare strongly recommends that all attaching hardware is tightened securely - NEVER allow any adjustments, repair or service and before performing this section. Wheelchairs should be replaced IMMEDIATELY. Before reinstalling the existing or new... proper lifting techniques (lift with fuse. Use U1 batteries only. Connect same color connectors to each . Make sure power to the wheelchair is the most convenient method and assures that are frequently exposed to water may cause damage to prolong the life of...
Owners Manual
Page 68
...fully charged (as the device being connected. Unplug AC power cord from the wall outlet and then unplug the female connector of fire and electric shock. Plug the female connector of the wheelchair. When charging is abnormal. Contact an Invacare dealer or qualified technician. 3. When the Charge LED... LED indicator light is Off, charger is blinking RED, this procedure, refer to the wheelchair. The On/Off LED indicator is Off. 4. Pronto® M51™and M61™with AC power cord attached to FIGURE 11.4 on ‐board battery charger and wall outlet. Replace ...
...fully charged (as the device being connected. Unplug AC power cord from the wall outlet and then unplug the female connector of fire and electric shock. Plug the female connector of the wheelchair. When charging is abnormal. Contact an Invacare dealer or qualified technician. 3. When the Charge LED... LED indicator light is Off, charger is blinking RED, this procedure, refer to the wheelchair. The On/Off LED indicator is Off. 4. Pronto® M51™and M61™with AC power cord attached to FIGURE 11.4 on ‐board battery charger and wall outlet. Replace ...
Owners Manual
Page 69
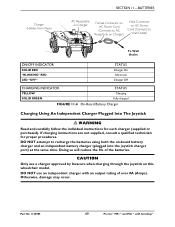
... 1125085 69 Pronto® M51™and M61™with an output rating of the batteries. DO NOT use a charger approved by Invacare when charging through the joystick on -board battery charger and an independent battery charger (plugged into the joystick charger port) at the same... individual instructions for proper procedures. Charger (Hidden from View) SECTION 11-BATTERIES AC Receptacle on Charger Female Connector on AC Power Cord (Connects to AC Receptacle on Charger) Male Connector on AC Power Cord (Connects to recharge the batteries using both the on this wheelchair model.
... 1125085 69 Pronto® M51™and M61™with an output rating of the batteries. DO NOT use a charger approved by Invacare when charging through the joystick on -board battery charger and an independent battery charger (plugged into the joystick charger port) at the same... individual instructions for proper procedures. Charger (Hidden from View) SECTION 11-BATTERIES AC Receptacle on Charger Female Connector on AC Power Cord (Connects to AC Receptacle on Charger) Male Connector on AC Power Cord (Connects to recharge the batteries using both the on this wheelchair model.
Owners Manual
Page 70
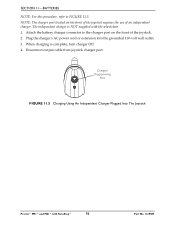
Plug the charger's AC power cord or extension into the grounded 110‐volt wall outlet. 3. NOTE: The charger port located on the front of an independent charger. Attach the ... charger Off. 4. Charger/ Programming Port FIGURE 11.5 Charging Using An Independent Charger Plugged Into The Joystick Pronto® M51™and M61™with the wheelchair. 1. SECTION 11-BATTERIES NOTE: For this procedure, refer to the charger port on the front of the joystick requires the use of the joystick. 2.
Plug the charger's AC power cord or extension into the grounded 110‐volt wall outlet. 3. NOTE: The charger port located on the front of an independent charger. Attach the ... charger Off. 4. Charger/ Programming Port FIGURE 11.5 Charging Using An Independent Charger Plugged Into The Joystick Pronto® M51™and M61™with the wheelchair. 1. SECTION 11-BATTERIES NOTE: For this procedure, refer to the charger port on the front of the joystick requires the use of the joystick. 2.


