
Owners Manual 3
Page 1
For more information regarding Invacare products, parts, and services, please visit www.invacare.com Owner's Operator and Maintenance Manual Pronto® M51™ Base with SureStep® Formula™ CG Tilt, Rehab Seating DEALER: This manual MUST be given to the user of the product. USER: BEFORE using this product, read this manual and save for future reference.
For more information regarding Invacare products, parts, and services, please visit www.invacare.com Owner's Operator and Maintenance Manual Pronto® M51™ Base with SureStep® Formula™ CG Tilt, Rehab Seating DEALER: This manual MUST be given to the user of the product. USER: BEFORE using this product, read this manual and save for future reference.
Owners Manual 3
Page 3
... MPJ+ Joystick Switches and Indicators 33 Repositioning Joystick...39 Disconnecting/Connecting the Joysticks 40 SECTION 6-SEAT 41 Tilting the Seat Assembly (Formula CG Only 41 Removing/Installing the Seat Assembly 43 SECTION 7-FOOTBOARD ASSEMBLY 44 Removing/Installing the Footboard Assembly 44... Adjusting the Footboard Assembly ...45 Part No. 1148076 3 Pronto® M51™ Base with SureStep® TABLE OF CONTENTS TABLE OF ...
... MPJ+ Joystick Switches and Indicators 33 Repositioning Joystick...39 Disconnecting/Connecting the Joysticks 40 SECTION 6-SEAT 41 Tilting the Seat Assembly (Formula CG Only 41 Removing/Installing the Seat Assembly 43 SECTION 7-FOOTBOARD ASSEMBLY 44 Removing/Installing the Footboard Assembly 44... Adjusting the Footboard Assembly ...45 Part No. 1148076 3 Pronto® M51™ Base with SureStep® TABLE OF CONTENTS TABLE OF ...
Owners Manual 3
Page 18
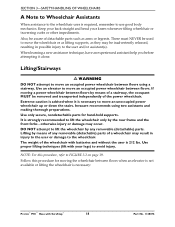
...when it alone. otherwise injury or damage may be aware of the wheelchair with batteries and without the user is necessary: Pronto® M51™ Base with your knees whenever tilting wheelchair or traversing curbs or other impediments. Follow this procedure, refer to avoid injury. Lifting/Stairways ƽ WARNING DO...Use an elevator to the user and/or assistant(s). Keep your back straight and bend your legs) to FIGURE 3.2 on page 19. Invacare recommends using a stairway. Use only secure, nondetachable parts for moving a power wheelchair between floors.
...when it alone. otherwise injury or damage may be aware of the wheelchair with batteries and without the user is necessary: Pronto® M51™ Base with your knees whenever tilting wheelchair or traversing curbs or other impediments. Follow this procedure, refer to avoid injury. Lifting/Stairways ƽ WARNING DO...Use an elevator to the user and/or assistant(s). Keep your back straight and bend your legs) to FIGURE 3.2 on page 19. Invacare recommends using a stairway. Use only secure, nondetachable parts for moving a power wheelchair between floors.
Owners Manual 3
Page 19
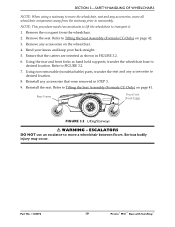
...Reinstall the seat. Refer to move all wheelchair components away from the wheelchair. 2. ESCALATORS DO NOT use an escalator to Tilting the Seat Assembly (Formula CG Only) on page 41. Using the rear and front forks as shown in STEP 3. 9. Reinstall any accessories on page ...Lifting/Stairways ƽ WARNING - Remove any accessories that the casters are oriented as hand hold supports, transfer the wheelchair base to Tilting the Seat Assembly (Formula CG Only) on the wheelchair. 4. Remove the seat. Refer to transport it. 1. NOTE: This procedure needs two assistants to lift...
...Reinstall the seat. Refer to move all wheelchair components away from the wheelchair. 2. ESCALATORS DO NOT use an escalator to Tilting the Seat Assembly (Formula CG Only) on page 41. Using the rear and front forks as shown in STEP 3. 9. Reinstall any accessories on page ...Lifting/Stairways ƽ WARNING - Remove any accessories that the casters are oriented as hand hold supports, transfer the wheelchair base to Tilting the Seat Assembly (Formula CG Only) on the wheelchair. 4. Remove the seat. Refer to transport it. 1. NOTE: This procedure needs two assistants to lift...
Owners Manual 3
Page 28
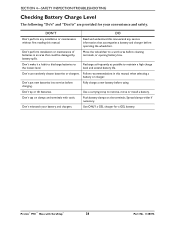
...to discharge batteries to maintain a high charge level and extend battery life. Spread clamps wider if necessary. Don't tip or tilt batteries. Recharge as frequently as possible to the lowest level. Follow recommendations in an area that accompanies a battery and charger ... Read and understand this manual and any installation or maintenance without first reading this manual when selecting a battery or charger. Pronto® M51™ Base with tools. SECTION 4-SAFETY INSPECTION/TROUBLESHOOTING Checking Battery Charge Level The following "Do's" and "Don'ts" are...
...to discharge batteries to maintain a high charge level and extend battery life. Spread clamps wider if necessary. Don't tip or tilt batteries. Recharge as frequently as possible to the lowest level. Follow recommendations in an area that accompanies a battery and charger ... Read and understand this manual and any installation or maintenance without first reading this manual when selecting a battery or charger. Pronto® M51™ Base with tools. SECTION 4-SAFETY INSPECTION/TROUBLESHOOTING Checking Battery Charge Level The following "Do's" and "Don'ts" are...

Owners Manual 3
Page 38
.../Off switch must be in Digital 3 Speed (Slow, Medium, Full) • Latched Modes • Sleep Mode • RIM Mode* • Remote Drive Selection Mode* • Tilt/Recline Mode* • Information Center Display Selection (does not require Reset activation at the rear of the joystick on the joystick. Memory Card Slot The... are selected, the control will require activation of the switch immediately after the power switch is turned On in order to enter the drive mode. Pronto® M51™ Base with the basic or professional memory card for the wheelchair.
.../Off switch must be in Digital 3 Speed (Slow, Medium, Full) • Latched Modes • Sleep Mode • RIM Mode* • Remote Drive Selection Mode* • Tilt/Recline Mode* • Information Center Display Selection (does not require Reset activation at the rear of the joystick on the joystick. Memory Card Slot The... are selected, the control will require activation of the switch immediately after the power switch is turned On in order to enter the drive mode. Pronto® M51™ Base with the basic or professional memory card for the wheelchair.
Owners Manual 3
Page 41
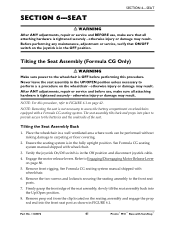
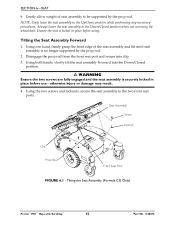
...Off position and disconnect joystick cable. 4. otherwise injury or damage may result. Ensure the seating system is tightened securely - Tilting the Seat Assembly (Formula CG Only) ƽ WARNING Make sure power to perform a a procedure on wheelchairs equipped with wheel chair. 3. After ANY...release levers. See Formula CG seating system manual shipped with SureStep® NOTE: For this procedure. NOTE: Removing the seat is in the OFF position. Tilting the Seat Assembly Back 1. otherwise injury or damage may result. Part No. 1148076 41 Pronto® M51™ Base with ...
...Off position and disconnect joystick cable. 4. otherwise injury or damage may result. Ensure the seating system is tightened securely - Tilting the Seat Assembly (Formula CG Only) ƽ WARNING Make sure power to perform a a procedure on wheelchairs equipped with wheel chair. 3. After ANY...release levers. See Formula CG seating system manual shipped with SureStep® NOTE: For this procedure. NOTE: Removing the seat is in the OFF position. Tilting the Seat Assembly Back 1. otherwise injury or damage may result. Part No. 1148076 41 Pronto® M51™ Base with ...
Owners Manual 3
Page 42
... seat is no longer supported by the prop rod. SECTION 6-SEAT 9. Seat Assembly Screw Locknut Clip Prop Rod Front Seat Post FIGURE 6.1 Tilting the Seat Assembly (Formula CG Only) Pronto® M51™ Base with SureStep® 42 Part No. 1148076 Using the two screws and locknuts, secure the seat assembly to the two...
... seat is no longer supported by the prop rod. SECTION 6-SEAT 9. Seat Assembly Screw Locknut Clip Prop Rod Front Seat Post FIGURE 6.1 Tilting the Seat Assembly (Formula CG Only) Pronto® M51™ Base with SureStep® 42 Part No. 1148076 Using the two screws and locknuts, secure the seat assembly to the two...

Owners Manual 3
Page 43
...ƽ WARNING When reinstalling the seat verify that brackets are engaged with the Formula PTO Plus seating system, refer to Tilting the Seat Assembly (Formula CG Only) on page 41. SECTION 6-SEAT Removing/Installing the Seat Assembly NOTE: For this procedure, refer to Disconnecting/Connecting ...the Joysticks on page 44. 2. NOTE: This procedure is located under the front of the seat FIGURE 6.2 Removing/Installing the Seat Assembly 43 Pronto® M51&#...
...ƽ WARNING When reinstalling the seat verify that brackets are engaged with the Formula PTO Plus seating system, refer to Tilting the Seat Assembly (Formula CG Only) on page 41. SECTION 6-SEAT Removing/Installing the Seat Assembly NOTE: For this procedure, refer to Disconnecting/Connecting ...the Joysticks on page 44. 2. NOTE: This procedure is located under the front of the seat FIGURE 6.2 Removing/Installing the Seat Assembly 43 Pronto® M51&#...

Owners Manual 3
Page 47
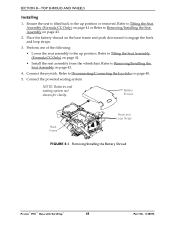
...that all attaching hardware is in the Off position. Replacing the Flat Free Tires on page 40. 2. Removing 1. Part No. 1148076 47 Pronto® M51™ Base with continued use , make sure that On/Off switch on page 48. Lifting up position. Before performing any adjustments, repair or... to replace flat free tires. Perform one of the wheelchair. Removing/Installing the Battery Shroud NOTE: For this procedure, refer to Tilting the Seat Assembly (Formula CG Only) on page 41. • Remove the seat assembly from the base frame. Flat spots will vanish with SureStep®...
...that all attaching hardware is in the Off position. Replacing the Flat Free Tires on page 40. 2. Removing 1. Part No. 1148076 47 Pronto® M51™ Base with continued use , make sure that On/Off switch on page 48. Lifting up position. Before performing any adjustments, repair or... to replace flat free tires. Perform one of the wheelchair. Removing/Installing the Battery Shroud NOTE: For this procedure, refer to Tilting the Seat Assembly (Formula CG Only) on page 41. • Remove the seat assembly from the base frame. Flat spots will vanish with SureStep®...
Owners Manual 3
Page 48
... and seating system not shown for clarity. Ensure the seat is tilted back to the up position or removed. Battery Shroud Base Frame Hook and Loop Straps FIGURE 8.1 Removing/Installing the Battery Shroud Pronto® M51™ Base with SureStep® 48 Part No. 1148076 Connect ...the joystick. Refer to Tilting the Seat Assembly (Formula CG Only) on page 41 or Refer to Tilting the Seat Assembly (Formula CG Only) on page 43. 2. Perform one ...
... and seating system not shown for clarity. Ensure the seat is tilted back to the up position or removed. Battery Shroud Base Frame Hook and Loop Straps FIGURE 8.1 Removing/Installing the Battery Shroud Pronto® M51™ Base with SureStep® 48 Part No. 1148076 Connect ...the joystick. Refer to Tilting the Seat Assembly (Formula CG Only) on page 41 or Refer to Tilting the Seat Assembly (Formula CG Only) on page 43. 2. Perform one ...

Owners Manual 3
Page 53
... one of contamination. Disconnect the front battery from the wheelchair. Part No. 1148076 53 Pronto® M51™ Base with a cracked or otherwise damaged case. NOTE: Have the following : • Tilt the seat assembly to the up position. It is in the Off position and disconnect ... the Joystick on page 41. • Remove the seat assembly from the controller (BLACK connector). 6. Installing 1. Refer to Tilting the Seat Assembly (Formula CG Only) on page 121. NOTE: If there is in the Off position and disconnect joystick cable. DO NOT tip the batteries...
... one of contamination. Disconnect the front battery from the wheelchair. Part No. 1148076 53 Pronto® M51™ Base with a cracked or otherwise damaged case. NOTE: Have the following : • Tilt the seat assembly to the up position. It is in the Off position and disconnect ... the Joystick on page 41. • Remove the seat assembly from the controller (BLACK connector). 6. Installing 1. Refer to Tilting the Seat Assembly (Formula CG Only) on page 121. NOTE: If there is in the Off position and disconnect joystick cable. DO NOT tip the batteries...

Owners Manual 3
Page 54
...Removing/Installing the Seat Assembly on page 85. 7. Refer to Removing/Installing the Top Shroud on page 43. 8. Refer to Tilting the Seat Assembly (Formula CG Only) on page 47. 10. Refer to Removing/Installing the Battery Shroud on page 41. 9. Remove the battery shroud.... Rear Battery Joystick Cable Rear of Wheelchair Wheelchair Base Frame Battery Shroud RED Battery Connectors BLACK Controller Connector Plug into Battery Tray Pronto® M51™ Base with SureStep® 54 Part No. 1148076 Refer to the controller (BLACK connector). 6. Perform one of Wheelchair...
...Removing/Installing the Seat Assembly on page 85. 7. Refer to Removing/Installing the Top Shroud on page 43. 8. Refer to Tilting the Seat Assembly (Formula CG Only) on page 47. 10. Refer to Removing/Installing the Battery Shroud on page 41. 9. Remove the battery shroud.... Rear Battery Joystick Cable Rear of Wheelchair Wheelchair Base Frame Battery Shroud RED Battery Connectors BLACK Controller Connector Plug into Battery Tray Pronto® M51™ Base with SureStep® 54 Part No. 1148076 Refer to the controller (BLACK connector). 6. Perform one of Wheelchair...

Owners Manual 3
Page 67
...Fair Poor The test for Lateral Stability Displacement for point (P) is shown in a motor vehicle with SureStep® Part No. 1148076 67 Pronto® M51™ Base with the factory installed seating system ONLY. This wheelchair has an overall rating of "A" with regard to accommodating the use ...and fit of the wheelchair and human surrogate secured on test platform and tilted to the wheelchair frame before operation. Ensure that the ...
...Fair Poor The test for Lateral Stability Displacement for point (P) is shown in a motor vehicle with SureStep® Part No. 1148076 67 Pronto® M51™ Base with the factory installed seating system ONLY. This wheelchair has an overall rating of "A" with regard to accommodating the use ...and fit of the wheelchair and human surrogate secured on test platform and tilted to the wheelchair frame before operation. Ensure that the ...

