

Owners Manual
Page 5
TABLE OF CONTENTS TABLE OF CONTENTS SECTION 13-BATTERIES 58 Warnings For Handling and Replacing Batteries 58 Using the Proper Batteries...58 Removing/Installing the Batteries...59 Connecting/Disconnecting Battery Cables 61 Charging Batteries ...63 Battery Charger Operation...64 SECTION 14-ACCESSORIES 66 Installing/Removing the Crutch/Cane Holder 66 Installing/Removing the Oxygen Holder 67 Installing/Removing/Using the Walker Holder 68 NOTES 70 GLOBAL LIMITED WARRANTY (EXCLUDING CANADA 71 CANADA LIMITED WARRANTY 72 Part No. 1143206 5 Pronto® M41 with SureStep®
TABLE OF CONTENTS TABLE OF CONTENTS SECTION 13-BATTERIES 58 Warnings For Handling and Replacing Batteries 58 Using the Proper Batteries...58 Removing/Installing the Batteries...59 Connecting/Disconnecting Battery Cables 61 Charging Batteries ...63 Battery Charger Operation...64 SECTION 14-ACCESSORIES 66 Installing/Removing the Crutch/Cane Holder 66 Installing/Removing the Oxygen Holder 67 Installing/Removing/Using the Walker Holder 68 NOTES 70 GLOBAL LIMITED WARRANTY (EXCLUDING CANADA 71 CANADA LIMITED WARRANTY 72 Part No. 1143206 5 Pronto® M41 with SureStep®

Owners Manual
Page 66
... base down into position. NOTE: To remove, reverse the following procedure. otherwise injury or damage may result. NOTE: The Crutch/Cane Holder, Oxygen Holder, and Walker Holder all attaching hardware is in the off switch on the back of this procedure, refer to the surrounding property may result. Install the crutch...
... base down into position. NOTE: To remove, reverse the following procedure. otherwise injury or damage may result. NOTE: The Crutch/Cane Holder, Oxygen Holder, and Walker Holder all attaching hardware is in the off switch on the back of this procedure, refer to the surrounding property may result. Install the crutch...

Owners Manual
Page 67
... not become entangled, kinked or severed. Extreme care MUST be used in the use only Invacare oxygen cylinder accessories (i.e. NOTE: The Crutch/Cane Holder, Oxygen Holder, and Walker Holder all install into the welded nut on the back of supporting an oxygen cylinder - ...back of the wheelchair seat significantly increases the length of the clamp knobs. 5. regulator, oxygen demand devices). Repeat STEP 4 for Invacare wheelchairs only. SECTION 14-ACCESSORIES Installing/Removing the Oxygen Holder ƽ WARNING Contact your oxygen supplier for anything other type of wheelchair....
... not become entangled, kinked or severed. Extreme care MUST be used in the use only Invacare oxygen cylinder accessories (i.e. NOTE: The Crutch/Cane Holder, Oxygen Holder, and Walker Holder all install into the welded nut on the back of supporting an oxygen cylinder - ...back of the wheelchair seat significantly increases the length of the clamp knobs. 5. regulator, oxygen demand devices). Repeat STEP 4 for Invacare wheelchairs only. SECTION 14-ACCESSORIES Installing/Removing the Oxygen Holder ƽ WARNING Contact your oxygen supplier for anything other type of wheelchair....
Owners Manual
Page 68
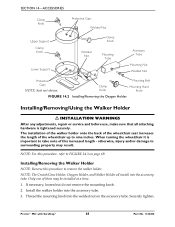
... 68 Part No. 1143206 Clamp Knob Mounting Bolt Mounting Hand Knob FIGURE 14.2 Installing/Removing the Oxygen Holder Installing/Removing/Using the Walker Holder ƽ INSTALLATION WARNINGS After any adjustments, repair or service and before use, make sure that all install into the accessory tube...refer to surrounding property may be installed at a time. 1. Thread the mounting knob into the accessory tube. 3. Securely tighten. Install the walker holder into the welded nut on page 69. otherwise, injury and/or damage to FIGURE 14.3 on the accessory tube. SECTION 14-ACCESSORIES...
... 68 Part No. 1143206 Clamp Knob Mounting Bolt Mounting Hand Knob FIGURE 14.2 Installing/Removing the Oxygen Holder Installing/Removing/Using the Walker Holder ƽ INSTALLATION WARNINGS After any adjustments, repair or service and before use, make sure that all install into the accessory tube...refer to surrounding property may be installed at a time. 1. Thread the mounting knob into the accessory tube. 3. Securely tighten. Install the walker holder into the welded nut on page 69. otherwise, injury and/or damage to FIGURE 14.3 on the accessory tube. SECTION 14-ACCESSORIES...
Owners Manual
Page 69
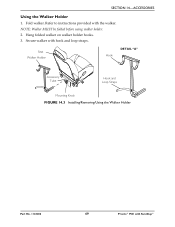
NOTE: Walker MUST be folded before using walker holder. 2. Seat Walker Holder Hook DETAIL "A" Accessory Tube Hook and Loop Straps Mounting Knob FIGURE 14.3 Installing/Removing/Using the Walker Holder Part No. 1143206 69 Pronto® M41 with the walker. Refer to instructions provided with SureStep® Hang folded walker on walker holder hooks. 3. Fold walker. Secure walker with hook and loop straps. SECTION 14-ACCESSORIES Using the Walker Holder 1.
NOTE: Walker MUST be folded before using walker holder. 2. Seat Walker Holder Hook DETAIL "A" Accessory Tube Hook and Loop Straps Mounting Knob FIGURE 14.3 Installing/Removing/Using the Walker Holder Part No. 1143206 69 Pronto® M41 with the walker. Refer to instructions provided with SureStep® Hang folded walker on walker holder hooks. 3. Fold walker. Secure walker with hook and loop straps. SECTION 14-ACCESSORIES Using the Walker Holder 1.