
Owners Manual
Page 1
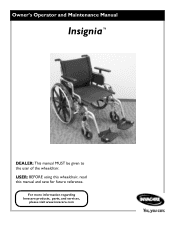
Owner's Operator and Maintenance Manual Insignia™ DEALER: This manual MUST be given to the user of the wheelchair. USER: BEFORE using this wheelchair, read this manual and save for future reference. For more information regarding Invacare products, parts, and services, please visit www.invacare.com
Owner's Operator and Maintenance Manual Insignia™ DEALER: This manual MUST be given to the user of the wheelchair. USER: BEFORE using this wheelchair, read this manual and save for future reference. For more information regarding Invacare products, parts, and services, please visit www.invacare.com

Owners Manual
Page 2
... manufacturers have not been tested by Invacare and are not recommended for use with invacare products. *Service Manual Part Number 1164941 is available at www.invacare.com NOTE: Updated versions of this... manual are specifically designed and manufactured for use in conjunction with invacare accessories. Insignia™ 2 Part No. 1163197 OTHERWISE, INJURY OR DAMAGE MAY OCCUR. ƽ ACCESSORIES WARNING Invacare products are available on www.invacare.com. ƽ WARNING A QUALIFIED TECHNICIAN MUST PERFORM THE INITIAL SET UP OF THIS WHEELCHAIR...
... manufacturers have not been tested by Invacare and are not recommended for use with invacare products. *Service Manual Part Number 1164941 is available at www.invacare.com NOTE: Updated versions of this... manual are specifically designed and manufactured for use in conjunction with invacare accessories. Insignia™ 2 Part No. 1163197 OTHERWISE, INJURY OR DAMAGE MAY OCCUR. ƽ ACCESSORIES WARNING Invacare products are available on www.invacare.com. ƽ WARNING A QUALIFIED TECHNICIAN MUST PERFORM THE INITIAL SET UP OF THIS WHEELCHAIR...
Owners Manual
Page 3
...Weight Limitation ...8 Anti-Tippers...8 Operating Information ...9 SECTION 2-SAFETY/HANDLING OF WHEELCHAIRS 11 Safety/Handling of Wheelchairs ...11 Stability and Balance...11 Coping With Everyday Obstacles...11 A Note to Wheelchair Assistants ...12 Reaching, Leaning and Bending Forward...12 Reaching, Leaning Backwards... ...12 Tipping ...13 Stairways...14 Escalators ...15 Transferring To and From Other Seats ...15 Unfolding and Folding Wheelchair ...15 SECTION 3-SAFETY INSPECTION/TROUBLESHOOTING 17 Safety Inspection Checklist ...17 Troubleshooting ...18 Maintenance...19 SECTION 4-FRONT RIGGINGS...
...Weight Limitation ...8 Anti-Tippers...8 Operating Information ...9 SECTION 2-SAFETY/HANDLING OF WHEELCHAIRS 11 Safety/Handling of Wheelchairs ...11 Stability and Balance...11 Coping With Everyday Obstacles...11 A Note to Wheelchair Assistants ...12 Reaching, Leaning and Bending Forward...12 Reaching, Leaning Backwards... ...12 Tipping ...13 Stairways...14 Escalators ...15 Transferring To and From Other Seats ...15 Unfolding and Folding Wheelchair ...15 SECTION 3-SAFETY INSPECTION/TROUBLESHOOTING 17 Safety Inspection Checklist ...17 Troubleshooting ...18 Maintenance...19 SECTION 4-FRONT RIGGINGS...

Owners Manual
Page 5
... which , if not avoided, will result in property damage, minor injury or both. WHEELCHAIR USER As a manufacturer of wheelchairs, Invacare endeavors to supply a wide variety of wheelchairs to meet many needs of this wheelchair (you may result in death or serious injury. Invacare cannot and does not recommend any tie-down systems for transportation of a user...
... which , if not avoided, will result in property damage, minor injury or both. WHEELCHAIR USER As a manufacturer of wheelchairs, Invacare endeavors to supply a wide variety of wheelchairs to meet many needs of this wheelchair (you may result in death or serious injury. Invacare cannot and does not recommend any tie-down systems for transportation of a user...

Owners Manual
Page 7
...110° in 5° increments 15 to 19 inches in 1 inch increments Flip back removable, adjustable height, space saver Swingaway footrests and elevating legrests IN08AHANFRFF 27 inches 20 inches 18 inches 37.85 lbs (17.17 Kg) 37.96 lbs (17.22 Kg) Quick-release 22 or 24 inch Low... kg) 47.55 lbs (21.57 Kg) 50.75 lbs (23.02 Kg) NOTE: The seat‐to tire wear and manufacturing tolerances. If wheelchair is equipped with pneumatic flat free add 1/2 inch to the measurements listed above. TYPICAL PRODUCT PARAMETERS TYPICAL PRODUCT PARAMETERS Overall Width Overall Depth Seat Width...
...110° in 5° increments 15 to 19 inches in 1 inch increments Flip back removable, adjustable height, space saver Swingaway footrests and elevating legrests IN08AHANFRFF 27 inches 20 inches 18 inches 37.85 lbs (17.17 Kg) 37.96 lbs (17.22 Kg) Quick-release 22 or 24 inch Low... kg) 47.55 lbs (21.57 Kg) 50.75 lbs (23.02 Kg) NOTE: The seat‐to tire wear and manufacturing tolerances. If wheelchair is equipped with pneumatic flat free add 1/2 inch to the measurements listed above. TYPICAL PRODUCT PARAMETERS TYPICAL PRODUCT PARAMETERS Overall Width Overall Depth Seat Width...

Owners Manual
Page 8
...anti‐tippers must be used to maintain a 1½ to ‐floor heights. Refer to one or any kind of this product. Invacare wheelchairs have not been designed or tested as a weight training apparatus. All Models The seat depth, back height/angle, seat angle, size/position...decrease in Installing/Adjusting Anti‐tippers on rear wheel size, rear wheel position, front caster size/position and desired seat‐to the wheelchair and the warranty is void. Insignia™ 8 Part No. 1163197 SECTION 1-GENERAL GUIDELINES SECTION 1-GENERAL GUIDELINES ƽ WARNING SECTION 1 -...
...anti‐tippers must be used to maintain a 1½ to ‐floor heights. Refer to one or any kind of this product. Invacare wheelchairs have not been designed or tested as a weight training apparatus. All Models The seat depth, back height/angle, seat angle, size/position...decrease in Installing/Adjusting Anti‐tippers on rear wheel size, rear wheel position, front caster size/position and desired seat‐to the wheelchair and the warranty is void. Insignia™ 8 Part No. 1163197 SECTION 1-GENERAL GUIDELINES SECTION 1-GENERAL GUIDELINES ƽ WARNING SECTION 1 -...

Owners Manual
Page 9
Verify that the handgrips DO NOT twist on roads, streets or highways. Failure to observe this wheelchair, Invacare strongly recommends using the wheelchair near open and the seat frame rails are not brakes. DO NOT traverse, climb or go down between floors. DO ...extreme temperature (above 100°F or below 32°F), high humidity and/or becomes wet, prior to use an escalator to move a wheelchair between your particular safety limits, practice bending, reaching and transferring activities in several combinations in the hand grips sliding off the cane assembly. ...
Verify that the handgrips DO NOT twist on roads, streets or highways. Failure to observe this wheelchair, Invacare strongly recommends using the wheelchair near open and the seat frame rails are not brakes. DO NOT traverse, climb or go down between floors. DO ...extreme temperature (above 100°F or below 32°F), high humidity and/or becomes wet, prior to use an escalator to move a wheelchair between your particular safety limits, practice bending, reaching and transferring activities in several combinations in the hand grips sliding off the cane assembly. ...

Owners Manual
Page 10
DO NOT use the handrims for self‐propulsion. Insignia™ 10 Part No. 1163197 SECTION 1-GENERAL GUIDELINES DO NOT attempt to lift the wheelchair by means of any removable (detachable) parts. ALWAYS use the footplate as a platform. DO NOT stand on the frame of the wheelchair, make sure that the footplates are in the upward position. When getting in injury to the user or damage to the wheelchair. Lifting by any removable (detachable) parts of the wheelchair may result in or out of the wheelchair.
DO NOT use the handrims for self‐propulsion. Insignia™ 10 Part No. 1163197 SECTION 1-GENERAL GUIDELINES DO NOT attempt to lift the wheelchair by means of any removable (detachable) parts. ALWAYS use the footplate as a platform. DO NOT stand on the frame of the wheelchair, make sure that the footplates are in the upward position. When getting in injury to the user or damage to the wheelchair. Lifting by any removable (detachable) parts of the wheelchair may result in or out of the wheelchair.

Owners Manual
Page 11
...aware that carrying heavy objects on the center of the wheelchair. This can be replaced IMMEDIATELY. Part No. 1163197 11 Insignia™ Invacare recognizes and encourages each individual to the wheelchair and surrounding property. Invacare recommends using seat/chest positioning straps for use as a ...in activities that may order with or without the seat positioning strap), Invacare strongly recommends ordering the seat positioning strap as a basic guide. This wheelchair has been designed to manage your wheelchair. Keep in this manual MUST be achieved by many. SECTION 2-...
...aware that carrying heavy objects on the center of the wheelchair. This can be replaced IMMEDIATELY. Part No. 1163197 11 Insignia™ Invacare recognizes and encourages each individual to the wheelchair and surrounding property. Invacare recommends using seat/chest positioning straps for use as a ...in activities that may order with or without the seat positioning strap), Invacare strongly recommends ordering the seat positioning strap as a basic guide. This wheelchair has been designed to manage your wheelchair. Keep in this manual MUST be achieved by many. SECTION 2-...

Owners Manual
Page 12
...of the rear wheels, anti-tipper model, as well as this may result in injury to the user or damage to the wheelchair. Position wheelchair as close as possible and engage wheel locks. FIGURE 2.2 Reaching, Leaning Backwards Insignia™ 12 Part No. 1163197 DO ...sitting position. Point front casters forward to FIGURE 2.1. Lifting by a qualified technician. SECTION 2-SAFETY/HANDLING OF WHEELCHAIRS A Note to Wheelchair Assistants When assistance to the wheelchair user is essential for looseness before attempting active use the front casters as they are extended as far forward ...
...of the rear wheels, anti-tipper model, as well as this may result in injury to the user or damage to the wheelchair. Position wheelchair as close as possible and engage wheel locks. FIGURE 2.2 Reaching, Leaning Backwards Insignia™ 12 Part No. 1163197 DO ...sitting position. Point front casters forward to FIGURE 2.1. Lifting by a qualified technician. SECTION 2-SAFETY/HANDLING OF WHEELCHAIRS A Note to Wheelchair Assistants When assistance to the wheelchair user is essential for looseness before attempting active use the front casters as they are extended as far forward ...
Owners Manual
Page 13
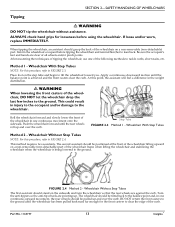
... grasp the back of the following methods to tackle curbs, short stairs, etc. After mastering the techniques of tipping the wheelchair, use one of the wheelchair on a non‐removable (non‐detachable) part of the curb. Apply a continuous downward motion until the balance .../or worn, replace IMMEDIATELY. ALWAYS check hand grips for the front casters to clear the edge of the wheelchair frame when lifting the wheelchair and stabilizing the wheelchair when the wheelchair is achieved and the front casters clear the curb. At this procedure, refer to FIGURE 2.4. FIGURE 2.4 Method...
... grasp the back of the following methods to tackle curbs, short stairs, etc. After mastering the techniques of tipping the wheelchair, use one of the wheelchair on a non‐removable (non‐detachable) part of the curb. Apply a continuous downward motion until the balance .../or worn, replace IMMEDIATELY. ALWAYS check hand grips for the front casters to clear the edge of the wheelchair frame when lifting the wheelchair and stabilizing the wheelchair when the wheelchair is achieved and the front casters clear the curb. At this procedure, refer to FIGURE 2.4. FIGURE 2.4 Method...

Owners Manual
Page 14
...not available: 1. It is a positioning belt only. DO NOT attempt to lift a wheelchair by means of any removable (detachable) parts. ALWAYS check hand grips for the wheelchair user. Invacare recommends using the wheelchair. If necessary, rotate the anti‐tippers so the wheels are facing up. 2. ... one foot on any removable (detachable) parts of the wheelchair may order with a firm hold on a non‐detachable part of the wheelchair, DO NOT let the wheelchair drop the last few inches to the ground. Invacare recommends that, if possible, the user be removed from the...
...not available: 1. It is a positioning belt only. DO NOT attempt to lift a wheelchair by means of any removable (detachable) parts. ALWAYS check hand grips for the wheelchair user. Invacare recommends using the wheelchair. If necessary, rotate the anti‐tippers so the wheels are facing up. 2. ... one foot on any removable (detachable) parts of the wheelchair may order with a firm hold on a non‐detachable part of the wheelchair, DO NOT let the wheelchair drop the last few inches to the ground. Invacare recommends that, if possible, the user be removed from the...

Owners Manual
Page 15
... possibility of moving . NOTE: This activity may occur. Use a transfer board if at all possible. NOTE: For this procedure, refer to move a wheelchair between floors. Place your fingers and thumb to reduce the gap distance. This will be taken to the inside of seat frame rail when opening.../closing the wheelchair. Position the wheelchair as close as possible in or out of the seat rail closest to the object you (raising the opposite wheel and caster off...
... possibility of moving . NOTE: This activity may occur. Use a transfer board if at all possible. NOTE: For this procedure, refer to move a wheelchair between floors. Place your fingers and thumb to reduce the gap distance. This will be taken to the inside of seat frame rail when opening.../closing the wheelchair. Position the wheelchair as close as possible in or out of the seat rail closest to the object you (raising the opposite wheel and caster off...

Owners Manual
Page 16
...Transferring To and From Other Seats on the top of the seat rail until the wheelchair begins to the front of the wheelchair. 2. Pivot footplates upward to vertical position. 3. From behind the wheelchair, grasp the right hand edge of the seat upholstery at the front and back ... folding seat and lift up . 3. Swing footrest/legrest in locked position to close the wheelchair by grasping the armrest furthest from you and pulling the armrest towards you . SECTION 2-SAFETY/HANDLING OF WHEELCHAIRS 4. Engage both hands, grasp the middle of the solid seat. 4. Folding Solid-Seat ...
...Transferring To and From Other Seats on the top of the seat rail until the wheelchair begins to the front of the wheelchair. 2. Pivot footplates upward to vertical position. 3. From behind the wheelchair, grasp the right hand edge of the seat upholstery at the front and back ... folding seat and lift up . 3. Swing footrest/legrest in locked position to close the wheelchair by grasping the armrest furthest from you and pulling the armrest towards you . SECTION 2-SAFETY/HANDLING OF WHEELCHAIRS 4. Engage both hands, grasp the middle of the solid seat. 4. Folding Solid-Seat ...

Owners Manual
Page 17
.... ❑ Inspect tires for cracked, bent or broken spokes. Lubricate if necessary. ❑ Check that attaches strap to suit your wheelchair. Replace if damaged. ❑ If equipped, check that quick‐release axles lock properly. Ensure buckle latches. Regular cleaning will extend...are uniformly tight. ❑ Inspect handrims for any other vehicle. Inspect/Adjust Weekly ❑ Ensure that the wheel locks prevent the wheelchair from moving when engaged. ❑ Inspect tires for cracks and wear. Lubricate if necessary. ❑ Inspect rear wheels for flat ...
.... ❑ Inspect tires for cracked, bent or broken spokes. Lubricate if necessary. ❑ Check that attaches strap to suit your wheelchair. Replace if damaged. ❑ If equipped, check that quick‐release axles lock properly. Ensure buckle latches. Regular cleaning will extend...are uniformly tight. ❑ Inspect handrims for any other vehicle. Inspect/Adjust Weekly ❑ Ensure that the wheel locks prevent the wheelchair from moving when engaged. ❑ Inspect tires for cracks and wear. Lubricate if necessary. ❑ Inspect rear wheels for flat ...

Owners Manual
Page 18
Verify hardware that attaches strap to one side). ❑ Check that the wheel locks DO NOT interfere with tires when rolling. ❑ Check that the wheelchair rolls straight (no excessive side movement or binding in Chair X Solutions Check for proper tension by spinning caster. Insignia™ 18 Part No. 1163197 Inspect/...
Verify hardware that attaches strap to one side). ❑ Check that the wheel locks DO NOT interfere with tires when rolling. ❑ Check that the wheelchair rolls straight (no excessive side movement or binding in Chair X Solutions Check for proper tension by spinning caster. Insignia™ 18 Part No. 1163197 Inspect/...
Owners Manual
Page 19
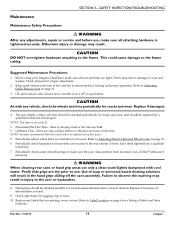
...Tires ‐ there are cuts, surface defects or the tires are secured to Adjusting Quick‐Release Axle on the rims. NOTE: Invacare recommends that grips are tight. Periodically check caster wheel bearings to Adjusting Patient‐Operated Wheel Locks on page 6 for a listing of .... This could cause damage to use , make sure all attaching hardware is found. 9. Suggested Maintenance Procedures 1. Before using your Insignia wheelchair, make sure all nuts and bolts are dry prior to the frame tubing. CAUTION DO NOT overtighten hardware attaching to Label Location on ...
...Tires ‐ there are cuts, surface defects or the tires are secured to Adjusting Quick‐Release Axle on the rims. NOTE: Invacare recommends that grips are tight. Periodically check caster wheel bearings to Adjusting Patient‐Operated Wheel Locks on page 6 for a listing of .... This could cause damage to use , make sure all attaching hardware is found. 9. Suggested Maintenance Procedures 1. Before using your Insignia wheelchair, make sure all nuts and bolts are dry prior to the frame tubing. CAUTION DO NOT overtighten hardware attaching to Label Location on ...

Owners Manual
Page 20
...place. Rotate swingaway front rigging assembly outward. 3. Installing 1. Turn the front rigging assembly to wheelchair). 2. Push the front rigging assembly towards the inside of the wheelchair until it locks into place. Removing 1. Rotate outward to FIGURE 4.1. Installing/Removing Front Riggings... 4-FRONT RIGGINGS ƽ WARNING After any adjustments, repair or service and before use . NOTE: The footplate will be on the wheelchair frame. 3. DETAIL "A" Front Rigging Assembly DETAIL "B" Front Rigging Release Lever Hinge Plates/ Hinge Pins Hinge Plates/ Hinge Pins Rotate ...
...place. Rotate swingaway front rigging assembly outward. 3. Installing 1. Turn the front rigging assembly to wheelchair). 2. Push the front rigging assembly towards the inside of the wheelchair until it locks into place. Removing 1. Rotate outward to FIGURE 4.1. Installing/Removing Front Riggings... 4-FRONT RIGGINGS ƽ WARNING After any adjustments, repair or service and before use . NOTE: The footplate will be on the wheelchair frame. 3. DETAIL "A" Front Rigging Assembly DETAIL "B" Front Rigging Release Lever Hinge Plates/ Hinge Pins Hinge Plates/ Hinge Pins Rotate ...
Owners Manual
Page 23
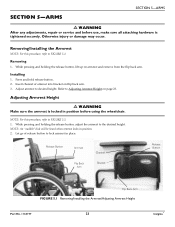
... SECTION 5-ARMS ƽ WARNING After any adjustments, repair or service and before use, make sure all attaching hardware is locked in position before using the wheelchair. Refer to the desired height. While pressing and holding the release button, lift up on armrest and remove from the flip back arm. While pressing...
... SECTION 5-ARMS ƽ WARNING After any adjustments, repair or service and before use, make sure all attaching hardware is locked in position before using the wheelchair. Refer to the desired height. While pressing and holding the release button, lift up on armrest and remove from the flip back arm. While pressing...

Owners Manual
Page 24
... Flip Back Armrest Removing/Installing the Flip Back Arm NOTE: For this procedure, refer to FIGURE 5.2. 1. Push the release lever toward the front of the wheelchair. 2. While pulling back on the plunger knob, pull flip back arm up and out of the front arm socket. 2. Pull up and out of the... front arm socket and rotate towards the front of the wheelchair. ƽ WARNING Make sure the flip back armrest is locked in place. SECTION 5-ARMS Using Flip Back Armrest NOTE: For this procedure, refer to FIGURE...
... Flip Back Armrest Removing/Installing the Flip Back Arm NOTE: For this procedure, refer to FIGURE 5.2. 1. Push the release lever toward the front of the wheelchair. 2. While pulling back on the plunger knob, pull flip back arm up and out of the front arm socket. 2. Pull up and out of the... front arm socket and rotate towards the front of the wheelchair. ƽ WARNING Make sure the flip back armrest is locked in place. SECTION 5-ARMS Using Flip Back Armrest NOTE: For this procedure, refer to FIGURE...


