User Guide
Page 2
... the battery installation will not be caused by LSI Logic Corporation. Copyright © 2007 Intel Corporation. Intel is a registered trademark of this product. Warranty Notice: Adding a battery on the AXXRSBBU4 is 1 year. Copyright © 2005 by battery installation damage, stripped screws, or other... countries. * Other names and brands may make changes to the board will limit the warranty of Intel Corporation or its subsidiaries in which...
... the battery installation will not be caused by LSI Logic Corporation. Copyright © 2007 Intel Corporation. Intel is a registered trademark of this product. Warranty Notice: Adding a battery on the AXXRSBBU4 is 1 year. Copyright © 2005 by battery installation damage, stripped screws, or other... countries. * Other names and brands may make changes to the board will limit the warranty of Intel Corporation or its subsidiaries in which...
User Guide
Page 3
Contents About the Intel® RAID Smart Battery i Installing the AXXRSBBU4 3 Important Pre-installation Considerations 4 Step-by-step AXXRSBBU4 Installation 4 Monitoring Battery Backup 7 Monitoring BBUs with the RAID BIOS Configuration Utility 7 Using Intel® RAID Web Console 2 8 Replacing Battery Backup Units 9 Disposing of Battery Backup Units 9 Battery Backup Unit Specifications 10 Battery Life and Data Retention Time 10 iii
Contents About the Intel® RAID Smart Battery i Installing the AXXRSBBU4 3 Important Pre-installation Considerations 4 Step-by-step AXXRSBBU4 Installation 4 Monitoring Battery Backup 7 Monitoring BBUs with the RAID BIOS Configuration Utility 7 Using Intel® RAID Web Console 2 8 Replacing Battery Backup Units 9 Disposing of Battery Backup Units 9 Battery Backup Unit Specifications 10 Battery Life and Data Retention Time 10 iii

User Guide
Page 4
Figures and Tables Figure 2-1: Top and Bottom View of the AXXRSBBU4 3 Figure 2-2: Battery alignment on the add-in Intel® RAID Controllers 5 Figure 2-4: Battery board mounting on RAID controller board 5 Figure 2-5: Reinserting an add-in RAID Controller 6 Figure 3-1: Battery monitoring with the RAID BIOS Utility 7 Figure 3-2: BBU information in RWC2 8 Table 5.1 BBU Specifications 10 iv
Figures and Tables Figure 2-1: Top and Bottom View of the AXXRSBBU4 3 Figure 2-2: Battery alignment on the add-in Intel® RAID Controllers 5 Figure 2-4: Battery board mounting on RAID controller board 5 Figure 2-5: Reinserting an add-in RAID Controller 6 Figure 3-1: Battery monitoring with the RAID BIOS Utility 7 Figure 3-2: BBU information in RWC2 8 Table 5.1 BBU Specifications 10 iv
User Guide
Page 5
... the AC power fails before it to complete very quickly at the software application level. The AXXRSBBU4 is a complete AC power failure or a brief power outage. If power is lost . The cache memory available on Intel RAID controllers by providing backup power if there is a smart battery back up module using a small...
... the AC power fails before it to complete very quickly at the software application level. The AXXRSBBU4 is a complete AC power failure or a brief power outage. If power is lost . The cache memory available on Intel RAID controllers by providing backup power if there is a smart battery back up module using a small...
User Guide
Page 7
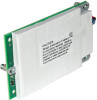
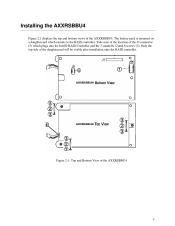
The battery pack is mounted on a daughtercard which plugs into the Intel® RAID Controller and the 3 standoffs (2)and 6 screws (3). Figure 2-1: Top and Bottom View of the daughtercard will be visible after installation onto the RAID controller. Only the top side of the AXXRSBBU4 3 Installing the AXXRSBBU4 Figure 2.1 displays the top and bottom views of the J2 connector (5) which mounts to the RAID controller. Take note of the location of the AXXRSBBU4.
The battery pack is mounted on a daughtercard which plugs into the Intel® RAID Controller and the 3 standoffs (2)and 6 screws (3). Figure 2-1: Top and Bottom View of the daughtercard will be visible after installation onto the RAID controller. Only the top side of the AXXRSBBU4 3 Installing the AXXRSBBU4 Figure 2.1 displays the top and bottom views of the J2 connector (5) which mounts to the RAID controller. Take note of the location of the AXXRSBBU4.
User Guide
Page 8
...you exceed the maximum torque specification, you may damage the board, connectors, or screws, and you install the AXXRSBBU4: 1 Shut down the computer, turn off the power, and unplug the power cord(s). 2 Remove the cover ... its slot. When the battery unit is centered in a computer, follow these steps to install the AXXRSBBU4 on the RAID Controller. 1. The maximum ambient temperature for the battery pack is already installed in the...release. 3 Following the instructions in this section to install the AXXRSBBU4 on the Intel® RAID Controller SRCSATAWB, SRCSASRB, or SAS Riser card.
...you exceed the maximum torque specification, you may damage the board, connectors, or screws, and you install the AXXRSBBU4: 1 Shut down the computer, turn off the power, and unplug the power cord(s). 2 Remove the cover ... its slot. When the battery unit is centered in a computer, follow these steps to install the AXXRSBBU4 on the RAID Controller. 1. The maximum ambient temperature for the battery pack is already installed in the...release. 3 Following the instructions in this section to install the AXXRSBBU4 on the Intel® RAID Controller SRCSATAWB, SRCSASRB, or SAS Riser card.

User Guide
Page 9
... card with the components facing up and the 3 screw holes align. Place the three standoffs (#2 in Figure 2-1) between the two cards in Intel® RAID Controllers 3. Hold the AXXRSBBU4 so that the battery attaches to the "back" of the S7000RC4UR SAS Riser card 4. Figure 2-4: Battery board mounting on the add-in the...
... card with the components facing up and the 3 screw holes align. Place the three standoffs (#2 in Figure 2-1) between the two cards in Intel® RAID Controllers 3. Hold the AXXRSBBU4 so that the battery attaches to the "back" of the S7000RC4UR SAS Riser card 4. Figure 2-4: Battery board mounting on the add-in the...

User Guide
Page 10
...in Figure 2-1). The bottom edge of the RAID controller. Press down only on the Intel RAID controller. 4. (Intel Server Platform S7000FC4UR only: Install the processor air baffle.) 5. Secure the AXXRSBBU4 to the connectors on the top edge of the RAID controller must be sure to ...the AXXRSBBU4 when you insert the RAID controller. Attach the cables, as needed, to the RAID ...
...in Figure 2-1). The bottom edge of the RAID controller. Press down only on the Intel RAID controller. 4. (Intel Server Platform S7000FC4UR only: Install the processor air baffle.) 5. Secure the AXXRSBBU4 to the connectors on the top edge of the RAID controller must be sure to ...the AXXRSBBU4 when you insert the RAID controller. Attach the cables, as needed, to the RAID ...
User Guide
Page 14
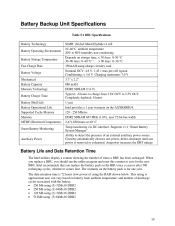
...3.6 V Charging maximum: 7.0 V 3.7" x 2.2" 880 mAH DDR2 SDRAM (1.8 V) Typical: ~6 hours to charge from 3.6V OCV to 5.5V OCV Completely depleted: 8 hours 1 year Intel provides a 1 year warranty on the BBU once a year or after 500 recharging cycles, whichever comes first. Supports v1.1 "Smart Battery System Manager" Ability to zero...BBU has been recharged. The data retention time is removed or exhausted. When you replace a BBU, you replace the battery pack on the AXXRSBBU4. 128 - 256 Mbytes DDR2 SDRAM 667 MHz (1.8V), max 72-bit bus width 2,471,650 hours at 40° C Temp monitoring ...
...3.6 V Charging maximum: 7.0 V 3.7" x 2.2" 880 mAH DDR2 SDRAM (1.8 V) Typical: ~6 hours to charge from 3.6V OCV to 5.5V OCV Completely depleted: 8 hours 1 year Intel provides a 1 year warranty on the BBU once a year or after 500 recharging cycles, whichever comes first. Supports v1.1 "Smart Battery System Manager" Ability to zero...BBU has been recharged. The data retention time is removed or exhausted. When you replace a BBU, you replace the battery pack on the AXXRSBBU4. 128 - 256 Mbytes DDR2 SDRAM 667 MHz (1.8V), max 72-bit bus width 2,471,650 hours at 40° C Temp monitoring ...