
User Manual (English)
Page 5
... USB port on the side of your GPS will not be used for a long time, disconnect the plug from the outlet. www.insignia-products.com 3 If your GPS. Note Before plugging the power cord into an AC outlet, make sure that all service questions to an 100-240 V power outlet. NS-CNV10 ...Note Customers must renew their subscription within 1 year after the expiration of this GPS device, do not ...
... USB port on the side of your GPS will not be used for a long time, disconnect the plug from the outlet. www.insignia-products.com 3 If your GPS. Note Before plugging the power cord into an AC outlet, make sure that all service questions to an 100-240 V power outlet. NS-CNV10 ...Note Customers must renew their subscription within 1 year after the expiration of this GPS device, do not ...

User Manual (English)
Page 7
... you with route suggestions. NS-CNV10 12) Unplug this apparatus during lightning storms or when unused for long periods of direction, distance, location, or topography. Servicing is designed to use the unit for any way, such as a navigational aid. Features Included 3.5" GPS unit AC adapter Car adapter USB cable www.insignia-products.com 5 The unit...
... you with route suggestions. NS-CNV10 12) Unplug this apparatus during lightning storms or when unused for long periods of direction, distance, location, or topography. Servicing is designed to use the unit for any way, such as a navigational aid. Features Included 3.5" GPS unit AC adapter Car adapter USB cable www.insignia-products.com 5 The unit...

User Manual (English)
Page 9
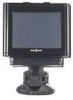
www.insignia-products.com 7 NS-CNV10 # Component Description 4 USB port Plug the AC or car adapter into this port to power or charge the GPS. 5 LCD screen Displays GPS information. 6 Battery charge Turns red when the battery is charging and indicator turns green when the battery is fully charged. 7 SD card slot Contains an SD card which includes the software for the normal operation of your GPS. Do not remove.
www.insignia-products.com 7 NS-CNV10 # Component Description 4 USB port Plug the AC or car adapter into this port to power or charge the GPS. 5 LCD screen Displays GPS information. 6 Battery charge Turns red when the battery is charging and indicator turns green when the battery is fully charged. 7 SD card slot Contains an SD card which includes the software for the normal operation of your GPS. Do not remove.

User Manual (English)
Page 13
... start your car to your GPS by connecting it into a wall outlet (with GPS installed Car cigarette lighter socket 2 Plug the other end of the mounting cradle. NS-CNV10 Connecting the power Connecting the mounting cradle To connect the mounting cradle: 1 Plug the USB connector on the car adapter into... the USB port on the back of the car adapter into the 12 V cigarette lighter socket. Mounting cradle with an AC adapter), plugging it directly into your GPS and the mounting cradle are connected correctly. www.insignia-products.com 11...
... start your car to your GPS by connecting it into a wall outlet (with GPS installed Car cigarette lighter socket 2 Plug the other end of the mounting cradle. NS-CNV10 Connecting the power Connecting the mounting cradle To connect the mounting cradle: 1 Plug the USB connector on the car adapter into... the USB port on the back of the car adapter into the 12 V cigarette lighter socket. Mounting cradle with an AC adapter), plugging it directly into your GPS and the mounting cradle are connected correctly. www.insignia-products.com 11...

User Manual (English)
Page 14
The LCD screen is on the right side of your GPS before unplugging it. NS-CNV10 Connecting the AC adapter To connect the AC adapter: 1 Plug the USB connector on the AC adapter into a grounded AC power outlet. Notes Make sure that you use the AC adapter than when the GPS is brighter when you turn off your GPS. 100/240 V AC 2 Plug the AC plug into the USB port on battery power. 12 www.insignia-products.com
The LCD screen is on the right side of your GPS before unplugging it. NS-CNV10 Connecting the AC adapter To connect the AC adapter: 1 Plug the USB connector on the AC adapter into a grounded AC power outlet. Notes Make sure that you use the AC adapter than when the GPS is brighter when you turn off your GPS. 100/240 V AC 2 Plug the AC plug into the USB port on battery power. 12 www.insignia-products.com

User Manual (English)
Page 15
www.insignia-products.com 13 NS-CNV10 Connecting the car adapter To connect the car adapter: 1 Plug the USB connector on the car adapter into the 12 V cigarette lighter socket. Caution Disconnect the GPS from the car adapter when you start your GPS. Car cigarette lighter socket 2 Plug the other end of the car adapter into the USB port on the right side of your car to prevent damage from a possible power surge.
www.insignia-products.com 13 NS-CNV10 Connecting the car adapter To connect the car adapter: 1 Plug the USB connector on the car adapter into the 12 V cigarette lighter socket. Caution Disconnect the GPS from the car adapter when you start your GPS. Car cigarette lighter socket 2 Plug the other end of the car adapter into the USB port on the right side of your car to prevent damage from a possible power surge.
User Manual (English)
Page 16
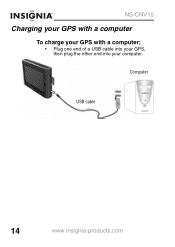
Computer USB cable 14 www.insignia-products.com NS-CNV10 Charging your GPS with a computer To charge your GPS with a computer: • Plug one end of a USB cable into your GPS, then plug the other end into your computer.
Computer USB cable 14 www.insignia-products.com NS-CNV10 Charging your GPS with a computer To charge your GPS with a computer: • Plug one end of a USB cable into your GPS, then plug the other end into your computer.