
User Guide
Page 12
...equipment is not sufficient protection to connect these interfaces metallically to OSP wiring. To avoid possible explosion, do not view directly with the IBM-approved part. For information, call . (C003) Power and cabling information for installation in GR-1089-CORE) and require isolation from the... exposed OSP cabling. The intrabuilding ports of this equipment must be connected to the chassis or frame ground. The addition of primary protectors is suitable for NEBS (Network Equipment-Building System) GR-1089-CORE The following information: laser...
...equipment is not sufficient protection to connect these interfaces metallically to OSP wiring. To avoid possible explosion, do not view directly with the IBM-approved part. For information, call . (C003) Power and cabling information for installation in GR-1089-CORE) and require isolation from the... exposed OSP cabling. The intrabuilding ports of this equipment must be connected to the chassis or frame ground. The addition of primary protectors is suitable for NEBS (Network Equipment-Building System) GR-1089-CORE The following information: laser...
User Guide
Page 26
... connecting the ac outlet correctly. Note: The remaining steps can be bolted to each other. Position the front ac outlet-mounting plate onto the rack frame with the mounting plate. Attaching the front or back ac electrical outlet: If you need to attach an ac outlet, you can use the procedure...
... connecting the ac outlet correctly. Note: The remaining steps can be bolted to each other. Position the front ac outlet-mounting plate onto the rack frame with the mounting plate. Attaching the front or back ac electrical outlet: If you need to attach an ac outlet, you can use the procedure...
User Guide
Page 27
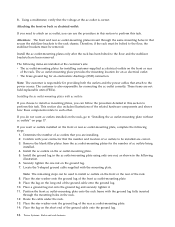
... (stabilizer mounting screws) into the mounting plate and through the mounting holes in the rack. Position the rear ac outlet-mounting plate onto the rack frame with the ground lug fully inserted through the mounting holes in the rack. 17. Securely tighten the screws. 1 Front or rear of ground cable 12...
... (stabilizer mounting screws) into the mounting plate and through the mounting holes in the rack. Position the rear ac outlet-mounting plate onto the rack frame with the ground lug fully inserted through the mounting holes in the rack. 17. Securely tighten the screws. 1 Front or rear of ground cable 12...

User Guide
Page 28
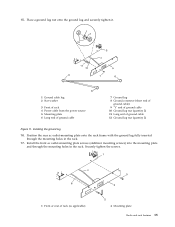
Securely tighten the screws. Note: The bus bar might be located at the rear of the rack or to the rack frame, either near the center in the rack. Installing the front mounting plate 18. Installing the back mounting plate 16 Power Systems: Racks and rack features 3 ...
Securely tighten the screws. Note: The bus bar might be located at the rear of the rack or to the rack frame, either near the center in the rack. Installing the front mounting plate 18. Installing the back mounting plate 16 Power Systems: Racks and rack features 3 ...

User Guide
Page 29
...source and -48 V dc power return cables from the top cover of the related hardware components and shows how these components relate to the rack frame. This procedure provides information about accessing the power distribution panel. 1. If you do not want any ac outlets installed on the front or rear... ac outlet-mounting plate, perform only "Attaching the rack to perform this task. Connecting a dc power source: Some rack models (such as the 7014-T00) can use the procedure in this section to the bus bars in the power distribution panel. Remove the six mounting screws from the customer...
...source and -48 V dc power return cables from the top cover of the related hardware components and shows how these components relate to the rack frame. This procedure provides information about accessing the power distribution panel. 1. If you do not want any ac outlets installed on the front or rear... ac outlet-mounting plate, perform only "Attaching the rack to perform this task. Connecting a dc power source: Some rack models (such as the 7014-T00) can use the procedure in this section to the bus bars in the power distribution panel. Remove the six mounting screws from the customer...

User Guide
Page 46
... standoffs and long foam to do this. 34 Power Systems: Racks and rack features For a model T42 rack, join the short foam to the end of the long foam, and adhere it to the frame length of the second rack as shown in the upper-left and lower-right corners of the...
... standoffs and long foam to do this. 34 Power Systems: Racks and rack features For a model T42 rack, join the short foam to the end of the long foam, and adhere it to the frame length of the second rack as shown in the upper-left and lower-right corners of the...