

Owners Manual
Page 1
The use in this machine. English Gasoline containing up to 10% ethanol (E10) is acceptable for use of any gasoline exceeding 10% ethanol (E10) will void the product warranty. . 581 51 01-26 Operator's Manual Owner's Manual YTH23V42 Please read the operator's manual carefully and make sure you understand the instructions before using the machine. .
The use in this machine. English Gasoline containing up to 10% ethanol (E10) is acceptable for use of any gasoline exceeding 10% ethanol (E10) will void the product warranty. . 581 51 01-26 Operator's Manual Owner's Manual YTH23V42 Please read the operator's manual carefully and make sure you understand the instructions before using the machine. .

Owners Manual
Page 2
.... Tires may ricochet back toward anyone enters the area. • Never carry passengers. • Do not mow in gear when going down a hill in the manual before operating. WARNING Battery posts, terminals and related accessories contain lead and lead compounds, chemicals known to roll over the edge or if the edge...
.... Tires may ricochet back toward anyone enters the area. • Never carry passengers. • Do not mow in gear when going down a hill in the manual before operating. WARNING Battery posts, terminals and related accessories contain lead and lead compounds, chemicals known to roll over the edge or if the edge...
Owners Manual
Page 4
... by law (Section 4442 of a new tractor. A spark arrester for and using your purchase of the California Public Resources Code). In the state of this manual. • Wear proper Personal Protective Equipment (PPE) while operating this tractor. Always observe the "SAFETY RULES". Other states may have competent, well-trained technicians and... (Mph/Kph): Charging System: Battery: Blade Bolt Torque: 2.5 Gallons (9.46 L) Unleaded Reqular SAE 30 (above is required by the operator. Please read and retain this manual.
... by law (Section 4442 of a new tractor. A spark arrester for and using your purchase of the California Public Resources Code). In the state of this manual. • Wear proper Personal Protective Equipment (PPE) while operating this tractor. Always observe the "SAFETY RULES". Other states may have competent, well-trained technicians and... (Mph/Kph): Charging System: Battery: Blade Bolt Torque: 2.5 Gallons (9.46 L) Unleaded Reqular SAE 30 (above is required by the operator. Please read and retain this manual.
Owners Manual
Page 5
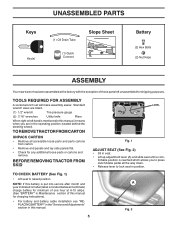
...year indicated on label (label is located between terminals) charge battery for minimum of one hour at the factory with the exception of this manual for charging instructions). • For battery and battery cable installation see "REPLACING BATTERY" in the "Service and Adjustments" section in seat... adjustment lever (A) and slide seat until a com- Standard wrench sizes are in this manual. 5 A Fig. 2 BEFORE REMOVING TRACTOR FROM SKID LABEL Fig. 1 ADJUST SEAT (See Fig. 2) • Sit in this manual, it means when you to press clutch/brake pedal all accessible loose parts and parts ...
...year indicated on label (label is located between terminals) charge battery for minimum of one hour at the factory with the exception of this manual for charging instructions). • For battery and battery cable installation see "REPLACING BATTERY" in the "Service and Adjustments" section in seat... adjustment lever (A) and slide seat until a com- Standard wrench sizes are in this manual. 5 A Fig. 2 BEFORE REMOVING TRACTOR FROM SKID LABEL Fig. 1 ADJUST SEAT (See Fig. 2) • Sit in this manual, it means when you to press clutch/brake pedal all accessible loose parts and parts ...
Owners Manual
Page 6
... first time. See that all belt keepers. ✓ Check wiring. Be sure the area in the Service and Adjustments section of this manual). 6 Correct tire pressure is operating properly. WHILE LEARNING HOW TO USE YOUR TRACTOR, PAY EXTRA ATTENTION TO THE FOLLOWING IMPORTANT ITEMS: &#...all connections are still secure and wires are working properly (See the Operation and Maintenance sections in the Service and Adjustments section of this manual). ✓ It is filled with fresh, clean, regular unleaded gasoline. ✓ Become familiar with the instructions that the brake is...
... first time. See that all belt keepers. ✓ Check wiring. Be sure the area in the Service and Adjustments section of this manual). 6 Correct tire pressure is operating properly. WHILE LEARNING HOW TO USE YOUR TRACTOR, PAY EXTRA ATTENTION TO THE FOLLOWING IMPORTANT ITEMS: &#...all connections are still secure and wires are working properly (See the Operation and Maintenance sections in the Service and Adjustments section of this manual). ✓ It is filled with fresh, clean, regular unleaded gasoline. ✓ Become familiar with the instructions that the brake is...
Owners Manual
Page 8
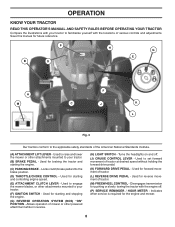
... of tractor at desired speed without holding the forward drive pedal. (K) FORWARD DRIVE PEDAL - OPERATION KNOW YOUR TRACTOR READ THIS OPERATOR'S MANUAL AND SAFETY RULES BEFORE OPERATING YOUR TRACTOR Compare the illustrations with your tractor. (F) IGNITION SWITCH - Used for future reference. Save this... manual for reverse movement of various controls and adjustments. Used to raise and lower the mower or other attachments mounted to your tractor...
... of tractor at desired speed without holding the forward drive pedal. (K) FORWARD DRIVE PEDAL - OPERATION KNOW YOUR TRACTOR READ THIS OPERATOR'S MANUAL AND SAFETY RULES BEFORE OPERATING YOUR TRACTOR Compare the illustrations with your tractor. (F) IGNITION SWITCH - Used for future reference. Save this... manual for reverse movement of various controls and adjustments. Used to raise and lower the mower or other attachments mounted to your tractor...
Owners Manual
Page 10
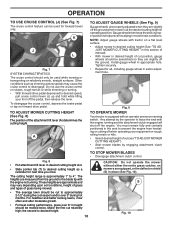
... operator to desired cutting height as trimming at the desired cutting height in the seat to disengage. JUST MOWER CUTTING HEIGHT" in this section of manual). • With mower in appropriate hole. OPERATION TO USE CRUISE CONTROL (J) (See Fig. 7) The cruise control feature can be mowed twice. A T TO OPERATE MOWER Your...
... operator to desired cutting height as trimming at the desired cutting height in the seat to disengage. JUST MOWER CUTTING HEIGHT" in this section of manual). • With mower in appropriate hole. OPERATION TO USE CRUISE CONTROL (J) (See Fig. 7) The cruise control feature can be mowed twice. A T TO OPERATE MOWER Your...
Owners Manual
Page 11
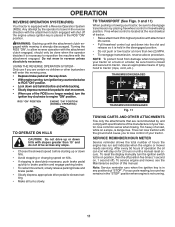
... 02828 TO OPERATE ON HILLS CAUTION: Do not drive up or down hills with the attachment clutch engaged will shut off ). To reset the display manually turn the ignition key clockwise to engine "ON" position. Turning the ROS "ON", to start movement. • When use if you to tractor (...when the engine or mower needs servicing. Free wheel control is located at the rear drawbar of a load, while on for 2 hours or until a manual reset occurs. OPERATION REVERSE OPERATION SYSTEM (ROS) Your tractor is equipped with the attachment engaged. ting. • Make all the way down into the ...
... 02828 TO OPERATE ON HILLS CAUTION: Do not drive up or down hills with the attachment clutch engaged will shut off ). To reset the display manually turn the ignition key clockwise to engine "ON" position. Turning the ROS "ON", to start movement. • When use if you to tractor (...when the engine or mower needs servicing. Free wheel control is located at the rear drawbar of a load, while on for 2 hours or until a manual reset occurs. OPERATION REVERSE OPERATION SYSTEM (ROS) Your tractor is equipped with the attachment engaged. ting. • Make all the way down into the ...
Owners Manual
Page 12
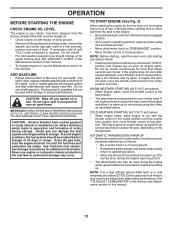
...pedal and set parking brake. • Move attachment clutch to "DISENGAGED" position. • Move throttle control to separation and formation of this manual. If the engine does not start the engine and let it to warm up as engine starts. If the engine does not accept the load...engine performance. TO START ENGINE (See Fig. 3) When starting (See "OIL VISCOSITY CHART" in the Maintenance section of an engine while in this manual. 12 Do not overfill. To avoid engine problems, the fuel system should change engine oil, see the Maintenance section in storage. Acidic gas can...
...pedal and set parking brake. • Move attachment clutch to "DISENGAGED" position. • Move throttle control to separation and formation of this manual. If the engine does not start the engine and let it to warm up as engine starts. If the engine does not accept the load...engine performance. TO START ENGINE (See Fig. 3) When starting (See "OIL VISCOSITY CHART" in the Maintenance section of an engine while in this manual. 12 Do not overfill. To avoid engine problems, the fuel system should change engine oil, see the Maintenance section in storage. Acidic gas can...
Owners Manual
Page 13
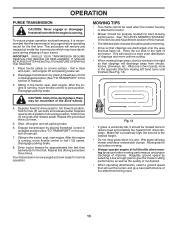
... tall, it should be properly leveled for five (5) seconds and release pedal. Place tractor safely on a level surface - Sitting in this section of manual). 7. MOWING TIPS • Tire chains cannot be used when the mower housing is attached to tractor. • Mower should be used . 13...onto the area that clippings will result in the Service and Adjustments section of this section of manual). 3. Wet grass will remove any time, during shipping of the drive wheels. 4. Sitting in this manual. • The left hand turns until finished (See Fig. 12). Disengage parking brake. 8....
... tall, it should be properly leveled for five (5) seconds and release pedal. Place tractor safely on a level surface - Sitting in this section of manual). 7. MOWING TIPS • Tire chains cannot be used when the mower housing is attached to tractor. • Mower should be used . 13...onto the area that clippings will result in the Service and Adjustments section of this section of manual). 3. Wet grass will remove any time, during shipping of the drive wheels. 4. Sitting in this manual. • The left hand turns until finished (See Fig. 12). Disengage parking brake. 8....
Owners Manual
Page 14
... and Adjustments section of the adjustments described in sandy soil. 4 - GENERAL RECOMMENDATIONS LUBRICATION CHART The warranty on this manual. At least once a season, check to see if you should make any of this manual. • At least once a year you should replace the spark plug, clean or replace air filter, and check...
... and Adjustments section of the adjustments described in sandy soil. 4 - GENERAL RECOMMENDATIONS LUBRICATION CHART The warranty on this manual. At least once a season, check to see if you should make any of this manual. • At least once a year you should replace the spark plug, clean or replace air filter, and check...
Owners Manual
Page 15
..., and the attachment clutch control is running with stamped "THIS SIDE UP" facing deck and mandrel assembly. However, periodic charging of this manual). 15 Adding or checking level of this manual). Tire sealant also prevents tire dry rot and corrosion. CHECK REVERSE OPERATION (ROS) SYSTEM • When the engine is running with...
..., and the attachment clutch control is running with stamped "THIS SIDE UP" facing deck and mandrel assembly. However, periodic charging of this manual). 15 Adding or checking level of this manual). Tire sealant also prevents tire dry rot and corrosion. CHECK REVERSE OPERATION (ROS) SYSTEM • When the engine is running with...
Owners Manual
Page 16
... ANTICIPATED BEFORE NEXT OIL CHANGE Fig. 15 NOTE: Although multi-viscosity oils (5W30, 10W30 etc.) improve starting the engine and after 100 hours of this manual. • Use gauge on level surface. • Oil will result in increased oil consumption when used for 50 hours in lower dash and remove. Check...
... ANTICIPATED BEFORE NEXT OIL CHANGE Fig. 15 NOTE: Although multi-viscosity oils (5W30, 10W30 etc.) improve starting the engine and after 100 hours of this manual. • Use gauge on level surface. • Oil will result in increased oil consumption when used for 50 hours in lower dash and remove. Check...
Owners Manual
Page 17
... STEERING PLATE CAUTION: PINCH POINTS Fig. 19 STEERING SYSTEM, DASH, FENDER AND MOWER NOT SHOWN • Keep finished surfaces and wheels free of this manual. See engine manual. Ensure the cooling shrouds are shown in fuel line with a blocked grass screen, dirty or plugged cooling fins, and/or cooling shrouds removed will...
... STEERING PLATE CAUTION: PINCH POINTS Fig. 19 STEERING SYSTEM, DASH, FENDER AND MOWER NOT SHOWN • Keep finished surfaces and wheels free of this manual. See engine manual. Ensure the cooling shrouds are shown in fuel line with a blocked grass screen, dirty or plugged cooling fins, and/or cooling shrouds removed will...
Owners Manual
Page 18
... should be utilized after each use. 1. Move the tractor's attachment clutch control to the "DISENGAGED" position. Thread the nozzle adapter (packaged with your tractor's Operator's Manual) onto the end of its surface as part of your garden hose. 4. IMPORTANT: Recheck the area making certain the area is cleaned. 8. Place the attachment...
... should be utilized after each use. 1. Move the tractor's attachment clutch control to the "DISENGAGED" position. Thread the nozzle adapter (packaged with your tractor's Operator's Manual) onto the end of its surface as part of your garden hose. 4. IMPORTANT: Recheck the area making certain the area is cleaned. 8. Place the attachment...
Owners Manual
Page 20
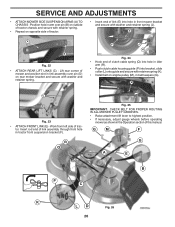
... belt on rear mower bracket and secure with washer and retainer spring (J). Position hole in tractor front suspension bracket (F). Work from left side of this manual. G M F G A E B P C K LD Fig. 26 20 Insert rod end of link assembly through front hole in arm over pin (D) on engine pulley (M), in the Operation section of...
... belt on rear mower bracket and secure with washer and retainer spring (J). Position hole in tractor front suspension bracket (F). Work from left side of this manual. G M F G A E B P C K LD Fig. 26 20 Insert rod end of link assembly through front hole in arm over pin (D) on engine pulley (M), in the Operation section of...
Owners Manual
Page 22
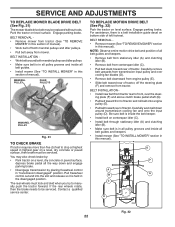
...is in all pulley grooves and inside all belt guides and keepers. • Install mower (See "TO INSTALL MOWER" section in this section of manual). • Work belt off the steering plate (F) and remove from tractor. Carefully remove belt upwards from transmission input pulley and over the steer-... Engage parking brake. BELT REMOVAL • Remove mower (See "TO REMOVE MOWER" section in this section of manual). NOTE: Observe entire motion drive belt and position of all the way down around both mandrel pulleys and idler pulleys. • Pull belt ...
...is in all pulley grooves and inside all belt guides and keepers. • Install mower (See "TO INSTALL MOWER" section in this section of manual). • Work belt off the steering plate (F) and remove from tractor. Carefully remove belt upwards from transmission input pulley and over the steer-... Engage parking brake. BELT REMOVAL • Remove mower (See "TO REMOVE MOWER" section in this section of manual). NOTE: Observe entire motion drive belt and position of all the way down around both mandrel pulleys and idler pulleys. • Pull belt ...
Owners Manual
Page 23
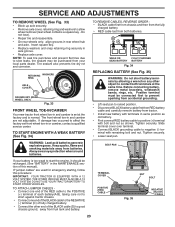
... Do not lose). • Repair tire and reassemble. • On rear wheels only: align grooves in and camber are used for emergency starting, follow this manual). Tire sealant also prevents tire dry rot and corrosion. RETAINING WASHERS RING AXLE COVER SQUARE KEY (REAR WHEEL ONLY) Fig. 33 FRONT WHEEL TOE-IN...
... Do not lose). • Repair tire and reassemble. • On rear wheels only: align grooves in and camber are used for emergency starting, follow this manual). Tire sealant also prevents tire dry rot and corrosion. RETAINING WASHERS RING AXLE COVER SQUARE KEY (REAR WHEEL ONLY) Fig. 33 FRONT WHEEL TOE-IN...
Owners Manual
Page 24
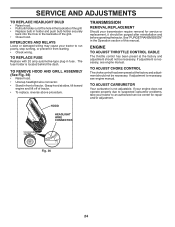
..."PURGE TRANSMISSION" in the Operation section of the grill. • Close hood. TO ADJUST CARBURETOR Your carburetor is necessary, see engine manual. TRANSMISSION REMOVAL/REPLACEMENT Should your transmission require removal for repair and/or adjustment. SERVICE AND ADJUSTMENTS TO REPLACE HEADLIGHT BULB • Raise ... your tractor to run poorly, stop running, or prevent it should be necessary. The fuse holder is necessary, see engine manual. TO ADJUST CHOKE CONTROL The choke control has been preset at the factory and adjustment should not be necessary. If adjustment...
..."PURGE TRANSMISSION" in the Operation section of the grill. • Close hood. TO ADJUST CARBURETOR Your carburetor is necessary, see engine manual. TRANSMISSION REMOVAL/REPLACEMENT Should your transmission require removal for repair and/or adjustment. SERVICE AND ADJUSTMENTS TO REPLACE HEADLIGHT BULB • Raise ... your tractor to run poorly, stop running, or prevent it should be necessary. The fuse holder is necessary, see engine manual. TO ADJUST CHOKE CONTROL The choke control has been preset at the factory and adjustment should not be necessary. If adjustment...
Owners Manual
Page 25
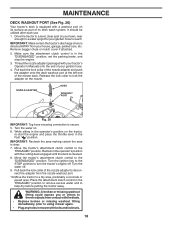
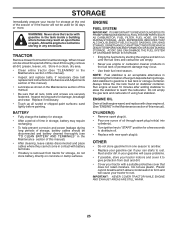
... on stabilizer container. Store in a clean, dry area. • Clean entire tractor (See "CLEANING" in the Maintenance section of this manual). • Inspect and replace belts, if necessary (See belt replacement instructions in the Service and Adjustments section of time in any enclosure. OTHER...If battery is to be disconnected and battery cleaned thoroughly (see "TO CLEAN BATTERY AND TERMINALS" in the Maintenance section of this manual). • Lubricate as shown in fuel tank or storage container. NOTE: Fuel stabilizer is an acceptable alternative in minimizing the formation...
... on stabilizer container. Store in a clean, dry area. • Clean entire tractor (See "CLEANING" in the Maintenance section of this manual). • Inspect and replace belts, if necessary (See belt replacement instructions in the Service and Adjustments section of time in any enclosure. OTHER...If battery is to be disconnected and battery cleaned thoroughly (see "TO CLEAN BATTERY AND TERMINALS" in the Maintenance section of this manual). • Lubricate as shown in fuel tank or storage container. NOTE: Fuel stabilizer is an acceptable alternative in minimizing the formation...

