
Owners Manual
Page 5
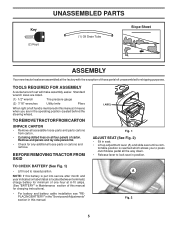
... adjustment lever (A) and slide seat until a com- Remove end panels and lay side panels flat. • Check for charging instructions). • For battery and battery cable installation see "REPLACING BATTERY" in the "Service and Adjustments" section in this manual, it means when you to raised position. TO CHECK... BATTERY (See Fig. 1) • Lift hood to press clutch/brake pedal all four panels of carton. TOOLS REQUIRED FOR ASSEMBLY A socket ...
... adjustment lever (A) and slide seat until a com- Remove end panels and lay side panels flat. • Check for charging instructions). • For battery and battery cable installation see "REPLACING BATTERY" in the "Service and Adjustments" section in this manual, it means when you to raised position. TO CHECK... BATTERY (See Fig. 1) • Lift hood to press clutch/brake pedal all four panels of carton. TOOLS REQUIRED FOR ASSEMBLY A socket ...

Owners Manual
Page 6
... PLEASE REVIEW THE FOLLOWING CHECKLIST: ✓ All assembly instructions have been completed. ✓ No remaining loose parts in carton. ✓ Battery is properly prepared and charged. ✓ Seat is adjusted comfortably and tightened securely. ✓ All tires are shown for best cutting performance...Before starting and transmission purging instructions (See "TO START ENGINE" and "PURGE TRANSMISSION" in front of tractor is important for replacing motion and mower blade drive belts in the Service and Adjustments section of other people and objects. See "TO LEVEL MOWER HOUSING...
... PLEASE REVIEW THE FOLLOWING CHECKLIST: ✓ All assembly instructions have been completed. ✓ No remaining loose parts in carton. ✓ Battery is properly prepared and charged. ✓ Seat is adjusted comfortably and tightened securely. ✓ All tires are shown for best cutting performance...Before starting and transmission purging instructions (See "TO START ENGINE" and "PURGE TRANSMISSION" in front of tractor is important for replacing motion and mower blade drive belts in the Service and Adjustments section of other people and objects. See "TO LEVEL MOWER HOUSING...

Owners Manual
Page 14
... should make any of this manual. • At least once a year you should replace the spark plug, clean or replace air filter, and check blades and belts for Loose Fasteners C Check/Replace Mower Blades T Lubrication Chart 0 Check Battery Level R Clean Battery and Terminals Clean Debris Off Steering Plate Check Transaxle Cooling Check Mower Levelness Check...
... should make any of this manual. • At least once a year you should replace the spark plug, clean or replace air filter, and check blades and belts for Loose Fasteners C Check/Replace Mower Blades T Lubrication Chart 0 Check Battery Level R Clean Battery and Terminals Clean Debris Off Steering Plate Check Transaxle Cooling Check Mower Levelness Check...

Owners Manual
Page 15
...; Remove blade bolt by turning counterclockwise. • Install new or resharpened blade with grease or petroleum jelly. • Reinstall battery (See "REPLACING BATTERY" in the engine "ON" position and the attachment clutch engaged, any maintenance. MAINTENANCE TRACTOR Always observe safety rules when performing ...an automotive charger will extend its life. • Keep battery and terminals clean. • Keep battery bolts tight. • Keep small vent holes open or remove caps or covers. Lbs. CAUTION: Use only a replacement blade approved by the operator to stop at 6-10 amperes ...
...; Remove blade bolt by turning counterclockwise. • Install new or resharpened blade with grease or petroleum jelly. • Reinstall battery (See "REPLACING BATTERY" in the engine "ON" position and the attachment clutch engaged, any maintenance. MAINTENANCE TRACTOR Always observe safety rules when performing ...an automotive charger will extend its life. • Keep battery and terminals clean. • Keep battery bolts tight. • Keep small vent holes open or remove caps or covers. Lbs. CAUTION: Use only a replacement blade approved by the operator to stop at 6-10 amperes ...
Owners Manual
Page 17
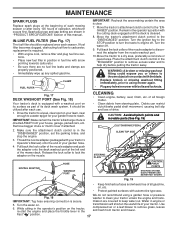
... attachment clutch control to help dry before putting the tractor away. Place the attachment clutch control in mower with the blade. • Replace broken or missing washout fitting immediately, prior to the "ENGAGED" position. Remove bagger chute or mulch cover if attached. 2. Pull back ... belt slip and loss of operation, whichever occurs first. Drive the tractor to a level, clear spot on . 6. CLEANING • Clean engine, battery, seat, finish, etc. Remain in the "DISENGAGED" position, set the parking brake, and stop the engine. 3. If fuel filter becomes clogged, ...
... attachment clutch control to help dry before putting the tractor away. Place the attachment clutch control in mower with the blade. • Replace broken or missing washout fitting immediately, prior to the "ENGAGED" position. Remove bagger chute or mulch cover if attached. 2. Pull back ... belt slip and loss of operation, whichever occurs first. Drive the tractor to a level, clear spot on . 6. CLEANING • Clean engine, battery, seat, finish, etc. Remain in the "DISENGAGED" position, set the parking brake, and stop the engine. 3. If fuel filter becomes clogged, ...

Owners Manual
Page 22
... RETAINING RING AXLE COVER SQUARE KEY (REAR WHEEL ONLY) Fig. 32 TO START ENGINE WITH A WEAK BATTERY (See Fig. 33) WEAK OR DEAD BATTERY FULLY CHARGED BATTERY Fig. 33 REPLACING BATTERY (See Fig. 34) WARNING: Do not short battery terminals by allowing a wrench or any other end of this procedure: IMPORTANT: YOUR TRACTOR IS EQUIPPED WITH...
... RETAINING RING AXLE COVER SQUARE KEY (REAR WHEEL ONLY) Fig. 32 TO START ENGINE WITH A WEAK BATTERY (See Fig. 33) WEAK OR DEAD BATTERY FULLY CHARGED BATTERY Fig. 33 REPLACING BATTERY (See Fig. 34) WARNING: Do not short battery terminals by allowing a wrench or any other end of this procedure: IMPORTANT: YOUR TRACTOR IS EQUIPPED WITH...

Owners Manual
Page 24
...; To help prevent corrosion and power leakage during storage. CYLINDER(S) • Remove spark plug(s). • Pour one season to another. • Replace your gasoline can if your can starts to be used for storage, do not store battery directly on stabilizer container. Do not use engine or carburetor cleaner products in storage...
...; To help prevent corrosion and power leakage during storage. CYLINDER(S) • Remove spark plug(s). • Pour one season to another. • Replace your gasoline can if your can starts to be used for storage, do not store battery directly on stabilizer container. Do not use engine or carburetor cleaner products in storage...

Owners Manual
Page 25
... starter. 1. Dirty air filter. 4. Spark plug wire loose. 10. Engine valves out of adjustment. Bent blade mandrel. 3. Replace blade. CORRECTION 1. Bad spark plug. 3. Engine clicks but will not turn over 1. Recharge or replace battery. 2. Clean battery terminals. 3. Check/replace solenoid or starter. Throttle in fuel. 8. Build-up of adjustment. 14. Low oil level/dirty oil...
... starter. 1. Dirty air filter. 4. Spark plug wire loose. 10. Engine valves out of adjustment. Bent blade mandrel. 3. Replace blade. CORRECTION 1. Bad spark plug. 3. Engine clicks but will not turn over 1. Recharge or replace battery. 2. Clean battery terminals. 3. Check/replace solenoid or starter. Throttle in fuel. 8. Build-up of adjustment. 14. Low oil level/dirty oil...

Owners Manual
Page 26
...Clogged mower deck vent holes from buildup 11. Place throttle control in parts manual. 11. Replace with attachment clutch engaged 1. Check/replace light switch. 4. Bad battery cell(s). 2. Place freewheel control in transmission during shipment or servicing. 5. Install axle key ... See Operation section. 26 Poor cut - Frozen blade mandrel. 1. Replace blade mandrel. Mower deck not level. 4. Mower drive belt worn. 8. Blades improperly installed. 9. Switch is "OFF". 2. Blown fuse. 1. Replace battery. 2. Motion drive belt worn, damaged, or broken. 4. If...
...Clogged mower deck vent holes from buildup 11. Place throttle control in parts manual. 11. Replace with attachment clutch engaged 1. Check/replace light switch. 4. Bad battery cell(s). 2. Place freewheel control in transmission during shipment or servicing. 5. Install axle key ... See Operation section. 26 Poor cut - Frozen blade mandrel. 1. Replace blade mandrel. Mower deck not level. 4. Mower drive belt worn. 8. Blades improperly installed. 9. Switch is "OFF". 2. Blown fuse. 1. Replace battery. 2. Motion drive belt worn, damaged, or broken. 4. If...
Owners Manual
Page 42
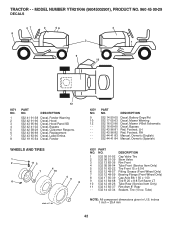
... 532 16 03-96 532 16 69-60 532 43 96-81 532 43 96-82 532 44 41-83 532 44 41-84 Decal, Battery Dnge/Poi Decal, Mower Warning Decal, Mower V-Belt Schematic Decal, Bypass Pad, Footrest, LH Pad, Footrest, RH Manual, Owner's (English) Manual, Owner's (...Spanish) KEY PART NO. MODEL NUMBER YTH21K46 (96045002901), PRODUCT NO. 960 45 00-29 DECALS 47 2 56 2 8 3 1 9 10 KEY NO. 1 2 3 4 5 6 7 8 12 PART NO. Decal, Replacement Decal, Label Emiss. Tube) NOTE: All component dimensions given in U.S. DESCRIPTION 532 41 91-38 532 42...
... 532 16 03-96 532 16 69-60 532 43 96-81 532 43 96-82 532 44 41-83 532 44 41-84 Decal, Battery Dnge/Poi Decal, Mower Warning Decal, Mower V-Belt Schematic Decal, Bypass Pad, Footrest, LH Pad, Footrest, RH Manual, Owner's (English) Manual, Owner's (...Spanish) KEY PART NO. MODEL NUMBER YTH21K46 (96045002901), PRODUCT NO. 960 45 00-29 DECALS 47 2 56 2 8 3 1 9 10 KEY NO. 1 2 3 4 5 6 7 8 12 PART NO. Decal, Replacement Decal, Label Emiss. Tube) NOTE: All component dimensions given in U.S. DESCRIPTION 532 41 91-38 532 42...

Parts List
Page 17
... Tube Rear (Service Item Only) Rim Asm 8" Rear Sealant, Tire (10 oz. MODEL NUMBER YTH21K46 (96045002601), PRODUCT NO. 960 45 00-26 DECALS 2 56 2 8 9 3 1 4 12 KEY NO. 1 2 3 4 5 6 8 PART NO. PART NO. inches 1 inch = 25.4 mm 42 Decal, Replacement Decal, Fender WHEELS AND TIRES 1 2 11 3 4 7 10 5 9 6 8 wheel_art_1-tex KEY NO.... 532 16 03-96 532 16 69-60 532 43 96-81 532 43 96-82 532 44 24 72 532 44 24-73 Decal, Battery Dnge/Poi Decal, Mower V-Belt Schematic Decal, Bypass Pad, Footrest, LH Pad, Footrest, RH Manual, Owner's (English) Manual, Owner's (Spanish) KEY NO. ...
... Tube Rear (Service Item Only) Rim Asm 8" Rear Sealant, Tire (10 oz. MODEL NUMBER YTH21K46 (96045002601), PRODUCT NO. 960 45 00-26 DECALS 2 56 2 8 9 3 1 4 12 KEY NO. 1 2 3 4 5 6 8 PART NO. PART NO. inches 1 inch = 25.4 mm 42 Decal, Replacement Decal, Fender WHEELS AND TIRES 1 2 11 3 4 7 10 5 9 6 8 wheel_art_1-tex KEY NO.... 532 16 03-96 532 16 69-60 532 43 96-81 532 43 96-82 532 44 24 72 532 44 24-73 Decal, Battery Dnge/Poi Decal, Mower V-Belt Schematic Decal, Bypass Pad, Footrest, LH Pad, Footrest, RH Manual, Owner's (English) Manual, Owner's (Spanish) KEY NO. ...


