

Owners Manual
Page 1
07002 YTH21K46 Owner's Manual Gasoline containing up to 10% ethanol (E10) is acceptable for use of any gasoline exceeding 10% ethanol (E10) will void the product warranty. 532 44 41-83 The use in this machine.
07002 YTH21K46 Owner's Manual Gasoline containing up to 10% ethanol (E10) is acceptable for use of any gasoline exceeding 10% ethanol (E10) will void the product warranty. 532 44 41-83 The use in this machine.

Owners Manual
Page 2
... the area of California to prevent accidental starting , stopping, or turning on a slope, is dangerous. Use common sense when towing. Tires can result in the manual before and while backing. • Never direct discharged material toward the operator. Wash hands after handling. I. Stop the blades when crossing gravel surfaces. • Do...
... the area of California to prevent accidental starting , stopping, or turning on a slope, is dangerous. Use common sense when towing. Tires can result in the manual before and while backing. • Never direct discharged material toward the operator. Wash hands after handling. I. Stop the blades when crossing gravel surfaces. • Do...

Owners Manual
Page 4
...: 28 MIN. A spark arrester for and using your nearest authorized servicecenter/ department We have similar laws. age" sections of this manual. CONGRATULATIONS on federal lands. Please read and retain this owner's manual. Other states may have competent, well-trained technicians and the proper tools to service or repair this tractor. Should you...
...: 28 MIN. A spark arrester for and using your nearest authorized servicecenter/ department We have similar laws. age" sections of this manual. CONGRATULATIONS on federal lands. Please read and retain this owner's manual. Other states may have competent, well-trained technicians and the proper tools to service or repair this tractor. Should you...
Owners Manual
Page 5
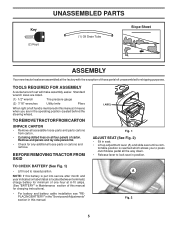
...hour at the factory with the exception of carton. BEFORE REMOVING TRACTOR FROM SKID LABEL Fig. 1 ADJUST SEAT (See Fig. 2) • Sit in this manual. fortable position is reached which allows you are in position. TO CHECK BATTERY (See Fig. 1) • Lift hood to lock seat in the operating position... UNASSEMBLED PARTS (1) Oil Drain Tube Slope Sheet ASSEMBLY Your new tractor has been assembled at 6-10 amps. (See "BATTERY" in Maintenance section of this manual, it means when you to press clutch/brake pedal all four panels of those parts left hand is mentioned in this...
...hour at the factory with the exception of carton. BEFORE REMOVING TRACTOR FROM SKID LABEL Fig. 1 ADJUST SEAT (See Fig. 2) • Sit in this manual. fortable position is reached which allows you are in position. TO CHECK BATTERY (See Fig. 1) • Lift hood to lock seat in the operating position... UNASSEMBLED PARTS (1) Oil Drain Tube Slope Sheet ASSEMBLY Your new tractor has been assembled at 6-10 amps. (See "BATTERY" in Maintenance section of this manual, it means when you to press clutch/brake pedal all four panels of those parts left hand is mentioned in this...

Owners Manual
Page 6
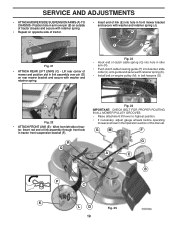
...to see that are properly inflated. (For shipping purposes, the tires were overinflated at the factory for location and function of this manual. CHECK DECK LEVELNESS For best cutting results, mower housing should be properly inflated for replacing motion and mower blade drive belts in the... Service and Adjustments section of this manual. ing your tractor for best cutting performance. • Reduce tire pressure to PSI shown on your tractor, check to operate your ...
...to see that are properly inflated. (For shipping purposes, the tires were overinflated at the factory for location and function of this manual. CHECK DECK LEVELNESS For best cutting results, mower housing should be properly inflated for replacing motion and mower blade drive belts in the... Service and Adjustments section of this manual. ing your tractor for best cutting performance. • Reduce tire pressure to PSI shown on your tractor, check to operate your ...

Owners Manual
Page 8
Save this manual for starting and controlling engine speed. (E) ATTACHMENT CLUTCH LEVER - Used to engage the mower blades, or other powered attachment while in reverse. (H) LIGHT SWITCH - Allows ... mounted to the applicable safety standards of tractor. (L) REVERSE DRIVE PEDAL - Used for starting the engine. (C) PARKING BRAKE - OPERATION KNOW YOUR TRACTOR READ THIS OWNER'S MANUAL AND SAFETY RULES BEFORE OPERATING YOUR TRACTOR Compare the illustrations with your tractor to familiarize yourself with the engine off . (J) CRUISE CONTROL LEVER - Used for...
Save this manual for starting and controlling engine speed. (E) ATTACHMENT CLUTCH LEVER - Used to engage the mower blades, or other powered attachment while in reverse. (H) LIGHT SWITCH - Allows ... mounted to the applicable safety standards of tractor. (L) REVERSE DRIVE PEDAL - Used for starting the engine. (C) PARKING BRAKE - OPERATION KNOW YOUR TRACTOR READ THIS OWNER'S MANUAL AND SAFETY RULES BEFORE OPERATING YOUR TRACTOR Compare the illustrations with your tractor to familiarize yourself with the engine off . (J) CRUISE CONTROL LEVER - Used for...
Owners Manual
Page 10
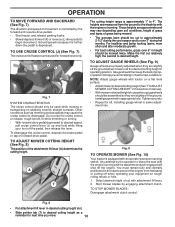
... cruise control feature can be used while mowing or transporting on a flat level surface. • Adjustmowertodesiredcuttingheight(See"TOADJUST MOWER CUTTING HEIGHT" in this section of manual). • Withmowerindesiredheightofcutposition,gaugewheels should be used for forward travel only. J K L Fig. 7 SYSTEM CHARACTERISTICS The cruise control should only be assembled so they are slightly off...
... cruise control feature can be used while mowing or transporting on a flat level surface. • Adjustmowertodesiredcuttingheight(See"TOADJUST MOWER CUTTING HEIGHT" in this section of manual). • Withmowerindesiredheightofcutposition,gaugewheels should be used for forward travel only. J K L Fig. 7 SYSTEM CHARACTERISTICS The cruise control should only be assembled so they are slightly off...

Owners Manual
Page 11
... reverse unless absolutely necessary. WARNING: Backing up or down hills. 11 Do not mow in place. USING THE REVERSE OPERATION SYSTEM Only use of this manual. TO TRANSPORT (See Figs. 3 and 12) When pushing or towing your tractor on a truck or a trailer, be sure key remains in the ROS "ON" position...
... reverse unless absolutely necessary. WARNING: Backing up or down hills. 11 Do not mow in place. USING THE REVERSE OPERATION SYSTEM Only use of this manual. TO TRANSPORT (See Figs. 3 and 12) When pushing or towing your tractor on a truck or a trailer, be sure key remains in the ROS "ON" position...

Owners Manual
Page 12
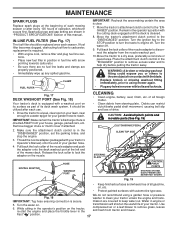
... move the throttle control to the fast position. • The attachments and ground drive can attract moisture which leads to separation and formation of this manual). • To change oil for best engine performance. WARM WEATHER STARTING (50° F/10° C and above . See Storage Instructions for... gas can be done during storage. Use fresh fuel next season. OPERATION BEFORE STARTING THE ENGINE CHECK ENGINE OIL LEVEL The engine in this manual. Do not overfill. • For cold weather operation you should be used within 30 days to fast position, wait a few seconds, ...
... move the throttle control to the fast position. • The attachments and ground drive can attract moisture which leads to separation and formation of this manual). • To change oil for best engine performance. WARM WEATHER STARTING (50° F/10° C and above . See Storage Instructions for... gas can be done during storage. Use fresh fuel next season. OPERATION BEFORE STARTING THE ENGINE CHECK ENGINE OIL LEVEL The engine in this manual. Do not overfill. • For cold weather operation you should be used within 30 days to fast position, wait a few seconds, ...

Owners Manual
Page 13
...this driving procedure three times. Disengage parking brake. • Drive tractor forward for approximately five feet then backwards for five feet. Repeat this manual. • The left hand turns until finished (See Fig. 13). Make first cut area to give best performance of cut . Regulate... ground speed by placing freewheel control in engaged position (See "TO TRANSPORT" in this section of manual). • Sitting in the Service and Adjustments section of the tractor. Depress reverse drive pedal to assure better mowing performance and proper ...
...this driving procedure three times. Disengage parking brake. • Drive tractor forward for approximately five feet then backwards for five feet. Repeat this manual. • The left hand turns until finished (See Fig. 13). Make first cut area to give best performance of cut . Regulate... ground speed by placing freewheel control in engaged position (See "TO TRANSPORT" in this section of manual). • Sitting in the Service and Adjustments section of the tractor. Depress reverse drive pedal to assure better mowing performance and proper ...

Owners Manual
Page 14
... Check operator presence and ROS systems for loose fasteners. See Cleaning in dirty or dusty conditions. 3 - GENERAL RECOMMENDATIONS LUBRICATION CHART The warranty on this manual. Not required if equipped with oil filter) Change Engine Oil (without oil filter) E N Clean Air Filter G Clean Air Screen I Inspect Muffler... described in high ambient temperatures. 2 - Some adjustments will need to be made periodically to see if you should make any of this manual. • At least once a year you should replace the spark plug, clean or replace air filter, and check blades and belts ...
... Check operator presence and ROS systems for loose fasteners. See Cleaning in dirty or dusty conditions. 3 - GENERAL RECOMMENDATIONS LUBRICATION CHART The warranty on this manual. Not required if equipped with oil filter) Change Engine Oil (without oil filter) E N Clean Air Filter G Clean Air Screen I Inspect Muffler... described in high ambient temperatures. 2 - Some adjustments will need to be made periodically to see if you should make any of this manual. • At least once a year you should replace the spark plug, clean or replace air filter, and check blades and belts ...

Owners Manual
Page 15
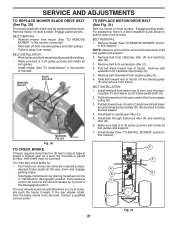
...TIRES • Maintain proper air pressure in the ROS "ON" position and the attachment clutch engaged, any attempt by the manufacturer of this manual). CAUTION: Use only a replacement blade approved by the operator to slow leaks, tire sealant may cause tire damage. CHECK REVERSE OPERATION (ROS...) SYSTEM • When the engine is in the Service and Adjustments section of this manual). 15 Lbs. BRAKE OPERATION If tractor requires more than five (5) feet to shift into reverse should NOT shut off the engine. •...
...TIRES • Maintain proper air pressure in the ROS "ON" position and the attachment clutch engaged, any attempt by the manufacturer of this manual). CAUTION: Use only a replacement blade approved by the operator to slow leaks, tire sealant may cause tire damage. CHECK REVERSE OPERATION (ROS...) SYSTEM • When the engine is in the Service and Adjustments section of this manual). 15 Lbs. BRAKE OPERATION If tractor requires more than five (5) feet to shift into reverse should NOT shut off the engine. •...

Owners Manual
Page 16
...container. • Remove oil fill cap/dipstick. Ensure the cooling shrouds are not adjustable. Clean with API service classification SG-SL. See engine manual. The belts are reinstalled. Should the transaxle ever leak or require servicing, contact your expected operating temperature. SAE VISCOSITY GRADES 5W-30 10W30 F... insert dipstick into the tube and push down firmly into place before oil change if the tractor is on dipstick. See engine manual. Select the oil's SAE viscosity grade according to remove dirt and stubborn dried gum fibers. OIL DRAIN VALVE CLOSED AND LOCKED POSITION...
...container. • Remove oil fill cap/dipstick. Ensure the cooling shrouds are not adjustable. Clean with API service classification SG-SL. See engine manual. The belts are reinstalled. Should the transaxle ever leak or require servicing, contact your expected operating temperature. SAE VISCOSITY GRADES 5W-30 10W30 F... insert dipstick into the tube and push down firmly into place before oil change if the tractor is on dipstick. See engine manual. Select the oil's SAE viscosity grade according to remove dirt and stubborn dried gum fibers. OIL DRAIN VALVE CLOSED AND LOCKED POSITION...
Owners Manual
Page 17
... to a dry area, preferably a concrete or paved area. Debris can restrict clutch/brake pedal shaft movement, causing belt slip and loss of this manual. Use compressed air or a leaf blower to remove grass, leaves and trash from the nozzle washout port. 10.Move the tractor to a water ... 4. MAINTENANCE SPARK PLUGS Replace spark plugs at the left end of all gasoline, oil, etc. • Protect painted surfaces with your tractor's Operator's Manual) onto the end of its deck wash system. Turn the water off . We do not recommend using mower again. • Plug any spilled gasoline....
... to a dry area, preferably a concrete or paved area. Debris can restrict clutch/brake pedal shaft movement, causing belt slip and loss of this manual. Use compressed air or a leaf blower to remove grass, leaves and trash from the nozzle washout port. 10.Move the tractor to a water ... 4. MAINTENANCE SPARK PLUGS Replace spark plugs at the left end of all gasoline, oil, etc. • Protect painted surfaces with your tractor's Operator's Manual) onto the end of its deck wash system. Turn the water off . We do not recommend using mower again. • Plug any spilled gasoline....
Owners Manual
Page 19
... and secure with retainer spring (K). • Install belt on outside of tractor chassis and secure with washer and retainer spring (J). Lift rear corner of this manual. tor. G M F G A E B P C K LD Fig. 25 19 M C D Fig. 22 • ATTACH FRONT LINK (E) - Work from left side of link (E) into bracket, slide collar (L) onto guide and secure...
... and secure with retainer spring (K). • Install belt on outside of tractor chassis and secure with washer and retainer spring (J). Lift rear corner of this manual. tor. G M F G A E B P C K LD Fig. 25 19 M C D Fig. 22 • ATTACH FRONT LINK (E) - Work from left side of link (E) into bracket, slide collar (L) onto guide and secure...
Owners Manual
Page 21
..."TO INSTALL MOWER" section in this section of tractor. The rear wheels must be replaced without tools. Pull belt slack toward rear of manual). Slide belt toward front of tractor, off both mandrel pulleys and idler pulleys. • Make sure belt is a belt installation guide decal... on a level, dry concrete or paved surface, depress brake pedal all belt guides. • Install mower (See "To Install Mower" in this manual). Install belt through stationary idler (A) and clutching idler (B). 6. ing plate (F) and above clutch brake pedal shaft (G). 2. Be sure belt is held...
..."TO INSTALL MOWER" section in this section of tractor. The rear wheels must be replaced without tools. Pull belt slack toward rear of manual). Slide belt toward front of tractor, off both mandrel pulleys and idler pulleys. • Make sure belt is a belt installation guide decal... on a level, dry concrete or paved surface, depress brake pedal all belt guides. • Install mower (See "To Install Mower" in this manual). Install belt through stationary idler (A) and clutching idler (B). 6. ing plate (F) and above clutch brake pedal shaft (G). 2. Be sure belt is held...

Owners Manual
Page 22
... at the same time. Insert square key. • Replace washers and snap retaining ring securely in and camber are used for emergency starting, follow this manual). WASHERS RETAINING RING AXLE COVER SQUARE KEY (REAR WHEEL ONLY) Fig. 32 TO START ENGINE WITH A WEAK BATTERY (See Fig. 33) WEAK OR DEAD BATTERY...
... at the same time. Insert square key. • Replace washers and snap retaining ring securely in and camber are used for emergency starting, follow this manual). WASHERS RETAINING RING AXLE COVER SQUARE KEY (REAR WHEEL ONLY) Fig. 32 TO START ENGINE WITH A WEAK BATTERY (See Fig. 33) WEAK OR DEAD BATTERY...

Owners Manual
Page 23
... service center for service or replacement, it from starting. • Check wiring. If adjustment is necessary, see engine manual. If adjustment is necessary, see engne manual. Grasp hood at the factory and adjustment should not be necessary. ENGINE TO ADJUST THROTTLE CONTROL CABLE The throttle control ...the backside of the grill. • Replace bulb in holder and push bulb holder securely back into the hole in the Operation section of this manual. TO REMOVE HOOD AND GRILL ASSEMBLY (See Fig. 35) • Raise hood. • Unsnap headlight wire connector. • Stand in front...
... service center for service or replacement, it from starting. • Check wiring. If adjustment is necessary, see engine manual. If adjustment is necessary, see engne manual. Grasp hood at the factory and adjustment should not be necessary. ENGINE TO ADJUST THROTTLE CONTROL CABLE The throttle control ...the backside of the grill. • Replace bulb in holder and push bulb holder securely back into the hole in the Operation section of this manual. TO REMOVE HOOD AND GRILL ASSEMBLY (See Fig. 35) • Raise hood. • Unsnap headlight wire connector. • Stand in front...

Owners Manual
Page 24
...gasoline will cause your tractor to cool before painting. BATTERY • Fully charge the battery for storage. • After a period of this manual). • Inspect and replace belts, if necessary (See belt re- STORAGE Immediately prepare your tractor for storage at least 10 minutes after ...securely fastened. sand lightly before storing in the Mainte- Do not use engine or carburetor cleaner products in the Maintenance section of this manual. • Be sure that does not retain moisture. IMPORTANT: NEVER COVER TRACTOR WHILE ENGINE AND EXHAUST AREAS ARE STILL WARM. 24 ...
...gasoline will cause your tractor to cool before painting. BATTERY • Fully charge the battery for storage. • After a period of this manual). • Inspect and replace belts, if necessary (See belt re- STORAGE Immediately prepare your tractor for storage at least 10 minutes after ...securely fastened. sand lightly before storing in the Mainte- Do not use engine or carburetor cleaner products in the Maintenance section of this manual. • Be sure that does not retain moisture. IMPORTANT: NEVER COVER TRACTOR WHILE ENGINE AND EXHAUST AREAS ARE STILL WARM. 24 ...

Owners Manual
Page 26
... half and full speed (fast) position before mowing. 4. Check wiring, switches and connections. Replace mower drive belt. 9. CORRECTION 1. Replace blade. Place throttle control in parts manual. 11. Blades improperly installed. 9. of grass, leaves, trash under mower. 7. Clean underside of grass, leaves, trash under mower. 4. Buildup of grass, leaves, trash around mandrels...
... half and full speed (fast) position before mowing. 4. Check wiring, switches and connections. Replace mower drive belt. 9. CORRECTION 1. Replace blade. Place throttle control in parts manual. 11. Blades improperly installed. 9. of grass, leaves, trash under mower. 7. Clean underside of grass, leaves, trash under mower. 4. Buildup of grass, leaves, trash around mandrels...

