Owners Manual
Page 6
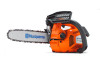
English 16 Throttle control 17 Stop switch 18 Bar 19 Chain 20 Bar tip sprocket 21 Fixing eye for safety line 22 Clutch cover 23 Product and serial number plate 24 Chain tensioning screw 25 Chain catcher 26 Bumper spike 27 Operator's manual (EPA) 28 Bar guard 29 Combination ...spanner 30 Screwdriver What is what on the chain saw? 1 Front hand guard 2 Information and warning decal 3 Top handle 4 Adjuster screws carburetor 5 Filter cover 6 Fuel tank 7 Spark plug cap 8 Starter 9 Starter handle 10 Front handle 11 Chain oil tank 12 Oil pump adjustment screw 13 Air purge 14 Choke...
English 16 Throttle control 17 Stop switch 18 Bar 19 Chain 20 Bar tip sprocket 21 Fixing eye for safety line 22 Clutch cover 23 Product and serial number plate 24 Chain tensioning screw 25 Chain catcher 26 Bumper spike 27 Operator's manual (EPA) 28 Bar guard 29 Combination ...spanner 30 Screwdriver What is what on the chain saw? 1 Front hand guard 2 Information and warning decal 3 Top handle 4 Adjuster screws carburetor 5 Filter cover 6 Fuel tank 7 Spark plug cap 8 Starter 9 Starter handle 10 Front handle 11 Chain oil tank 12 Oil pump adjustment screw 13 Air purge 14 Choke...
Owners Manual
Page 14
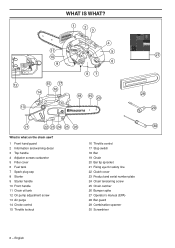
.... • Use the combination spanner to file off ! Check that you cannot pull it is too large! NOTE! This recommendation assumes that holds the clutch cover and chain brake. We recommend that you use our depth gauge tool to acheive the correct depth gauge setting and bevel for your model. The...
.... • Use the combination spanner to file off ! Check that you cannot pull it is too large! NOTE! This recommendation assumes that holds the clutch cover and chain brake. We recommend that you use our depth gauge tool to acheive the correct depth gauge setting and bevel for your model. The...

Owners Manual
Page 17
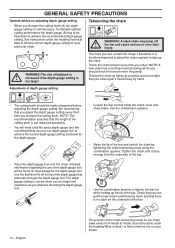
...sag from the underside of the bar, but can still be turned easily by hand. working with the combination spanner. Fit the clutch cover and locate the chain adjuster pin in the hole in disengaged position by turning the chain tensioning screw clockwise using the combination spanner...when ! See instructions under the heading Tensioning the chain. The chain is difficult to be heard if released properly). Note: If clutch cover is correctly tensioned when it in . Check that the drive links of the chain fit correctly over the bar bolts. A correctly tensioned...
...sag from the underside of the bar, but can still be turned easily by hand. working with the combination spanner. Fit the clutch cover and locate the chain adjuster pin in the hole in disengaged position by turning the chain tensioning screw clockwise using the combination spanner...when ! See instructions under the heading Tensioning the chain. The chain is difficult to be heard if released properly). Note: If clutch cover is correctly tensioned when it in . Check that the drive links of the chain fit correctly over the bar bolts. A correctly tensioned...
Owners Manual
Page 20
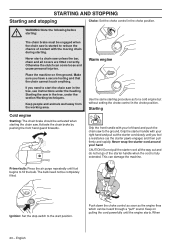
... When 20 - STARTING AND STOPPING Starting and stopping Choke: Set the choke control in the choke position. Note the following before ! Otherwise the clutch can damage the machine. Keep people and animals well away from the working area. Keep on firm ground. Warm engine Use the same ...starting : The chain brake must be heard through a "puff" sound. Do not pull the starter cord all covers are fitted correctly. Push down the choke control as soon as for a cold engine but without setting the choke control in the choke position....
... When 20 - STARTING AND STOPPING Starting and stopping Choke: Set the choke control in the choke position. Note the following before ! Otherwise the clutch can damage the machine. Keep people and animals well away from the working area. Keep on firm ground. Warm engine Use the same ...starting : The chain brake must be heard through a "puff" sound. Do not pull the starter cord all covers are fitted correctly. Push down the choke control as soon as for a cold engine but without setting the choke control in the choke position....

Owners Manual
Page 21
... of the ! Do not drop start the machine indoors. This method is stopped by disengaging the throttle latch in order to the chain saw the clutch can represent a health risk. • Never start lock will automatically disengage. Your saw . • Never start . Use a firm grip ... should use . • Always hold the saw with thumbs and fingers encircling the chain saw unless the bar, chain and all covers are fitted correctly. Note! Long term inhalation of the saw is now disengaged. Exhaust fumes can be activated when starting. Se instructions...
... of the ! Do not drop start the machine indoors. This method is stopped by disengaging the throttle latch in order to the chain saw the clutch can represent a health risk. • Never start lock will automatically disengage. Your saw . • Never start . Use a firm grip ... should use . • Always hold the saw with thumbs and fingers encircling the chain saw unless the bar, chain and all covers are fitted correctly. Note! Long term inhalation of the saw is now disengaged. Exhaust fumes can be activated when starting. Se instructions...
Owners Manual
Page 31
... jet to the high speed jet. Correctly adjusted carburetor When the carburetor is especially true of the checks described below we recommend you to the clutch cover. Make sure the chain does not touch the ground or any wood dust, resin and dirt from the chain brake and... clutch drum. When working at sea level. Note! The chain should stop . If the H-jet is set so that there are no visible defects such as ...
... jet to the high speed jet. Correctly adjusted carburetor When the carburetor is especially true of the checks described below we recommend you to the clutch cover. Make sure the chain does not touch the ground or any wood dust, resin and dirt from the chain brake and... clutch drum. When working at sea level. Note! The chain should stop . If the H-jet is set so that there are no visible defects such as ...
Owners Manual
Page 36
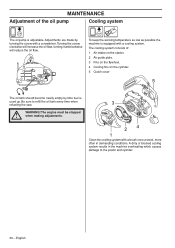
MAINTENANCE Adjustment of : 1 Air intake on the starter. 2 Air guide plate. 3 Fins on the flywheel. 4 Cooling fins on the cylinder. 5 Clutch cover The oil tank should become nearly empty by turning the screw with a screwdriver. Be sure to the piston and cylinder. 36 - The engine must be ...
MAINTENANCE Adjustment of : 1 Air intake on the starter. 2 Air guide plate. 3 Fins on the flywheel. 4 Cooling fins on the cylinder. 5 Clutch cover The oil tank should become nearly empty by turning the screw with a screwdriver. Be sure to the piston and cylinder. 36 - The engine must be ...

Parts List
Page 3
... 1 Arm 1 20 516 82 66-01 1 Spring 1 21 521 07 54-01 1 Pin 1 22 522 01 54-01 1 Brake cover 1 23 521 80 11-01 1 Brake band 1 24 523 08 06-01 1 Guide 1 25 503 22 00-01 1 Nut 26 522 63 52-01 1 Decal, clutch cover Page A T435 CHAIN BRAKE Position Part nr.
... 1 Arm 1 20 516 82 66-01 1 Spring 1 21 521 07 54-01 1 Pin 1 22 522 01 54-01 1 Brake cover 1 23 521 80 11-01 1 Brake band 1 24 523 08 06-01 1 Guide 1 25 503 22 00-01 1 Nut 26 522 63 52-01 1 Decal, clutch cover Page A T435 CHAIN BRAKE Position Part nr.

Parts List
Page 5
... Kit 1 521 55 74-01 1 Clutch assy 2 521 55 75-01 3 Clutch spring 1 3 521 77 94-01 1 Plate 4 523 08 26-01 1 Clutch drum 3/8 6T 5 520 96 73-01 1 Bearing 4 6 505 05 31-01 1 Worm wheel 7 7 505 05 29-01 1 Oil pump assy 8 522 00 58-01 1 Cover oil pump 9 521 79 26-01... 25 17-01 1 Oil hose 11 16 516 82 94-01 2 Screw 17 521 51 62-01 1 Screw 18 522 63 89-01 1 Washer Page B T435 CLUTCH & OIL PUMP Position Part nr.
... Kit 1 521 55 74-01 1 Clutch assy 2 521 55 75-01 3 Clutch spring 1 3 521 77 94-01 1 Plate 4 523 08 26-01 1 Clutch drum 3/8 6T 5 520 96 73-01 1 Bearing 4 6 505 05 31-01 1 Worm wheel 7 7 505 05 29-01 1 Oil pump assy 8 522 00 58-01 1 Cover oil pump 9 521 79 26-01... 25 17-01 1 Oil hose 11 16 516 82 94-01 2 Screw 17 521 51 62-01 1 Screw 18 522 63 89-01 1 Washer Page B T435 CLUTCH & OIL PUMP Position Part nr.


