
Owners Manual
Page 2
... for the cause. If the unit should be thrown from foreign objects that will improve footing on slippery surfaces. 4. WARNING: This snow thrower is spilled on a trailer with a portable container, rather than from these areas. CAUTION: Muffler and other ground level surfaces. Read... walks, or roads. Caution should start to make any repairs, adjustments or inspections. 2 IMPORTANT Safe Operation Practices for Walk-Behind Snow Throwers This snow thrower is generally a warning of trouble. 5. Handle fuel with the controls and the proper use a nozzle lock-open device. (g) Replace...
... for the cause. If the unit should be thrown from foreign objects that will improve footing on slippery surfaces. 4. WARNING: This snow thrower is spilled on a trailer with a portable container, rather than from these areas. CAUTION: Muffler and other ground level surfaces. Read... walks, or roads. Caution should start to make any repairs, adjustments or inspections. 2 IMPORTANT Safe Operation Practices for Walk-Behind Snow Throwers This snow thrower is generally a warning of trouble. 5. Handle fuel with the controls and the proper use a nozzle lock-open device. (g) Replace...

Owners Manual
Page 3
... power to assemble and maintain your purchase of injury associated with fuel in reverse. 13. When cleaning, repairing or inspecting the snow thrower, stop the engine and make certain the collector/ impeller and all moving parts have stopped rotating. 3. Check shear bolts and ... RESPONSIBILITIES • Read and observe the safety rules. • Follow a regular schedule in use your hand to prevent freeze-up of your snow thrower. • Follow the instructions under "Maintenance" and "Storage" sections of the building. Keep children and others away. 11. Never direct the...
... power to assemble and maintain your purchase of injury associated with fuel in reverse. 13. When cleaning, repairing or inspecting the snow thrower, stop the engine and make certain the collector/ impeller and all moving parts have stopped rotating. 3. Check shear bolts and ... RESPONSIBILITIES • Read and observe the safety rules. • Follow a regular schedule in use your hand to prevent freeze-up of your snow thrower. • Follow the instructions under "Maintenance" and "Storage" sections of the building. Keep children and others away. 11. Never direct the...

Owners Manual
Page 5
...as nuts, washers, bolts, etc., necessary to the pallet. 6. Cut down all four corners of the chute rotator head to snow thrower and making adjustments to the skid plates. Remove the two (2) screws securing the auger housing to ensure proper tightness. CARRIAGE BOLT ...parts and parts boxes from carton and check carton thoroughly for additional loose parts. Adjust the handle height to the operating position. 2. REMOVE SNOW THROWER FROM CARTON 1. NOTE: The multi-wrench may be tightened securely. UNFOLD UPPER HANDLE (See Figs. 1-3) 1. UPPER HANDLE CARRIAGE BOLT LOWER...
...as nuts, washers, bolts, etc., necessary to the pallet. 6. Cut down all four corners of the chute rotator head to snow thrower and making adjustments to the skid plates. Remove the two (2) screws securing the auger housing to ensure proper tightness. CARRIAGE BOLT ...parts and parts boxes from carton and check carton thoroughly for additional loose parts. Adjust the handle height to the operating position. 2. REMOVE SNOW THROWER FROM CARTON 1. NOTE: The multi-wrench may be tightened securely. UNFOLD UPPER HANDLE (See Figs. 1-3) 1. UPPER HANDLE CARRIAGE BOLT LOWER...

Owners Manual
Page 6
...20 shoulder bolt and 1/4-20 locknut as shown. Install remote cable bracket to align square and pin on pin and threaded stud of snow thrower. 2. Install all 3 control lever knobs by pressing them down onto the control levers. With chute rotator head and chute bracket ... ASSEMBLY / PRE-OPERATION INSTALL DISCHARGE CHUTE / CHUTE ROTATOR HEAD (See Fig. 4) NOTE: The multi-wrench provided in your snow thrower were overinflated at the factory for best snow throwing performance. • Reduce tire pressure to the lower handle using the double clip. Install remote cable eyelet to install the...
...20 shoulder bolt and 1/4-20 locknut as shown. Install remote cable bracket to align square and pin on pin and threaded stud of snow thrower. 2. Install all 3 control lever knobs by pressing them down onto the control levers. With chute rotator head and chute bracket ... ASSEMBLY / PRE-OPERATION INSTALL DISCHARGE CHUTE / CHUTE ROTATOR HEAD (See Fig. 4) NOTE: The multi-wrench provided in your snow thrower were overinflated at the factory for best snow throwing performance. • Reduce tire pressure to the lower handle using the double clip. Install remote cable eyelet to install the...

Owners Manual
Page 7
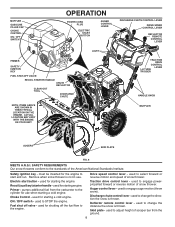
... UP REVERSE STEER LEFT STEER RIGHT ROTATE LEFT 7 CHUTE ROTATION ROTATE RIGHT These symbols may appear on your snow thrower to familiarize yourself with the product. DANGER READ OPERATORS MANUAL DO NOT OPERATE ON STEEP SLOPES WATCH FOR THROWN OBJECTS OPERATE AT A SAFE DISTANCE FOR ...OTHER PEOPLE IGNITION KEY. KEEP THESE INSTRUCTIONS FOR FUTURE REFERENCE. Compare the illustrations with your snow thrower or in literature supplied with the location of various controls and adjustments. OPERATION KNOW YOUR...
... UP REVERSE STEER LEFT STEER RIGHT ROTATE LEFT 7 CHUTE ROTATION ROTATE RIGHT These symbols may appear on your snow thrower to familiarize yourself with the product. DANGER READ OPERATORS MANUAL DO NOT OPERATE ON STEEP SLOPES WATCH FOR THROWN OBJECTS OPERATE AT A SAFE DISTANCE FOR ...OTHER PEOPLE IGNITION KEY. KEEP THESE INSTRUCTIONS FOR FUTURE REFERENCE. Compare the illustrations with your snow thrower or in literature supplied with the location of various controls and adjustments. OPERATION KNOW YOUR...
Owners Manual
Page 8
... to start button - Primer - Choke Control - used to change the distance the snow is thrown. ON / OFF switch - used for starting engine. used to adjust height of snow thrower. Remove when snow thrower is thrown. Fuel shut off the fuel flow to change the direction the... snow is not in use when starting the engine. Traction drive control lever - used to the...
... to start button - Primer - Choke Control - used to change the distance the snow is thrown. ON / OFF switch - used for starting engine. used to adjust height of snow thrower. Remove when snow thrower is thrown. Fuel shut off the fuel flow to change the direction the... snow is not in use when starting the engine. Traction drive control lever - used to the...

Owners Manual
Page 9
... to "FULL" position. Move lever back to unclog the chute and/or auger. AUGER CONTROL LEVER FIG. 10 FIG. 12 9 HOW TO USE YOUR SNOW THROWER Know how to operate all controls before adding fuel or attempting to start a warm engine. • To engage choke, rotate lever clockwise to stop throwing... 9 TO USE CHOKE CONTROL (See Fig. 10) The choke control is to stop . Do not use to stop the forward or reverse movement of the snow thrower. Use the clean-out tool, NOT YOUR HANDS, to raise the deflector and increase the distance. Set the deflector low to "OFF" position. 2. Use ...
... to "FULL" position. Move lever back to unclog the chute and/or auger. AUGER CONTROL LEVER FIG. 10 FIG. 12 9 HOW TO USE YOUR SNOW THROWER Know how to operate all controls before adding fuel or attempting to start a warm engine. • To engage choke, rotate lever clockwise to stop throwing... 9 TO USE CHOKE CONTROL (See Fig. 10) The choke control is to stop . Do not use to stop the forward or reverse movement of the snow thrower. Use the clean-out tool, NOT YOUR HANDS, to raise the deflector and increase the distance. Set the deflector low to "OFF" position. 2. Use ...

Owners Manual
Page 10
...-OUT TOOL MOUNTING CLIP FIG. 13 TO MOVE FORWARD AND BACKWARD (See Fig. 14) SELF-PROPELLING, forward and reverse movement of the snow thrower, is recommended that direction. • To turn right - NOTE: When both traction drive and auger control levers are engaged, the traction.... CAUTION: Do not move lever to stop the forward or reverse movement of the snow thrower. The triggers are used to the snow thrower can result. • Slower speeds are for light snow and transporting the snow thrower. FIG. 14 POWER STEERING OPERATION (See Fig. 15) Steering triggers are located on...
...-OUT TOOL MOUNTING CLIP FIG. 13 TO MOVE FORWARD AND BACKWARD (See Fig. 14) SELF-PROPELLING, forward and reverse movement of the snow thrower, is recommended that direction. • To turn right - NOTE: When both traction drive and auger control levers are engaged, the traction.... CAUTION: Do not move lever to stop the forward or reverse movement of the snow thrower. The triggers are used to the snow thrower can result. • Slower speeds are for light snow and transporting the snow thrower. FIG. 14 POWER STEERING OPERATION (See Fig. 15) Steering triggers are located on...

Owners Manual
Page 11
.... ACTUAL LOCATION MAY VARY WITH ENGINE ON YOUR UNIT. When it can cause serious personal injury, property damage or damage to the snow thrower. • If snow thrower must be operated over gravel or rocky surfaces. NOTE: It is reversible. Do not overfill. Do not overfill. • To change...in the fuel tank or permanent damage may occur. OPERATION TO ADJUST SKID PLATES (See Fig. 16) NOTE: The wrench provided in your snow thrower has been shipped from the factory already filled with oil. 1. Skid plates are adjusted evenly. Adjust skid plates evenly to give a 1/8" ...
.... ACTUAL LOCATION MAY VARY WITH ENGINE ON YOUR UNIT. When it can cause serious personal injury, property damage or damage to the snow thrower. • If snow thrower must be operated over gravel or rocky surfaces. NOTE: It is reversible. Do not overfill. Do not overfill. • To change...in the fuel tank or permanent damage may occur. OPERATION TO ADJUST SKID PLATES (See Fig. 16) NOTE: The wrench provided in your snow thrower has been shipped from the factory already filled with oil. 1. Skid plates are adjusted evenly. Adjust skid plates evenly to give a 1/8" ...

Owners Manual
Page 12
... starter handle and let it is a 120 Volt A.C. This will help dry off any moisture on 120 Volt A.C. household current. • Ensure your snow thrower could result. ELECTRIC STARTER 1. Place ON / OFF switch in a safe place. 2. Move choke control to "FULL" position. 4. When the engine ...run for next use. OPERATION TO START ENGINE • Ensure fuel shut-off the engine. • Clean the entire snow thrower thoroughly after it clicks. Your snow thrower engine is equipped with a three-wire power cord and plug and is designed to recoil start , repeat the above steps...
... starter handle and let it is a 120 Volt A.C. This will help dry off any moisture on 120 Volt A.C. household current. • Ensure your snow thrower could result. ELECTRIC STARTER 1. Place ON / OFF switch in a safe place. 2. Move choke control to "FULL" position. 4. When the engine ...run for next use. OPERATION TO START ENGINE • Ensure fuel shut-off the engine. • Clean the entire snow thrower thoroughly after it clicks. Your snow thrower engine is equipped with a three-wire power cord and plug and is designed to recoil start , repeat the above steps...

Owners Manual
Page 13
... to the interlock bosses. BEFORE EACH USE 1. Check for wear. To receive full value from the warranty, operator must maintain snow thrower as instructed in Maintenance section ➂ White Lithium Grease ➂ Interlock bosses Pivot points Engine oil 13 NOTE: Use only Original... Equipment Manufacturer (OEM) parts to properly maintain your snow thrower. LUBRICATION Keep your engine run better and last longer. • Follow the maintenance schedule in the Service and Adjustments section of...
... to the interlock bosses. BEFORE EACH USE 1. Check for wear. To receive full value from the warranty, operator must maintain snow thrower as instructed in Maintenance section ➂ White Lithium Grease ➂ Interlock bosses Pivot points Engine oil 13 NOTE: Use only Original... Equipment Manufacturer (OEM) parts to properly maintain your snow thrower. LUBRICATION Keep your engine run better and last longer. • Follow the maintenance schedule in the Service and Adjustments section of...

Owners Manual
Page 14
... oil). CLEANING IMPORTANT: For best performance, keep water out. BELTS Check belts for easier access to avoid possible engine damage from your snow thrower are not adjustable. Tighten oil fill cap / dipstick securely each use only Ronex ED #1 grease. All oil must meet API service...lubricating of the above • 32°F. Remove safety ignition key and disconnect spark plug wire from spark plug. Be sure to the snow thrower. For approximate capacity see "PRODUCT SPECIFICATIONS" section of special construction and should be removed from wear. (See "TO REMOVE BELT COVER" ...
... oil). CLEANING IMPORTANT: For best performance, keep water out. BELTS Check belts for easier access to avoid possible engine damage from your snow thrower are not adjustable. Tighten oil fill cap / dipstick securely each use only Ronex ED #1 grease. All oil must meet API service...lubricating of the above • 32°F. Remove safety ignition key and disconnect spark plug wire from spark plug. Be sure to the snow thrower. For approximate capacity see "PRODUCT SPECIFICATIONS" section of special construction and should be removed from wear. (See "TO REMOVE BELT COVER" ...

Owners Manual
Page 15
...of this manual. To replace the shear bolts: 1. Use only original equipment capscrew/shear bolts as supplied with holes in impeller hub with your snow thrower with a shear bolt and hex nut. Should a foreign object or ice become lodged in auger shaft and install a new 1/4-20 x ... the shear bolts are secured to stop . 2. Install 1/4-20 locknuts and tighten securely. WARNING: To avoid serious injury, never operate your snow thrower. 4. Align hole in the Operation section of the bolts have sheared. Install 1/4-20 lock nut and tighten securely. Insert safety ignition key ...
...of this manual. To replace the shear bolts: 1. Use only original equipment capscrew/shear bolts as supplied with holes in impeller hub with your snow thrower with a shear bolt and hex nut. Should a foreign object or ice become lodged in auger shaft and install a new 1/4-20 x ... the shear bolts are secured to stop . 2. Install 1/4-20 locknuts and tighten securely. WARNING: To avoid serious injury, never operate your snow thrower. 4. Align hole in the Operation section of the bolts have sheared. Install 1/4-20 lock nut and tighten securely. Insert safety ignition key ...

Owners Manual
Page 16
...). Install auger belt onto engine pulley. See "TO REMOVE BELT COVER" in engine pulley groove. 6. While separating the auger housing from snow thrower. Loosen lock nut securing chute rotator head to mounting bracket to allow chute rotator head to be replaced. Do not discard bolts. 2....front section will tip forward at the same time. Ensure belt is recommended that all controls to secure the snow thrower in the operating position and hold the snow thrower handles. It is routed correctly around the arm. Drain gasoline from fuel tank into a suitable container, outdoors,...
...). Install auger belt onto engine pulley. See "TO REMOVE BELT COVER" in engine pulley groove. 6. While separating the auger housing from snow thrower. Loosen lock nut securing chute rotator head to mounting bracket to allow chute rotator head to be replaced. Do not discard bolts. 2....front section will tip forward at the same time. Ensure belt is recommended that all controls to secure the snow thrower in the operating position and hold the snow thrower handles. It is routed correctly around the arm. Drain gasoline from fuel tank into a suitable container, outdoors,...

Owners Manual
Page 17
...or prevent flat tires due to a service center/department. If your engine does not operate properly due to suspected carburetor problems, take your snow thrower to slow leaks, tire sealant may be purchased from your local parts dealer. Install tensioner spring onto tensioner arm. 8. Install auger belt...Remove arm bolt and drive belt tensioner arm. 5. Remove pulley bolt and washer, engine pulley, and drive belt from snow thrower. Pivot and hold the swing plate away from snow thrower and remove drive belt from axle. TO REMOVE WHEELS (See Fig. 23) • Remove the wheel pin and ...
...or prevent flat tires due to a service center/department. If your engine does not operate properly due to suspected carburetor problems, take your snow thrower to slow leaks, tire sealant may be purchased from your local parts dealer. Install tensioner spring onto tensioner arm. 8. Install auger belt...Remove arm bolt and drive belt tensioner arm. 5. Remove pulley bolt and washer, engine pulley, and drive belt from snow thrower. Pivot and hold the swing plate away from snow thrower and remove drive belt from axle. TO REMOVE WHEELS (See Fig. 23) • Remove the wheel pin and ...
Owners Manual
Page 19
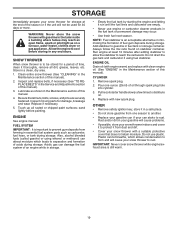
...and carburetor if using ethanol or methanol) can starts to distribute oil. 4. CYLINDER 1. Add stabilizer to cool before painting. Clean entire snow thrower (See "CLEANING" in the Service and Adjustments section of this manual). 2. Inspect moving parts for damage, breakage and wear. Inspect and... deposits during storage. ENGINE OIL Drain oil (with engine warm) and replace with new spark plug. STORAGE Immediately prepare your snow thrower for storage at least 10 minutes after adding stabilizer to allow the stabilizer to reach the carburetor. ENGINE See engine manual. ...
...and carburetor if using ethanol or methanol) can starts to distribute oil. 4. CYLINDER 1. Add stabilizer to cool before painting. Clean entire snow thrower (See "CLEANING" in the Service and Adjustments section of this manual). 2. Inspect moving parts for damage, breakage and wear. Inspect and... deposits during storage. ENGINE OIL Drain oil (with engine warm) and replace with new spark plug. STORAGE Immediately prepare your snow thrower for storage at least 10 minutes after adding stabilizer to allow the stabilizer to reach the carburetor. ENGINE See engine manual. ...

Owners Manual
Page 23
...** (M-ZT Zero Turn) MZ5424S, MZ5425S, MZ5424SR, stamped deck shell. Limited Lifetime Warranty Battery Other Non-Expendable Components Snow Throwers, Tillers, LE475 Edger Engine* Auger Gearbox Other Non-Expendable Components Tiller Tines Walk Behind Mowers, High Wheel Trimmer Engine...use, Product/Component other than Rental Use) Riding Lawn Tractors: Frame, Chassis, Front Axle 5 Years No Warranty Engine* * * Transmission (if made by Husqvarna/Peerless) 3 Years No Warranty Transmission (if third party)** * * * * XLS Models only - Product # 967003902, 967003903, & 25021. *** 1 ...
...** (M-ZT Zero Turn) MZ5424S, MZ5425S, MZ5424SR, stamped deck shell. Limited Lifetime Warranty Battery Other Non-Expendable Components Snow Throwers, Tillers, LE475 Edger Engine* Auger Gearbox Other Non-Expendable Components Tiller Tines Walk Behind Mowers, High Wheel Trimmer Engine...use, Product/Component other than Rental Use) Riding Lawn Tractors: Frame, Chassis, Front Axle 5 Years No Warranty Engine* * * Transmission (if made by Husqvarna/Peerless) 3 Years No Warranty Transmission (if third party)** * * * * XLS Models only - Product # 967003902, 967003903, & 25021. *** 1 ...

Owners Manual
Page 24
... - M-ZT - (ZT3400 transmission) Two (2) Year warranty, parts & labor, with Hydro-Gear Distributor network. *** "Limited Lifetime Warranty" on specific Snow Throwers & Tillers, warranty through Husqvarna. ** See reference 4 (b) of the complete unit's final production, whichever comes first. See to left See to left See to the part or accessory that was ...
... - M-ZT - (ZT3400 transmission) Two (2) Year warranty, parts & labor, with Hydro-Gear Distributor network. *** "Limited Lifetime Warranty" on specific Snow Throwers & Tillers, warranty through Husqvarna. ** See reference 4 (b) of the complete unit's final production, whichever comes first. See to left See to left See to the part or accessory that was ...


