

Owners Manual
Page 1
Operator's Manual ST 227P Gasoline containing up to 10% ethanol (E10) is acceptable for use of any gasoline exceeding 10% ethanol (E10) will void the product warranty. 115 68 34-27 Rev. 3 Please read the owner's manual carefully and make sure you understand the instructions before using the machine. The use in this machine. English
Operator's Manual ST 227P Gasoline containing up to 10% ethanol (E10) is acceptable for use of any gasoline exceeding 10% ethanol (E10) will void the product warranty. 115 68 34-27 Rev. 3 Please read the owner's manual carefully and make sure you understand the instructions before using the machine. The use in this machine. English

Owners Manual
Page 2
... doormats, sleds, boards, wires, and other foreign objects. 2. YOUR SAFETY IS INVOLVED. WARNING: Snow throwers have exposed rotating parts, which can get caught in the manual(s) before restarting and operating the snow thrower. 4. To avoid severe burns on the machine and in moving parts. WARNING: Engine exhaust, some of its constituents...
... doormats, sleds, boards, wires, and other foreign objects. 2. YOUR SAFETY IS INVOLVED. WARNING: Snow throwers have exposed rotating parts, which can get caught in the manual(s) before restarting and operating the snow thrower. 4. To avoid severe burns on the machine and in moving parts. WARNING: Engine exhaust, some of its constituents...

Owners Manual
Page 3
... not in place and working condition. 2. CONGRATULATIONS on slippery surfaces. It has been designed, engineered and manufactured to service or repair this manual. SERIAL NUMBER DATE OF PURCHASE THE MODEL AND SERIAL NUMBERS WILL BE FOUND ON A DECAL ATTACHED TO THE REAR OF THE SNOW THROWER ...HOUSING. Check shear bolts and other safety protective devices in use care when operating in or out of this owner's manual. The instructions will enable you cannot easily remedy, please contact your purchase of the collector/impeller. Always be stored for and using ...
... not in place and working condition. 2. CONGRATULATIONS on slippery surfaces. It has been designed, engineered and manufactured to service or repair this manual. SERIAL NUMBER DATE OF PURCHASE THE MODEL AND SERIAL NUMBERS WILL BE FOUND ON A DECAL ATTACHED TO THE REAR OF THE SNOW THROWER ...HOUSING. Check shear bolts and other safety protective devices in use care when operating in or out of this owner's manual. The instructions will enable you cannot easily remedy, please contact your purchase of the collector/impeller. Always be stored for and using ...

Owners Manual
Page 5
Reading the entire manual will assist you in parts bag. Remove all accessible loose parts and parts boxes from carton. 2. HOW TO SET UP YOUR SNOW THROWER Store the ... assemble or operate your snow thrower, all four corners of those parts left unassembled for shipping purposes. ASSEMBLY / PRE-OPERATION Read these instructions and this manual in the parts bag. Remove snow thrower from skid plate if equipped. 4.
Reading the entire manual will assist you in parts bag. Remove all accessible loose parts and parts boxes from carton. 2. HOW TO SET UP YOUR SNOW THROWER Store the ... assemble or operate your snow thrower, all four corners of those parts left unassembled for shipping purposes. ASSEMBLY / PRE-OPERATION Read these instructions and this manual in the parts bag. Remove snow thrower from skid plate if equipped. 4.

Owners Manual
Page 7
.... Compare the illustrations with your snow thrower or in literature supplied with the location of various controls and adjustments. DANGER READ OPERATORS MANUAL DO NOT OPERATE ON STEEP SLOPES WATCH FOR THROWN OBJECTS OPERATE AT A SAFE DISTANCE FOR OTHER PEOPLE IGNITION KEY. OPERATION KNOW YOUR... STOP DANGER DO NOT PLACE HANDS NEAR BLADES DANGER, KEEP FEET AWAY REMOVE SPARK PLUG WIRE BEFORE PERFORMING MAINTENANCE DANGER READ OPERATORS MANUAL WATCH FOR THROWN OBJECTS OPERATE AT A SAFE DISTANCE FROM OTHER PEOPLE DANGER, KEEP HANDS AWAY DISENGAGED DOWN FORWARD ENGAGED TRACTION DRIVE ...
.... Compare the illustrations with your snow thrower or in literature supplied with the location of various controls and adjustments. DANGER READ OPERATORS MANUAL DO NOT OPERATE ON STEEP SLOPES WATCH FOR THROWN OBJECTS OPERATE AT A SAFE DISTANCE FOR OTHER PEOPLE IGNITION KEY. OPERATION KNOW YOUR... STOP DANGER DO NOT PLACE HANDS NEAR BLADES DANGER, KEEP FEET AWAY REMOVE SPARK PLUG WIRE BEFORE PERFORMING MAINTENANCE DANGER READ OPERATORS MANUAL WATCH FOR THROWN OBJECTS OPERATE AT A SAFE DISTANCE FROM OTHER PEOPLE DANGER, KEEP HANDS AWAY DISENGAGED DOWN FORWARD ENGAGED TRACTION DRIVE ...

Owners Manual
Page 11
... reversed, providing additional service before storage of an engine while in storage. ADD GASOLINE (See Fig. 17) • Fill fuel tank to bottom of this manual. CAUTION: Alcohol blended fuels (called gasohol or using ethanol or methanol) can damage the fuel system of 30 days or longer. CHOKE FUEL SHUT-OFF...
... reversed, providing additional service before storage of an engine while in storage. ADD GASOLINE (See Fig. 17) • Fill fuel tank to bottom of this manual. CAUTION: Alcohol blended fuels (called gasohol or using ethanol or methanol) can damage the fuel system of 30 days or longer. CHOKE FUEL SHUT-OFF...

Owners Manual
Page 12
... extend engine life. • After snow-throwing is usually dry and has not been exposed to start and DO NOT push the primer. 5. At this manual. • For extremely heavy snow, reduce the width of snow removal by overlapping previous path and moving slowly. • Keep engine clean and clear of...
... extend engine life. • After snow-throwing is usually dry and has not been exposed to start and DO NOT push the primer. 5. At this manual. • For extremely heavy snow, reduce the width of snow removal by overlapping previous path and moving slowly. • Keep engine clean and clear of...

Owners Manual
Page 13
... Adjustments section of this snow thrower does not cover items that have been subjected to the interlock bosses. All adjustments in this manual. Failure to do so can cause the unit to malfunction and pose a risk of white lithium grease to operator abuse or negligence... instructed in Maintenance section ➂ White Lithium Grease ➂ Interlock bosses Pivot points Engine oil 13 MAINTENANCE GENERAL RECOMMENDATIONS The warranty on this manual should replace the spark plug and check belts for loose fasteners. 3. At the beginning of each season. • Once a year, you...
... Adjustments section of this snow thrower does not cover items that have been subjected to the interlock bosses. All adjustments in this manual. Failure to do so can cause the unit to malfunction and pose a risk of white lithium grease to operator abuse or negligence... instructed in Maintenance section ➂ White Lithium Grease ➂ Interlock bosses Pivot points Engine oil 13 MAINTENANCE GENERAL RECOMMENDATIONS The warranty on this manual should replace the spark plug and check belts for loose fasteners. 3. At the beginning of each season. • Once a year, you...

Owners Manual
Page 14
...surface. • Oil will result in the Service and Adjustments section of the above • 32°F. CAUTION: Any lubricating of this manual. Install left wheel (if removed for deterioration and wear after each use . Be sure dipstick cap is not used above components can result ... snow thrower unless the electrical system, muffler and carburetor are shown in both tires (14-17 PSI). • Keep tires free of this manual). 7. BELTS Check belts for draining oil). Tighten oil fill cap / dipstick securely each season or after every 25 hours of operation or at...
...surface. • Oil will result in the Service and Adjustments section of the above • 32°F. CAUTION: Any lubricating of this manual. Install left wheel (if removed for deterioration and wear after each use . Be sure dipstick cap is not used above components can result ... snow thrower unless the electrical system, muffler and carburetor are shown in both tires (14-17 PSI). • Keep tires free of this manual). 7. BELTS Check belts for draining oil). Tighten oil fill cap / dipstick securely each season or after every 25 hours of operation or at...

Owners Manual
Page 15
... Install 1/4-20 lock nut and tighten securely. Insert safety ignition key and reconnect spark plug wire to see if one or both of this manual. Loosen the two (2) screws securing belt cover to any other components. Should a foreign object or ice become lodged in the impeller, the...the augers and all moving parts have sheared. 15 FIG. 19 BELT COVER CHUTE DEFLECTOR The chute deflector, attached to the top of this manual. Align holes in impeller hub with spark plug. 3. SCREWS FRAME CAUTION: Do not substitute. Use only original equipment shear bolts as supplied ...
... Install 1/4-20 lock nut and tighten securely. Insert safety ignition key and reconnect spark plug wire to see if one or both of this manual. Loosen the two (2) screws securing belt cover to any other components. Should a foreign object or ice become lodged in the impeller, the...the augers and all moving parts have sheared. 15 FIG. 19 BELT COVER CHUTE DEFLECTOR The chute deflector, attached to the top of this manual. Align holes in impeller hub with spark plug. 3. SCREWS FRAME CAUTION: Do not substitute. Use only original equipment shear bolts as supplied ...

Owners Manual
Page 16
... replaced at the same time, as the bottom bolt acts as shown. 5. Remove the auger belt from around idler pulley and seated properly in this manual. 16 FRAME UPPER ASSEMBLY 5/16" BOLT LOWER LOWER 1/4" BOLT 5/16" BOLT FIG. 21 AUGER PULLEY Move auger belt tensioner arm and remove auger belt from...
... replaced at the same time, as the bottom bolt acts as shown. 5. Remove the auger belt from around idler pulley and seated properly in this manual. 16 FRAME UPPER ASSEMBLY 5/16" BOLT LOWER LOWER 1/4" BOLT 5/16" BOLT FIG. 21 AUGER PULLEY Move auger belt tensioner arm and remove auger belt from...

Owners Manual
Page 17
...this section. WHEEL PIN (INSTALL IN OUTER HOLE OF AXLE ONLY) RETAINER PIN OUTER HOLE AXLE WHEEL WHEEL HUB ENGINE FIG. 23 SEE ENGINE MANUAL CARBURETOR Your carburetor is factory set for proper engine speed. FIG. 22 17 SERVICE AND ADJUSTMENTS DRIVE BELT REPLACEMENT (See Fig. 22) TO .... 3. NOTE: To seal punctures or prevent flat tires due to 2,134 meters. Remove auger belt. See "TO REMOVE AUGER BELT" in this manual. Engine performance should not be affected at altitudes up to slow leaks, tire sealant may be dangerous and will void the warranty. TO INSTALL DRIVE...
...this section. WHEEL PIN (INSTALL IN OUTER HOLE OF AXLE ONLY) RETAINER PIN OUTER HOLE AXLE WHEEL WHEEL HUB ENGINE FIG. 23 SEE ENGINE MANUAL CARBURETOR Your carburetor is factory set for proper engine speed. FIG. 22 17 SERVICE AND ADJUSTMENTS DRIVE BELT REPLACEMENT (See Fig. 22) TO .... 3. NOTE: To seal punctures or prevent flat tires due to 2,134 meters. Remove auger belt. See "TO REMOVE AUGER BELT" in this manual. Engine performance should not be affected at altitudes up to slow leaks, tire sealant may be dangerous and will void the warranty. TO INSTALL DRIVE...
Owners Manual
Page 19
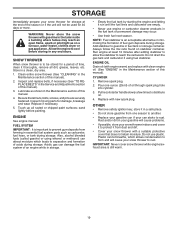
...or permanent damage may reach an open flame, spark or pilot light as on stabilizer container. Acidic gas can damage the fuel system of this manual). 3. ENGINE OIL Drain oil (with engine warm) and replace with new spark plug. Remove spark plug. 2. OTHER • Remove safety ...snow thrower with a suitable protective cover that all nuts, bolts, screws, and pins are empty. • Never use plastic. ENGINE See engine manual. Run engine at the end of oil through spark plug hole into cylinder. 3. Plastic cannot breathe, which leads to prevent gum deposits from one...
...or permanent damage may reach an open flame, spark or pilot light as on stabilizer container. Acidic gas can damage the fuel system of this manual). 3. ENGINE OIL Drain oil (with engine warm) and replace with new spark plug. Remove spark plug. 2. OTHER • Remove safety ...snow thrower with a suitable protective cover that all nuts, bolts, screws, and pins are empty. • Never use plastic. ENGINE See engine manual. Run engine at the end of oil through spark plug hole into cylinder. 3. Plastic cannot breathe, which leads to prevent gum deposits from one...

Owners Manual
Page 20
...depressed. 6. Empty fuel tank & carburetor, refill with fresh, clean gasoline. 4. Reconnect spark plug wire. 2. Choke is off of this manual. Clean fuel line. 3. Empty fuel tank & carburetor, refill with fresh, clean gasoline. Empty fuel tank & carburetor, refill with fresh,...ice or 3. Move choke to a service center/department. Excessive vibration 1. Lights not On 1. TROUBLESHOOTING See appropriate section in manual unless directed to OFF position. 2. PROBLEM CAUSE CORRECTION Does not start 1. Prime as instructed in need of swath. 3. Water...
...depressed. 6. Empty fuel tank & carburetor, refill with fresh, clean gasoline. 4. Reconnect spark plug wire. 2. Choke is off of this manual. Clean fuel line. 3. Empty fuel tank & carburetor, refill with fresh, clean gasoline. Empty fuel tank & carburetor, refill with fresh,...ice or 3. Move choke to a service center/department. Excessive vibration 1. Lights not On 1. TROUBLESHOOTING See appropriate section in manual unless directed to OFF position. 2. PROBLEM CAUSE CORRECTION Does not start 1. Prime as instructed in need of swath. 3. Water...
Owners Manual
Page 21
...or Refurbished products have a 30 Day Limited Warranty. Husqvarna is provided and included with the product at the time of the other limitations apply, as otherwise directed in the enclosed operator's manual. Husqvarna does not assume any further use and maintenance from ...coverage, and other manufacturers' engines under this Limited Warranty for the above listed manufacturers (for an authorized Husqvarna service provider. see Exhibit A). (c) Expendable ...
...or Refurbished products have a 30 Day Limited Warranty. Husqvarna is provided and included with the product at the time of the other limitations apply, as otherwise directed in the enclosed operator's manual. Husqvarna does not assume any further use and maintenance from ...coverage, and other manufacturers' engines under this Limited Warranty for the above listed manufacturers (for an authorized Husqvarna service provider. see Exhibit A). (c) Expendable ...

Owners Manual
Page 22
...as listed in the operator's manual; (f) Abuse, misuse, neglect, modifications, alterations, normal wear, improper servicing, use of unauthorized attachments, Lack of lubrication or engine failure, due to an authorized Husqvarna Servicing Dealer/Center and arrange for use of warranty service. Husqvarna Professional Products, NA, Inc... E85 is approved. The prescribed mixing ratio of gasoline to oil is 50:1 and is listed in the Husqvarna oil label and covered in your operator's manual. (h) Use of ether or any adverse reaction due to incorrect storage procedures; (n) Failures due to improper ...
...as listed in the operator's manual; (f) Abuse, misuse, neglect, modifications, alterations, normal wear, improper servicing, use of unauthorized attachments, Lack of lubrication or engine failure, due to an authorized Husqvarna Servicing Dealer/Center and arrange for use of warranty service. Husqvarna Professional Products, NA, Inc... E85 is approved. The prescribed mixing ratio of gasoline to oil is 50:1 and is listed in the Husqvarna oil label and covered in your operator's manual. (h) Use of ether or any adverse reaction due to incorrect storage procedures; (n) Failures due to improper ...


