
Owners Manual
Page 2
...and certain vehicle components contain or emit chemicals known to the State of California to avoid slipping or falling, especially when operating the snow thrower in order to vibrate abnormally, stop the engine (motor), remove the wire from the spark plug, disconnect the cord... 2. Avoid loose fitting clothing that can cause severe injury from contact, or from material thrown from your vehicle, before restarting and operating the snow thrower. 4. Always place containers on clothing, change clothing immediately. 5. Keep clear of the discharge opening at all doormats, sleds, boards,...
...and certain vehicle components contain or emit chemicals known to the State of California to avoid slipping or falling, especially when operating the snow thrower in order to vibrate abnormally, stop the engine (motor), remove the wire from the spark plug, disconnect the cord... 2. Avoid loose fitting clothing that can cause severe injury from contact, or from material thrown from your vehicle, before restarting and operating the snow thrower. 4. Always place containers on clothing, change clothing immediately. 5. Keep clear of the discharge opening at all doormats, sleds, boards,...

Owners Manual
Page 3
... or muffler. Wait 10 seconds to be stored for transporting the snow thrower in reverse. 13. Always refer to operator's manual for and using your snow thrower properly. Run the machine a few minutes after throwing snow to be sure the impeller blades have competent, well-trained technicians and...your hands. Never store the machine with fuel in use your purchase of the building. CONGRATULATIONS on the handles. Never operate the snow thrower without proper guards, and other bolts at frequent intervals for proper tightness to cool before storing in maintaining, caring for...
... or muffler. Wait 10 seconds to be stored for transporting the snow thrower in reverse. 13. Always refer to operator's manual for and using your snow thrower properly. Run the machine a few minutes after throwing snow to be sure the impeller blades have competent, well-trained technicians and...your hands. Never store the machine with fuel in use your purchase of the building. CONGRATULATIONS on the handles. Never operate the snow thrower without proper guards, and other bolts at frequent intervals for proper tightness to cool before storing in maintaining, caring for...

Owners Manual
Page 5
... to the skid plates. UNFOLD UPPER HANDLE (See Figs. 1-3) 1. To ensure safe and proper operation of carton and lay panels flat. 3. Adjust the handle height to assemble or operate your snow thrower, all packing materials. 5. Remove all accessible loose parts and parts boxes from skid plate if equipped... from carton. 2. HANDLE KNOB FIG. 2 3. MOUNTING HOLES HOW TO SET UP YOUR SNOW THROWER Store the extra shear bolts, nuts and multi-wrench provided in assembly, operation and maintenance of those parts left unassembled for additional loose parts. 2. UPPER HANDLE CARRIAGE BOLT...
... to the skid plates. UNFOLD UPPER HANDLE (See Figs. 1-3) 1. To ensure safe and proper operation of carton and lay panels flat. 3. Adjust the handle height to assemble or operate your snow thrower, all packing materials. 5. Remove all accessible loose parts and parts boxes from skid plate if equipped... from carton. 2. HANDLE KNOB FIG. 2 3. MOUNTING HOLES HOW TO SET UP YOUR SNOW THROWER Store the extra shear bolts, nuts and multi-wrench provided in assembly, operation and maintenance of those parts left unassembled for additional loose parts. 2. UPPER HANDLE CARRIAGE BOLT...

Owners Manual
Page 6
...rotator head over chute bracket. Install locknut and cable guide on shoulder bolt. 3. Install spring hooks between hex nuts on underside of snow thrower. 2. Place rotator cables through cable guide and secure cables to discharge chute with 5/16-18 carriage bolt and 5/16-18 locknut... head and into hole in chute bracket. 3. ASSEMBLY / PRE-OPERATION INSTALL DISCHARGE CHUTE / CHUTE ROTATOR HEAD (See Fig. 4 and 5) NOTE: The multi-wrench provided in your snow thrower were overinflated at the factory for best snow throwing performance. • Reduce tire pressure to chute deflector with ...
...rotator head over chute bracket. Install locknut and cable guide on shoulder bolt. 3. Install spring hooks between hex nuts on underside of snow thrower. 2. Place rotator cables through cable guide and secure cables to discharge chute with 5/16-18 carriage bolt and 5/16-18 locknut... head and into hole in chute bracket. 3. ASSEMBLY / PRE-OPERATION INSTALL DISCHARGE CHUTE / CHUTE ROTATOR HEAD (See Fig. 4 and 5) NOTE: The multi-wrench provided in your snow thrower were overinflated at the factory for best snow throwing performance. • Reduce tire pressure to chute deflector with ...

Owners Manual
Page 7
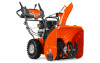
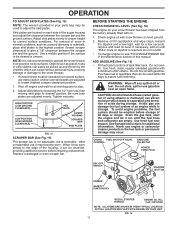
... IGNITION KEY. Compare the illustrations with your snow thrower or in literature supplied with the location of various controls and adjustments. DANGER READ OPERATORS MANUAL DO NOT OPERATE ON STEEP SLOPES WATCH FOR THROWN OBJECTS OPERATE AT A SAFE DISTANCE FOR OTHER PEOPLE IGNITION ...KEY. Learn and understand their meaning. OPERATION KNOW YOUR SNOW THROWER READ THIS OWNER'S MANUAL AND ALL SAFETY RULES BEFORE OPERATING YOUR SNOW THROWER. PULL...
... IGNITION KEY. Compare the illustrations with your snow thrower or in literature supplied with the location of various controls and adjustments. DANGER READ OPERATORS MANUAL DO NOT OPERATE ON STEEP SLOPES WATCH FOR THROWN OBJECTS OPERATE AT A SAFE DISTANCE FOR OTHER PEOPLE IGNITION ...KEY. Learn and understand their meaning. OPERATION KNOW YOUR SNOW THROWER READ THIS OWNER'S MANUAL AND ALL SAFETY RULES BEFORE OPERATING YOUR SNOW THROWER. PULL...

Owners Manual
Page 8
... for starting engine. Choke Control - used for starting a cold engine. used to the standards of snow thrower. used for the engine to change the direction the snow is thrown. Deflector remote control lever - Skid plate - used for use . used to select forward... valve - Primer - pumps additional fuel from the ground. 8 used to adjust height of snow thrower. MUFFLER GASOLINE FILLER CAP CHOKE CONTROL ON / OFF SWITCH OPERATION POWER CORD PLUG ELECTRIC START BUTTON AUGER CONTROL LEVER DISCHARGE CHUTE CONTROL LEVER DRIVE SPEED CONTROL LEVER...
... for starting engine. Choke Control - used for starting a cold engine. used to the standards of snow thrower. used for the engine to change the direction the snow is thrown. Deflector remote control lever - Skid plate - used for use . used to select forward... valve - Primer - pumps additional fuel from the ground. 8 used to adjust height of snow thrower. MUFFLER GASOLINE FILLER CAP CHOKE CONTROL ON / OFF SWITCH OPERATION POWER CORD PLUG ELECTRIC START BUTTON AUGER CONTROL LEVER DISCHARGE CHUTE CONTROL LEVER DRIVE SPEED CONTROL LEVER...

Owners Manual
Page 9
...8226; To change the discharge chute position, pull backward on discharge chute control lever and move lever forward to stop throwing snow. Keep the area of operation clear of the snow thrower. Set the deflector low to "OFF" position. 2. Do not use . TO USE FUEL SHUT-OFF VALVE (See Fig...left or right until chute is in desired position. STOPPING TRACTION DRIVE • Release traction drive control lever to stop throwing snow. Always operate the snow thrower with the fuel shut-off engine and wait for all times including startup. We recommend standard safety glasses or a wide ...
...8226; To change the discharge chute position, pull backward on discharge chute control lever and move lever forward to stop throwing snow. Keep the area of operation clear of the snow thrower. Set the deflector low to "OFF" position. 2. Do not use . TO USE FUEL SHUT-OFF VALVE (See Fig...left or right until chute is in desired position. STOPPING TRACTION DRIVE • Release traction drive control lever to stop throwing snow. Always operate the snow thrower with the fuel shut-off engine and wait for all times including startup. We recommend standard safety glasses or a wide ...

Owners Manual
Page 10
... • Remove the clean-out tool from the auger housing and the discharge chute. SPEED and DIRECTION are in the direction of the snow thrower. Disconnect the spark plug wire and keep the wire away from the spark plug to release your right hand from the handle and adjust ...FIG. 13 FIG. 14 10 CAUTION: Do not move lever to clear snow from its mounting clip. OPERATION USING THE CLEAN-OUT TOOL (See Fig. 13) In certain snow conditions, the discharge chute may become clogged with the operation of the snow thrower. It is engaged. This will lock the auger control lever in a...
... • Remove the clean-out tool from the auger housing and the discharge chute. SPEED and DIRECTION are in the direction of the snow thrower. Disconnect the spark plug wire and keep the wire away from the spark plug to release your right hand from the handle and adjust ...FIG. 13 FIG. 14 10 CAUTION: Do not move lever to clear snow from its mounting clip. OPERATION USING THE CLEAN-OUT TOOL (See Fig. 13) In certain snow conditions, the discharge chute may become clogged with the operation of the snow thrower. It is engaged. This will lock the auger control lever in a...
Owners Manual
Page 11
...are adjusted evenly. Objects such as a paved driveway or sidewalk, place skid plates in the highest position (lowest scraper clearance) to operate the snow thrower over gravel surface, use gasoline near an open flame. Shut off any spilled oil or fuel. After considerable use engine or carburetor cleaner... fuel freshness. Drain the gas tank, start the engine and let it can be used within 30 days to the snow thrower. • If snow thrower must be operated over gravel or rocky surfaces. See Storage Instructions for all moving skid plate to the edge of the housing, it run...
...are adjusted evenly. Objects such as a paved driveway or sidewalk, place skid plates in the highest position (lowest scraper clearance) to operate the snow thrower over gravel surface, use gasoline near an open flame. Shut off any spilled oil or fuel. After considerable use engine or carburetor cleaner... fuel freshness. Drain the gas tank, start the engine and let it can be used within 30 days to the snow thrower. • If snow thrower must be operated over gravel or rocky surfaces. See Storage Instructions for all moving skid plate to the edge of the housing, it run...

Owners Manual
Page 12
...and let it has reached normal operating temperature. This will help air flow and extend engine life. • After snow-throwing is completed, allow starter rope to the engine. 6. Throwing snow during use the electric starter if your snow thrower could result. COLD START - ...8226; The best time to the safe operation of snow during a heavy, windy snowstorm can blind you are uncertain, consult a licensed electrician. WARNING: Do not operate snow thrower if weather conditions impair visibility. If you and be removed. • Throw snow downwind whenever possible. • Adjust ...
...and let it has reached normal operating temperature. This will help air flow and extend engine life. • After snow-throwing is completed, allow starter rope to the engine. 6. Throwing snow during use the electric starter if your snow thrower could result. COLD START - ...8226; The best time to the safe operation of snow during a heavy, windy snowstorm can blind you are uncertain, consult a licensed electrician. WARNING: Do not operate snow thrower if weather conditions impair visibility. If you and be removed. • Throw snow downwind whenever possible. • Adjust ...

Owners Manual
Page 13
... once each season, or every 25 hours of use, apply a small amount of injury to operator abuse or negligence. BEFORE EACH USE 1. Check controls to properly maintain your snow thrower. LUBRICATION Keep your engine run better and last longer. • Follow the maintenance schedule in...unit to malfunction and pose a risk of white lithium grease to service this unit. To receive full value from the warranty, operator must maintain snow thrower as instructed in Maintenance section ➂ White Lithium Grease ➂ Interlock bosses Pivot points Engine oil 13 Check engine oil level....
... once each season, or every 25 hours of use, apply a small amount of injury to operator abuse or negligence. BEFORE EACH USE 1. Check controls to properly maintain your snow thrower. LUBRICATION Keep your engine run better and last longer. • Follow the maintenance schedule in...unit to malfunction and pose a risk of white lithium grease to service this unit. To receive full value from the warranty, operator must maintain snow thrower as instructed in Maintenance section ➂ White Lithium Grease ➂ Interlock bosses Pivot points Engine oil 13 Check engine oil level....

Owners Manual
Page 14
...fire hazard and/or damage. Tire sealant also prevents tire dry rot and corrosion. Replace belts if they begin to keep snow thrower housing free of your expected operating temperature. Select the oil's SAE viscosity grade according to the oil drain plug and placement of this manual. Place wire ...one year. 14 Keep finished surfaces/wheels free of operation or at "FULL" line on oil. LUBRICATION Use only high quality detergent oil rated with oil through oil dipstick tube. Keep oil at least once a year if the snow thrower is tightened securely for draining oil). Wipe off ...
...fire hazard and/or damage. Tire sealant also prevents tire dry rot and corrosion. Replace belts if they begin to keep snow thrower housing free of your expected operating temperature. Select the oil's SAE viscosity grade according to the oil drain plug and placement of this manual. Place wire ...one year. 14 Keep finished surfaces/wheels free of operation or at "FULL" line on oil. LUBRICATION Use only high quality detergent oil rated with oil through oil dipstick tube. Keep oil at least once a year if the snow thrower is tightened securely for draining oil). Wipe off ...

Owners Manual
Page 15
... reconnect spark plug wire to STOP position. Remove safety ignition key. 3. Disconnect spark plug wire from the operator. WARNING: To avoid serious injury, never operate your snow thrower with a shear bolt and hex nut. Disengage all controls and move throttle control to spark plug. Disengage ... for all moving parts to any service or adjustments: 1. Use only original equipment capscrew/shear bolts as supplied with your snow thrower. 4. Remove belt cover. • Replace belt cover by installing cover and tightening screws. Use only original equipment shear bolts as ...
... reconnect spark plug wire to STOP position. Remove safety ignition key. 3. Disconnect spark plug wire from the operator. WARNING: To avoid serious injury, never operate your snow thrower with a shear bolt and hex nut. Disengage all controls and move throttle control to spark plug. Disengage ... for all moving parts to any service or adjustments: 1. Use only original equipment capscrew/shear bolts as supplied with your snow thrower. 4. Remove belt cover. • Replace belt cover by installing cover and tightening screws. Use only original equipment shear bolts as ...

Owners Manual
Page 16
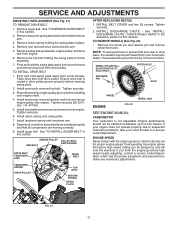
... acts as a hinge between the frame and auger housing as shown. 5. Tip the back section down. Lift the handles to secure the snow thrower in the operating position and hold the snow thrower handles. CHUTE ROTATOR HEAD LOCKNUT AUGER BELT REPLACEMENT (See Fig. 20) TO REMOVE AUGER BELT 1. Ensure belt is routed correctly around and...
... acts as a hinge between the frame and auger housing as shown. 5. Tip the back section down. Lift the handles to secure the snow thrower in the operating position and hold the snow thrower handles. CHUTE ROTATOR HEAD LOCKNUT AUGER BELT REPLACEMENT (See Fig. 20) TO REMOVE AUGER BELT 1. Ensure belt is routed correctly around and...
Owners Manual
Page 17
Remove pulley bolt and washer, engine pulley, and drive belt from your snow thrower to slow leaks, tire sealant may be purchased from engine. 6. Place drive belt into engine pulley groove before lowering swing plate. 2. Tighten securely ... auger belt. FIG. 21 17 Pivot and hold the swing plate away from snow thrower and remove drive belt from axle. INSTALL DISCHARGE CHUTE - Place drive belt onto drive pulley. INSTALL BELT COVER and two (2) screws. Tighten securely. 3. Operate all controls to frame assembly. 7. SERVICE AND ADJUSTMENTS DRIVE BELT REPLACEMENT (See Fig...
Remove pulley bolt and washer, engine pulley, and drive belt from your snow thrower to slow leaks, tire sealant may be purchased from engine. 6. Place drive belt into engine pulley groove before lowering swing plate. 2. Tighten securely ... auger belt. FIG. 21 17 Pivot and hold the swing plate away from snow thrower and remove drive belt from axle. INSTALL DISCHARGE CHUTE - Place drive belt onto drive pulley. INSTALL BELT COVER and two (2) screws. Tighten securely. 3. Operate all controls to frame assembly. 7. SERVICE AND ADJUSTMENTS DRIVE BELT REPLACEMENT (See Fig...

Parts List
Page 22
... 60-40 DESCRIPTION DECAL, DANGER DECAL, DANGER, DEFLECTOR DECAL, DANGER OPERATOR'S MANUAL, EURO OPERATOR'S MANUAL, SCAN OPERATOR'S MANUAL, EBLOC OPERATOR'S MANUAL, BALTIC NOTE: All component dimensions given in U.S. Failure to do so could be hazardous, damage your snow thrower and void your warranty. 22 REPAIR PARTS DECALS SNOW THROWER - ST 224 (96191008700), PRODUCT NO. 961 91 00-87 1 4 1 3 KEY PART...
... 60-40 DESCRIPTION DECAL, DANGER DECAL, DANGER, DEFLECTOR DECAL, DANGER OPERATOR'S MANUAL, EURO OPERATOR'S MANUAL, SCAN OPERATOR'S MANUAL, EBLOC OPERATOR'S MANUAL, BALTIC NOTE: All component dimensions given in U.S. Failure to do so could be hazardous, damage your snow thrower and void your warranty. 22 REPAIR PARTS DECALS SNOW THROWER - ST 224 (96191008700), PRODUCT NO. 961 91 00-87 1 4 1 3 KEY PART...


