
Owners Manual
Page 3
... Running 32 Stopping the Engine 33 Operating On Hills 34 Mowing Tips 35 Headlights 36 Weak Battery 36 Jumper Cables Use 36 Battery Voltage Light 37 Moving Machine By Hand 37 MAINTENANCE 38 Maintenance Schedule 38 Battery 40 Safety System 41 Park Brake 41 Tire Pressures 42 Anti-scalp Rollers 42 Caster Wheels...
... Running 32 Stopping the Engine 33 Operating On Hills 34 Mowing Tips 35 Headlights 36 Weak Battery 36 Jumper Cables Use 36 Battery Voltage Light 37 Moving Machine By Hand 37 MAINTENANCE 38 Maintenance Schedule 38 Battery 40 Safety System 41 Park Brake 41 Tire Pressures 42 Anti-scalp Rollers 42 Caster Wheels...
Owners Manual
Page 4
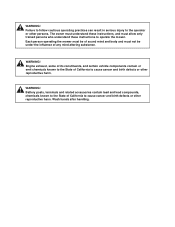
... and body and must allow only trained persons who understand these instructions, and must not be under the influence of California to operate the mower. Battery posts, terminals and related accessories contain lead and lead compounds, chemicals known to the State of California to the operator or other reproductive harm. Engine...
... and body and must allow only trained persons who understand these instructions, and must not be under the influence of California to operate the mower. Battery posts, terminals and related accessories contain lead and lead compounds, chemicals known to the State of California to the operator or other reproductive harm. Engine...
Owners Manual
Page 7
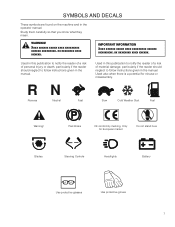
... the operator manual. Park Brake CE conformity marking. Used also when there is a potential for European market Do not stand here Blades Steering Controls Headlights Battery Use protective glasses Use protective gloves 7 WARNING! xx xxxxxxxx xxxx xxxxxx. IMPORTANT INFORMATION Xxxx xxxxxx xxxxx xxxx xxxxxxxxx xxxxxx xxxxxxxxx. Used in this publication to...
... the operator manual. Park Brake CE conformity marking. Used also when there is a potential for European market Do not stand here Blades Steering Controls Headlights Battery Use protective glasses Use protective gloves 7 WARNING! xx xxxxxxxx xxxx xxxxxx. IMPORTANT INFORMATION Xxxx xxxxxx xxxxx xxxx xxxxxxxxx xxxxxx xxxxxxxxx. Used in this publication to...

Owners Manual
Page 8
Rotating blades, keep away from the machine Use on slopes no greater than 10° No passengers Whole body exposure to thrown objects Severing of fingers and toes Do not open or remove Careful backing up, Careful going forward, safety shields while watch for other people watch for other people engine is running Moving sharp blades under cover Battery acid is corrosive, explosive and flammable Warning! SYMBOLS AND DECALS Read Operator Manual Shut off engine before performing any maintenance or repair work Keep a safe distance from the discharge deck Do not touch parts 8
Rotating blades, keep away from the machine Use on slopes no greater than 10° No passengers Whole body exposure to thrown objects Severing of fingers and toes Do not open or remove Careful backing up, Careful going forward, safety shields while watch for other people watch for other people engine is running Moving sharp blades under cover Battery acid is corrosive, explosive and flammable Warning! SYMBOLS AND DECALS Read Operator Manual Shut off engine before performing any maintenance or repair work Keep a safe distance from the discharge deck Do not touch parts 8
Owners Manual
Page 14
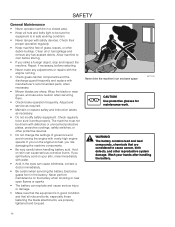
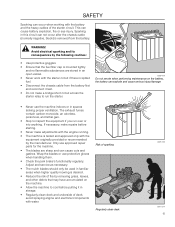
...corrosive burns. Never drive the machine in the eyes can cause blindness, contact a doctor immediately. • Be careful when servicing the battery. Use protective glasses for maintenance work. Wash your skin, rinse immediately with water. • Acid in an enclosed space 8011-515 CAUTION...! Acid on your hands after handling the battery. 14 WARNING! The battery contains lead and lead compounds, chemicals that are considered to cause cancer, birth defects, and other debris buildup. Wrap the blade...
...corrosive burns. Never drive the machine in the eyes can cause blindness, contact a doctor immediately. • Be careful when servicing the battery. Use protective glasses for maintenance work. Wash your skin, rinse immediately with water. • Acid in an enclosed space 8011-515 CAUTION...! Acid on your hands after handling the battery. 14 WARNING! The battery contains lead and lead compounds, chemicals that are considered to cause cancer, birth defects, and other debris buildup. Wrap the blade...
Owners Manual
Page 15
... • Allow the machine to inspect the equipment if you run the starter. 6003-009 Do not smoke when performing maintenance on the battery, the battery can cause battery explosion, fire or eye injury. If necessary, make repairs before putting it last. • Do not make adjustments with the engine running...occur when working with water. Sparking in this circuit can not occur after the chassis cable (normally negative, black) is removed from the battery first and reconnect it in an open vessel. • Never work with the starter circuit if there is tested and approved only with ...
... • Allow the machine to inspect the equipment if you run the starter. 6003-009 Do not smoke when performing maintenance on the battery, the battery can cause battery explosion, fire or eye injury. If necessary, make repairs before putting it last. • Do not make adjustments with the engine running...occur when working with water. Sparking in this circuit can not occur after the chassis cable (normally negative, black) is removed from the battery first and reconnect it in an open vessel. • Never work with the starter circuit if there is tested and approved only with ...
Owners Manual
Page 20
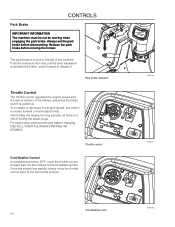
... machine. Avoid idling the engine for long periods, as there is found on the left of fouling the spark plugs. For best mower performance and battery charging, USE FULL THROTTLE WHEN STARTING OR MOWING. Always set the park brake before moving when engaging the park brake.
... machine. Avoid idling the engine for long periods, as there is found on the left of fouling the spark plugs. For best mower performance and battery charging, USE FULL THROTTLE WHEN STARTING OR MOWING. Always set the park brake before moving when engaging the park brake.
Owners Manual
Page 21
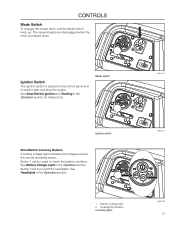
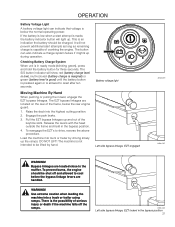
...239 21 The mower blades are disengaged when the knob is below the normal operating power. Battery voltage light 2. Blade switch 8058-247 Ignition switch SmartSwitch Courtesy Buttons A battery voltage light indicates that voltage is pressed down. See SmartSwitch Ignition and Starting in the Operation ... turn on the control panel and is used to start and stop the engine. See Battery Voltage Light in the Operation section for instructions. Button 1 can be used to check the battery condition. See Headlights in the Operation section. 8058-247 1 2 1. CONTROLS Blade Switch...
...239 21 The mower blades are disengaged when the knob is below the normal operating power. Battery voltage light 2. Blade switch 8058-247 Ignition switch SmartSwitch Courtesy Buttons A battery voltage light indicates that voltage is pressed down. See SmartSwitch Ignition and Starting in the Operation ... turn on the control panel and is used to start and stop the engine. See Battery Voltage Light in the Operation section for instructions. Button 1 can be used to check the battery condition. See Headlights in the Operation section. 8058-247 1 2 1. CONTROLS Blade Switch...
Owners Manual
Page 36
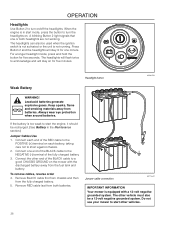
...end of the RED cable to the NEGATIVE (-) terminal of the fully charged battery. 3. The other vehicles. 36 When the engine is not running. If the battery is equipped with the discharged battery away from both headlights are not working. Jumper cable connection 8011-642 IMPORTANT ... short against chassis. 2. Remove RED cable last from the fuel tank and battery. Remove BLACK cable first from chassis and then from batteries. A blinking Button 2 light signals that one or both batteries. The headlights will flash twice to acknowledge and will stay lit for one ...
...end of the RED cable to the NEGATIVE (-) terminal of the fully charged battery. 3. The other vehicles. 36 When the engine is not running. If the battery is equipped with the discharged battery away from both headlights are not working. Jumper cable connection 8011-642 IMPORTANT ... short against chassis. 2. Remove RED cable last from the fuel tank and battery. Remove BLACK cable first from chassis and then from batteries. A blinking Button 2 light signals that one or both batteries. The headlights will flash twice to acknowledge and will stay lit for one ...
Owners Manual
Page 37
... reverse the above procedure. Raise the deck into a truck or trailer using ramps. To prevent burns, the engine should be charged. If the battery is low when a start attempts as long as remaining charge is the possibility of the keyhole slots. This is below the rear engine guard. 1....EZT's to the muffler. Release the levers with the head outside the frame and held in ready mode (blinking green), press and hold the battery button for three seconds. Use extreme caution when loading the machine into the highest cutting position. 2. DO NOT LIFT! Bypass linkages are located...
... reverse the above procedure. Raise the deck into a truck or trailer using ramps. To prevent burns, the engine should be charged. If the battery is low when a start attempts as long as remaining charge is the possibility of the keyhole slots. This is below the rear engine guard. 1....EZT's to the muffler. Release the levers with the head outside the frame and held in ready mode (blinking green), press and hold the battery button for three seconds. Use extreme caution when loading the machine into the highest cutting position. 2. DO NOT LIFT! Bypass linkages are located...
Owners Manual
Page 38
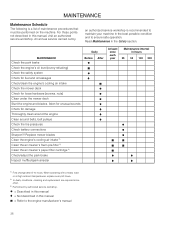
... engine and blades, listen for unusual sounds Check for damage Thoroughly clean around the engine Clean around belts, belt pulleys Check the tire pressures Check battery connections Sharpen3)/ Replace mower blades Clean the engine's cooling air intake 2) Clean the air cleaner's foam pre-filter 2) Clean the air cleaner's paper filter cartridge...
... engine and blades, listen for unusual sounds Check for damage Thoroughly clean around the engine Clean around belts, belt pulleys Check the tire pressures Check battery connections Sharpen3)/ Replace mower blades Clean the engine's cooling air intake 2) Clean the air cleaner's foam pre-filter 2) Clean the air cleaner's paper filter cartridge...

Owners Manual
Page 40
.... 65 min. 115 min. 145 min. 280 min. 85 min. 150 min. 195 min. 370 min. *Charging time depends on the battery and terminals can cause the battery to open or remove caps or covers. Always use two wrenches for charging times. Disconnect BLACK... battery cable first, then the RED battery cable and remove the battery from the mower. 6. Using two ½" wrenches disconnect BLACK battery cable then RED battery cable. 3. Carefully remove the battery from the machine. 3. Reconnect RED battery cable to contact both terminals at : 50 Amps...
.... 65 min. 115 min. 145 min. 280 min. 85 min. 150 min. 195 min. 370 min. *Charging time depends on the battery and terminals can cause the battery to open or remove caps or covers. Always use two wrenches for charging times. Disconnect BLACK... battery cable first, then the RED battery cable and remove the battery from the mower. 6. Using two ½" wrenches disconnect BLACK battery cable then RED battery cable. 3. Carefully remove the battery from the machine. 3. Reconnect RED battery cable to contact both terminals at : 50 Amps...
Owners Manual
Page 49
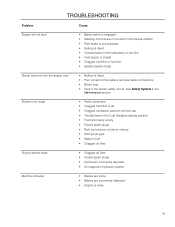
...Machine vibrates • Blades are loose • Blades are not locked in the neutral position • Park brake is not activated • Battery is dead • Contamination in the starter safety circuit. TROUBLESHOOTING Problem Cause Engine will not start • Blade switch is engaged. •...; Steering controls are incorrectly balanced • Engine is dead • Poor contact of the battery terminal cable connections • Blown fuse • Fault in the carburetor or fuel line. • Fuel supply is closed • Clogged ...
...Machine vibrates • Blades are loose • Blades are not locked in the neutral position • Park brake is not activated • Battery is dead • Contamination in the starter safety circuit. TROUBLESHOOTING Problem Cause Engine will not start • Blade switch is engaged. •...; Steering controls are incorrectly balanced • Engine is dead • Poor contact of the battery terminal cable connections • Blown fuse • Fault in the carburetor or fuel line. • Fuel supply is closed • Clogged ...
Owners Manual
Page 50
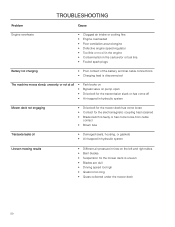
... • Too little or no oil in the engine • Contamination in the carburetor or fuel line. • Fouled spark plugs Battery not charging • Poor contact of the battery terminal cable connections • Charging lead is disconnected The machine moves slowly, unevenly, or not at all • Park brake on •...
... • Too little or no oil in the engine • Contamination in the carburetor or fuel line. • Fouled spark plugs Battery not charging • Poor contact of the battery terminal cable connections • Charging lead is disconnected The machine moves slowly, unevenly, or not at all • Park brake on •...
Owners Manual
Page 51
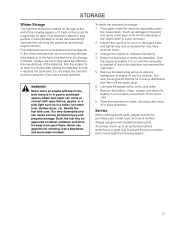
... engine for storage: 1. WARNING! Turn over the engine so that the oil is a good way to avoid corrosion. 2. Always use genuine Husqvarna spare parts. Do not empty the fuel tank and the carburetor if you have become loose. 3. It is drained of fuel or the stabilizer...dryer, etc. dispose of engine oil into an approved container outdoors and store far away from direct cold. 8. Clean, charge, and store the battery in a cool place, but protect it to the sticky residues that can cause serious personal injury and property damage. STORAGE Winter Storage The machine should...
... engine for storage: 1. WARNING! Turn over the engine so that the oil is a good way to avoid corrosion. 2. Always use genuine Husqvarna spare parts. Do not empty the fuel tank and the carburetor if you have become loose. 3. It is drained of fuel or the stabilizer...dryer, etc. dispose of engine oil into an approved container outdoors and store far away from direct cold. 8. Clean, charge, and store the battery in a cool place, but protect it to the sticky residues that can cause serious personal injury and property damage. STORAGE Winter Storage The machine should...

Owners Manual
Page 56
SERVICE JOURNAL Action Delivery Service Charge the battery Adjust the tire pressure of all wheels to 15 PSI (1 bar) Mount the steering controls in the normal position Connect the contact box to the ...
SERVICE JOURNAL Action Delivery Service Charge the battery Adjust the tire pressure of all wheels to 15 PSI (1 bar) Mount the steering controls in the normal position Connect the contact box to the ...
Owners Manual
Page 57
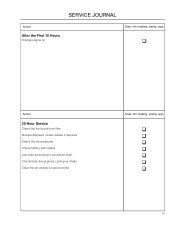
SERVICE JOURNAL Action After the First 10 Hours Change engine oil Date, mtr reading, stamp, sign q Action 25-Hour Service Check the fuel pump's air filter Sharpen/Replace mower blades if required Check the tire pressures Check battery with cables Lubricate according to lubrication chart Check/clean the engine's cooling air intake Clean the air cleaner's foam pre-filter Date, mtr reading, stamp, sign q q q q q q q 57
SERVICE JOURNAL Action After the First 10 Hours Change engine oil Date, mtr reading, stamp, sign q Action 25-Hour Service Check the fuel pump's air filter Sharpen/Replace mower blades if required Check the tire pressures Check battery with cables Lubricate according to lubrication chart Check/clean the engine's cooling air intake Clean the air cleaner's foam pre-filter Date, mtr reading, stamp, sign q q q q q q q 57
Parts Manual
Page 11
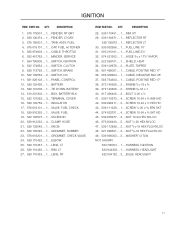
... 174652 1 SWITCH, CLUTCH 9.. 539 113792 1 SWITCH, BRAKE 10.. 532 109553 2 SWITCH, NC 11.. 581 826102 1 PANEL, CONTROL 12.. 539 102436 1 BATTERY 13.. 539 131209 1 TIE DOWN, BATTERY 14.. 510 231302 1 BOX, BATTERY BLK 15.. 532 131563 3 TERMINAL COVER 16.. 539 102759 1 INSULATOR 17.. 576 618101 1 VALVE, FUEL CHECK 18.. 539 916325 1 VALVE, FUEL...
... 174652 1 SWITCH, CLUTCH 9.. 539 113792 1 SWITCH, BRAKE 10.. 532 109553 2 SWITCH, NC 11.. 581 826102 1 PANEL, CONTROL 12.. 539 102436 1 BATTERY 13.. 539 131209 1 TIE DOWN, BATTERY 14.. 510 231302 1 BOX, BATTERY BLK 15.. 532 131563 3 TERMINAL COVER 16.. 539 102759 1 INSULATOR 17.. 576 618101 1 VALVE, FUEL CHECK 18.. 539 916325 1 VALVE, FUEL...
Parts Manual
Page 23
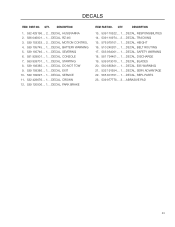
... 1 DECAL, SERV ADVANTAGE 22.. 585 801701 1 DECAL, REPL PARTS 23.. 539 977778 3 ABRASIVE PAD 23 DESCRIPTION 1.. 532 429196 2 DECAL, HUSQVARNA 2.. 586 046001 1 DECAL, RZ 46i 3.. 539 103333 2 DECAL, MOTION CONTROL 4.. 539 105745 1 DECAL, BATTERY WARNING 5.. 539 105746 1 DECAL, SEVERING 6.. 581 929801 1 DECAL, CONSOLE 7.. 583 933701 1 DECAL, STARTING 8.. 539 108385 1 DECAL, DO NOT...
... 1 DECAL, SERV ADVANTAGE 22.. 585 801701 1 DECAL, REPL PARTS 23.. 539 977778 3 ABRASIVE PAD 23 DESCRIPTION 1.. 532 429196 2 DECAL, HUSQVARNA 2.. 586 046001 1 DECAL, RZ 46i 3.. 539 103333 2 DECAL, MOTION CONTROL 4.. 539 105745 1 DECAL, BATTERY WARNING 5.. 539 105746 1 DECAL, SEVERING 6.. 581 929801 1 DECAL, CONSOLE 7.. 583 933701 1 DECAL, STARTING 8.. 539 108385 1 DECAL, DO NOT...


