Owners Manual
Page 3
...-scalp Rollers 42 Caster Wheels 42 V-belts 43 Deck Belt Removal 43 Cutting Blades 44 Blade replacement 44 Adjusting the Mower Deck 45 Leveling deck 45 Cleaning 46 Hardware 46 LUBRICATION 47 Lubrication Schedule 47 Wheel and Deck Zerks 48 Front Wheel Mount 48 Front Wheel Bearings... 48 Transmission 48 Deck Spindles 48 TROUBLESHOOTING 49 STORAGE 51 Winter Storage ...
...-scalp Rollers 42 Caster Wheels 42 V-belts 43 Deck Belt Removal 43 Cutting Blades 44 Blade replacement 44 Adjusting the Mower Deck 45 Leveling deck 45 Cleaning 46 Hardware 46 LUBRICATION 47 Lubrication Schedule 47 Wheel and Deck Zerks 48 Front Wheel Mount 48 Front Wheel Bearings... 48 Transmission 48 Deck Spindles 48 TROUBLESHOOTING 49 STORAGE 51 Winter Storage ...

Owners Manual
Page 8
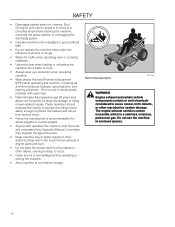
Rotating blades, keep away from the machine Use on slopes no greater than 10° No passengers Whole body exposure to thrown objects Severing of fingers and toes Do not open or remove Careful backing up, Careful going forward, safety shields while watch for other people watch for other people engine is running Moving sharp blades under cover Battery acid is corrosive, explosive and flammable Warning! SYMBOLS AND DECALS Read Operator Manual Shut off engine before performing any maintenance or repair work Keep a safe distance from the discharge deck Do not touch parts 8
Rotating blades, keep away from the machine Use on slopes no greater than 10° No passengers Whole body exposure to thrown objects Severing of fingers and toes Do not open or remove Careful backing up, Careful going forward, safety shields while watch for other people watch for other people engine is running Moving sharp blades under cover Battery acid is corrosive, explosive and flammable Warning! SYMBOLS AND DECALS Read Operator Manual Shut off engine before performing any maintenance or repair work Keep a safe distance from the discharge deck Do not touch parts 8
Owners Manual
Page 10
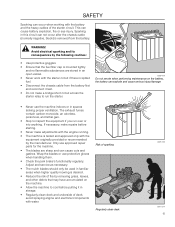
... before storage. The engine exhaust contains carbon monoxide, which can touch the hot exhaust or engine parts and burn. • Do not allow the mower deck to protect themselves and others from serious injury. • Follow the manufacturer's recommendation for traffic when operating near or crossing roadways. • Use extra care...
... before storage. The engine exhaust contains carbon monoxide, which can touch the hot exhaust or engine parts and burn. • Do not allow the mower deck to protect themselves and others from serious injury. • Follow the manufacturer's recommendation for traffic when operating near or crossing roadways. • Use extra care...

Owners Manual
Page 13
There is risk for the mower deck's drive belt is spilled on the ground. Allow engine and exhaust system to expand, as the heat from a gasoline dispenser nozzle. • Keep the nozzle ...
There is risk for the mower deck's drive belt is spilled on the ground. Allow engine and exhaust system to expand, as the heat from a gasoline dispenser nozzle. • Keep the nozzle ...
Owners Manual
Page 15
... the battery, the battery can explode and cause serious injury/damage • Never use the machine indoors or in storage. • Regularly clean deck and underside of the starter circuit. If necessary, make repairs before putting it last. • Do not make adjustments with the engine running. .... • The blades are stored in familiar areas when higher quality mowing is desired. • Reduce the risk of sparking Regularly clean deck 8009-728 8011-514 15 Only use protective gloves when handling them. • Check the park brake's functionality regularly. Risk of fire by...
... the battery, the battery can explode and cause serious injury/damage • Never use the machine indoors or in storage. • Regularly clean deck and underside of the starter circuit. If necessary, make repairs before putting it last. • Do not make adjustments with the engine running. .... • The blades are stored in familiar areas when higher quality mowing is desired. • Reduce the risk of sparking Regularly clean deck 8009-728 8011-514 15 Only use protective gloves when handling them. • Check the park brake's functionality regularly. Risk of fire by...

Owners Manual
Page 18
... tank 7. The rider is regulated and thereby the direction and speed. Control Locations 3 2 4 5 1 5 6 18 7 8 9 10 11 1. Fuel shut off valve 5. Fuses 12 13 8. SmartSwitchTM 12. Deck lift 8058-250 driven hydraulic pumps. Transmission from the engine is made via a belt- Tracking adjustment 4. Bypass Linkages 6. Service minder 10. Steering control levers 2. Throttle...
... tank 7. The rider is regulated and thereby the direction and speed. Control Locations 3 2 4 5 1 5 6 18 7 8 9 10 11 1. Fuel shut off valve 5. Fuses 12 13 8. SmartSwitchTM 12. Deck lift 8058-250 driven hydraulic pumps. Transmission from the engine is made via a belt- Tracking adjustment 4. Bypass Linkages 6. Service minder 10. Steering control levers 2. Throttle...
Owners Manual
Page 21
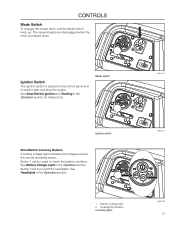
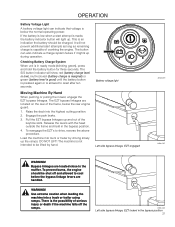
... SmartSwitch Ignition and Starting in the Operation section. See Battery Voltage Light in the Operation section for instructions. CONTROLS Blade Switch To engage the mower deck, pull the blade switch knob up. The mower blades are disengaged when the knob is pressed down. Headlights indicator Courtesy lights 8058-239 21 See...
... SmartSwitch Ignition and Starting in the Operation section. See Battery Voltage Light in the Operation section for instructions. CONTROLS Blade Switch To engage the mower deck, pull the blade switch knob up. The mower blades are disengaged when the knob is pressed down. Headlights indicator Courtesy lights 8058-239 21 See...
Owners Manual
Page 24
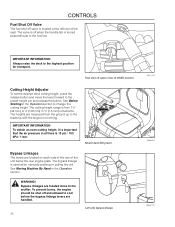
... Fuel shut off when the handle tab is important that the air pressure in the CLOSED position Cutting Height Adjuster To set the desired deck cutting height, press the release button and move the lever forward to change the cutting height. IMPORTANT INFORMATION To obtain an even cutting ... should be shut off valve is used when manually pushing or pulling the unit. See Before Starting in the Operation section. Mower deck lifting lever Bypass Linkages The levers are handled. 24 Left side bypass linkage 8011-419 8058-251 8058-0147 IMPORTANT INFORMATION Always raise the...
... Fuel shut off when the handle tab is important that the air pressure in the CLOSED position Cutting Height Adjuster To set the desired deck cutting height, press the release button and move the lever forward to change the cutting height. IMPORTANT INFORMATION To obtain an even cutting ... should be shut off valve is used when manually pushing or pulling the unit. See Before Starting in the Operation section. Mower deck lifting lever Bypass Linkages The levers are handled. 24 Left side bypass linkage 8011-419 8058-251 8058-0147 IMPORTANT INFORMATION Always raise the...

Owners Manual
Page 27
... 27 Perform the daily maintenance before starting (see Maintenance Schedule in the Maintenance section). 3. Adjust the seat to the desired position. Lengthways adjustment 5. Set the deck cutting height by inserting the lift pin into the activated position. • Both steering controls must be in the fuel tank. 4. OPERATION Before Starting 1.
... 27 Perform the daily maintenance before starting (see Maintenance Schedule in the Maintenance section). 3. Adjust the seat to the desired position. Lengthways adjustment 5. Set the deck cutting height by inserting the lift pin into the activated position. • Both steering controls must be in the fuel tank. 4. OPERATION Before Starting 1.

Owners Manual
Page 28
Sit on the top of the lifting lever. Raise the mower deck by pushing the release button on the seat. 2. Mower deck lifting lever 3. Activate the park brake by pressing the blade switch downwards. 8058-187 Blade switch 8058-247 28 Disengage the mower blades by pushing the release button in and pulling the lever fully upwards. 8058-019 Pull park brake upwards to the locked (transport) position. OPERATION Starting the Engine 1. Pull the lifting lever backward to activate 4.
Sit on the top of the lifting lever. Raise the mower deck by pushing the release button on the seat. 2. Mower deck lifting lever 3. Activate the park brake by pressing the blade switch downwards. 8058-187 Blade switch 8058-247 28 Disengage the mower blades by pushing the release button in and pulling the lever fully upwards. 8058-019 Pull park brake upwards to the locked (transport) position. OPERATION Starting the Engine 1. Pull the lifting lever backward to activate 4.

Owners Manual
Page 32
...controls inwards, out of the neutral position (N). Push the release button on the cutting height lever and move lever to full throttle. 5. Mower deck lifting lever 4. Park brake released 3. Make sure the work area is running, any attempt by pushing the top release button in and moving ...blade engagement and throttle control 8058-248 32 OPERATION Running 1. WARNING! Set the engine to the pin, release the button. Engage the mower deck by the rotating blades. When the engine is free from objects that no one is equipped with an operator presence system. Make sure that...
...controls inwards, out of the neutral position (N). Push the release button on the cutting height lever and move lever to full throttle. 5. Mower deck lifting lever 4. Park brake released 3. Make sure the work area is running, any attempt by pushing the top release button in and moving ...blade engagement and throttle control 8058-248 32 OPERATION Running 1. WARNING! Set the engine to the pin, release the button. Engage the mower deck by the rotating blades. When the engine is free from objects that no one is equipped with an operator presence system. Make sure that...
Owners Manual
Page 33
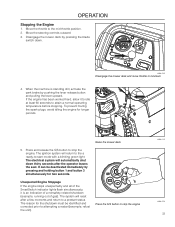
...to stop the engine. The system will automatically shut down . 8058-249 Disengage the mower deck and move throttle to attain a normal operating temperature before stopping. Raise the mower deck 5. The electrical system will reset after the operator leaves the seat. It can be ... the blade switch down thirty seconds after a few moments and return to attempting a restart (example, refuel the unit). Disengage the mower deck by pressing and holding button 1 and button 3 simultaneously for longer periods. When the machine is an indication of a nonsafety related shutdown ...
...to stop the engine. The system will automatically shut down . 8058-249 Disengage the mower deck and move throttle to attain a normal operating temperature before stopping. Raise the mower deck 5. The electrical system will reset after the operator leaves the seat. It can be ... the blade switch down thirty seconds after a few moments and return to attempting a restart (example, refuel the unit). Disengage the mower deck by pressing and holding button 1 and button 3 simultaneously for longer periods. When the machine is an indication of a nonsafety related shutdown ...
Owners Manual
Page 35
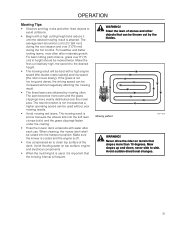
...healthier and better looking lawns, mow often after each use. When cleaning, the mower deck shall be raised into the soft lawn, clumps build, and the grass clippings fasten under the cowling. &#...8226; Hose the mower deck underside with a high engine speed (the blades rotate rapidly) and low speed (the rider moves ...can be increased without poor mowing results. • Avoid mowing wet lawns. Clear the lawn of the deck. The average lawn should be mowed twice. If the grass is attained. Make sure the mower is ...
...healthier and better looking lawns, mow often after each use. When cleaning, the mower deck shall be raised into the soft lawn, clumps build, and the grass clippings fasten under the cowling. &#...8226; Hose the mower deck underside with a high engine speed (the blades rotate rapidly) and low speed (the rider moves ...can be increased without poor mowing results. • Avoid mowing wet lawns. Clear the lawn of the deck. The average lawn should be mowed twice. If the grass is attained. Make sure the mower is ...
Owners Manual
Page 37
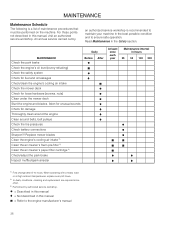
... Machine By Hand When pushing or pulling the mower, engage the EZT bypass linkages. Load the machine into truck or trailer by hand. Raise the deck into a truck or trailer using ramps. The S/S button indicator will show red (battery charge level is low), multi-colored (battery charge is marginal) or green...
... Machine By Hand When pushing or pulling the mower, engage the EZT bypass linkages. Load the machine into truck or trailer by hand. Raise the deck into a truck or trailer using ramps. The S/S button indicator will show red (battery charge level is low), multi-colored (battery charge is marginal) or green...
Owners Manual
Page 38
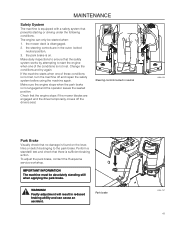
...) Check the safety system Check for fuel and oil leakages Check/clean the engine's cooling air intake Check the mower deck Check for loose hardware (screws, nuts) Clean under the mower deck Start the engine and blades, listen for unusual sounds Check for damage Thoroughly clean around the engine Clean around belts...
...) Check the safety system Check for fuel and oil leakages Check/clean the engine's cooling air intake Check the mower deck Check for loose hardware (screws, nuts) Clean under the mower deck Start the engine and blades, listen for unusual sounds Check for damage Thoroughly clean around the engine Clean around belts...

Owners Manual
Page 39
... the fuel filter Replace paper air filter 2) Check the caster wheels (every 200 hours) Replace the air cleaner's foam pre-filter 2) Check/adjust the mower deck Check the engine valve clearance 3) Perform the 300-hour service 3) Daily Before After At least once each year Maintenance interval in the disengaged position. •...
... the fuel filter Replace paper air filter 2) Check the caster wheels (every 200 hours) Replace the air cleaner's foam pre-filter 2) Check/adjust the mower deck Check the engine valve clearance 3) Perform the 300-hour service 3) Daily Before After At least once each year Maintenance interval in the disengaged position. •...

Owners Manual
Page 40
Position deck to contact both terminals at : 50 Amps 30 Amps 20 Amps 10 Amps - Carefully remove the battery from accidental grounding. FULL CHARGE - 20 min. 35 ...
Position deck to contact both terminals at : 50 Amps 30 Amps 20 Amps 10 Amps - Carefully remove the battery from accidental grounding. FULL CHARGE - 20 min. 35 ...
Owners Manual
Page 41
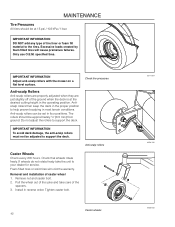
... the seated position. Make sure the engine stops when the park brake is not met. To adjust the park brake, contact the Husqvarna service workshop. the steering controls are engaged and the driver temporarily moves off and repair the safety system before using the machine again.... standstill test and check that the engine stops if the mower blades are in the outer, locked neutral position, 3. WARNING! the mower deck is sufficient braking action. Steering controls locked in reduced braking ability and can only be absolutely standing still when applying the park brake. IMPORTANT...
... the seated position. Make sure the engine stops when the park brake is not met. To adjust the park brake, contact the Husqvarna service workshop. the steering controls are engaged and the driver temporarily moves off and repair the safety system before using the machine again.... standstill test and check that the engine stops if the mower blades are in the outer, locked neutral position, 3. WARNING! the mower deck is sufficient braking action. Steering controls locked in reduced braking ability and can only be absolutely standing still when applying the park brake. IMPORTANT...
Owners Manual
Page 42
...that wheels rotate freely. IMPORTANT INFORMATION DO NOT add any type of the spacers. 3. specified tires. Check tire pressures IMPORTANT INFORMATION To avoid deck damage, the anti-scalp rollers must not be approximately ¼" (6.5 mm) from ground. Pull the wheel out of the yoke and take...or solid tires will cause premature failures. Install in the operating position. MAINTENANCE Tire Pressures All tires should be adjusted to support the deck. IMPORTANT INFORMATION Adjust anti-scalp rollers with the mower on a flat level surface. Do not adjust the rollers to the tires. ...
...that wheels rotate freely. IMPORTANT INFORMATION DO NOT add any type of the spacers. 3. specified tires. Check tire pressures IMPORTANT INFORMATION To avoid deck damage, the anti-scalp rollers must not be approximately ¼" (6.5 mm) from ground. Pull the wheel out of the yoke and take...or solid tires will cause premature failures. Install in the operating position. MAINTENANCE Tire Pressures All tires should be adjusted to support the deck. IMPORTANT INFORMATION Adjust anti-scalp rollers with the mower on a flat level surface. Do not adjust the rollers to the tires. ...

Owners Manual
Page 43
... the idler arm to release the tension on the top of the belt guide for severe cracking and large nicks. Idler arm Removing the deck belt 2 1 Deck Belt Installation NOTE: For ease in normal operation. Push inward on a level surface. Correct if needed. 7. NOTE: The belt will ...is complete. Check for reinstallation. 6. Park on the idler arm and carefully route belt over the top of operation. Note the position of the deck. 1. Belt guide 3. Place belt around the electric clutch pulley that may have accumulated around the mandrel housings. 5. NOTE: The belt guide ...
... the idler arm to release the tension on the top of the belt guide for severe cracking and large nicks. Idler arm Removing the deck belt 2 1 Deck Belt Installation NOTE: For ease in normal operation. Push inward on a level surface. Correct if needed. 7. NOTE: The belt will ...is complete. Check for reinstallation. 6. Park on the idler arm and carefully route belt over the top of operation. Note the position of the deck. 1. Belt guide 3. Place belt around the electric clutch pulley that may have accumulated around the mandrel housings. 5. NOTE: The belt guide ...


