Owners Manual
Page 2
To avoid the possibility of the edger-trimmer, it means your personal safety. TABLE OF CONTENTS General Safety Suggestion 3 Edger-Trimmer Features 4 Assembly 5 Attaching the Handle 5 Installing Throttle Wire 5 Fill Engine With Oil 5 Operating Your... 6 Engaging Drive Belt 6 Stopping The Engine 6 Correct Edger-Trimmer Usage 8 Operation of the Edger-Trimmer 8 Maintaining Your Edger-Trimmer 9 Maintenance Check List 9 Engine 9 Oil Quality 9 Oil Level 9 Oil Changes 9 Spark Plug 9 Blade Maintenance 9 Blade Changes 9 Lubrication 9 Storage Instructions 13 Maintenance Notes 13-...
To avoid the possibility of the edger-trimmer, it means your personal safety. TABLE OF CONTENTS General Safety Suggestion 3 Edger-Trimmer Features 4 Assembly 5 Attaching the Handle 5 Installing Throttle Wire 5 Fill Engine With Oil 5 Operating Your... 6 Engaging Drive Belt 6 Stopping The Engine 6 Correct Edger-Trimmer Usage 8 Operation of the Edger-Trimmer 8 Maintaining Your Edger-Trimmer 9 Maintenance Check List 9 Engine 9 Oil Quality 9 Oil Level 9 Oil Changes 9 Spark Plug 9 Blade Maintenance 9 Blade Changes 9 Lubrication 9 Storage Instructions 13 Maintenance Notes 13-...

Owners Manual
Page 3
...Remove potential thrown objects. Be thoroughly 8. Stop the engine whenever you leave the 2. Make sure all edger-trimer operators know the safety, operating, and maintenance blade and all per- Do not ll gasoline tank indoors, when engine is running, or while engine .... 2. When repairing or inspecting, make certain 4. procedures. 11. Always push slowly over rough ground. 15. Remember, never operate edger-trimmer unless blade guard, belt guards, and debris guard are stopped. Edgeortrimonlyindaylightoringoodarti cial light. 2. Keep all stones, sticks, wire, bones, and other...
...Remove potential thrown objects. Be thoroughly 8. Stop the engine whenever you leave the 2. Make sure all edger-trimer operators know the safety, operating, and maintenance blade and all per- Do not ll gasoline tank indoors, when engine is running, or while engine .... 2. When repairing or inspecting, make certain 4. procedures. 11. Always push slowly over rough ground. 15. Remember, never operate edger-trimmer unless blade guard, belt guards, and debris guard are stopped. Edgeortrimonlyindaylightoringoodarti cial light. 2. Keep all stones, sticks, wire, bones, and other...
Owners Manual
Page 5
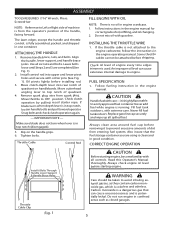
..., lower support, and handle brace holes. Leave bolts loose until Steps 2 and 3 are using is clean and in good condition. If blade turns when depth lever is in engine crankcase. 1. If the throttle cable is not attached to avoid inhaling exhaust gasses, as closed garages... ENGINE OPERATION Install 6 Bolts Through Handle Lower Support & Handle Brace Holes Throttle Cable Clip Fig. 1 CAUTION Before starting engine. The lawn edger, except the handle and throttle control, is fully assembled, packed, and shipped in the engine manual. Check clutch operation by pulling recoil starter...
..., lower support, and handle brace holes. Leave bolts loose until Steps 2 and 3 are using is clean and in good condition. If blade turns when depth lever is in engine crankcase. 1. If the throttle cable is not attached to avoid inhaling exhaust gasses, as closed garages... ENGINE OPERATION Install 6 Bolts Through Handle Lower Support & Handle Brace Holes Throttle Cable Clip Fig. 1 CAUTION Before starting engine. The lawn edger, except the handle and throttle control, is fully assembled, packed, and shipped in the engine manual. Check clutch operation by pulling recoil starter...
Owners Manual
Page 6
... for trimming or choose several vertical positions for edging. Wear safety glasses when operating the edger-trimmer. Make sure engine is stopped and blade is also used to start edger-trimmer in base of lever permit adjusting depth of operator control. It is not rotating ...THE DRIVE BELT Move clutch and depth lever forward to the o position. OPERATING YOUR EDGER-TRIMMER CORRECT ENGINE OPERATION CAUTION Always disengage edger-trimmer blade and shut engine o when leaving the edger-trimmer unattended, even if for trimming. WARNING Never adjust cutterhead angle when engine is ...
... for trimming or choose several vertical positions for edging. Wear safety glasses when operating the edger-trimmer. Make sure engine is stopped and blade is also used to start edger-trimmer in base of lever permit adjusting depth of operator control. It is not rotating ...THE DRIVE BELT Move clutch and depth lever forward to the o position. OPERATING YOUR EDGER-TRIMMER CORRECT ENGINE OPERATION CAUTION Always disengage edger-trimmer blade and shut engine o when leaving the edger-trimmer unattended, even if for trimming. WARNING Never adjust cutterhead angle when engine is ...
Owners Manual
Page 7
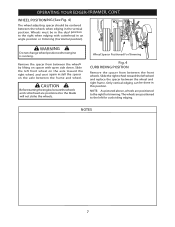
OPERATING YOUR EDGER-TRIMMER, CONT. Remove the spacer from between the front wheels. Slide the left wheel and replace the spacer between the wheels when edging in this position. Wheels must be sure the wheels and cutterhead are positioned so the blade will not strike the wheels. WARNING Do not change wheel positions...
OPERATING YOUR EDGER-TRIMMER, CONT. Remove the spacer from between the front wheels. Slide the left wheel and replace the spacer between the wheels when edging in this position. Wheels must be sure the wheels and cutterhead are positioned so the blade will not strike the wheels. WARNING Do not change wheel positions...
Owners Manual
Page 8
... beds, trim close to poles and hydrants, and also under fences and other areas of trimmer-edger. For best appearance around owers, adjust blade to side away from blade, and replace spacer. It will put unnecessary stress on such land. OPERATION OF THE EDGERTRIMMER WARNING... corners when front wheels are placed together at handle). Avoid edging or trimming in wet grass, as blade begins to clear discharge areas or edgertrimmer blade wihout disengaging the edger-trimmer and stopping the engine. Four-wheel design of roots. It will be utilized. 8 Around specially...
... beds, trim close to poles and hydrants, and also under fences and other areas of trimmer-edger. For best appearance around owers, adjust blade to side away from blade, and replace spacer. It will put unnecessary stress on such land. OPERATION OF THE EDGERTRIMMER WARNING... corners when front wheels are placed together at handle). Avoid edging or trimming in wet grass, as blade begins to clear discharge areas or edgertrimmer blade wihout disengaging the edger-trimmer and stopping the engine. Four-wheel design of roots. It will be utilized. 8 Around specially...
Owners Manual
Page 9
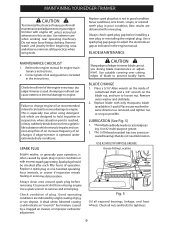
.... Place a 5/16" Allen wrench on the inside of operation. Replace blade with only Husqvarna blade (available in poor condition. Use #2 multi-purpose grease. 2. Check the oil level of oil changes if edger-trimmer is used. Increase frequency of the engine every time the edger-trimmer is operated under extremely dusty conditions. USE #2 MULTI-PURPOSE GREASE...
.... Place a 5/16" Allen wrench on the inside of operation. Replace blade with only Husqvarna blade (available in poor condition. Use #2 multi-purpose grease. 2. Check the oil level of oil changes if edger-trimmer is used. Increase frequency of the engine every time the edger-trimmer is operated under extremely dusty conditions. USE #2 MULTI-PURPOSE GREASE...
Owners Manual
Page 11
... Cap 505289917 8" Rear Wheel Outside Bearing Only 505289918 8" Rear Wheel Inside Bearing Only. No 33,53,51,52,54,55,56,61,37,(2)63, (2)36) LE475 Decal NOTE: All component dimensions given in U.S. NO. 34 35 36 36A 37 40 41 42 44 45 46 47 49 50 51 52 53... Guard Pivot Bolt Flat Washer 7/16 Spring, Head Recoil Cup Body, Cutterhead Lever, Angle Shifting Pin 5/16 x 2 Spring Brace Cutterhead Drive Belt (4L-300) Cutting Blade 1-1/4 Pin U-Clamp Spacer Grease Fitting Handle and Wheel Bearing Cutting Head Complete (Inc. LAWN EDGER AND TRIMMER PARTS LIST REF.
... Cap 505289917 8" Rear Wheel Outside Bearing Only 505289918 8" Rear Wheel Inside Bearing Only. No 33,53,51,52,54,55,56,61,37,(2)63, (2)36) LE475 Decal NOTE: All component dimensions given in U.S. NO. 34 35 36 36A 37 40 41 42 44 45 46 47 49 50 51 52 53... Guard Pivot Bolt Flat Washer 7/16 Spring, Head Recoil Cup Body, Cutterhead Lever, Angle Shifting Pin 5/16 x 2 Spring Brace Cutterhead Drive Belt (4L-300) Cutting Blade 1-1/4 Pin U-Clamp Spacer Grease Fitting Handle and Wheel Bearing Cutting Head Complete (Inc. LAWN EDGER AND TRIMMER PARTS LIST REF.

Owners Manual
Page 16
... or use , except as provided in your area. All 300 series trimmers, brushcutters, clearing saws, hovering trimmers, stick edgers, backpack blowers, hand held blowers, hedge trimmers, power-assist collection systems for noncommercial, nonprofessional, noninstitutional or nonincome producing use...not manufactured by the respective manufacturer's warranty as herein stated. An authorized Husqvarna retailer can be normally located through normal regular use, including, but not limited to, belts, blades, blade adapters, bulbs, clutches, clutch drums, filters, guide bars, lubricants, rewind...
... or use , except as provided in your area. All 300 series trimmers, brushcutters, clearing saws, hovering trimmers, stick edgers, backpack blowers, hand held blowers, hedge trimmers, power-assist collection systems for noncommercial, nonprofessional, noninstitutional or nonincome producing use...not manufactured by the respective manufacturer's warranty as herein stated. An authorized Husqvarna retailer can be normally located through normal regular use, including, but not limited to, belts, blades, blade adapters, bulbs, clutches, clutch drums, filters, guide bars, lubricants, rewind...

Parts Guide
Page 3
NO. LAWN EDGER AND TRIMMER PARTS LIST REF. No 33,53,51,52,54,55,56,61,37,(2)63, (2)36) LE475 Decal NOTE: All component dimensions given in U.S. Also for 7" & 8" Rear Wheels 505289916 8" Rear Wheel Complete w/ Bearings, Wide Tire & Hub Cap ...DESCRIPTION Screw 1/4-20 x 1/2 Hex Cutterhead Pulley Guard Cutterhead Bearing (2 Req.) Spring Washer (New 01/87) Mandrel, Head Clamp, Blade Guard Bolt 1/4-28 x 1-1/2 Hex (2 Req.) Blade Guard Main Complete Blade Guard Washer, Friction (2 Req.) Nut 1/2-20 , Debris Sweep U-Clamp Complete Debris Guard Pivot Bolt Flat Washer 7/16 Spring, ...
NO. LAWN EDGER AND TRIMMER PARTS LIST REF. No 33,53,51,52,54,55,56,61,37,(2)63, (2)36) LE475 Decal NOTE: All component dimensions given in U.S. Also for 7" & 8" Rear Wheels 505289916 8" Rear Wheel Complete w/ Bearings, Wide Tire & Hub Cap ...DESCRIPTION Screw 1/4-20 x 1/2 Hex Cutterhead Pulley Guard Cutterhead Bearing (2 Req.) Spring Washer (New 01/87) Mandrel, Head Clamp, Blade Guard Bolt 1/4-28 x 1-1/2 Hex (2 Req.) Blade Guard Main Complete Blade Guard Washer, Friction (2 Req.) Nut 1/2-20 , Debris Sweep U-Clamp Complete Debris Guard Pivot Bolt Flat Washer 7/16 Spring, ...


