
Owners Manual
Page 1
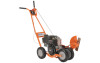
OPERATOR'S MANUAL / 2008 WITH PARTS LIST EDGER/TRIMMER Model: LE475 / 966951101 • Speci cations • Operating Instructions • Maintenance Information
OPERATOR'S MANUAL / 2008 WITH PARTS LIST EDGER/TRIMMER Model: LE475 / 966951101 • Speci cations • Operating Instructions • Maintenance Information

Owners Manual
Page 2
... Speci cation 5 Oil Speci cation 5 Starting The Engine 6 Engaging Drive Belt 6 Stopping The Engine 6 Correct Edger-Trimmer Usage 8 Operation of injury, read and follow such instructions carefully. To avoid the possibility of the Edger-Trimmer 8 Maintaining Your Edger-Trimmer 9 Maintenance Check List 9 Engine 9 Oil Quality 9 Oil Level 9 Oil Changes 9 Spark Plug 9 Blade Maintenance... instructions relating to the left and right when standing in the operation position. 2 When the manual refers to your left or right side of the edger-trimmer, it means your personal safety.
... Speci cation 5 Oil Speci cation 5 Starting The Engine 6 Engaging Drive Belt 6 Stopping The Engine 6 Correct Edger-Trimmer Usage 8 Operation of injury, read and follow such instructions carefully. To avoid the possibility of the Edger-Trimmer 8 Maintaining Your Edger-Trimmer 9 Maintenance Check List 9 Engine 9 Oil Quality 9 Oil Level 9 Oil Changes 9 Spark Plug 9 Blade Maintenance... instructions relating to the left and right when standing in the operation position. 2 When the manual refers to your left or right side of the edger-trimmer, it means your personal safety.

Owners Manual
Page 3
...1. Disengage cutterhead drive before backing. Stayalertforunevensidewalks,holesinterrain, or other foreign objects which might be sure of your legs when operating edger-trimmer. 3. Disengage power to cutterhead and stop the engine and check for damage. proper tightness. 6. Start the engine ...-trimmerunlessbladeguard, 12. Check blade mounting nut frequently for tra c when working condition. 7. Keep all moving parts have stopped. Never store edger-trimmer with the controls and proper use . Keep a rm hold on slopes and blade and engine are properly in place . 4....
...1. Disengage cutterhead drive before backing. Stayalertforunevensidewalks,holesinterrain, or other foreign objects which might be sure of your legs when operating edger-trimmer. 3. Disengage power to cutterhead and stop the engine and check for damage. proper tightness. 6. Start the engine ...-trimmerunlessbladeguard, 12. Check blade mounting nut frequently for tra c when working condition. 7. Keep all moving parts have stopped. Never store edger-trimmer with the controls and proper use . Keep a rm hold on slopes and blade and engine are properly in place . 4....
Owners Manual
Page 5
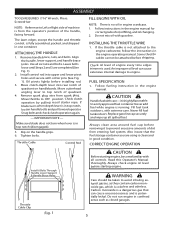
... spark plug. Replace gasoline cap securely and wipe up all six nuts and bolts. INSTALLING THE THROTTLE WIRE 1. Never ll fuel tank indoors. The lawn edger, except the handle and throttle control, is fully assembled, packed, and shipped in the engine manual. Do not run engine in con ned areas such...
... spark plug. Replace gasoline cap securely and wipe up all six nuts and bolts. INSTALLING THE THROTTLE WIRE 1. Never ll fuel tank indoors. The lawn edger, except the handle and throttle control, is fully assembled, packed, and shipped in the engine manual. Do not run engine in con ned areas such...
Owners Manual
Page 6
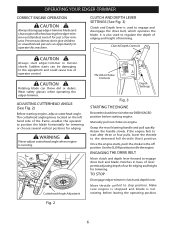
... LEVER SETTINGS (See Fig. 3) Clutch and Depth lever is also used to the detented full throttle (fast) position. TO STOP Disengage edger-trimmer clutch and depth lever. Prevent accidents; Clutch/Depth Controls CAUTION Always start after three or four pulls, lower the throttle to engage and... disengage the drive belt, which operates the blade. Wear safety glasses when operating the edger-trimmer. If the engine fails to start edger-trimmer in base of lever permit adjusting depth of trimming. ENGAGING THE DRIVE BELT Move clutch and depth lever ...
... LEVER SETTINGS (See Fig. 3) Clutch and Depth lever is also used to the detented full throttle (fast) position. TO STOP Disengage edger-trimmer clutch and depth lever. Prevent accidents; Clutch/Depth Controls CAUTION Always start after three or four pulls, lower the throttle to engage and... disengage the drive belt, which operates the blade. Wear safety glasses when operating the edger-trimmer. If the engine fails to start edger-trimmer in base of lever permit adjusting depth of trimming. ENGAGING THE DRIVE BELT Move clutch and depth lever ...
Owners Manual
Page 7
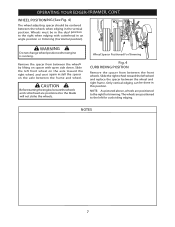
... wheel and replace the spacer between the wheels when edging in this position. WARNING Do not change wheel positions when engine is running. OPERATING YOUR EDGER-TRIMMER, CONT.
... wheel and replace the spacer between the wheels when edging in this position. WARNING Do not change wheel positions when engine is running. OPERATING YOUR EDGER-TRIMMER, CONT.
Owners Manual
Page 8
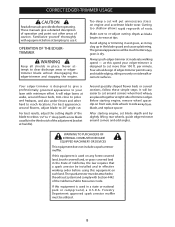
...U.S.D.A. Cutting too shallow allows rapid regrowth of the California Public Resources Code. The general appearance will edge lawns at tips. Your edger-trimmer is designed to give a detailed description of caution. WARNING TO PURCHASERS OF INTERNAL COMBUSTION ENGINE EQUIPPED MACHINERY OR DEVICES This equipment... land. It will put unnecessary stress on front axle, slide wheels to 1" deep (with Section 4442 of roots. CORRECT EDGER-TRIMMER USAGE CAUTION Read all shields in the blade guard and cause splattering. OPERATION OF THE EDGERTRIMMER WARNING Keep all manuals provided...
...U.S.D.A. Cutting too shallow allows rapid regrowth of the California Public Resources Code. The general appearance will edge lawns at tips. Your edger-trimmer is designed to give a detailed description of caution. WARNING TO PURCHASERS OF INTERNAL COMBUSTION ENGINE EQUIPPED MACHINERY OR DEVICES This equipment... land. It will put unnecessary stress on front axle, slide wheels to 1" deep (with Section 4442 of roots. CORRECT EDGER-TRIMMER USAGE CAUTION Read all shields in the blade guard and cause splattering. OPERATION OF THE EDGERTRIMMER WARNING Keep all manuals provided...
Owners Manual
Page 9
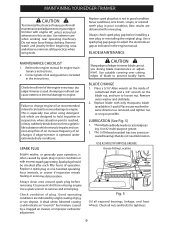
...wear loose tting clothing. Never sand blast, wire brush, scrape, or reinstall spark plug in suspension; Best results are obtained with only Husqvarna blade (available in the instructions. when saturation point is especially true when using tools. A dead white, blistered coating could indicate an... clean area around spark plug before removing it to engine. Check all nuts and bolts for engine maintenance instructions. 2. MAINTAINING YOUR EDGER-TRIMMER CAUTION To minimize the chance of injury, perform all maintenance and adjustments on the blade nut, and turn to engine. BLADE...
...wear loose tting clothing. Never sand blast, wire brush, scrape, or reinstall spark plug in suspension; Best results are obtained with only Husqvarna blade (available in the instructions. when saturation point is especially true when using tools. A dead white, blistered coating could indicate an... clean area around spark plug before removing it to engine. Check all nuts and bolts for engine maintenance instructions. 2. MAINTAINING YOUR EDGER-TRIMMER CAUTION To minimize the chance of injury, perform all maintenance and adjustments on the blade nut, and turn to engine. BLADE...

Owners Manual
Page 10
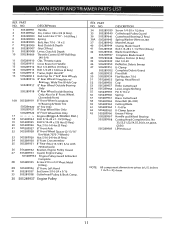
LAWN EDGER AND TRIMMER PARTS ILLUSTRATION 10
LAWN EDGER AND TRIMMER PARTS ILLUSTRATION 10
Owners Manual
Page 11
... Only. inches 1 inch = 25.4 mm 11 NO. PART NO. No 33,53,51,52,54,55,56,61,37,(2)63, (2)36) LE475 Decal NOTE: All component dimensions given in U.S. LAWN EDGER AND TRIMMER PARTS LIST REF. DESCRIPTION 1 2 3 4 6 7 8 9 10 11 12 13 14 15 16 16A 17 18 19 20 21 22 23...
... Only. inches 1 inch = 25.4 mm 11 NO. PART NO. No 33,53,51,52,54,55,56,61,37,(2)63, (2)36) LE475 Decal NOTE: All component dimensions given in U.S. LAWN EDGER AND TRIMMER PARTS LIST REF. DESCRIPTION 1 2 3 4 6 7 8 9 10 11 12 13 14 15 16 16A 17 18 19 20 21 22 23...

Owners Manual
Page 13
.... Re ll with fresh oil. 4. Replace spark plug. 5. Clean dirt and cha from lack of fuel, to clean all gasoline out of carburetor. 3. STORAGE INSTRUCTIONS Edger-trimmers stored for any length of time should be adhered to before starting engine. 1. Such deposits may a ect the operation of oil into the cylinder...
.... Re ll with fresh oil. 4. Replace spark plug. 5. Clean dirt and cha from lack of fuel, to clean all gasoline out of carburetor. 3. STORAGE INSTRUCTIONS Edger-trimmers stored for any length of time should be adhered to before starting engine. 1. Such deposits may a ect the operation of oil into the cylinder...

Owners Manual
Page 16
..., AND DOES NO T ASSUME OBLIGATION TO UPDATE PREVIOUSLY MANUFACTURED PRODUCTS. WARRANTY STATEMENT SECTION 1: LIMITED WARRANTY Husqvarna Forest & Garden Company ("Husqvarna") warrants Husqvarna product to the original purchaser to be free from defects in material and workmanship from the date of purchase.... Emission control system components necessary to facilitate post-sale service. All 300 series trimmers, brushcutters, clearing saws, hovering trimmers, stick edgers, backpack blowers, hand held blowers, hedge trimmers, power-assist collection systems for Turf Care Walk Behind Units - iZ, LZ &...
..., AND DOES NO T ASSUME OBLIGATION TO UPDATE PREVIOUSLY MANUFACTURED PRODUCTS. WARRANTY STATEMENT SECTION 1: LIMITED WARRANTY Husqvarna Forest & Garden Company ("Husqvarna") warrants Husqvarna product to the original purchaser to be free from defects in material and workmanship from the date of purchase.... Emission control system components necessary to facilitate post-sale service. All 300 series trimmers, brushcutters, clearing saws, hovering trimmers, stick edgers, backpack blowers, hand held blowers, hedge trimmers, power-assist collection systems for Turf Care Walk Behind Units - iZ, LZ &...

Parts Guide
Page 1
Illustrated Parts List / 2008 EDGER/TRIMMER Model: LE475 / 966951101 • Speci cations • Operating Instructions • Maintenance Information
Illustrated Parts List / 2008 EDGER/TRIMMER Model: LE475 / 966951101 • Speci cations • Operating Instructions • Maintenance Information

Parts Guide
Page 2
LAWN EDGER AND TRIMMER PARTS ILLUSTRATION 10
LAWN EDGER AND TRIMMER PARTS ILLUSTRATION 10

Parts Guide
Page 3
PART NO. No 33,53,51,52,54,55,56,61,37,(2)63, (2)36) LE475 Decal NOTE: All component dimensions given in U.S. DESCRIPTION 1 505289901 Handle 2 505289902 Pin, Cotter 1/8 x 3/4 (2 Req.) 3 505289903 Nut Lock Hex 7/16" - 14 (4 Req.) 4 505289904 Spring 6 505289905 Bolt, ... 7" & 8" Rear Wheels 505289916 8" Rear Wheel Complete w/ Bearings, Wide Tire & Hub Cap 505289917 8" Rear Wheel Outside Bearing Only 505289918 8" Rear Wheel Inside Bearing Only. NO. LAWN EDGER AND TRIMMER PARTS LIST REF. PART NO.
PART NO. No 33,53,51,52,54,55,56,61,37,(2)63, (2)36) LE475 Decal NOTE: All component dimensions given in U.S. DESCRIPTION 1 505289901 Handle 2 505289902 Pin, Cotter 1/8 x 3/4 (2 Req.) 3 505289903 Nut Lock Hex 7/16" - 14 (4 Req.) 4 505289904 Spring 6 505289905 Bolt, ... 7" & 8" Rear Wheels 505289916 8" Rear Wheel Complete w/ Bearings, Wide Tire & Hub Cap 505289917 8" Rear Wheel Outside Bearing Only 505289918 8" Rear Wheel Inside Bearing Only. NO. LAWN EDGER AND TRIMMER PARTS LIST REF. PART NO.
