

Parts Manual
Page 3
ENGINE Ref Part No Description 1 000 00 00-00 W/O DESCRIPTION 2 532 12 50-78 WASHER 3 532 15 04-06 BOLT 4 590 73 98-01 ADAPTER 5 586 85 96-...-01 BOLT -- 591 42 89-27 OPERATOR'S MANUAL -- 591 42 89-96 OPERATOR'S MANUAL -- 591 42 89-31 OPERATOR'S MANUAL 587 67 82-04 MANUAL LC221FH, 96145003600, 2017-10 Remark Honda 160CC Engine 3/8-16 Blade, 25 mm, 21" FWD High Lift Hardened 3/8, Helical Spring Hex Head Machine Screw OPERATOR MANUAL ENGLISH...
ENGINE Ref Part No Description 1 000 00 00-00 W/O DESCRIPTION 2 532 12 50-78 WASHER 3 532 15 04-06 BOLT 4 590 73 98-01 ADAPTER 5 586 85 96-...-01 BOLT -- 591 42 89-27 OPERATOR'S MANUAL -- 591 42 89-96 OPERATOR'S MANUAL -- 591 42 89-31 OPERATOR'S MANUAL 587 67 82-04 MANUAL LC221FH, 96145003600, 2017-10 Remark Honda 160CC Engine 3/8-16 Blade, 25 mm, 21" FWD High Lift Hardened 3/8, Helical Spring Hex Head Machine Screw OPERATOR MANUAL ENGLISH...

Parts Manual
Page 7
MOWER DECK / CUTTING DECK Ref Part No Description 1 587 01 52-01 BOLT 2 589 19 78-02 HANDLEBAR BRACKET 3 587 59 99-01 NUT 4 587 25 06-01 SPRING 5 586 13 ... 874 78 05-12 SCREW 54 532 42 79-42 NUT 55 532 42 11-14 WATER CONNECTOR 56 586 92 27-01 MULCHING PLUG LC221FH, 96145003600, 2017-10 Remark QTY KIT Handle, Pivot, 5/16-18 2 Adjustable Handle, Right 1 Serrated Flange, 5/16-18 2 Right, Door 1 Rear 1 Flanged, 3/8-16 2 Left, Door 1 Adjustable...
MOWER DECK / CUTTING DECK Ref Part No Description 1 587 01 52-01 BOLT 2 589 19 78-02 HANDLEBAR BRACKET 3 587 59 99-01 NUT 4 587 25 06-01 SPRING 5 586 13 ... 874 78 05-12 SCREW 54 532 42 79-42 NUT 55 532 42 11-14 WATER CONNECTOR 56 586 92 27-01 MULCHING PLUG LC221FH, 96145003600, 2017-10 Remark QTY KIT Handle, Pivot, 5/16-18 2 Adjustable Handle, Right 1 Serrated Flange, 5/16-18 2 Right, Door 1 Rear 1 Flanged, 3/8-16 2 Left, Door 1 Adjustable...
Owner Manual
Page 2
... other objects that children will remain where you last saw them. • Keep children out of the mowing area and under rotating parts. Stop blade when crossing gravel surfaces. 2 - FAILURE TO OBSERVE THE FOLLOWING SAFETY INSTRUCTIONS COULD RESULT IN SERIOUS INJURY OR DEATH. ... with an internal combustion engine and should be seriously ! injured or killed by law (Section 4442 of a responsible adult other engine parts become extremely hot during operation and remain hot after handling. Carefully read and follow all of California to point ! General operation •...
... other objects that children will remain where you last saw them. • Keep children out of the mowing area and under rotating parts. Stop blade when crossing gravel surfaces. 2 - FAILURE TO OBSERVE THE FOLLOWING SAFETY INSTRUCTIONS COULD RESULT IN SERIOUS INJURY OR DEATH. ... with an internal combustion engine and should be seriously ! injured or killed by law (Section 4442 of a responsible adult other engine parts become extremely hot during operation and remain hot after handling. Carefully read and follow all of California to point ! General operation •...
Owner Manual
Page 3
...on a slope, do not mow it on the ground. Tall grass can result in safe working condition. • Never tamper with manufacturer's recommended parts, when necessary. • Mower blades are a major factor related to slip & fall accidents, which could cause a slip and fall accident. ...the engine to be thrown. Always be sure of accessories. Slope operation Slopes are sharp and can cut. Poor footing could expose moving parts or allow objects to vibrate abnormally, stop before restarting. • Never attempt to make adjustments or repairs with the rim of alcohol ...
...on a slope, do not mow it on the ground. Tall grass can result in safe working condition. • Never tamper with manufacturer's recommended parts, when necessary. • Mower blades are a major factor related to slip & fall accidents, which could cause a slip and fall accident. ...the engine to be thrown. Always be sure of accessories. Slope operation Slopes are sharp and can cut. Poor footing could expose moving parts or allow objects to vibrate abnormally, stop before restarting. • Never attempt to make adjustments or repairs with the rim of alcohol ...
Owner Manual
Page 10
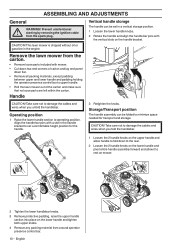
... upper handle. • Roll the lawn mower out of the carton and make sure that no loose parts are left within the carton. starting by removing the ignition cable from the carton. • Remove loose parts included with mower. • Cut down two end corners of carton and lay end panel down...
... upper handle. • Roll the lawn mower out of the carton and make sure that no loose parts are left within the carton. starting by removing the ignition cable from the carton. • Remove loose parts included with mower. • Cut down two end corners of carton and lay end panel down...
Owner Manual
Page 11
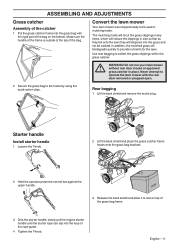
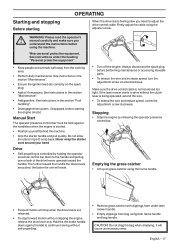
... fall onto the lawn they will biodegrade quickly to provide nutrients for the lawn. WARNING! Never attempt to operate the lawn mower with the rigid part of the bag on top of the grass bag frame. 3 Grip the starter handle, slowly pull the engine starter handle until the starter rope can...
... fall onto the lawn they will biodegrade quickly to provide nutrients for the lawn. WARNING! Never attempt to operate the lawn mower with the rigid part of the bag on top of the grass bag frame. 3 Grip the starter handle, slowly pull the engine starter handle until the starter rope can...
Owner Manual
Page 13
... 30 days to separation and formation of acids during storage. Do not overfill. Tighten the fuel cap carefully after adding the stabilizer so that any part of excess fuel. • Fuel stabilizer is released gently. Contact your local gas station to find out where to avoid tacky deposits during storage. Fuel...
... 30 days to separation and formation of acids during storage. Do not overfill. Tighten the fuel cap carefully after adding the stabilizer so that any part of excess fuel. • Fuel stabilizer is released gently. Contact your local gas station to find out where to avoid tacky deposits during storage. Fuel...
Owner Manual
Page 17
WARNING! See instructions in the section "Fuel handling". • Disengage drive system, if equipped, before performing maintenance or accessing movable parts. • To tension the wire and increase speed, turn the adjustment screw counterclockwise. The further toward the handle. Always disconnect the spark plug before starting ...
WARNING! See instructions in the section "Fuel handling". • Disengage drive system, if equipped, before performing maintenance or accessing movable parts. • To tension the wire and increase speed, turn the adjustment screw counterclockwise. The further toward the handle. Always disconnect the spark plug before starting ...
Owner Manual
Page 18
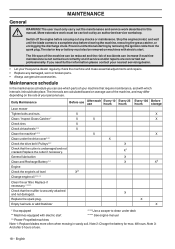
...carried out by removing the ignition cable from the spark plug.The starter key or battery must also be reduced and the risk of your Husqvarna dealer regularly check the machine and make essential adjustments and repairs. • Replace any checks or maintenance. Empty fuel tank or add ...Stabilizer X X X * If so equipped **** Use a scraper to a complete stop before carrying out any damaged, worn or broken parts. • Always use hours Every 25 hours Lawn mower Tighten bolts and nuts. Daily Maintenance Before use After each Every 10 use genuine accessories. ...
...carried out by removing the ignition cable from the spark plug.The starter key or battery must also be reduced and the risk of your Husqvarna dealer regularly check the machine and make essential adjustments and repairs. • Replace any checks or maintenance. Empty fuel tank or add ...Stabilizer X X X * If so equipped **** Use a scraper to a complete stop before carrying out any damaged, worn or broken parts. • Always use hours Every 25 hours Lawn mower Tighten bolts and nuts. Daily Maintenance Before use After each Every 10 use genuine accessories. ...
Owner Manual
Page 23
Always exercise care and use genuine parts. 4 Use block of wood between blade and lawn mower housing and tighten the blade bolt, turning clockwise. 5 The bolt should consult an expert before continuing. ...
Always exercise care and use genuine parts. 4 Use block of wood between blade and lawn mower housing and tighten the blade bolt, turning clockwise. 5 The bolt should consult an expert before continuing. ...
Owner Manual
Page 24
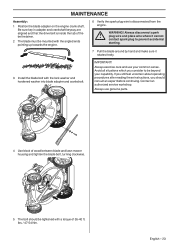
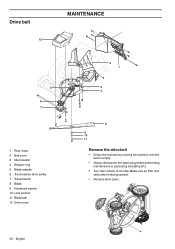
Make sure air filter and carburetor is empty. • Always disconnect the spark plug before performing maintenance or accessing mocable parts. • Turn lawn mower on its side. English Drive belt 12 MAINTENANCE 5 6 7 1 Rear insert 2 Belt cover 3 Idler bracket 4 Stripper ring 5 Blade adapter 6 Transmission drive pulley 7 Transmission 8 Blade 9 Hardened washer 10 Lock washer 11 Blade bolt 12 Drive cover 2 1 3 4 8 9 10 11 Remove the drive belt • Empty the fuel tank by running the machine until the tank is facing upward. • Remove drive cover. 24 -
Make sure air filter and carburetor is empty. • Always disconnect the spark plug before performing maintenance or accessing mocable parts. • Turn lawn mower on its side. English Drive belt 12 MAINTENANCE 5 6 7 1 Rear insert 2 Belt cover 3 Idler bracket 4 Stripper ring 5 Blade adapter 6 Transmission drive pulley 7 Transmission 8 Blade 9 Hardened washer 10 Lock washer 11 Blade bolt 12 Drive cover 2 1 3 4 8 9 10 11 Remove the drive belt • Empty the fuel tank by running the machine until the tank is facing upward. • Remove drive cover. 24 -

Owner Manual
Page 25
Remove blade and attaching hardware: bolt, lock washer and hardened washer. Always use genuine parts. • Thread the new belt over the adapter and place the belt on engine pulley. • Route the belt over the adapter. IMPORTANT! English - 25 ...
Remove blade and attaching hardware: bolt, lock washer and hardened washer. Always use genuine parts. • Thread the new belt over the adapter and place the belt on engine pulley. • Route the belt over the adapter. IMPORTANT! English - 25 ...


