

Operation Manual
Page 2
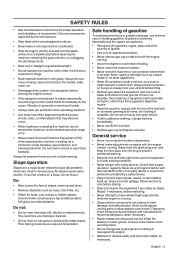
...thrown by this symbol to operate the machine. • Be particularly careful near or under the watchful care of a responsible adult other engine parts become extremely hot during operation and remain hot after handling. To avoid severe burns on or near any ). with plug. If a spark ...the presence of its ! covered or grass-covered land unless the engine's exhaust system is clear of the mowing area and under rotating parts. The American Academy of Pediatrics recommends that children will remain where you last saw them. • Keep children out of other safety ...
...thrown by this symbol to operate the machine. • Be particularly careful near or under the watchful care of a responsible adult other engine parts become extremely hot during operation and remain hot after handling. To avoid severe burns on or near any ). with plug. If a spark ...the presence of its ! covered or grass-covered land unless the engine's exhaust system is clear of the mowing area and under rotating parts. The American Academy of Pediatrics recommends that children will remain where you last saw them. • Keep children out of other safety ...
Operation Manual
Page 3
... that may obscure vision. • When loading or unloading this machine, do not mow it. Poor footing could expose moving parts or allow objects to interfere with the intended function of a safety device or reduce the protection provided by the manufacturer. •... Never tamper with a plastic liner. If this machine, including (at all nuts and bolts tight to make adjustments or repairs with manufacturer's recommended parts, when necessary. • Mower blades are explosive. • Extinguish all cigarettes, cigars, pipes and other appliances. • Never fill containers ...
... that may obscure vision. • When loading or unloading this machine, do not mow it. Poor footing could expose moving parts or allow objects to interfere with the intended function of a safety device or reduce the protection provided by the manufacturer. •... Never tamper with a plastic liner. If this machine, including (at all nuts and bolts tight to make adjustments or repairs with manufacturer's recommended parts, when necessary. • Mower blades are explosive. • Extinguish all cigarettes, cigars, pipes and other appliances. • Never fill containers ...

Operation Manual
Page 10
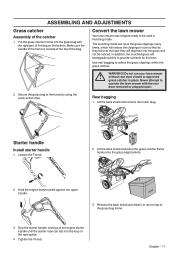
... position The handle assembly can be folded to upper handle. • Roll the lawn mower out of the carton and make sure that no loose parts are left within the carton. CAUTION! Prevent unintentional ! English Take care not to damage the cables and wires when you fold the handlebar. 1 ... 2 Rotate the handle and align the handle bar pins with a slot in the engine. 4 Remove any packing material from the carton. • Remove loose parts included with mower. • Cut down two end corners of carton and lay end panel down to the rear. 2 Loosen the 2 handle knobs on the...
... position The handle assembly can be folded to upper handle. • Roll the lawn mower out of the carton and make sure that no loose parts are left within the carton. CAUTION! Prevent unintentional ! English Take care not to damage the cables and wires when you fold the handlebar. 1 ... 2 Rotate the handle and align the handle bar pins with a slot in the engine. 4 Remove any packing material from the carton. • Remove loose parts included with mower. • Cut down two end corners of carton and lay end panel down to the rear. 2 Loosen the 2 handle knobs on the...
Operation Manual
Page 11
... handle. 3 Release the back shield and allow it to rest on the bottom. English - 11 Never attempt to operate the lawn mower with the rigid part of the bag on top of the grass bag frame. 3 Grip the starter handle, slowly pull the engine starter handle until the starter rope can...
... handle. 3 Release the back shield and allow it to rest on the bottom. English - 11 Never attempt to operate the lawn mower with the rigid part of the bag on top of the grass bag frame. 3 Grip the starter handle, slowly pull the engine starter handle until the starter rope can...

Operation Manual
Page 13
... with gasoline. Always stop the engine and ! The engine should be used within 30 days to the engine. • See instructions in quantities that any part of fuel. Use a fuel can at least 10 minutes after adding the stabilizer so that can start a fire. Clean the area around the fuel cap...
... with gasoline. Always stop the engine and ! The engine should be used within 30 days to the engine. • See instructions in quantities that any part of fuel. Use a fuel can at least 10 minutes after adding the stabilizer so that can start a fire. Clean the area around the fuel cap...

Operation Manual
Page 17
...; Disengage drive system, if so equipped, before starting OPERATING When the drive starts feeling slow you understand the instructions before performing maintenance or accessing movable parts. • To tension the wire and increase speed, turn the adjustment screw counterclockwise. See instructions in the section "Maintenance". • Ensure the ignition lead sits...
...; Disengage drive system, if so equipped, before starting OPERATING When the drive starts feeling slow you understand the instructions before performing maintenance or accessing movable parts. • To tension the wire and increase speed, turn the adjustment screw counterclockwise. See instructions in the section "Maintenance". • Ensure the ignition lead sits...
Operation Manual
Page 19
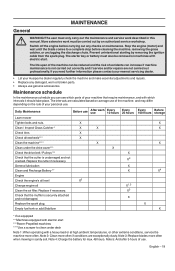
... 1: When operating with electric start ***Power-Propelled machines ****Use a scraper to a complete stop before carrying out any damaged, worn or broken parts. • Always use Every 10 hours Every 25 hours Lawn mower Tighten bolts and nuts. Note 2: Clean more often. More extensive work ... the air filter. Note 4: Charge the battery for max. 48 hours. The intervals are calculated based on average use of your Husqvarna dealer regularly check the machine and make essential adjustments and repairs. • Replace any checks or maintenance. Daily Maintenance Before use After...
... 1: When operating with electric start ***Power-Propelled machines ****Use a scraper to a complete stop before carrying out any damaged, worn or broken parts. • Always use Every 10 hours Every 25 hours Lawn mower Tighten bolts and nuts. Note 2: Clean more often. More extensive work ... the air filter. Note 4: Charge the battery for max. 48 hours. The intervals are calculated based on average use of your Husqvarna dealer regularly check the machine and make essential adjustments and repairs. • Replace any checks or maintenance. Daily Maintenance Before use After...

Operation Manual
Page 24
... retainer. 2 The blade must be tightened with the lock washer and hardened washer into blade adapter and crankshaft. WARNING! Always exercise care and use genuine parts. 4 Use block of 35-40 ft. Always use your capability. Always disconnect spark ! Be sure key in adapter and crankshaft keyway are aligned and that...
... retainer. 2 The blade must be tightened with the lock washer and hardened washer into blade adapter and crankshaft. WARNING! Always exercise care and use genuine parts. 4 Use block of 35-40 ft. Always use your capability. Always disconnect spark ! Be sure key in adapter and crankshaft keyway are aligned and that...
Operation Manual
Page 25
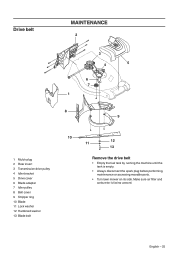
Make sure air filter and carburetor is empty. • Always disconnect the spark plug before performing maintenance or accessing movable parts. • Turn lawn mower on its side. English - 25 Drive belt MAINTENANCE 2 3 4 5 6 7 1 8 9 1 Mulch plug 2 Rear insert 3 Transmission drive pulley 4 Idler bracket 5 Drive cover 6 Blade adapter 7 Idler pulley 8 Belt cover 9 Stripper ring 10 Blade 11 Lock washer 12 Hardened washer 13 Blade bolt 10 12 11 13 Remove the drive belt • Empty the fuel tank by running the machine until the tank is facing upward.
Make sure air filter and carburetor is empty. • Always disconnect the spark plug before performing maintenance or accessing movable parts. • Turn lawn mower on its side. English - 25 Drive belt MAINTENANCE 2 3 4 5 6 7 1 8 9 1 Mulch plug 2 Rear insert 3 Transmission drive pulley 4 Idler bracket 5 Drive cover 6 Blade adapter 7 Idler pulley 8 Belt cover 9 Stripper ring 10 Blade 11 Lock washer 12 Hardened washer 13 Blade bolt 10 12 11 13 Remove the drive belt • Empty the fuel tank by running the machine until the tank is facing upward.

Operation Manual
Page 26
... from transmission. 26 - See instructions in housing to rear insert / rear transmission belt keeper. • Reinstall rear insert. • Reinstall the blade. Always use genuine parts. • Place new belt on the engine crank shaft. Replace the drive belt. Route the other end of the belt retainer. • Reattach cable to...
... from transmission. 26 - See instructions in housing to rear insert / rear transmission belt keeper. • Reinstall rear insert. • Reinstall the blade. Always use genuine parts. • Place new belt on the engine crank shaft. Replace the drive belt. Route the other end of the belt retainer. • Reattach cable to...


